はじめに
私は、現在、prisma+Next.js+Vercel PostgresSQLの構成でアプリを作成しています。
このアプリで問い合わせフォームを作成することになったので、作り方の手順とともに書いていきたいと思います。
今回は、フォーム自体ではなくフォームに入力し送信したときに、問い合わせ者にメールを送る部分のAPIの作成をしていきます。
完成図
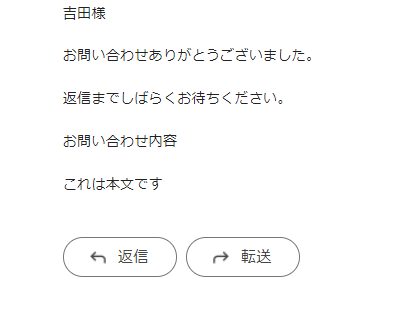
このように、json形式で名前(name),メールアドレス(email),件名(subject),本文(content)をbodyに入れてPOSTを叩いたときに、正しいレスポンスが返ってきて、メールが送られていれば成功です。

環境
バージョンは適当です。
"next": "13.4.19",
"react": "18.2.0",
"nodemailer": "^6.9.4",

"@types/nodemailer": "^6.4.9",
"@types/react": "18.2.21",
送信者のメールアドレスはGmailを使います。他のメールアドレスでも可能ですが、今回はGmailの前提で書いています。
流れ
1.Gmailの二段階認証をして、パスワードを取得する。
2.メールアドレスとパスワードを.envファイルに格納する。秘匿情報なので、.env.localなど外部に公開しないものに記述しましょう。
3.パッケージのインストールとコーディング
今回はコーディング部分に焦点を当てるため、二段階認証の設定に関してはほかの記事を参考にしてください。
パッケージのインストール
$ npm install nodemailer
typescriptの場合
$ npm install @types/nodemailer
envファイル
もちろん自分自身のメールアドレスとパスワードを記述してください。
MAIL_ACCOUNT="*******.gmail.com"
MAIL_PASSWORD="****************"
インポート部分
const nodemailer = require('nodemailer');
または、
import nodemailer from 'nodemailer';
実装
全体像から先に記述します。
今回は、api/sendmail.tsに記述して、ホスト名/api/sendmailにPostメソッドでデータを送ったタイミングでメールを送るようにしました。
渡すパラメータは、json形式で名前(name),メールアドレス(email),件名(subject),本文(content)です。
{
    "name":"鈴木",
    "email":"*******@gmail.com",
    "subject":"メールのテスト",
    "content":"これは本文です"
}
メール送信のAPI
import nodemailer from "nodemailer";
import { NextApiRequest, NextApiResponse } from "next";

export default async function handler(
  req: NextApiRequest,
  res: NextApiResponse
) {
  if (req.method === "POST") {
    try {
      const { name, email, subject, content } = req.body;

      const transporter = nodemailer.createTransport({
        service: "gmail",
        auth: {
          user: process.env.MAIL_ACCOUNT,
          pass: process.env.MAIL_PASSWORD,
        },
      });

      const mailOptions = {
        from: process.env.MAIL_ACCOUNT,
        to: email,
        subject: subject,
        text: `${name}様\n\nお問い合わせありがとうございました。\n\n返信までしばらくお待ちください。\n\nお問い合わせ内容\n\n${content}`,
      };

      const info = await transporter.sendMail(mailOptions);
      console.log("Email sent: " + info.response);

      res.status(200).json({ message: "メールが送信されました。" });
    } catch (error) {
      console.error(error);
      res.status(500).json({ error: "メールの送信中にエラーが発生しました。" });
    }
  } else {
    res.status(405).json({ error: "POSTメソッドを使用してください。" });
  }
}
要点
トランスポーターの作成
まず、トランスポーターを作り、送り手の情報を格納します。
このとき、process.envでenv.localの情報を取得しています。(Next.js)
const { name, email, subject, content } = req.body;

      const transporter = nodemailer.createTransport({
        service: "gmail",
        auth: {
          user: process.env.MAIL_ACCOUNT,
          pass: process.env.MAIL_PASSWORD,
        },
      });
メールオプションの作成
const mailOptions = {
        from: process.env.MAIL_ACCOUNT,
        to: email,
        subject: subject,
        text: `${name}様\n\nお問い合わせありがとうございました。\n\n返信までしばらくお待ちください。\n\nお問い合わせ内容\n\n${content}`,
      };
bodyで受け取ったパラメータをここで使います。fromには送る側のメールアドレス、toには受け取る側のメールアドレスを入れてください。
textにはメールの本文を書き入れますが、htmlを指定してhtmlの形でメールを送ることもできるようです。
レスポンス
 res.status(200).json({ message: "メールが送信されました。" });
    } catch (error) {
      console.error(error);
      res.status(500).json({ error: "メールの送信中にエラーが発生しました。" });
    }
  } else {
    res.status(405).json({ error: "POSTメソッドを使用してください。" });
  }
今回は認証をつけていないので、このような感じにしています。
好きなように変更してください。
実際に試す
今回はAPIをつくっただけなので、Postmanを使って検証しました。
結果
まとめ
今回は、問い合わせを受けたときにその内容を投稿者に返す部分を実装しました。
実際にはフォームから問い合わせるのでフォームが必要なのですが、ここまでできればあとはchatGPTにでも作ってもらえればいいとおもいます。(笑)
もちろん、内容をデータベースに保存する処理や管理者にもメールを送る処理などもあるといいですね。
補足
実際にchatGPTでフォームを作成してもらいました。
CSSはtailwindで書いてもらっています。
(多少の手直しはしました)
import React, { useState } from "react";
import axios from "axios"; // Import Axios for making HTTP requests

const ContactForm: React.FC = () => {
  const [formData, setFormData] = useState({
    name: "",
    email: "",
    subject: "",
    content: "",
  });

  const [isSending, setIsSending] = useState(false);
  const [message, setMessage] = useState<string | null>(null); // State for success/error message

  const handleChange = (
    e: React.ChangeEvent<HTMLInputElement | HTMLTextAreaElement>
  ) => {
    const { name, value } = e.target;
    setFormData((prevData) => ({ ...prevData, [name]: value }));
  };

  const handleSendMail = async () => {
    setIsSending(true);
    setMessage(null); // Clear any previous messages

    try {
      // Send the form data to your API endpoint
      const response = await axios.post("/api/sendmail", {
        subject: formData.subject,
        content: formData.content,
        name: formData.name,
        email: formData.email,
      });

      // Check the response status and show a message based on it
      if (response.status === 200) {
        // Successful response, set the success message
        setMessage("Email sent successfully!");
        // You can also reset the form here if needed
        setFormData({
          name: "",
          email: "",
          subject: "",
          content: "",
        });
      } else {
        // Handle other response status codes here
        setMessage("Error sending email. Status code: " + response.status);
      }
    } catch (error: any) {
      // Handle any errors that occur during the API request
      setMessage("Error sending email: " + error.message);
    } finally {
      setIsSending(false);
    }
  };

  return (
    <div className="w-1/2 mx-auto">
      <h2 className="text-2xl font-bold mb-4">お問い合わせフォーム</h2>
      <form>
        <div className="mb-4">
          <label
            htmlFor="name"
            className="block text-sm font-medium text-gray-700"
          >
            名前:
          </label>
          <input
            type="text"
            id="name"
            name="name"
            value={formData.name}
            onChange={handleChange}
            className="border border-gray-300 p-2 w-full rounded-md"
          />
        </div>
        <div className="mb-4">
          <label
            htmlFor="email"
            className="block text-sm font-medium text-gray-700"
          >
            メールアドレス:
          </label>
          <input
            type="email"
            id="email"
            name="email"
            value={formData.email}
            onChange={handleChange}
            className="border border-gray-300 p-2 w-full rounded-md"
          />
        </div>
        <div className="mb-4">
          <label
            htmlFor="subject"
            className="block text-sm font-medium text-gray-700"
          >
            件名:
          </label>
          <input
            type="text"
            id="subject"
            name="subject"
            value={formData.subject}
            onChange={handleChange}
            className="border border-gray-300 p-2 w-full rounded-md"
          />
        </div>
        <div className="mb-4">
          <label
            htmlFor="content"
            className="block text-sm font-medium text-gray-700"
          >
            本文:
          </label>
          <textarea
            id="content"
            name="content"
            value={formData.content}
            onChange={handleChange}
            className="border border-gray-300 p-2 w-full rounded-md h-32 resize-none"
          />
        </div>
        <div className="mb-4">
          <button
            type="button"
            onClick={handleSendMail}
            disabled={isSending}
            className={`bg-blue-500 text-white p-2 rounded-md ${
              isSending ? "opacity-50 cursor-not-allowed" : ""
            }`}
          >
            {isSending ? "送信中..." : "送信"}
          </button>
        </div>
        {message && (
          <div
            className={`${
              message.includes("successfully")
                ? "text-green-700"
                : "text-red-700"
            } text-sm font-medium`}
          >
            {message}
          </div>
        )}
      </form>
    </div>
  );
};

export default ContactForm;


