1.はじめに
今回はSocketChannelの使い方を簡単にまとめてみます。
流れは以下のようにご参照ください。
- クライアント
1.SocketChannelを経由でサーバーを接続
2.データバッファを用意してサーバーへ書き出す/読み込
3.SocketChannelをクローズ
- サーバー
1.iPアドレスとポートをバインドする
2.ServerSocketChannelImpl.accept()メソッドでSocketChannelのインスタンスをもらう
3.データバッファを用意してクライアントへ書き出す/読み込
4.SocketChannelとServerSocketChannelをクローズ
じゃあ、こらから、クライアントとサーバーの通信デモを作ろう
2.クライアント
ソースコードは以下の通りです。
package socketchannel;
import java.io.IOException;
import java.net.InetSocketAddress;
import java.nio.ByteBuffer;
import java.nio.channels.SocketChannel;

public class WebClient {
  public static void main(String[] args) throws IOException {

        //1.SocketChannelのopen()メソッドでSocketChannelインスタンスを作ろう
        SocketChannel socketChannel = SocketChannel.open();

        //2.サーバーへ接続
        socketChannel.connect(new InetSocketAddress("127.0.0.1", 3333));

        //3.サーバーへ送信のデータを準備する
        ByteBuffer writeBuffer = ByteBuffer.allocate(128);
        writeBuffer.put("hello WebServer this is from WebClient".getBytes());
        writeBuffer.flip();
        socketChannel.write(writeBuffer);
        ByteBuffer readBuffer = ByteBuffer.allocate(128);
        socketChannel.read(readBuffer);
        StringBuilder stringBuffer=new StringBuilder();

        //4.サーバーからのデータを受け取り
        readBuffer.flip();
        while (readBuffer.hasRemaining()) {
            stringBuffer.append((char) readBuffer.get());
        }
        System.out.println("サーバーからのメッセージ:"+stringBuffer);
        socketChannel.close();
     }
}
3.サーバー
サーバー側のソースコードは以下の通りです。
package socketchannel;
import java.io.IOException;
import java.net.InetSocketAddress;
import java.nio.ByteBuffer;
import java.nio.channels.ServerSocketChannel;
import java.nio.channels.SocketChannel;
public class WebServer {
public static void main(String args[]) throws IOException {
try {
//1.ServerSocketChannelのopen()メソッドでServerSocketChannelのインスタンスを作ろう
ServerSocketChannel ssc = ServerSocketChannel.open();
//2.ipとportをバインド
ssc.socket().bind(new InetSocketAddress("127.0.0.1", 3333));
//ServerSocketChannelImplのaccept()メソッドでSocketChannelインスタンスをもらってクライアントへの書き読み
SocketChannel socketChannel = ssc.accept();
//3.書き出すデータを準備する
ByteBuffer writeBuffer = ByteBuffer.allocate(128);
writeBuffer.put("hello WebClient this is from WebServer".getBytes());
writeBuffer.flip();
socketChannel.write(writeBuffer);
ByteBuffer readBuffer = ByteBuffer.allocate(128);
////4.読み込むデータを準備する
socketChannel.read(readBuffer);
StringBuilder stringBuffer=new StringBuilder();
readBuffer.flip();
while (readBuffer.hasRemaining()) {
stringBuffer.append((char) readBuffer.get());
}
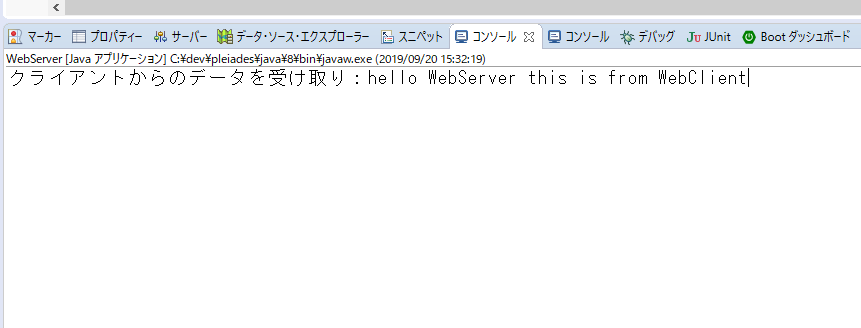
System.out.println("クライアントからのデータを受け取り:"+stringBuffer);
socketChannel.close();
ssc.close();
} catch (IOException e) {
e.printStackTrace();
}
}
}
まあ、上記のデモを実行したら、うまくいれば、結果は以下のように出ていく。
4.最後に
最後まで読んでいただき、ありがとうございます。