この記事は toio アドベントカレンダー2021 17日目の記事です。
こんにちは!今日はtoioのアップデート(技術仕様2.3.0)で追加された磁気センサーを使った動作を紹介します。
↓まずは早速動いている様子から↓
お腹を空かせたキューブが、(大好物?の)ハンバーガーを追いかけます。
キューブの動きが本当に生きているようで、愛着が湧きますよね笑
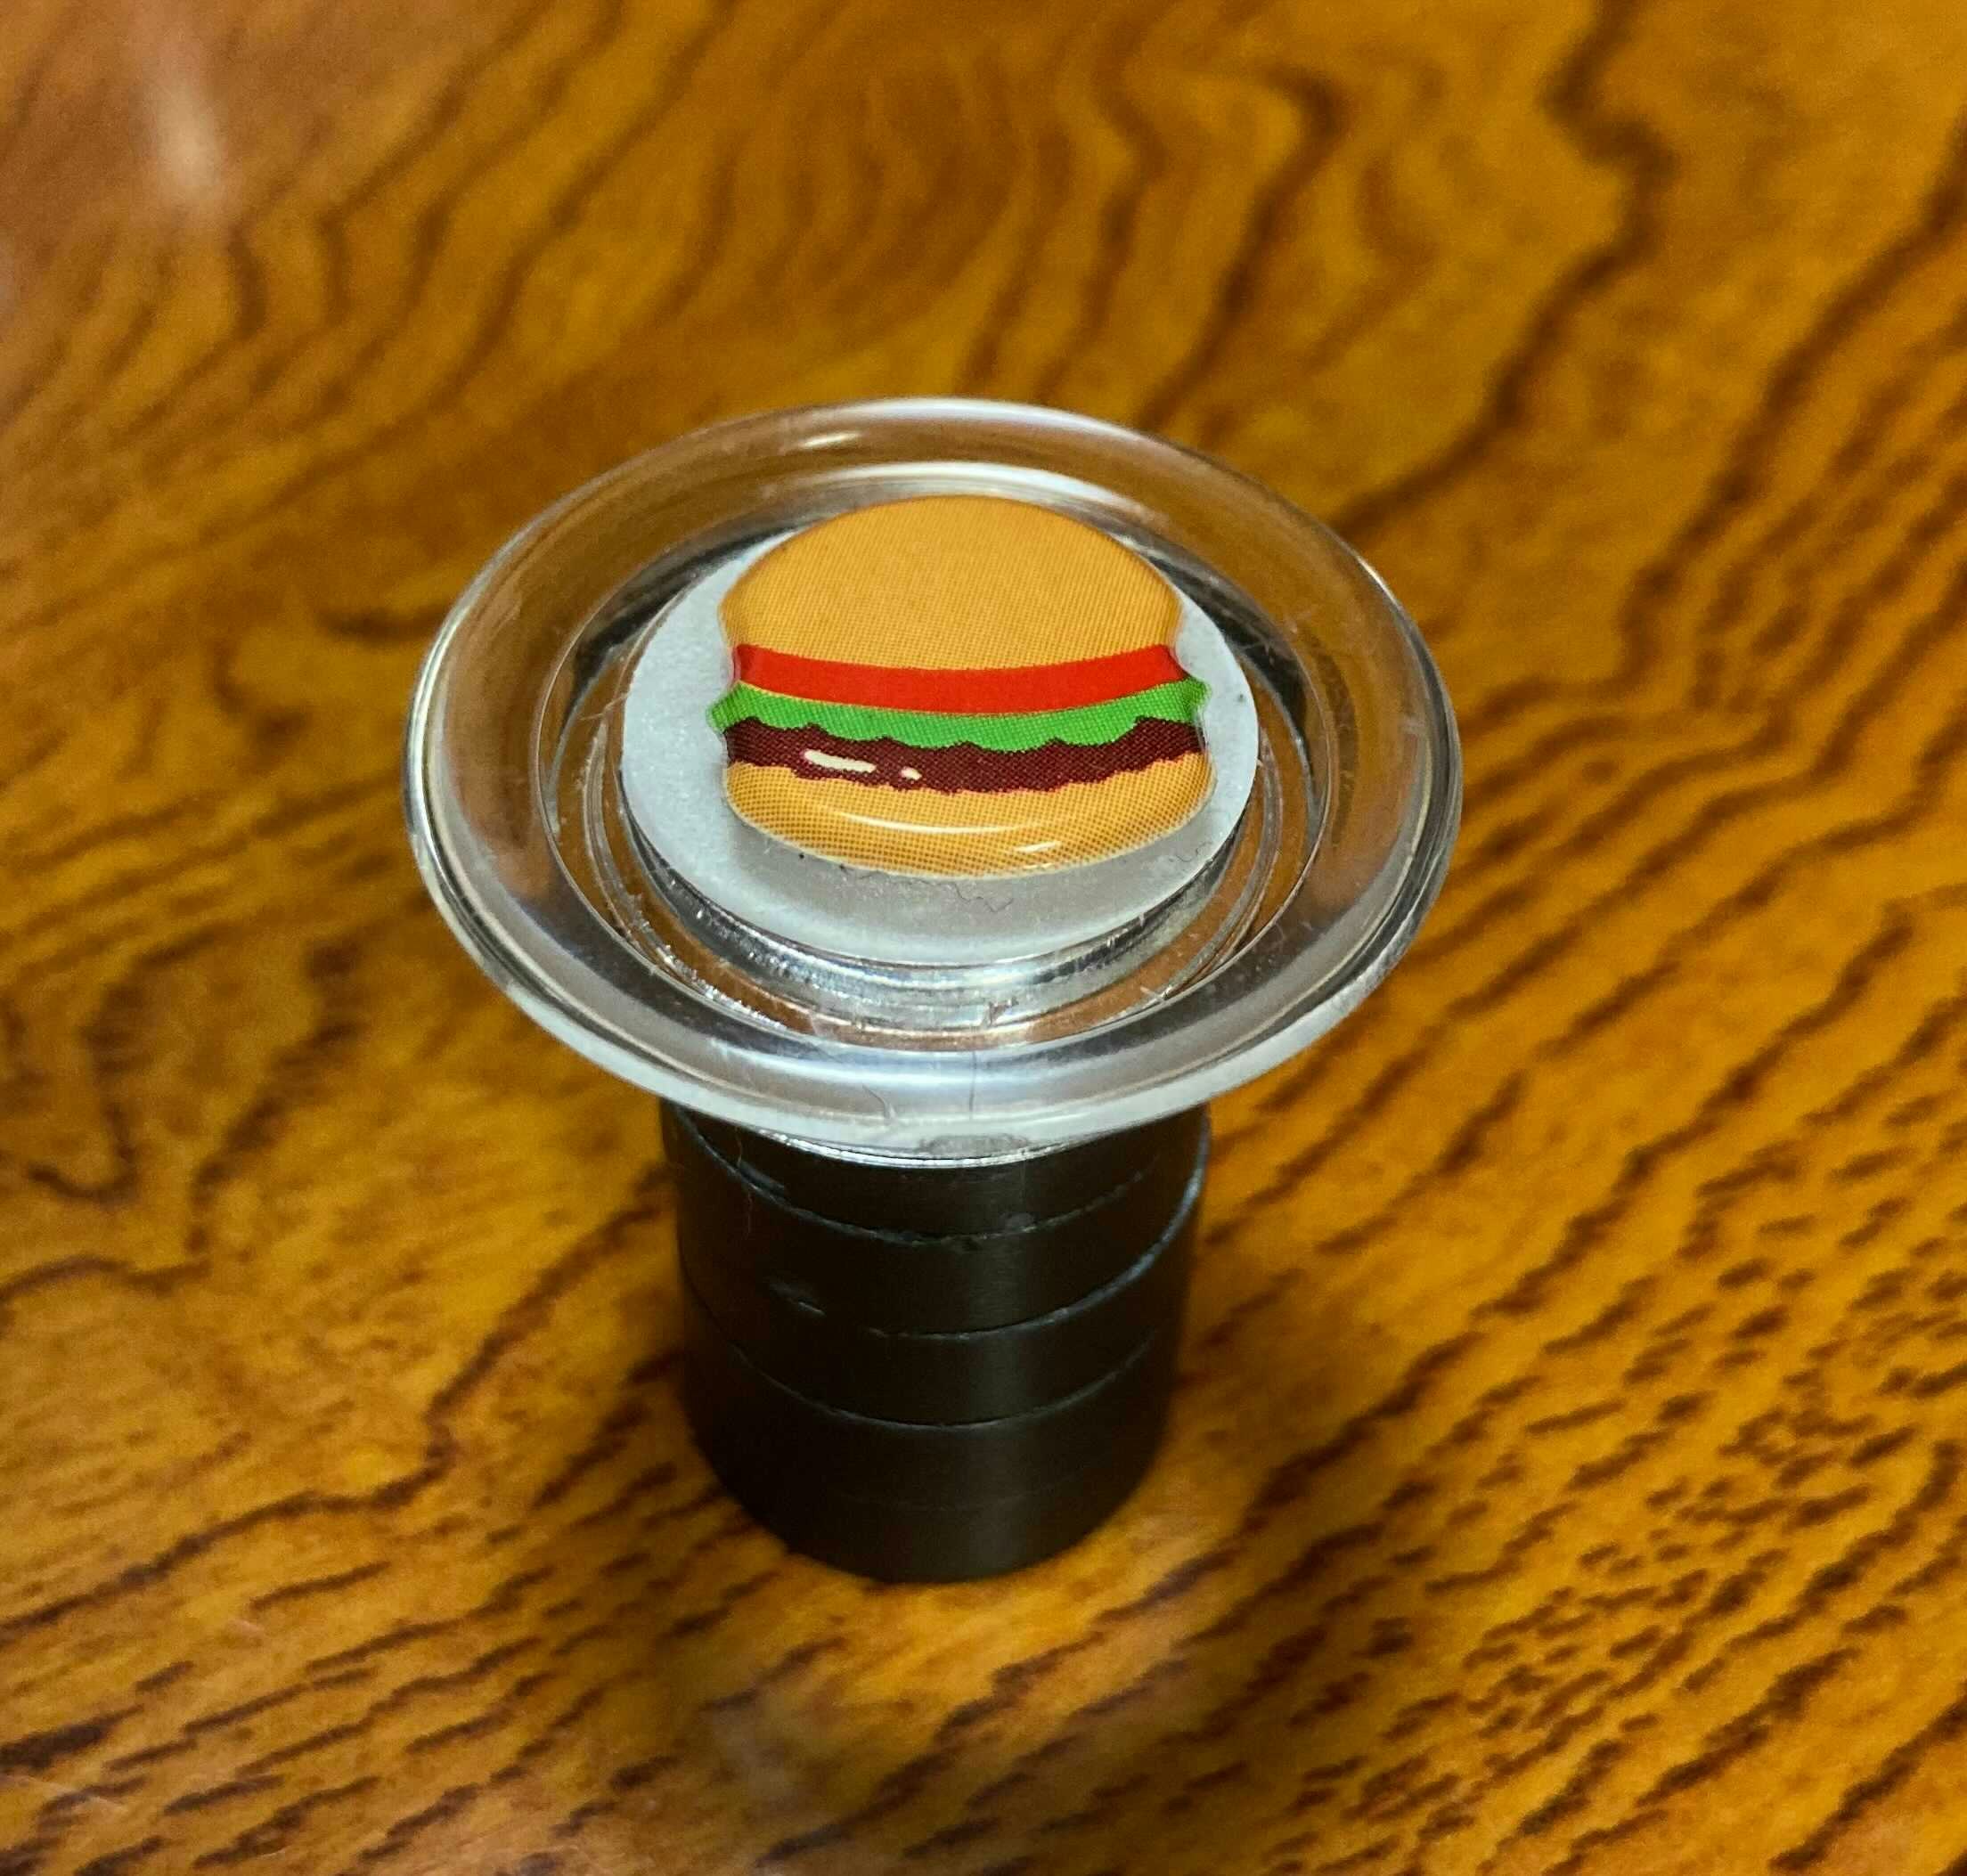
お気付きの方もいると思いますが、ハンバーガーのシールをマグネットに貼っているので、このマグネットの磁気を検知してキューブが追いかけてくる仕組みになっています。
それでは早速、中身に関して説明していきます!
開発環境
- toio.js
- toio Core Cube 1台
- PC 1台 (なんでも使えると思いますが、mac book proを使っています。)
- マグネット(できるだけ強力なもの)
作り方
- toio.jsにマグネット検出機能を追加
- マグネットセンサーの入力でモーター移動させるアプリを作成
- マグネットのエサを作ってキューブに近づける。
toio.jsにマグネット検出機能を追加
toio.jsは公式が出しているOSSですが、マグネット検出機能には未対応なので、自分でコードを作成する必要があります。(実際はこれが一番大変)
magnet検出機能の有効化
技術仕様書:設定の磁気センサーの設定を参考にtoioに要求するコードを実装します。
サンプルコード
/packages/cube/src/cube.tsの329行目
  public setMagnetDetection(): void {
    if (this.configurationCharacteristic !== null) {
      this.configurationCharacteristic.setMagnetDetection()
    }
  }
/packages/cube/src/characteristics/configuration-characteristic.tsの67行目
  public setMagnetDetection(): void {
    this.characteristic.write(Buffer.from([0x1b, 0x00, 0x02, 0x01, 0x00]), false)
  }
これをアプリケーション側で呼び出すことで、磁気検出の通知が始まります。
磁気検出の通知の受け取り
技術仕様書:磁気センサーの磁気センサー情報の取得を参考に通知データを処理します。
サンプルコード
packages/cube/src/characteristics/sensor-characteristic.tsの21行目にsensor:magnetdetectionを追加
export interface Event {
  'sensor:slope': (data: { isSloped: boolean }) => void
  'sensor:collision': (data: { isCollisionDetected: boolean }) => void
  'sensor:double-tap': () => void
  'sensor:orientation': (data: { orientation: number }) => void
  'sensor:magnetdetection': (data: { x: number; y: number; z: number; power: number }) => void
}
packages/cube/src/characteristics/sensor-characteristic.tsの100行目付近にonDataを修正
  private onData(data: Buffer): void {
    try {
      const parsedData = this.spec.parse(data)
      if (parsedData.dataType === 'sensor:detection') {
        if (this.prevStatus.isSloped !== parsedData.data.isSloped) {
          this.eventEmitter.emit('sensor:slope', { isSloped: parsedData.data.isSloped })
        }
        if (parsedData.data.isCollisionDetected) {
          this.eventEmitter.emit('sensor:collision', { isCollisionDetected: parsedData.data.isCollisionDetected })
        }
        if (parsedData.data.isDoubleTapped) {
          this.eventEmitter.emit('sensor:double-tap')
        }
        if (this.prevStatus.orientation !== parsedData.data.orientation) {
          this.eventEmitter.emit('sensor:orientation', { orientation: parsedData.data.orientation })
        }
        this.prevStatus = parsedData.data
      } else if (parsedData.dataType === 'sensor:magnet') {
        this.eventEmitter.emit('sensor:magnetdetection', {
          x: parsedData.magnet.x,
          y: parsedData.magnet.y,
          z: parsedData.magnet.z,
          power: parsedData.magnet.power,
        })
      }
    } catch (e) {
      return
    }
  }
}
packages/cube/src/characteristics/specs/sensor-spec.tsの大部分を修正
export interface DataType {
  buffer: Uint8Array
  data: { isSloped: boolean; isCollisionDetected: boolean; isDoubleTapped: boolean; orientation: number }
  magnet: { x: number; y: number; z: number; power: number }
  dataType: String
}

/**
 * @hidden
 */
export class SensorSpec {
  public parse(buffer: Buffer): DataType {
    if (buffer.byteLength < 3) {
      throw new Error('parse error')
    }

    const type = buffer.readUInt8(0)
    if (type === 1) {
      const isSloped = buffer.readUInt8(1) === 0
      const isCollisionDetected = buffer.readUInt8(2) === 1
      const isDoubleTapped = buffer.readUInt8(3) === 1
      const orientation = buffer.readUInt8(4)

      return {
        buffer: buffer,
        data: {
          isSloped: isSloped,
          isCollisionDetected: isCollisionDetected,
          isDoubleTapped: isDoubleTapped,
          orientation: orientation,
        },
        magnet: { x: 0, y: 0, z: 0, power: 0 },
        dataType: 'sensor:detection',
      }
    } else if (type === 2) {
      const Power = buffer.readUInt8(2)
      const X = buffer.readInt8(3)
      const Y = buffer.readInt8(4)
      const Z = buffer.readInt8(5)

      return {
        buffer: buffer,
        data: {
          isSloped: false,
          isCollisionDetected: false,
          isDoubleTapped: false,
          orientation: 0,
        },
        magnet: { x: X, y: Y, z: Z, power: Power },
        dataType: 'sensor:magnet',
      }
    } else {
      throw new Error('parse error')
    }
  }
}
マグネットセンサーの入力でモーター移動させるアプリを作成
やっと動作するコードを実装できます。
サンプルコード
const { NearestScanner } = require('@toio/scanner')

function chase(x, y, power) {
  const angle = (Math.atan2(y, x) * 180) / Math.PI
  let targetAngle = 0
  targetAngle = angle - 180
  if (targetAngle > 180) {
    targetAngle -= 360
  } else if (targetAngle < -180) {
    targetAngle += 360
  }
  console.log(targetAngle, power)

  if (power == 0) {
    return [0, 0]
  } else {
    const ratio = 1 - Math.abs(targetAngle) / 90
    // let speed = 20
    let speed = power + 20
    console.log(speed, ratio)
    if (targetAngle > 0) {
      return [speed, speed * ratio]
    } else {
      return [speed * ratio, speed]
    }

  }
}

async function main() {
  // start a scanner to find nearest two cubes
  const cube = await new NearestScanner().start()

  // connect to the cube
  await cube.connect()

  cube.setMagnetDetection()

  let power = 0

  // set light color and store position
  cube.on('sensor:magnetdetection', data => {
    power = data.power
    cube.move(...chase(data.x, data.y, data.power), 100)
  })

  setInterval(() => {
    if (power !== 0) {
      cube.turnOnLight({ durationMs: 0, red: 255, green: 0, blue: 255 })
    } else {
      cube.turnOffLight()
    }
  }, 200)
}

main()
技術的なポイントを解説していきます。
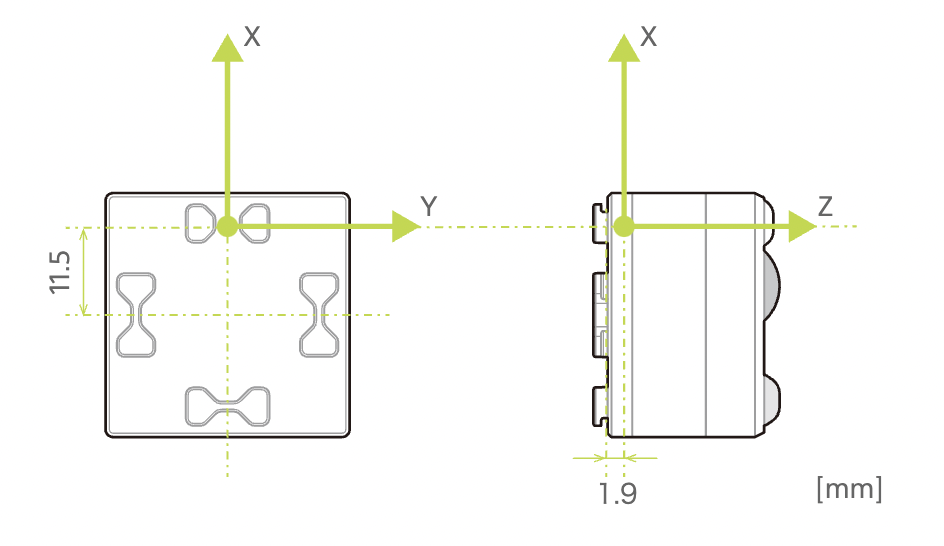
キューブのマグネットセンサーは以下のような座標軸で検出・通知がされます。
このx軸とy軸方向の入力をMath.atan2(y, x)を実行すると磁石の方向がわかります。(合わせてラジアンを°に変換しています。)
ここから、今回のマグネットの特性(極性)に合わせて、キューブの進行方向の角度を調整します。(これはトライアンドエラーで調整してください。) 今回はマイナス180°しています。
function chase(x, y, power) {
  const angle = (Math.atan2(y, x) * 180) / Math.PI
  let targetAngle = 0
  targetAngle = angle - 180
  if (targetAngle > 180) {
    targetAngle -= 360
  } else if (targetAngle < -180) {
    targetAngle += 360
  }
ここまでいったらあとは動く実装をするだけです。ほぼchaseのコードを流用です。
マグネットの強さ(=power)が0の時は静止、speedはマグネットの強さに合わせてトライアンドエラーで調整します。
  if (power == 0) {
    return [0, 0]
  } else {
    const ratio = 1 - Math.abs(targetAngle) / 90
    // let speed = 20
    let speed = power + 20
    console.log(speed, ratio)
    if (targetAngle > 0) {
      return [speed, speed * ratio]
    } else {
      return [speed * ratio, speed]
    }
  }
マグネットのエサを作ってキューブに近づける。
マグネットのエサはダイソーで揃えました。マグネット2種とシールを使っています。

一つだけだとマグネットの強さが足りず、キューブにかなり近づけないと反応しなかったので、数を増やして作りました。
ちなみに、マグネットの反対側をキューブに近づけると、極性が反対になるのでキューブがエサに対して逃げるような動きをします。ぜひ面白いのでトライしてみてください。
終わり
いかがでしたでしょうか?
磁気センサーを使うと他にも色々な体験ができそうですよね。また何かアイデアを思いついたら作ってみます。
ちなみに、toio for unityではもうすでにマグネットセンサーが使えるみたいです。
あっという間に17日ですね。
残りも僅かですが、みなさん良い年末をお過ごしください!
