1. はじめに
極寒あばら家からこんにちは。🦓幸福🦓と申します。
この時期の寒さに耐えかねて電気あんかを購入しました。
制御します(唐突)
2. ハードウェア構成
今回の機材構成は以下の通りです。
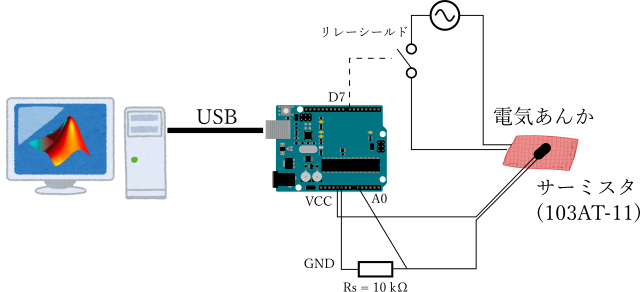
装置外観

2.1 Arduino Uno R3
今年も今年とて感情を失ったマイコンとしてI/Oのインターフェイスに徹してもらいます。ごめんね。
A0にあんかの表面に取り付けたサーミスタ測温回路の電圧入力、D7にリレーを接続します。
https://store-usa.arduino.cc/products/arduino-uno-rev3
2.2 リレーシールド
電気あんかの電源をON/OFFするためのリレーを搭載したArduino用シールドです。接点容量等を考慮してチョイス。
ArduinoのD7の出力に応じてスイッチします(ノーマリーオープン)。
https://wiki.dfrobot.com/Relay_Shield_for_Arduino_V2.1__SKU_DFR0144_
3. 機能仕様
今回使うあんかには温調機能がなく、深夜に汗だくになって起きることがあります。またタイマーもないので電源を消し忘れることもしばしば。というわけで以下の機能を実装していきます。
3.1 温調制御
リレーの制御かつ精度もそんなにいらないのでヒス付きのON/OFF制御を用います。予備実験により設定温度は45 ℃、ヒステリシス幅は5 ℃(42.5~47.5 ℃)としました。

3.2 タイマー
あんか自体にタイマーもスイッチもないので、朝イチの寝ぼけた状態でコンセントを引っこ抜くことはほとんど不可能です(n敗)。そこで、MATLAB側で起動・終了時刻の設定を行い、現在時刻がその間のときのみリレーONを許可します。
3.3 気象予報連携
わざわざPCにつなげた意味を見失わないように外気温の予報に基づいて設定温度を可変できるようにします。といっても外気温の変化速度はあんかの温度変化速度よりも十分に遅いため、予見制御の枠組みではなく瞬時気温の取得に用い、外気温が閾値以下の場合に温調の設定温度を50 ℃とします。
気象予報の取得にはOpen-Meteo APIを使用します。
4. 実装
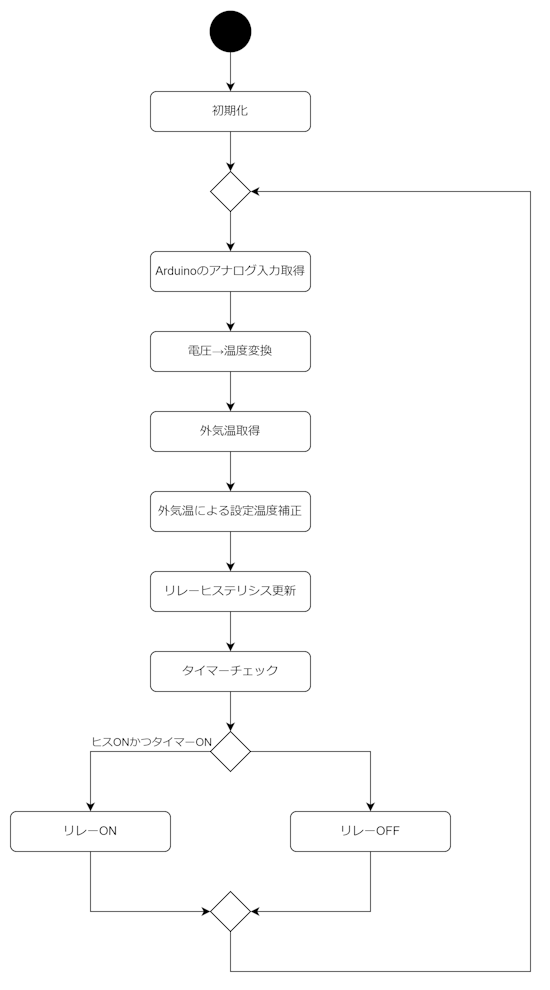
制御はシンプルに温度取得とリレーの制御を繰り返しています。
%% Initialize
clear;
close all;

%% Constants
% control relay every 10 minutes
RELAY_CONTROL_PERIOD = 600;

% Turn on control during 0-6 AM
TIMER_ON_HOUR = 0;
TIMER_OFF_HOUR = 6;

% HOME location
HOME_LATITUDE = 35.6825;
HOME_LONGITUDE = 139.752778;

% Heater target temperature
TARGET_TEMPERATURE = 45;

% When the outdoor temperature is less than the threshold,
% offset target temperature
OUTDOOR_TEMPERATURE_CORRECTION = 5;
OUTDOOR_TEMPERATURE_CORRECTION_THRESHOLD = 5;

%% Instantiate Classes
% Arduino client
uno = ArduinoInterface();

% Hysteresys to prevent relay chattering
hys = RelayHysteresis(TARGET_TEMPERATURE);

% API I/F with Open-Meteo weather forecast service
tfapi = TemperatureForecast(HOME_LATITUDE, HOME_LONGITUDE);

% Bedtime timer
relay_timer = OnOffTimer(TIMER_ON_HOUR, TIMER_OFF_HOUR);

data_plot = DataPlotter();

%% Main Loop
while true
    % Acquire thermistor voltage, convert to temperature, prefilter
    thermistor_voltage = uno.GetThermistorVoltage();
    temperature = ThermistorCalculator.GetTemperature(thermistor_voltage);

    % Get outdoor temperature from Open-Meteo
    outdoor_temperature = tfapi.GetOutdoorTemperature();

    % Correct heater target temperature based on outdoor temperature
    if outdoor_temperature < OUTDOOR_TEMPERATURE_CORRECTION_THRESHOLD
        hys.SetTargetTemperature(TARGET_TEMPERATURE+OUTDOOR_TEMPERATURE_CORRECTION);
    else
        hys.SetTargetTemperature(TARGET_TEMPERATURE);
    end

    % Switch relay based on temperature and timer
    hysteresis_on = hys.UpdateHysteresis(temperature);
    timer_on = relay_timer.GetTimerStatus();
    uno.SwitchRelay(hysteresis_on && timer_on);

    % Update plot
    data_plot.AppendData(temperature, outdoor_temperature, hysteresis_on, timer_on);
    pause(RELAY_CONTROL_PERIOD);
end
また以下の機能に独立にクラスを作成しています。
- Arduinoとのインターフェイス
- サーミスタの電圧-温度変換(Static)
- リレー用のヒステリシス
- 温度予報取得
- タイマー制御
4.1 Arduinoとのインターフェイス
ピン情報やArduinoとの接続オブジェクトの保持、A0のAnalogReadとD7のDigitalWriteを行います。
classdef ArduinoInterface < handle
    properties(Constant)
        RELAY_SWITCH_PIN = "D7"
        THERMISTER_PIN = "A0"
        VCC = 5
    end

    properties(Access=private)
        client  % Arduino connection object
    end

    methods(Access=public)
        % Initialize connection to Arduino
        function obj = ArduinoInterface()
            obj.client = arduino;
        end

        % Open relay on delete
        function delete(obj)
            arguments
                obj ArduinoInterface
            end

            obj.SwitchRelay(false);
        end

        function SwitchRelay(obj, close_relay)
            arguments
                obj ArduinoInterface
                close_relay logical
            end

            obj.client.writeDigitalPin(obj.RELAY_SWITCH_PIN, close_relay);
        end

        function voltage = GetThermisterVoltage(obj)
            arguments
                obj ArduinoInterface
            end

            voltage = obj.client.readVoltage(obj.THERMISTER_PIN);
        end
    end
end
4.2 サーミスタの電圧-温度変換(Static)
サーミスタ回路の電圧-温度変換式をまとめたStaticクラスです。以下のBパラメータ方程式によりA0の電圧値から現在のあんか温度を取得します。
$$
\theta=\frac{1}{\frac{1}{B}\ln\left(\frac{{R}}{R_{R}}\right)+\frac{1}{\theta_{R}}}
$$
| 変数 | 内容 |
|---|---|
| $\theta$ | サーミスタ温度($K$) |
| $B$ | サーミスタのB定数($K$) |
| $R$ | サーミスタの抵抗値($\Omega$) |
| $\theta_{R},\ R_{R}$ | リファレンス温度($K$)およびそのときの抵抗値($\Omega$) |
今回は抵抗分圧でサーミスタ抵抗値を取得しているため、A0の電圧値から以下のように計算します。
$$
R=\frac{V_{CC}-V_o}{V_o}R_{s}
$$
| 変数 | 内容 |
|---|---|
| $V_{CC}$ | 電源電圧($5 V$) |
| $R_{s}$ | 分圧抵抗の抵抗値($\Omega$) |
| $V_o$ | A0の電圧値($V$) |
% Convert output voltage to temperature
classdef ThermistorCalculator < handle
    properties(Constant)
        KELVIN_OFFSET = 273.15
        REF_TEMPERATURE = 298.15
        REF_RESISTANCE = 10000
        SERIES_RESISTANCE = 10000
        B_CONSTANT = 3435
    end

    methods(Static)
        function temperature = GetTemperature(output_voltage)
            arguments
                output_voltage double
            end

            thermister_resistance = (ArduinoInterface.VCC - output_voltage)*ThermistorCalculator.SERIES_RESISTANCE / output_voltage;
            temperature = 1 / ( ...
                log( ...
                    thermister_resistance / ThermistorCalculator.REF_RESISTANCE ...
                ) / ThermistorCalculator.B_CONSTANT ...
                + 1/ThermistorCalculator.REF_TEMPERATURE ...
            ) - ThermistorCalculator.KELVIN_OFFSET;
        end
    end
end
4.3 リレー用のヒステリシス
リレー用のヒステリシスに関して、閾値と状態の保持と管理を行います。
classdef RelayHysteresis < handle
    properties(Constant)
        hysteresis_width = 5 % Temperature difference between on/off threshold
    end

    properties(Access=private)
        on_temperature double
        off_temperature double
        relay_state logical
    end

    methods(Access=public)
        % Set middle point of hysteresis as the target temperature
        function obj = RelayHysteresis(target_temperature)
            arguments
                target_temperature double
            end

            obj.SetTargetTemperature(target_temperature);

            obj.relay_state = false;
        end

        % Update relay state
        function relay_state = UpdateHysteresis(obj, temperature)
            arguments
                obj RelayHysteresis
                temperature double
            end

            if temperature > obj.off_temperature
                obj.relay_state = false;
            elseif temperature < obj.on_temperature
                obj.relay_state = true;
            end

            relay_state = obj.relay_state;
        end

        % Convert center and width of hysteresis to on/off threshold
        function SetTargetTemperature(obj, target_temperature)
            arguments
                obj RelayHysteresis
                target_temperature double
            end

            obj.on_temperature = target_temperature - obj.hysteresis_width / 2;
            obj.off_temperature = target_temperature + obj.hysteresis_width / 2;
        end
    end
end
4.4 温度予報取得
Open-Meteo APIとのインターフェイスを行います。クエリのフォーマットに緯度経度を追記してレスポンスを取得します。
% Get current temperature of a specific area from Open-Meteo
classdef TemperatureForecast < handle
properties(Constant)
API_URL_FORMAT = "https://api.open-meteo.com/v1/forecast?latitude=%f&longitude=%f¤t=temperature_2m"
end
properties(Access=private)
api_url string
end
methods(Access=public)
function obj = TemperatureForecast(home_latitude, home_longitude)
arguments
home_latitude double
home_longitude double
end
obj.api_url = sprintf(TemperatureForecast.API_URL_FORMAT, home_latitude, home_longitude);
end
function outdoor_temperature = GetOutdoorTemperature(obj)
arguments
obj TemperatureForecast
end
response = webread(obj.api_url);
outdoor_temperature = response.current.temperature_2m;
end
end
end
4.5 タイマー制御
タイマー設定の保持と、現在の時刻がタイマーON時間に該当するかを判定します。
classdef OnOffTimer < handle
    properties(Access=private)
        time_on_hour
        time_off_hour
        cross_midnight_flag
    end

    methods(Access=public)
        function obj = OnOffTimer(time_on_hour, time_off_hour)
            arguments
                time_on_hour double
                time_off_hour double
            end

            obj.time_on_hour = time_on_hour;
            obj.time_off_hour = time_off_hour;
            obj.cross_midnight_flag = time_on_hour > time_off_hour;
        end

        function timer_on = GetTimerStatus(obj)
            arguments
                obj OnOffTimer
            end

            current_hour = hour(datetime);
            if obj.cross_midnight_flag
                timer_on = (obj.time_on_hour <= current_hour) || (current_hour < obj.time_off_hour);
            else
                timer_on = (obj.time_on_hour <= current_hour) && (current_hour < obj.time_off_hour);
            end
        end
    end
end
5. 実験
実際に寝てみた際の温度推移は以下の図の通りです。温調制御、タイマーともに意図通り動作しています。03:00以降温度が上がらなくなっていますが、おそらく寝返りで上に載っていた布団が外れたためと思われます。

6. まとめ
Q. で、安眠できたの?
A. 枕元でカチカチうっさいんじゃい!!