SwiftUIでGameCenterの実装
今回はiOSのGameKitの機能を使って、Leaderboardを使ったランキング機能の実装をSwiftUIでする方法を紹介します。
Leaderboardというのは簡単に言うとスコアボードのことで、AppStoreConnectで作成、設定できます。
アプリからこのLeaderboardにスコアを送信することでランキング化され、表示し確認することができます。
AppStoreConnect上での設定
Leaderboardの追加
まずはAppStoreConnectの各アプリのページのサービス欄に移動し、下記画像の+ボタンを押します。

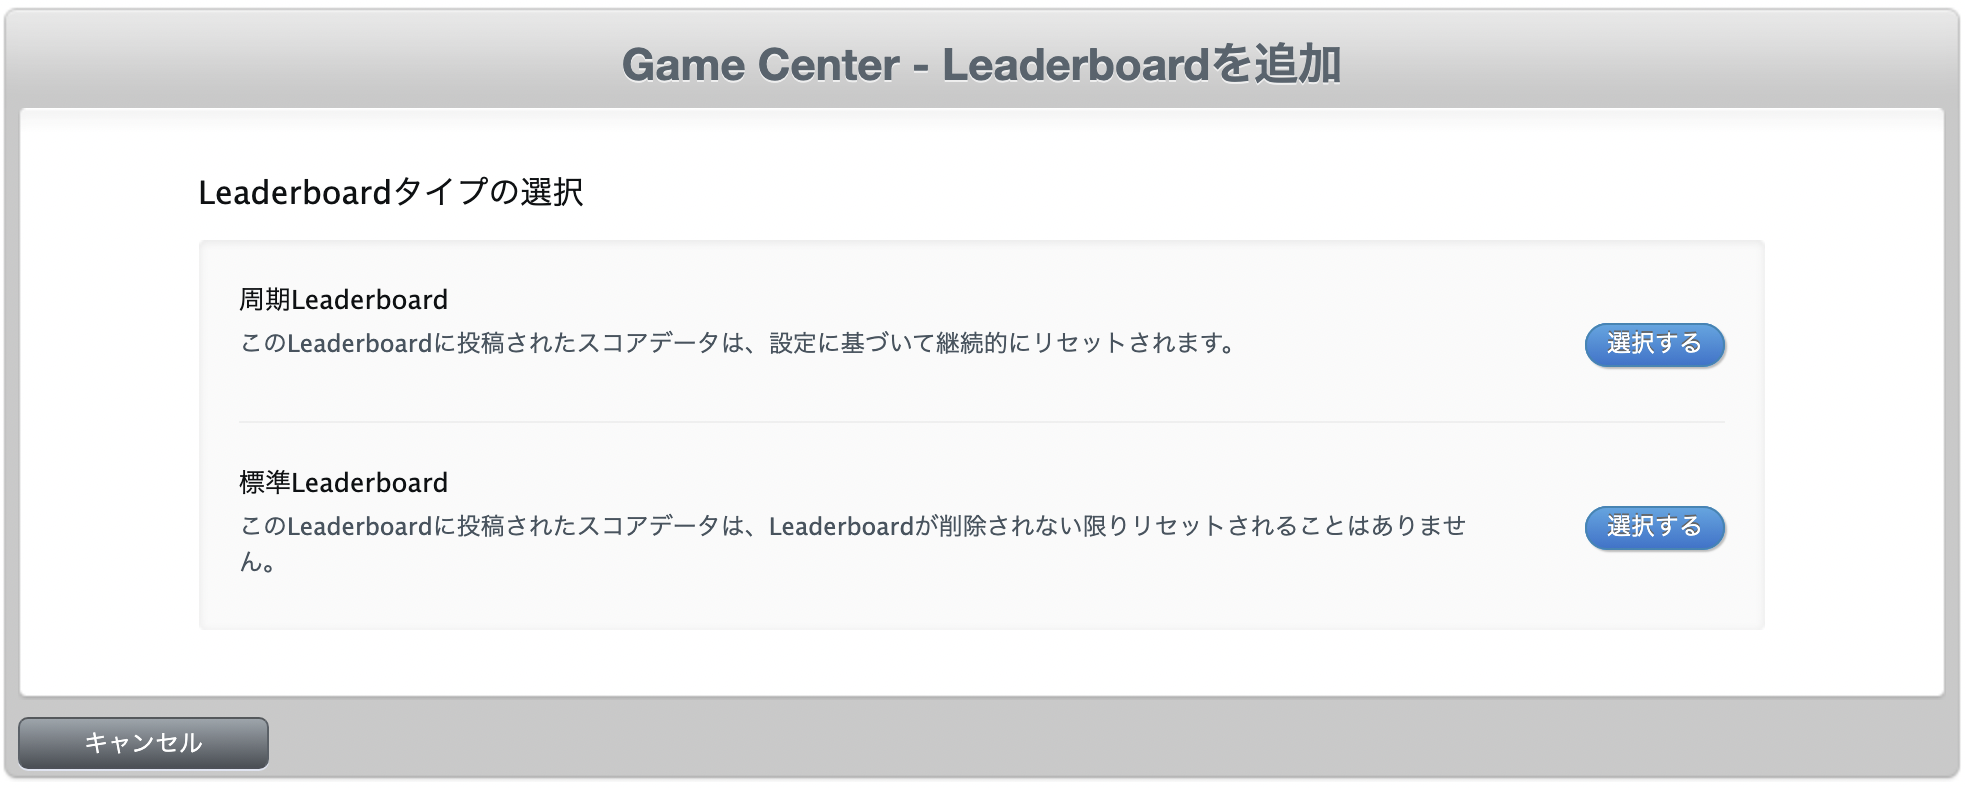
次に以下のフォームが表示されるので、Leaderboardのタイプを選択します。
周期Leaderboardは1日ごとなどの一定の周期で新しくデータをリセットしたい場合に利用します。
標準Leaderboardはリセットされることはなく、ずっとデータが集積してほしい場合に利用します。
今回は標準Leaderboardを利用していきます。

次にLeaderboardの設定をします。Leaderboardの参照名、LeaderboardID、その他スコアに関する設定を行います。

次にローカライズの設定をします。最低一つの言語設定をする必要があるので任意の言語を登録してください。

次にAppStoreタグに移り、以下のGameCenterのタグにチェックを入れます。

次にGameCenterの欄の下にLeaderboardの欄があるので、先ほどサービス連携のタグで登録したLeaderBoardを適用します。これでAppStoreConnectでの設定は完了です。

認証処理
以下の処理でLeaderboardに連携するための、ユーザー認証処理ができます。
Leaderboardの表示、スコアの送信の前に認証は行っておきましょう。
func authenticateLocalPlayer() {
    let player = GKLocalPlayer.local
    player.authenticateHandler = { _, error in
        guard error == nil else {
            print(error?.localizedDescription ?? "")
            return
        }
    }
}
Leaderboardの表示
一番簡単な実装(詳細な位置が指定できない)
まずは一番簡単にLeaderboard(スコアボード)を表示する実装を紹介します。
以下はユーザー認証後、Leaderboardを表示するためのボタンを設置する処理です。
ここで設置するボタンというのは GKAccessPoint のことを指します。
GKAccessPointはiOS14から新たにGameKitに追加され、isActiveをtrueにするだけで画面に描画され、Leaderboardへの遷移処理などもやってくれる優れものです。
ただ難点としては、ボタンの位置が画面の左上、左下、右上、右下の4パターンしか選べないということです。
そのため詳細な座標などを指定してLeaderboardを表示する発火ボタンを設置したい場合は別の方法をとる必要があります。
func authenticateLocalPlayer() {
    let player = GKLocalPlayer.local
    player.authenticateHandler = { _, error in
        guard error == nil else {
            print(error?.localizedDescription ?? "")
            return
        }
        GKAccessPoint.shared.isActive = localPlayer.isAuthenticated
        GKAccessPoint.shared.location = .topLeading
    }
}
詳細な位置に発火ポイントを設置する実装
詳細な位置にLeaderboardにを表示する発火ポイントを設置するには、SwiftUIで提供されているButtonなどを任意の場所に設置すればできます。そしてButtonのactionに表示フラグをtrueにする記述をすれば、.sheet(isPresented:)などでフラグtrue時に、.sheet(isPresented:)で指定したViewがモーダルとして表示されます。
これらの工程を以下のコードに記します。
まずButtonを設置し、Buttonのaction(タップ時の処理)にLeaderboard表示フラグ(isShowLeaderBoard)をtrueにする処理を書きます。
次にLeaderboard表示フラグ(isShowLeaderBoard)を引数に指定した.sheet(isPresented:)を設置し、フラグtrue時に表示するView(GameCenterViewController)を記述します。
これでButtonタップ時に、GameCenterViewControllerがモーダル表示されるコードが完成しました。
@State var isShowLeaderBoard: Bool = false

var body: some View {
    Button {
        if GKLocalPlayer.local.isAuthenticated {
            isShowLeaderBoard = true
        }
    } label: {
    }
    .sheet(isPresented: $isShowLeaderBoard) {
        GameCenterViewController()
    }
}
次にLeaderboardを表示するGameCenterViewControllerを記述します。
Leaderboardを表示するGKGameCenterViewControllerはUIViewControllerを継承しているので、UIViewControllerRepresentableを使用しSwiftUIでも描画可能にするために以下のように実装します。
ポイントはGKGameCenterViewControllerのデリゲートメソッドをCoordinatorに記述し、画面を閉じるコードを書くことでモーダルが閉じる実装を忘れないでください。
struct GameCenterViewController: UIViewControllerRepresentable {

    func makeUIViewController(
        context: UIViewControllerRepresentableContext<GameCenterViewController>
    ) -> GKGameCenterViewController {
        let gcvc: GKGameCenterViewController = GKGameCenterViewController()
        gcvc.gameCenterDelegate = context.coordinator
        return gcvc
    }

    func updateUIViewController(
        _ uiViewController: GKGameCenterViewController,
        context: UIViewControllerRepresentableContext<GameCenterViewController>
    ) {}

    func makeCoordinator() -> Coordinator {
        Coordinator()
    }

    class Coordinator: NSObject, GKGameCenterControllerDelegate {
        func gameCenterViewControllerDidFinish(_ gameCenterViewController: GKGameCenterViewController) {
            // モーダルを閉じる
            gameCenterViewController.dismiss(animated: true, completion: nil)
        }

    }
}
スコアの送信
Leaderboardにスコアを送信するには、GKLeaderboardのクラスメソッドであるsubmitScoreにスコアやleaderboardの諸々の引数を指定して、実行することで送信できます。
func sendLeaderboardWithID(score: Int) {
    if GKLocalPlayer.local.isAuthenticated {
        GKLeaderboard.submitScore(score, context: 0, player: GKLocalPlayer.local, leaderboardIDs: ["LeaderboardのID"]) { error in
            print(error ?? "")
        }
    } else {
        print("GameCenterにログインしていません")
    }
}
参考
https://developer.apple.com/forums/thread/651161
https://developer.apple.com/documentation/gamekit/