はじめに
Blenderでモデリングを行う過程で、独自の機能を盛り込んだドット絵エディタをPythonで作りました。
このドット絵エディタにはFFT機能の他に、ドット絵をそのままSVG形式でエクスポートする機能があります。 pic.twitter.com/cgJuAudnKa
— ヒサン@電子材料・デバイスbot (@Hisan_twi) July 30, 2021
このシリーズではこのドット絵エディタの作り方を複数回に分けて解説します。
本記事ではその第1回目として、Pythonでシンプルなドット絵エディタを作る方法を解説します。
環境
- iMac (Retina 5K, 27-inch, Late 2015)
- Python: 3.9.1
使用ライブラリ:
- PySide6
PySide6は事前にインストールしておく必要があります。
PySideは以前の記事:PyQtとSQLiteで定期ツィートを登録するアプリを作るで使用したPyQtとほとんど同じもので、Python用のGUIライブラリです(参考)。記事の方でPyQtの基本的なコードの書き方を解説していますので、必要に応じて参照してください。
ソースコード
まずはソースコードを示します。
import sys
from PySide6.QtCore import *
from PySide6.QtWidgets import *
from PySide6.QtGui import *

class MainWindow(QMainWindow):
	def __init__(self, parent=None):
		super(MainWindow, self).__init__(parent)

		self.canvas = Canvas()
		self.setCentralWidget(self.canvas)
		self.initUI()
	#ウィンドウ設定
	def initUI(self):
		self.setGeometry(100, 200, 700, 650)
		self.setWindowTitle("PAINTapl")
		#メニューバーの設定
		menubar = self.menuBar()
		openAct = QAction("&画像開く", self)
		saveAct = QAction("&保存", self)
		exitAct = QAction("&終了", self)
		openAct.setShortcut("Ctrl+O")
		openAct.triggered.connect(self.openFile)
		saveAct.setShortcut("Ctrl+S")
		saveAct.triggered.connect(self.saveFile)
		exitAct.triggered.connect(QCoreApplication.instance().quit)
		fileMenu = menubar.addMenu("&ファイル")
		fileMenu.addAction(openAct)
		fileMenu.addAction(saveAct)
		fileMenu.addAction(exitAct)
		#消去ボタンの設定
		qpix = QPixmap.fromImage("Icon_Clear.png")
		icon = QIcon(qpix)
		btn = QPushButton(icon, "", self)
		btn.move(self.canvas.offsetx_image1, 10)
		btn.resize(40, 40)
		btn.setIconSize(qpix.size())
		btn.clicked.connect(self.canvas.resetImage)

	#画像を開く
	def openFile(self):
		path = QDir.currentPath()
		fileName, _ = QFileDialog.getOpenFileName(self, "Open File", path)
		if fileName:
			self.canvas.openImage(fileName, self.canvas.image1)

	#画像を保存
	def saveFile(self):
		path = QDir.currentPath()
		fileName, _ = QFileDialog.getSaveFileName(self, "Save as", path)
		if fileName:
			if not fileName[-4:] == ".png":
				fileName = fileName + ".png"
			return self.canvas.saveImage(fileName, self.canvas.image1)
		return False

class Canvas(QWidget):
	def __init__(self, parent=None):
		super(Canvas, self).__init__(parent)

		self.imgMag = 16									#画像の拡大倍率
		self.canvasSize = 512								#画像領域の大きさ
		self.imgSize = int(self.canvasSize/self.imgMag)		#画像の実際の画像サイズ

		self.myPenWidth = 1
		self.myPenColor = QColor(0,0,0)
		self.image1 = QImage()
		self.image1_grid = QImage(self.canvasSize, self.canvasSize, QImage.Format_ARGB32)		#原画像のグリッド
		self.check1 = False
		#ウィンドウ左上からのキャンバスの位置
		self.offsetx_image1 = 150
		self.offsety_image1 = 60

		#画像1の領域
		self.rect1_place = QRect(self.offsetx_image1, self.offsety_image1, self.canvasSize, self.canvasSize)

		self.setGrid(self.image1_grid)

	def mousePressEvent(self, event):
		if event.button() == Qt.LeftButton:
			self.lastPos = event.position().toPoint()
			#画像1の領域のみで有効にする
			if self.rect1_place.left() <= self.lastPos.x() and self.lastPos.x() <= self.rect1_place.right() \
				and self.rect1_place.top() <= self.lastPos.y() and self.lastPos.y() <= self.rect1_place.bottom():
				self.check1 = True

	def mouseMoveEvent(self, event):
		if event.buttons() and Qt.LeftButton:
			if self.check1:
				image = self.image1
				rect = self.rect1_place
				self.drawLine(event.position().toPoint(), image, rect)

	def mouseReleaseEvent(self, event):
		if event.button() == Qt.LeftButton:
			if self.check1:
				image = self.image1
				rect = self.rect1_place
				self.drawLine(event.position().toPoint(), image, rect)
			self.check1 = False

	#描画の処理
	def drawLine(self, endPos, image, rect):
		painter = QPainter(image)
		painter.setPen(QPen(self.myPenColor, self.myPenWidth, Qt.SolidLine, Qt.RoundCap, Qt.RoundJoin))
		#線の始点と終点を実際の画像に合わせて補正する
		v1 = (self.lastPos-rect.topLeft()-QPoint(self.imgMag, self.imgMag)/2)/self.imgMag
		v2 = (endPos-rect.topLeft()-QPoint(self.imgMag, self.imgMag)/2)/self.imgMag
		painter.drawLine(v1, v2)
		self.update()
		self.lastPos = QPoint(endPos)

	#グリッドの描画
	def setGrid(self, image):
		image.fill(qRgba(255, 255, 255,0))
		for i in range(0, self.canvasSize + 1, self.imgMag):
			for j in range(0, self.canvasSize):
				image.setPixelColor(i, j, QColor(193,193,225,255))
				image.setPixelColor(j, i, QColor(193,193,225,255))
				if not i == 0:
					image.setPixelColor(i-1, j, QColor(193,193,225,255))
					image.setPixelColor(j, i-1, QColor(193,193,225,255))
		#中心の線を赤色にする
		for j in range(0, self.canvasSize):
			image.setPixelColor(self.canvasSize/2, j, QColor(255,127,127,255))
			image.setPixelColor(j, self.canvasSize/2, QColor(255,127,127,255))
			image.setPixelColor(self.canvasSize/2-1, j, QColor(255,127,127,255))
			image.setPixelColor(j, self.canvasSize/2-1, QColor(255,127,127,255))

	def paintEvent(self, event):
		painter1 = QPainter(self)
		rect1_size = QRect(0, 0, self.imgSize, self.imgSize)
		painter1.drawImage(self.rect1_place, self.image1, rect1_size)
		rect_grid = QRect(0, 0, self.canvasSize, self.canvasSize)
		painter1_grid = QPainter(self)
		painter1_grid.drawImage(self.rect1_place, self.image1_grid, rect_grid)

	#ウィンドウサイズを固定している場合、ウィンドを開いたときだけ動作する処理
	def resizeEvent(self, event):
		if self.image1.width() < self.width() or self.image1.height() < self.height():
			changeWidth = max(self.width(), self.image1.width())
			changeHeight = max(self.height(), self.image1.height())
			self.image1 = self.resizeImage(self.image1, QSize(changeWidth, changeHeight))
			self.image1_grid = self.resizeimage_grid(self.image1_grid, QSize(changeWidth, changeHeight))
			self.update()

	def resizeImage(self, image, newSize):
		changeImage = QImage(QSize(self.imgSize, self.imgSize), QImage.Format_Grayscale8)
		changeImage.fill(255)
		painter = QPainter(changeImage)
		painter.drawImage(QPoint(0, 0), image)
		return changeImage

	def resizeimage_grid(self, image, newSize):
		changeImage = QImage(newSize, QImage.Format_ARGB32)
		changeImage.fill(qRgba(255, 255, 255,0))
		painter = QPainter(changeImage)
		painter.drawImage(QPoint(0, 0), image)
		return changeImage

	def resetImage(self):
		self.image1.fill(qRgb(255, 255, 255))
		self.update()

	def openImage(self, filename, image):
		if not image.load(filename):
			return False
		self.update()
		return True

	def saveImage(self, filename, image):
		if image.save(filename, "PNG"):
			return True
		else:
			return False

def main():
	app = QApplication(sys.argv)
	main_window = MainWindow()
	main_window.show()
	sys.exit(app.exec())

if __name__ == "__main__":
	main()
2021/8/7 追記:CanvasクラスにopenImageとsaveImageが不足していて画像を開く/保存ができなかったので追加しました。
このコードを実行するためにはソースコードと同じフォルダにアイコン用画像ファイルIcon_Clear.pngを置く必要があります。
Icon_Clear.png:

実行結果
このコードを実行すると、下の画像のウィンドウが開きます。
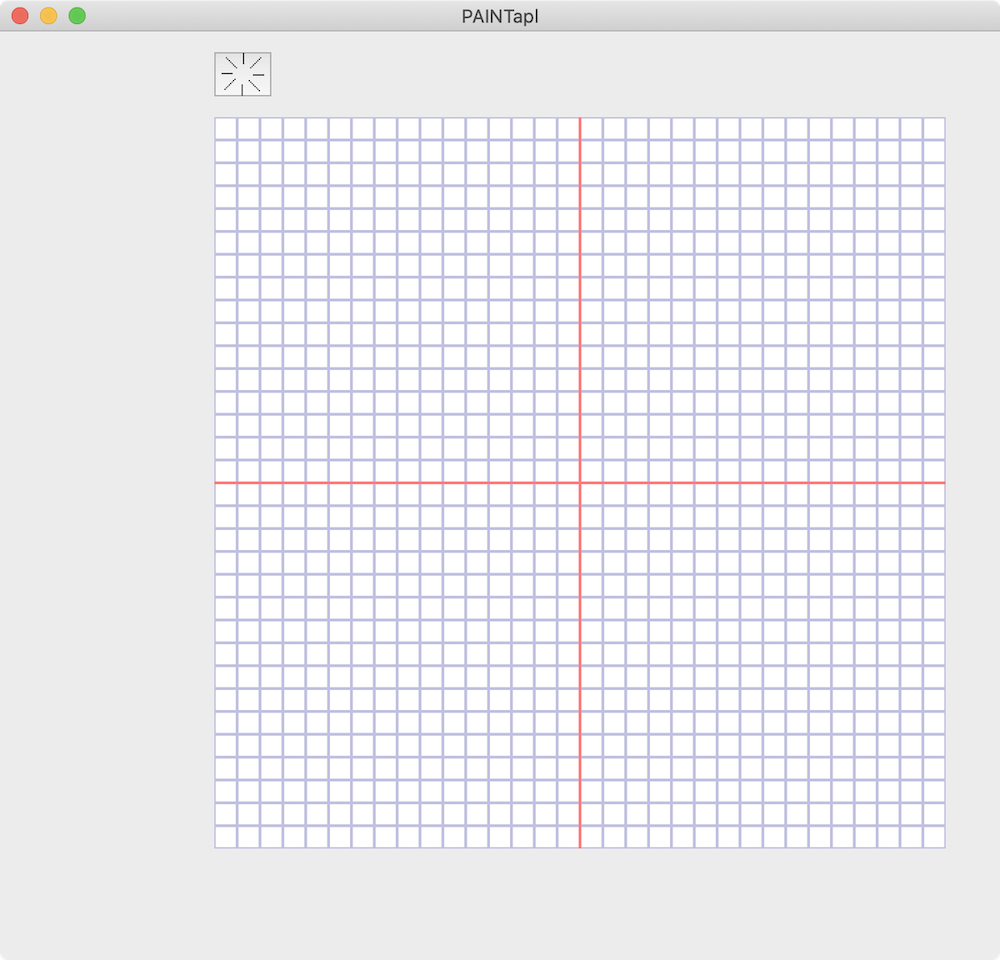
少し右に寄っていて不格好ですが、後で拡張するために左側に余白を持たせています。
まだペンの色は黒だけですが、とりあえず右クリックでドットを打って絵を描くことができます。
上のアイコンボタンをクリックするとキャンバスの絵をクリアして初期状態に戻すことができます。
ファイルメニューから画像を保存したり、開いたりすることができます。
macOSだとファイルメニューを開けないことがありますが、その場合は一旦ウィンドウ外をクリックして再びウィンドウをアクティブにするとファイルメニューを開けます。
解説
基本的な構成は@pto8913さんの記事のペイントプログラムを参考にしました。
キャンバスの表示にはQPainterクラスのdrawImage関数を使用します。
drawImgeは3つの引数をとります。
QPainter.drawImage(ウィンドウに表示する領域, 画像, 画像のうち表示させる領域)
詳細は公式ドキュメントを参照してください。
第1引数と第3引数はどちらもQRect型(またはQRectF型)です。第1引数よりも第3匹数の方がサイズが小さい場合、表示される画像のピクセルが拡大されるためドット絵エディタらしく表示されます。
あとはマウスイベント(mousePressEvent、mouseMoveEvent、mouseReleaseEvent)で取得されるマウスカーソルの座標(event.position())を実サイズの画像の座標に変換してQPainter.drawLine関数で線を描画するようにすればドット絵エディタとして機能します。
次回予告
まずはシンプルなドット絵エディタを作成することができました。
次回はこのドット絵エディタにペイントツールを追加していきます。