はじめに
Robot/ロボット Advent Calendar 2017 の12日目です。よろしくお願いします。
自然言語解析の会話やQ&Aなどを設定するサービス(*)がいくつかありますが、今回 GoogleHomeのAction on Googleで使用する自然言語対話プラットフォームのDialogflowをRoBoHoNから使ってみました。Dialogflowの設定や、RoBoHoN側の一部ソースは省略となってしまいますが、DialogflowのAPI呼び出しの部分について下記に紹介いたします。
また、デジタルハリウッド サービスロボティクス専攻修了生・講師向け交流イベントロボトーク vol.1でもご紹介させていただきました。よかったらこちらもご参照ください。
* IBM Cloud Conversation, Windows Azure QnA Maker など
構成
開発環境
- Android Studio 2.3.3
- RoBoHoN SDK Ver1.2.0
- OkHttp 3.9.0
- okio 1.13.0
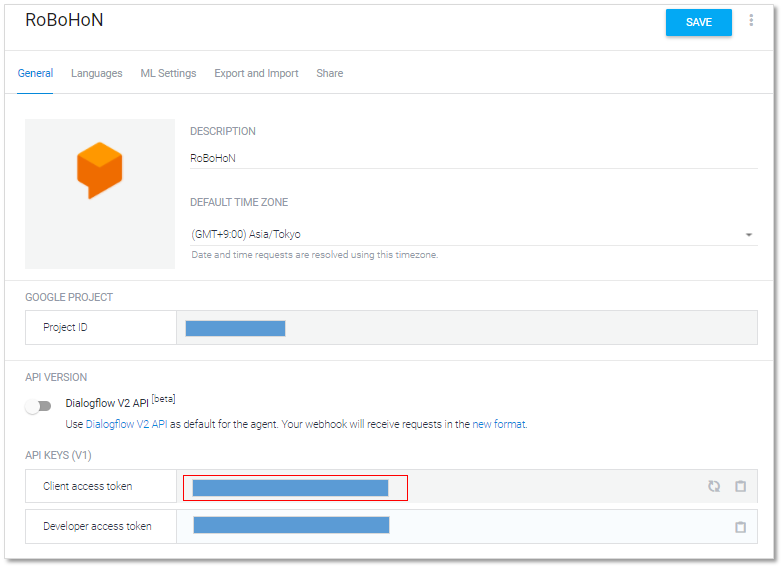
Dialogflow V1 API
Dialogflow の [V1 API] (https://dialogflow.com/docs/reference/agent/) を使用します。
Dialogflow の API を使用するには、TOKENが必要となります。TOKENは、エージェントの設定画面のClient access token となります。(赤枠)
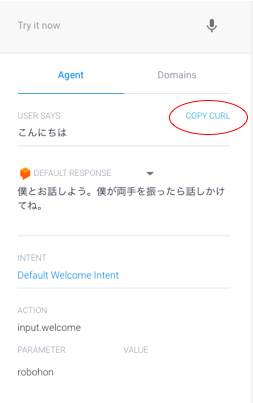
手軽にAPIを確認するには
Dialogflowの画面のCOPY CURLをクリックすると、クリップボードにCURLを使用したAPI呼出のコマンドラインがコピーされます。このコマンドラインに沿ってAPI呼出のプログラムを作成するとわかりやすいです。
curlのコマンドライン
curl 'https://api.dialogflow.com/v1/query?v=20170712&query=%E3%81%93%E3%82%93%E3%81%AB%E3%81%A1%E3%81%AF&lang=ja&sessionId=835b1373-0c64-4c34-bda7-28685c0a72e4&timezone=Asia/Tokyo' -H 'Authorization:Bearer (DialogflowのClient access token)'
APIから返されるJSONデータ
{
  "id": "c9595590-c014-4ffd-b041-b4c5ab2a3ffb",
  "timestamp": "2017-12-11T00:46:26.007Z",
  "lang": "ja",
  "result": {
    "source": "agent",
    "resolvedQuery": "こんにちは",
    "action": "input.welcome",
    "actionIncomplete": false,
    "parameters": {
      "robohon": ""
    },
    "contexts": [],
    "metadata": {
      "intentId": "d269049b-974a-4d49-a50b-b2d40d2834c1",
      "webhookUsed": "false",
      "webhookForSlotFillingUsed": "false",
      "intentName": "Default Welcome Intent"
    },
    "fulfillment": {
      "speech": "僕とお話しよう。僕が両手を振ったら話しかけてね。",
      "messages": [
        {
          "type": 0,
          "speech": "僕とお話しよう。僕が両手を振ったら話しかけてね。"
        }
      ]
    },
    "score": 1.0
  },
  "status": {
    "code": 200,
    "errorType": "success",
    "webhookTimedOut": false
  },
  "sessionId": "835b1373-0c64-4c34-bda7-28685c0a72e4"
}
サンプル1
Dialogflow API を呼び出し、RoBoHoNで発話するサンプルです。API呼出には OkHttpを使用しています。OkHttpの使用方法につきましては、RoBoHoNからSlackに投稿してみましたを参照ください。
このサンプルでは、JSONデータの"fulfillment"の"speech"の内容をRoBoHoNで発話、"metadata"の"intentName"が"robotalk.end"の時は、アプリ終了のシナリオを実行するようにしています。
package jp.co.softwing.robotalk;

import android.os.AsyncTask;
import android.util.Log;

import org.json.JSONException;
import org.json.JSONObject;

import java.io.IOException;

import okhttp3.OkHttpClient;
import okhttp3.Request;
import okhttp3.Response;
import okhttp3.HttpUrl;

import jp.co.sharp.android.voiceui.VoiceUIManager;
import jp.co.softwing.robotalk.customize.ScenarioDefinitions;
import jp.co.softwing.robotalk.util.VoiceUIManagerUtil;
import jp.co.softwing.robotalk.util.VoiceUIVariableUtil;


/**
 * Created by yasui on 2017/10/19.
 */

public class AsyncDialogFlow extends AsyncTask<String, Void, String > {

    public static final String TAG = AsyncDialogFlow.class.getSimpleName();

    /**
     * DialogFlow Token (取扱注意)
     */
    private static final String DF_TOKEN = "(DialogflowのClient access tokenを記載してください)";

    /**
     * 音声UI制御.
     */
    private VoiceUIManager mVoiceUIManager = null;

    /**
     * コンストラクタ
     */
    public AsyncDialogFlow(VoiceUIManager mainVoiceUIManager) {
        super();
        mVoiceUIManager = mainVoiceUIManager;
    }

    /**
     * Dialogflow V1 API
     */
    @Override
    protected String doInBackground(String... params) {
        Log.v(TAG, "doInBackground()");

        String query = params[0];
        String sessionId = params[1];

        Log.d(TAG, query);
        Log.d(TAG, sessionId);

        String result = "";

        HttpUrl url = new HttpUrl.Builder()
                .scheme("https")
                .host("api.dialogflow.com")
                .addPathSegment("v1")
                .addPathSegment("query")
                .addQueryParameter("v", "20170712")
                .addQueryParameter("query", query)
                .addQueryParameter("lang", "ja")
                .addQueryParameter("sessionId", sessionId)
                .addQueryParameter("timezone", "Asia/Tokyo")
                .build();

        Request request = new Request.Builder()
                .header("Authorization", "Bearer " + DF_TOKEN)
                .url(url)
                .build();

        OkHttpClient client = new OkHttpClient();

        try {
            Response response = client.newCall(request).execute();
            result = response.body().string();
        } catch (IOException ex) {
            Log.e(TAG, "OkHttpClient [" + ex.getMessage() + "]");
        }

        return result;
    }

    /**
     * 実行後の結果解析
     */
    @Override
    protected void onPostExecute(String result) {
        Log.v(TAG, "onPostExecute()");

        boolean isOk = false;
        String saymessage = "";
        String accost = ScenarioDefinitions.ACC_DF_MES;

        try {
            if (result.length() > 0) {
                JSONObject json = new JSONObject(result);
                JSONObject tagStatus = json.getJSONObject("status");
                if(tagStatus != null ){
                    String code = tagStatus.getString("code");
                    if(code.equals("200")){
                        JSONObject tagResult = json.getJSONObject("result");
                        JSONObject tagFulfillment = tagResult.getJSONObject("fulfillment");
                        JSONObject tagMetadata = tagResult.getJSONObject("metadata");
                        String intentName = tagMetadata.getString("intentName");
                        String speech = tagFulfillment.getString("speech");
                        saymessage = speech;
                        Log.d(TAG, json.toString());
                        isOk = true;
                        if(intentName.equals("robotalk.end")){
                            accost = ScenarioDefinitions.ACC_DF_END;
                        }
                    } else {
                        Log.e(TAG, "DialogFlowResultError:" + result);
                    }
                }
            }
        } catch (JSONException ex) {
            Log.e(TAG, "Failed JSONObject[" + ex.getMessage() + "]");
        }

        //ロボホン発話
        if (isOk) {
            if (mVoiceUIManager != null) {
                int ret;
                ret = VoiceUIVariableUtil.setVariableData(mVoiceUIManager,
                        ScenarioDefinitions.MEM_P_DF_MES, saymessage);
                if (ret == VoiceUIManager.VOICEUI_ERROR) {
                    Log.d(TAG, "setVariableData:VARIABLE_REGISTER_FAILED : " + ScenarioDefinitions.MEM_P_DF_MES);
                }
                VoiceUIVariableUtil.VoiceUIVariableListHelper helper =
                        new VoiceUIVariableUtil.VoiceUIVariableListHelper().addAccost(accost);
                VoiceUIManagerUtil.updateAppInfo(mVoiceUIManager, helper.getVariableList(), true);
            }
        }else{
            if (mVoiceUIManager != null) {
                VoiceUIVariableUtil.VoiceUIVariableListHelper helper =
                        new VoiceUIVariableUtil.VoiceUIVariableListHelper().addAccost(ScenarioDefinitions.ACC_DF_MES_ERR);
                VoiceUIManagerUtil.updateAppInfo(mVoiceUIManager, helper.getVariableList(), true);
            }
        }
    }
}
サンプル2
サンプル1には、RoBoHoNで認識した ${Lvcsr:Basic} の値を Java側に受け渡して、m_messageとして渡します。また、会話の継続のため、sessionIdを渡します。sessionIdは最初の会話を始める前に1回生成したものを渡し続けます。
   // DialogFlowにクエリー送信を行う
   AsyncDialogFlow task = new AsyncDialogFlow(mVoiceUIManager);
   String params[] = {m_message, sessionId};
   task.execute(params);
使ってみて
RoBoHoNとDialogflowを連携してみて感じたことは、やっぱりRoBoHoNっていいなって感じたことでした。単なる文字列ですが、RoBoHoN経由で話してもらうと生き生きした感じになります。
またDialogflowを使うことで、RoBoHoN側のアプリを修正することなく、会話を増やしたり、反応する文章をすぐに登録することができたりすることが素晴らしいと思いました。