はじめに
スマートスピーカー Advent Calendar 2017 の 7日目の記事です。よろしくお願いします。
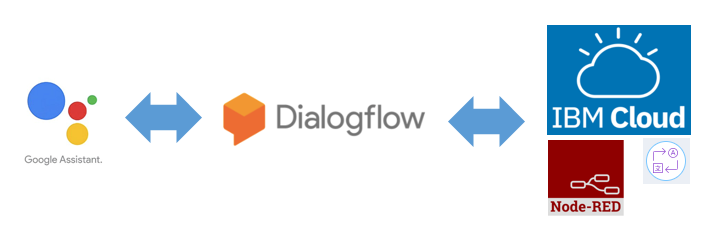
Actions on Google で使用する自然言語対話プラットフォームの DialogFlow と、IBM Cloud のNode-RED を使って、簡易翻訳ツールを作ってみようと思います。
構成
Dialogflow の Webhook に IBM Cloud (旧Bluemix) の Node-REDを使用します。
事前準備
以下の資料および記事を参考にさせていただきました。
(1)IBM Cloud のアカウント作成と、Node-RED環境が使えるまで
IBM Cloud ハンズオン・セミナー 初級編 資料
(2)Dialogflow(旧api.ai)を使用するまで
Actions on Googleでapi.aiを使ってGoogle Homeに何か言わせてみる
簡易翻訳ツールの内容
「翻訳開始して」と話したら、翻訳モードに移り、話かけた「日本語」を「英語」に翻訳します。
「翻訳終了」でアプリが終了するように定義します。
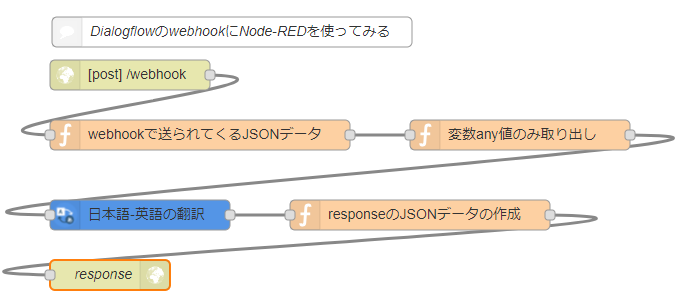
Node-RED
Node-REDのフローはこんな感じです。「Language Translator」を使っています。
フローの作成前に、IBM Cloud のカタログから、「Language Translator」のサービスを有効にすることと、Node-REDとの接続作成をしておいてください。
[
    {
        "id": "f86e3483.663a98",
        "type": "watson-translator",
        "z": "23aa250a.88cefa",
        "name": "日本語-英語の翻訳",
        "action": "translate",
        "basemodel": "ja-en",
        "domain": "news",
        "srclang": "ja",
        "destlang": "en",
        "password": "",
        "custom": "",
        "domainhidden": "news",
        "srclanghidden": "ja",
        "destlanghidden": "en",
        "basemodelhidden": "ja-en",
        "customhidden": "",
        "filetype": "forcedglossary",
        "trainid": "",
        "lgparams2": true,
        "neural": true,
        "default-endpoint": true,
        "service-endpoint": "https://gateway.watsonplatform.net/language-translator/api",
        "x": 170,
        "y": 220,
        "wires": [
            [
                "ebc7dc6b.2e68"
            ]
        ]
    },
    {
        "id": "ebc7dc6b.2e68",
        "type": "function",
        "z": "23aa250a.88cefa",
        "name": "responseのJSONデータの作成",
        "func": "msg.payload={ speech: msg.payload, displayText: msg.payload }\nreturn msg;",
        "outputs": 1,
        "noerr": 0,
        "x": 450,
        "y": 220,
        "wires": [
            [
                "934d1f48.2cb448"
            ]
        ]
    },
    {
        "id": "8a6a2f8d.29e46",
        "type": "function",
        "z": "23aa250a.88cefa",
        "name": "変数any値のみ取り出し",
        "func": "msg.payload=msg.payload.result.parameters.any;\nreturn msg;",
        "outputs": 1,
        "noerr": 0,
        "x": 550,
        "y": 140,
        "wires": [
            [
                "f86e3483.663a98"
            ]
        ]
    },
    {
        "id": "934d1f48.2cb448",
        "type": "http response",
        "z": "23aa250a.88cefa",
        "name": "response",
        "statusCode": "",
        "headers": {
            "Content-Type": "application/json"
        },
        "x": 140,
        "y": 280,
        "wires": []
    },
    {
        "id": "c126708b.932ba",
        "type": "function",
        "z": "23aa250a.88cefa",
        "name": "webhookで送られてくるJSONデータ",
        "func": "msg.payload=msg.req.body\nreturn msg",
        "outputs": 1,
        "noerr": 0,
        "x": 230,
        "y": 140,
        "wires": [
            [
                "8a6a2f8d.29e46"
            ]
        ]
    },
    {
        "id": "a53b46e6.6990f8",
        "type": "http in",
        "z": "23aa250a.88cefa",
        "name": "",
        "url": "/webhook",
        "method": "post",
        "upload": false,
        "swaggerDoc": "",
        "x": 160,
        "y": 80,
        "wires": [
            [
                "c126708b.932ba"
            ]
        ]
    },
    {
        "id": "420f6595.6780cc",
        "type": "comment",
        "z": "23aa250a.88cefa",
        "name": "DialogflowのwebhookにNode-REDを使ってみる",
        "info": "",
        "x": 262,
        "y": 37,
        "wires": []
    }
]
Dialogflowの設定
| Intents | 説明 |
|---|---|
| translate.start | 翻訳を開始する音声トリガー |
| translate.event | 聞き取った言葉をNode-REDに投げる |
| translate.end | 翻訳の終了(アプリ終了)の音声トリガー |
| Fulfillment | 説明 |
|---|---|
| Webhook | Node-RED の HTTP Node (POST) の URLを指定します |
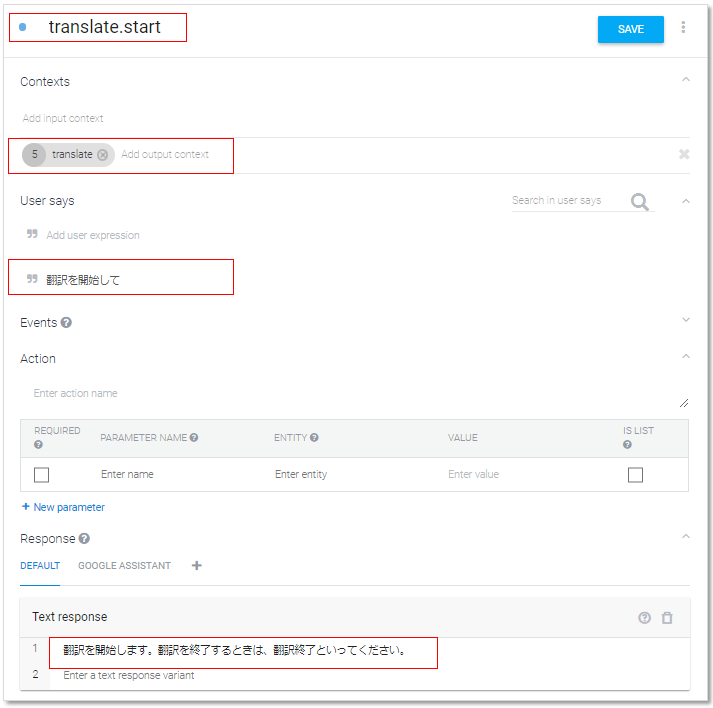
Intents 「translate.start」
| 項目 | 設定内容 | 補足 |
|---|---|---|
| Intents名 | translate.start | |
| Contexts(output) | translate | translate.event, translate.end を受け付けるためのフラグ |
| User says | 翻訳を開始して | |
| Text response | 翻訳を開始します。翻訳を終了するときは、翻訳終了といってください。 |
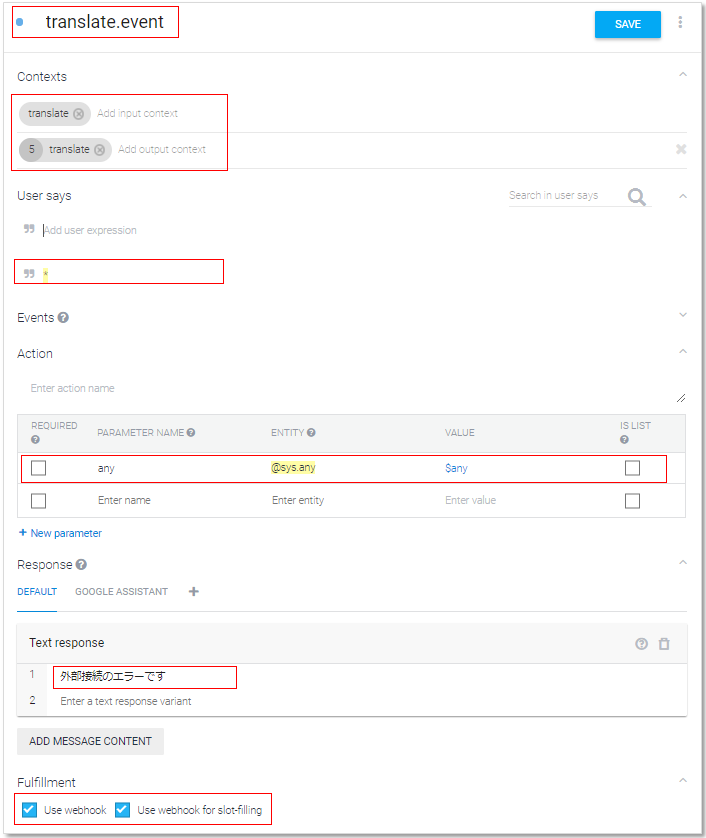
Intents 「translate.event」
| 項目 | 設定内容 | 補足 |
|---|---|---|
| Intents名 | translate.event | |
| Contexts(input) | translate | |
| Contexts(output) | translate | |
| User says | * | * に Entity「@sys.any」 を割り当てます。 |
| Text response | 外部接続のエラーです | webhookが失敗したときにこのメッセージが返答されます。 |
| use webhook | チェック | |
| Use webhook for slot-filling | チェック |
Intents 「translate.end」
| 項目 | 設定内容 | 補足 |
|---|---|---|
| Intents名 | translate.end | |
| Contexts(output) | translate | 数字を0に設定します。0にするとContextsが外れます。今回アプリを終了してしまいますが、この文脈を終わらせて対話を継続させたいときに行います。 |
| User says | * | 翻訳終了 |
| Text response | 翻訳を終了します | |
| End conversation | チェック | アプリが終了します |

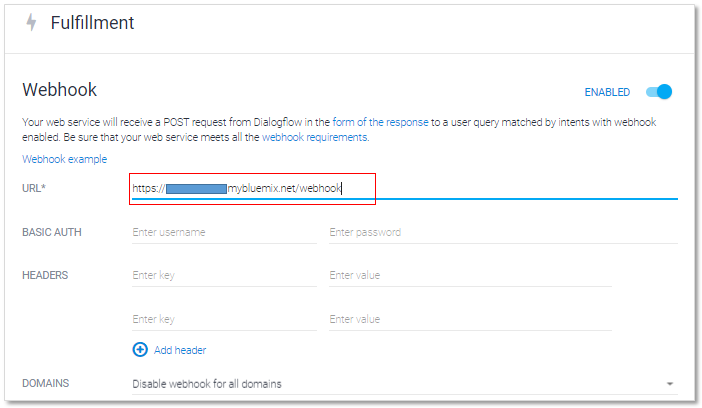
Fulfillment webhook
| 項目 | 設定内容 | 補足 |
|---|---|---|
| URL | https://hoge.mybluemix.net/webhook | http node の URL を /webhook に設定したので、https://hoge.mybluemix.net/webhook となります。 |
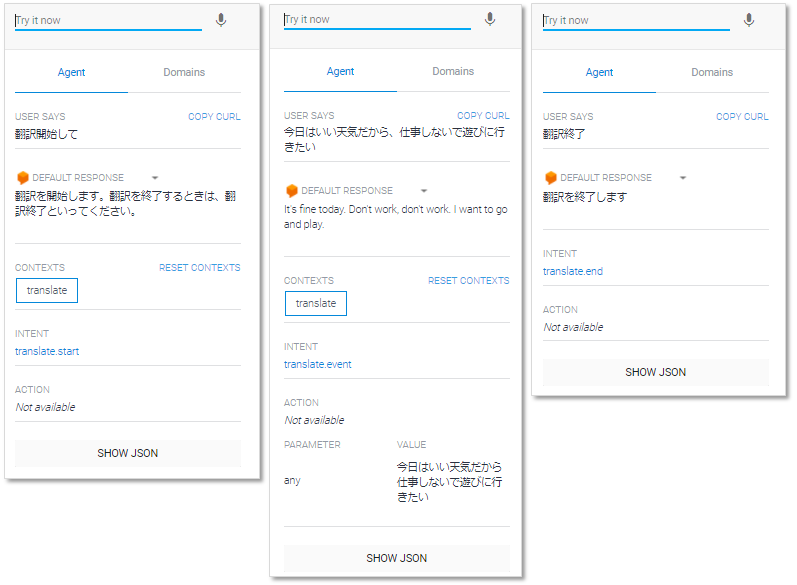
動かしてみる
トレーニング欄
Dialogflowの右側のトレーニング欄から実行してみます。Try it now に入力してみてください。最初の発話で「CONTEXTS」が設定され、次の発話で翻訳、最後に翻訳終了で「CONTEXTS」が外れることがわかります。
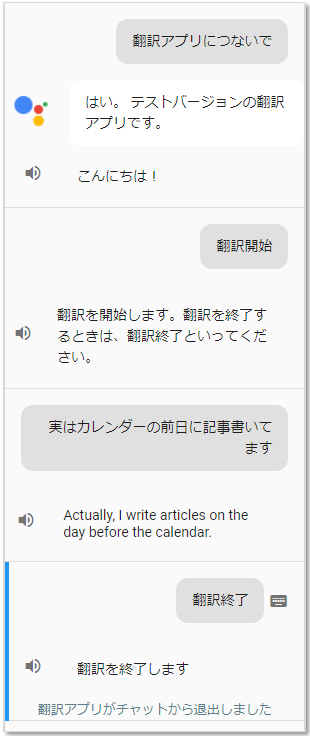
Actions on Google の Simulator
Actions on Google の Simulator で実行します。Simulator でアプリを動かすまでの設定は今回割愛いたします。
まとめ
Simulator まではいい感じだったのですが、実機の Google Home で動かすと、翻訳後の発話が日本語のエージェントが発話してしまうので、もうひと工夫必要でした ^^;
また、Google Home 側で、「うまく聞き取れませんでした」のあと、前回の翻訳した内容が発話されてしまうなぞの現象も発生しているので、もう少し調べてみようと思います。
ですが、WebhookにNode-REDを使うことで、いろいろとできることが増えると思います。ぜひ試してみてください。