はじめに
みなさん、ARMTemplate使ってますか?
今日はお名前.comで管理している、Office365で使用する独自ドメインをAzure DNSに設定します。
Azure DNSのレコード設定は ポータルやPowerShell,CLIから設定できます。
O365には3ドメイン割り当てていて、DNSゾーンごとに繰り返し移行していかなければなりません。
繰り返し移行なので、勉強もかねて ARMTemplate化してみました。
Step1 リソースを作る
1. ポータルからDeploy
いきなりAzure DNSのARMテンプレートを作るのはサッパリわからないので、
まずはAzureからポチポチ作ります。
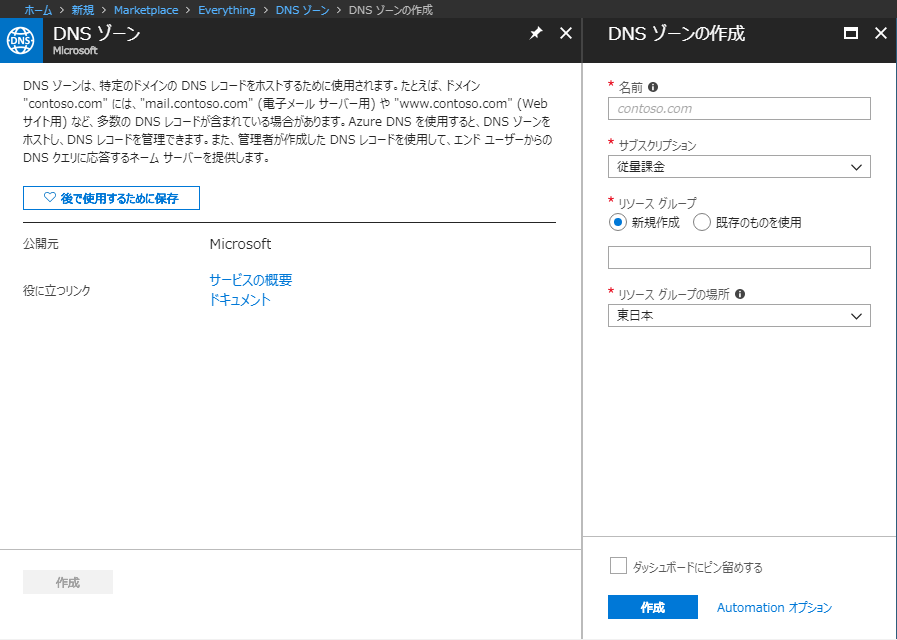
- んん…ゾーン名しかパラメータができない、DNSレコード設定はどうやらここではできないようです
2. 出来上がったリソースを眺める
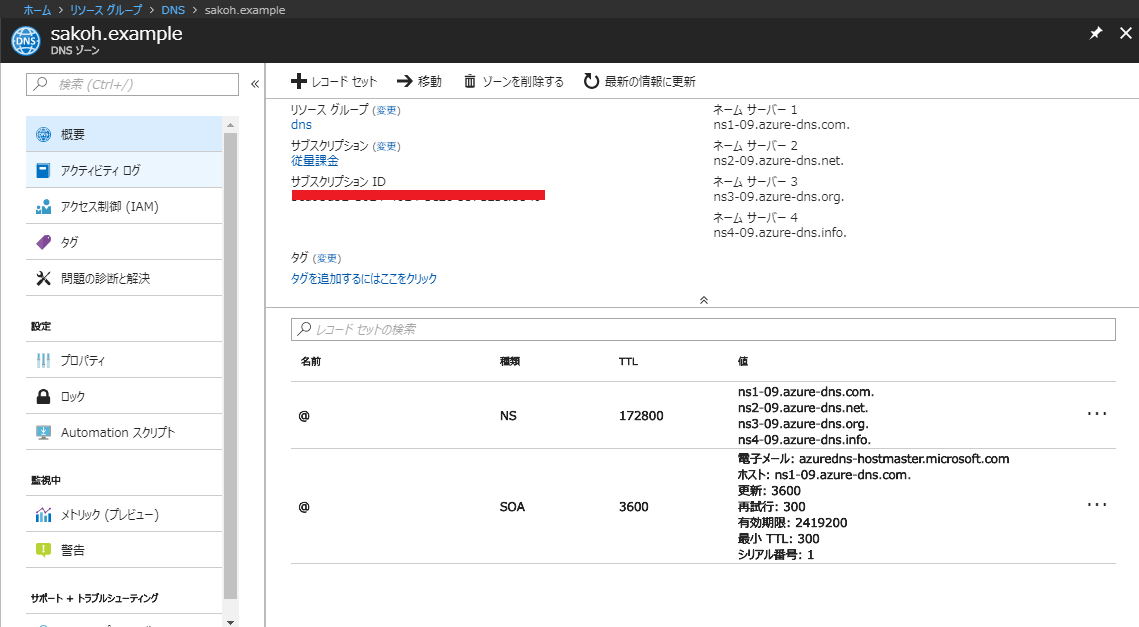
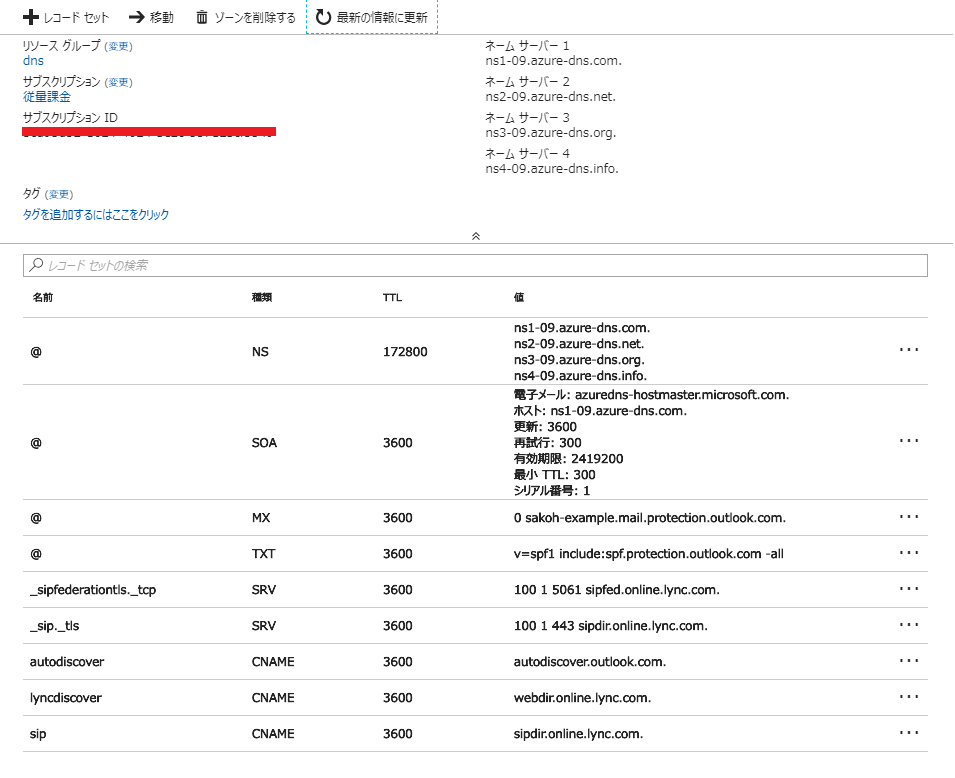
- なるほど、NSとSOAは自動でできるわけか
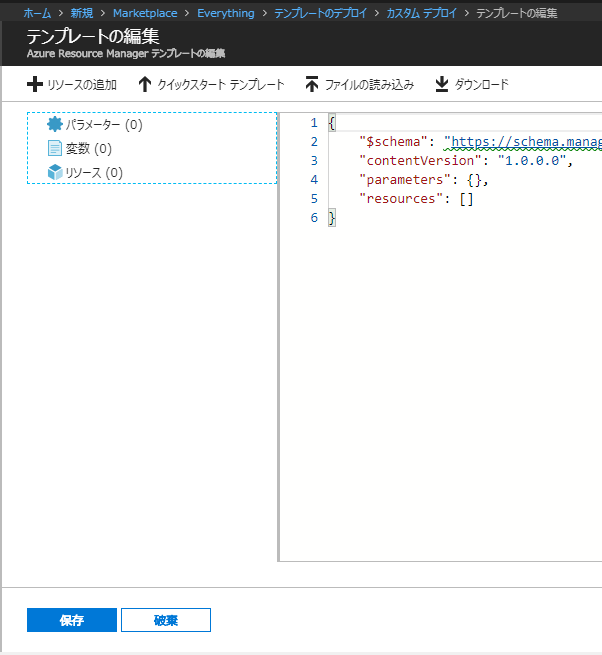
3. 作った時のARMを眺める
リソースグループ→デプロイ
{
    "$schema": "https://schema.management.azure.com/schemas/2015-01-01/deploymentTemplate.json#",
    "contentVersion": "1.0.0.0",
    "parameters": {
        "dnsZoneName": {
            "type": "String",
            "metadata": {
                "description": "The name of the DNS zone."
            }
        }
    },
    "resources": [
        {
            "type": "Microsoft.Network/dnszones",
            "name": "[parameters('dnsZoneName')]",
            "apiVersion": "2016-04-01",
            "location": "global",
            "properties": {}
        }
    ]
}
シンプルで美しい
Step2 必要なDNSレコードを追加してみる
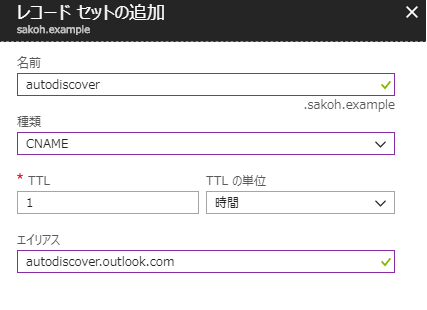
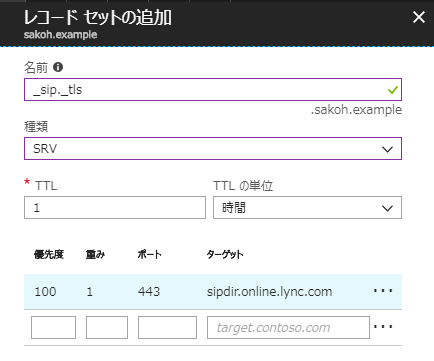
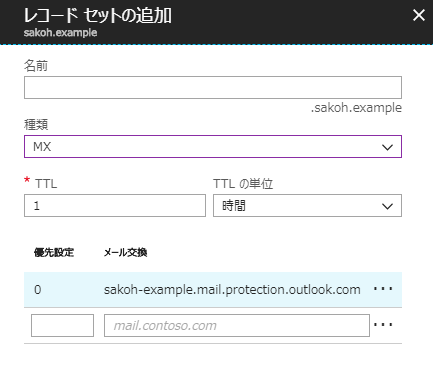
今回登録するDNSレコードはこんな感じ
autodiscover.sakoh.example. 3600 IN CNAME autodiscover.outlook.com.
lyncdiscover.sakoh.example. 3600 IN CNAME webdir.online.lync.com.
sip.sakoh.example. 3600 IN CNAME sipdir.online.lync.com.
sakoh.example. 3600 IN MX 0 sakoh-example.mail.protection.outlook.com.
sakoh.example. 3600 IN TXT "v=spf1 include:spf.protection.outlook.com -all"
_sip._tls.sakoh.example. 3600 IN SRV 100 1 443 sipdir.online.lync.com.
_sipfederationtls._tcp.sakoh.example. 3600 IN SRV 100 1 5061 sipfed.online.lync.com.
-
CNAME
-
SRV
-
MX
-
結果
Step3 ARMTemplateをエクスポートしてみる
エクスポートしてわかること
- DNSレコード単位でリソースが分かれている
- DNSレコード種類ごとにリソースタイプが分かれている
エクスポートしたTemplateの不満
-
DNSレコードの増減をパラメタだけで制御できない(resourcesセクションの編集が必要)
-
NS/SOAレコード等、作成時に指定すべきでない項目が含まれている
-
リソース名をパラメタ化するのは良いが、リソース名と(偶然)一致するCNAMEの中身を中途半端にパラメタ参照にする点↓
template{ "comments": "リソース '/subscriptions/xxxxxxxx-xxxx-xxxx-xxxx-xxxxxxxxxxxx/resourceGroups/dns/providers/Microsoft.Network/dnszones/sakoh.example/CNAME/sip' から一般化されました。", "type": "Microsoft.Network/dnszones/CNAME", "name": "[concat(parameters('dnszones_sakoh.example_name'), '/', parameters('CNAME_sip_name'))]", "apiVersion": "2017-10-01", "scale": null, "properties": { "TTL": 3600, "CNAMERecord": { "cname": "[concat(parameters('CNAME_sip_name'),'dir.online.lync.com')]" } }, "dependsOn": [ "[resourceId('Microsoft.Network/dnszones', parameters('dnszones_sakoh.example_name'))]" ] }[concat(parameters('CNAME_sip_name'),'dir.online.lync.com')]って
Step4 ARMTemplateをカスタマイズする
テンプレートに求める要件の整理
- Azure DNS(ゾーン)リソースの作成
- DNSレコードリソースの作成
- 各種DNSレコードをパラメタファイルのみで設定できること(テンプレート側編集なし)
必要となる技術要素
- レコード用のリソース数が可変となる
- →パラメタの配列化が必要
- Azure Resource Manager テンプレートの parameters セクション
- 今回はArray[Object]を使用します。
- →反復処理が必要
- →パラメタの配列化が必要
カスタマイズ
-
Template側 parametersセクションをゾーン名、DNSレコード種類毎のArrayにします。
template.json(/parameters)(抜粋)"parameters": { "DnsZoneName": { "type": "string" }, "CNAME": { "type": "array" }, "SRV": { "type": "array" }, "TXT": { "type": "array" }, "MX": { "type": "array" } } -
Parameter側、parametersセクションにDNSレコードを書きます。(オブジェクトの配列)
parameters.json(/parameters)(抜粋)"parameters": { "CNAME": { "value": [ { "name": "autodiscover", "record": "autodiscover.outlook.com", "ttl": 3600 }, { "name": "lyncdiscover", "record": "webdir.online.lync.com", "ttl": 3600 }, { "name": "sip", "record": "sipdir.online.lync.com", "ttl": 3600 } ] }, } -
Template側 resoucesをリソース種類毎に1つに削り、反復処理を組み込みます。
template.json(/resources)(抜粋){ "type": "Microsoft.Network/dnszones/CNAME", "name": "[concat(parameters('DnsZoneName'), '/', parameters('CNAME')[copyIndex()].name)]", "apiVersion": "2017-10-01", "properties": { "TTL": "[parameters('CNAME')[copyIndex()].ttl]", "CNAMERecord": { "cname": "[parameters('CNAME')[copyIndex()].record]" } }, "copy": { "count": "[length(parameters('CNAME'))]", "name": "cname-loop" }, "dependsOn": [ "[resourceId('Microsoft.Network/dnszones', parameters('DnsZoneName'))]" ] }1."copy"プロパティを追加し、回数にパラメタの配列の長さ
length(parameters('CNAME'))を指定しています
2.各リソース設定値はparameter('CNAME')[copyIndex()].ttl等で取り出します
作成したARMTemplateは以下
template
parameter
Step5 デプロイ
今回はポータルから行います。
-
ポータルのリソースの作成から、
Template deploymentを検索します
-
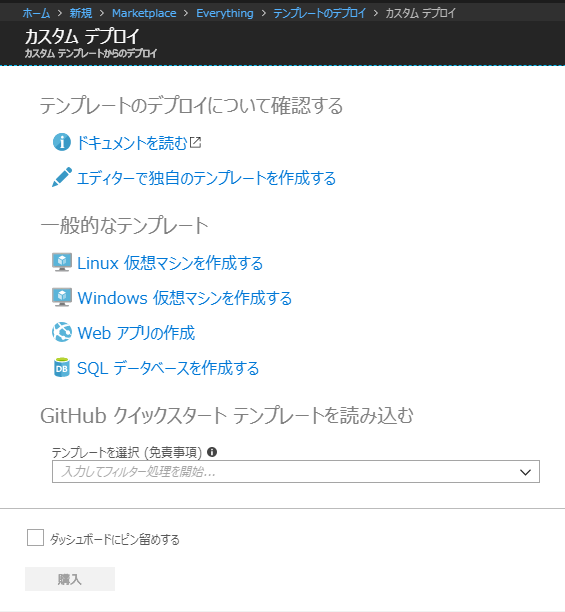
カスタムデプロイ画面の
エディターで独自のテンプレートを作成するを選択します
-
テンプレートの編集画面の
ファイルの読み込みボタンを押下します
読み込まれたら、保存ボタンを押下します。 -
カスタムデプロイ画面が表示されます
作ったテンプレートのパラメタの入力欄が表示されていることを確認して下さい。
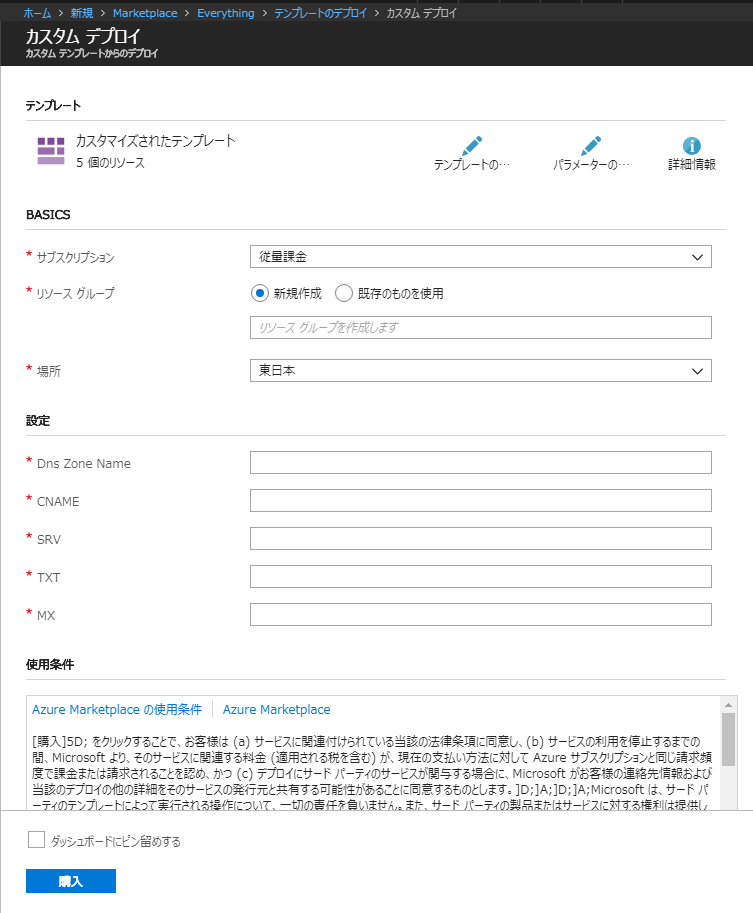
-
パラメータの編集画面でパラメタを入力/ファイルから読み込み します。

-
カスタムデプロイ画面に戻り、入力したパラメタが入っていることを確認します。
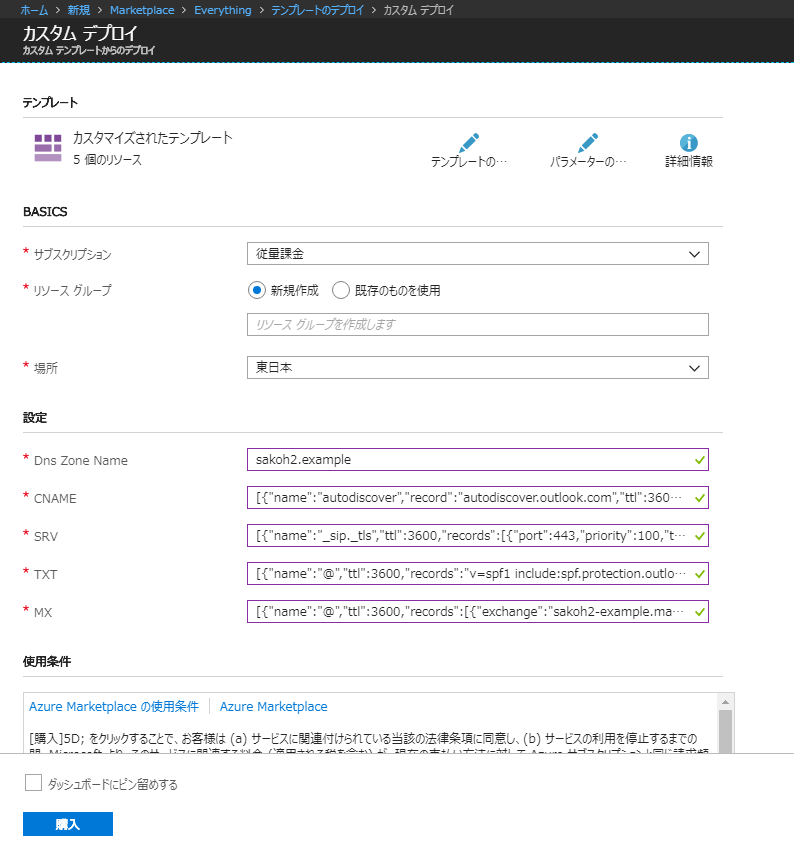
あとは、リソースグループ選んで、でぷろーいです!!
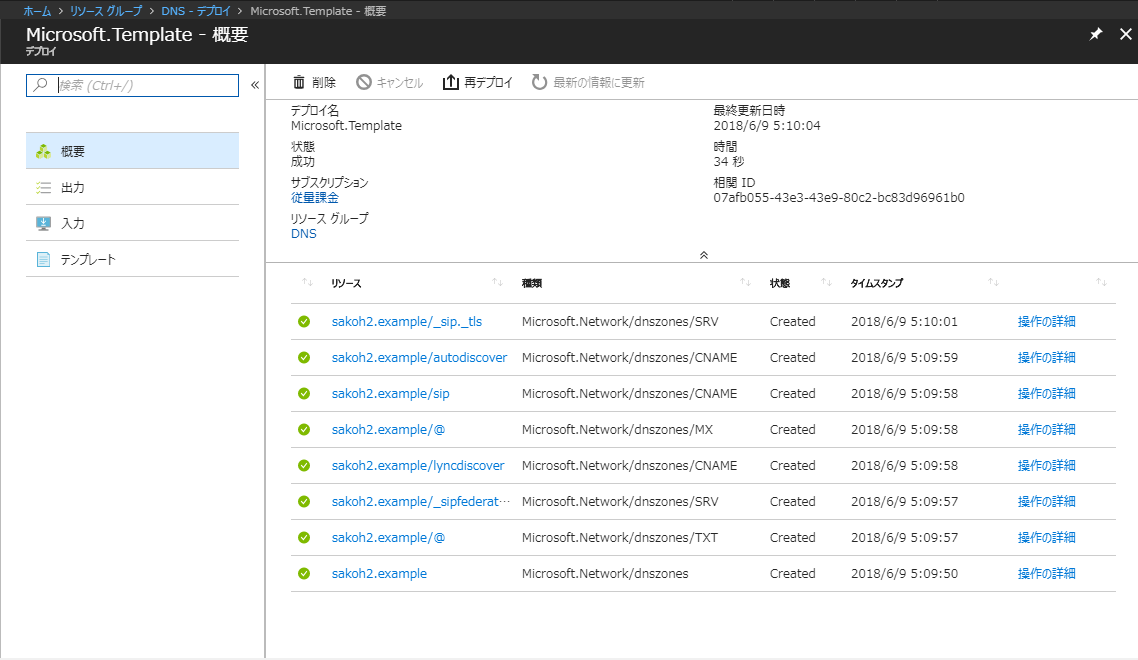
リソースグループのデプロイ履歴から、個別のリソースがそれぞれデプロイできたことがわかります
追記:ネームサーバーの変更はレジストラ側でちゃんとやるように!
ここまでやって&Qiita書いてて、今更 気付いた!!
ゾーンファイルを一括で指定できるべき。
なんでできないんだろとおもってググってみたら、、
Azure CLI 2.0 を使用した DNS ゾーン ファイルのインポートとエクスポート
Azure DNS では、Azure コマンドライン インターフェイス (CLI) を使用したゾーン ファイルのインポートおよびエクスポートをサポートしています。
Azure PowerShell または Azure Portal を使用したゾーン ファイルのインポートは、現時点ではサポートされていません。
CLIのみ!!
ARMTemplateの勉強になったし、良いけど…すべての操作はポータルでできるようにすべき
手を動かす前に、ちゃんと疑問点がないか落ち着いて考えて、ぐぐって、ドキュメントは読もうと思った次第。
一応CLI&ゾーンファイルでやってみます。
Azure CLIでインポートまでやってみる
-
リソースを全消しします。
-
作って
az network dns zone create -g DNS -n sakoh.exampleoutput{ "etag": "xxxxxxxx-xxxx-xxxx-xxxx-xxxxxxxxxxxxx", "id": "/subscriptions/xxxxxxxx-xxxx-xxxx-xxxx-xxxxxxxxxxxxx/resourceGroups/dns/providers/Microsoft.Network/dnszones/sakoh.example", "location": "global", "maxNumberOfRecordSets": 5000, "name": "sakoh.example", "nameServers": [ "ns1-09.azure-dns.com.", "ns2-09.azure-dns.net.", "ns3-09.azure-dns.org.", "ns4-09.azure-dns.info." ], "numberOfRecordSets": 2, "registrationVirtualNetworks": null, "resolutionVirtualNetworks": null, "resourceGroup": "dns", "tags": {}, "type": "Microsoft.Network/dnszones", "zoneType": "Public" } -
エクスポート
commandcd clouddrive az network dns zone export -g DNS -n sakoh.example -f sakoh.example.zoneoutput; Exported zone file from Azure DNS ; Zone name: sakoh.example ; Resource Group Name: DNS ; Date and time (UTC): Fri, 08 Jun 2018 18:30:04 +0000 $TTL 300 $ORIGIN sakoh.example. @ 3600 IN SOA ns1-09.azure-dns.com. azuredns-hostmaster.microsoft.com. ( 1 ; serial 3600 ; refresh 300 ; retry 2419200 ; expire 300 ; minimum ) 172800 IN NS ns1-09.azure-dns.com. 172800 IN NS ns2-09.azure-dns.net. 172800 IN NS ns3-09.azure-dns.org. 172800 IN NS ns4-09.azure-dns.info. -
追記
File共有から、更新sakoh.example.zone(追記部分のみ)autodiscover.sakoh.example. 3600 IN CNAME autodiscover.outlook.com. lyncdiscover.sakoh.example. 3600 IN CNAME webdir.online.lync.com. sip.sakoh.example. 3600 IN CNAME sipdir.online.lync.com. sakoh.example. 3600 IN MX 0 sakoh-example.mail.protection.outlook.com. sakoh.example. 3600 IN TXT "v=spf1 include:spf.protection.outlook.com -all" _sip._tls.sakoh.example. 3600 IN SRV 100 1 443 sipdir.online.lync.com. _sipfederationtls._tcp.sakoh.example. 3600 IN SRV 100 1 5061 sipfed.online.lync.com. -
インポート
commandaz network dns zone import -g DNS -n sakoh.example -f sakoh.example.zoneoutput== BEGINNING ZONE IMPORT: sakoh.example == (1/12) Imported 1 records of type 'soa' and name '@' (5/12) Imported 4 records of type 'NS' and name '@' (6/12) Imported 1 records of type 'mx' and name '@' (7/12) Imported 1 records of type 'txt' and name '@' (8/12) Imported 1 records of type 'cname' and name 'autodiscover' (9/12) Imported 1 records of type 'cname' and name 'lyncdiscover' (10/12) Imported 1 records of type 'cname' and name 'sip' (11/12) Imported 1 records of type 'srv' and name '_sip._tls' (12/12) Imported 1 records of type 'srv' and name '_sipfederationtls._tcp' == 12/12 RECORDS IMPORTED SUCCESSFULLY: 'sakoh.example' == -
完了
おわりに
AzureDNSはCLIで良い。ARMTemplate要らない子。
反復処理は初めて使ったので、当初よくわからず入れ子のテンプレートにして入れ子をループしてました。後になって気づいてフラットにしたけど。(入れ子も勉強できたヨ)
参考→Azure リソース デプロイ時のリンクされたテンプレートおよび入れ子になったテンプレートの使用
よくわかってないこと(末尾ドット)
ゾーンファイルのインポートで、末尾ドットつけるように書いてあったからそうしたけど、リソース上もドットがついた。
ポータルから作るとき、末尾ドット指定せずに作った場合でも、リソース上もドットなしになるけど、うまく動く(メールとか届く)ので、いるのか、いらないのか、動作に違いはあるのか、ないのか…教えてほしい
nslookup -type=CNAME autodiscover.sakoh.example ns1-09.azure-dns.com //ドットあり(cli)
nslookup -type=CNAME autodiscover.sakoh2.example ns1-03.azure-dns.com //ドットなし(arm)
autodiscover.sakoh.example      canonical name = autodiscover.outlook.com.
autodiscover.sakoh2.example     canonical name = autodiscover.outlook.com.