はじめに
最近わたしが所属するWeb制作チームでスタイルガイドが導入されました。
デザイナーとエンジニアが一緒にWebサイトを制作するにあたって、よく使うコンポーネントがスタイルガイドにまとめてあると、共通の作業が効率化できて非常に便利です。
 私のチームでは、スタイルガイドを[Fractal](https://fractal.build/)というフレームワークで構築しました。
この記事では、その構築時に培った知見を少しだけ紹介します。
私のチームでは、スタイルガイドを[Fractal](https://fractal.build/)というフレームワークで構築しました。
この記事では、その構築時に培った知見を少しだけ紹介します。
この記事では
FractalのCLIで引数として入力したcomponentのhbsファイルを、一つのHTMLファイルにレンダリングするスクリプトを紹介します。
前提
- すでにFractalを用いたスタイルガイドの枠組みを作っている or 理解している
(まだの方はこちらへGO 👉 Fractal - Getting Started)
ソースコード
fractal.js
const fs = require('fs');
const path = require('path');

// To create new dir func if there is nothing on the dirPath
let makeDir = (dirPath) => { if (!fs.existsSync(dirPath)) { fs.mkdirSync(dirPath); } };
makeDir('./exports');

// Custom command func for export
function exportComponents(args, done) {
  const app = this.fractal;
  const target = args.component;

  let targetItem;
  const componentList = [];
  for (let item of app.components.flatten()) {
    componentList.push(item.handle);
    if (item.handle === target) targetItem = item;
  }

  if (targetItem) {
    targetItem.render(null, null, {
      preview: true
    }).then(function (html) {
      const filePath = path.join('./exports/', args.options.output || '', `${targetItem.handle}.html`);
      fs.writeFile(filePath, html, function (err) {
        if (err) app.cli.console.error(`Error exporting ${args.component} - ${err.message}`);
        else app.cli.console.success(`Component ${args.component} exported to ${filePath}`);
        done();
      });
    });
  } else {
    app.cli.console.error(`Component ${args.component} not found`);
  }
}

// Set custom export command func to Fractal CLI
fractal.cli.command('export <component>', exportComponents, {
  description: 'export a component',
  options: [
    ['-l, --layout', 'export the component within it\'s preview layout.'],
    ['-o, --output <output-dir>', 'The directory to export the component into, relative to the CWD.'],
  ]
});
package.json
{
  "name": "fractal-demo",
  "version": "1.0.0",
  "scripts": {
    "export": "fractal export"
  }
...
}
実行例
console
$ npm run export button
> fractal-demo@1.0.0 export /Users/username/GitHub/fractal-demo
> fractal export "button"
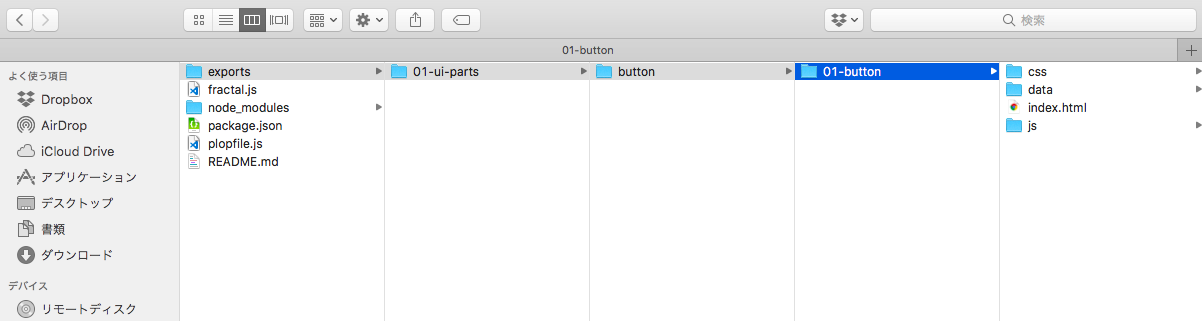
✔ Component button exported to export/01-ui-parts/button/01-button/index.html
実行結果
HTMLファイルが書き出されました。

参考サイト
- Github issue - Possibility to export components only as rendered HTML files
- Github issue - Specify target components to Builder
なぜやったか
ひとえに、必要なコンポーネントのHTMLファイルを一つ一つ切り出して使いたかったからです。
公式で用意されたレンダリング機能は、テンプレートエンジンHandlebarsを基にした独自のテンプレートの構造で書き出されてしまうため、コンポーネント単位で一つのHTMLを取得するには、上記スクリプトのようにCustom commandsで機能を自作する必要がありました。
ちなみに現在は未実装ですが、今後公式で同様のレンダリング機能(buildメソッド等)が追加されるかもしれません。
おまけ: スクリプトの応用
CLIツール開発ができるPLOPやoclifなどと組み合わせると、例えば以下の機能が拡張できて便利です。
- レンダリングしたいコンポーネントを対話的に選択できるようになる
- HTMLの関連ファイルも同時に取得できるようになる
実行例
console
$ npm run export

> fractal-demo@1.0.0 export /Users/username/GitHub/fractal-demo
> plop export

? Which component?: 01-ui-parts
❯ 01-ui-parts
  02-header-parts
  03-footer-parts
  04-praph-parts
? What new component category?: button
❯ button
  title
  sub-title
  navbar
  register
[SUCCESS] function Exported: 01-ui-parts < button
実行結果
この例では、選択したコンポーネントのHTMLファイルとその関連ファイルを、コンポーネントごとのフォルダに出力するようにしました。
Node.jsのCLIツール開発は他にもVorpalやCommander、Ginitなど色々ありますので、好みのものを選ぶといいと思いますよ。