はじめに
「なんかWebスクレイピングでPuppeteerばかり注目されてる気がするけどcheerioも使えるんだからな」
ということを伝えたくて今回は動的サイトをあえてPuppeteerやSeleniumを使わずにWebスクレイピングしてみた。
ただ結論から言えば今回のサイトのような場合はpuppeteerを使った方が圧倒的に簡単で確実である。
また、本投稿で登場するサイトはあくまで例として実際にスクレイピングを行なったサイトの構成を元に作成しております。
本プログラムをコピペしても動作しませんのでご注意ください。
今回のチャレンジ
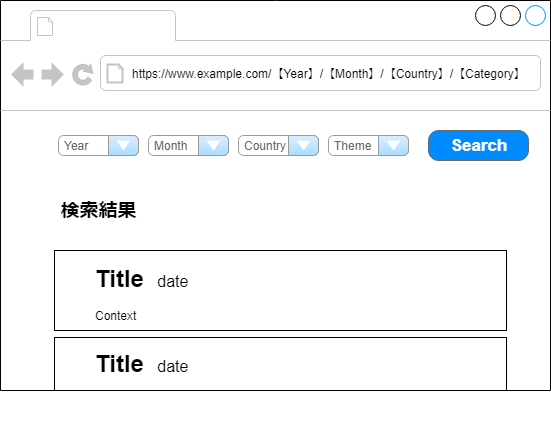
今回は以下のようなニュースサイトでWebスクレイピングを挑戦してみた。
ゴール
ゴールは本記事の趣旨を簡単に理解できるようにするため「2019年に出稿された記事全てを取得する」とする
事前調査
分析したところ、サイトの仕様は以下のようになっていることがわかった。
- トップページ
https://www.newsexample.comより検索を行うことができる - 各セレクタがURLのパラメータとなり、Searchボタンを押すと
https://www.newsexample.com/【Year】/【Month】/【Country】/【Category】といった感じでリクエストが送信される - 条件に合致するニュースが検索結果に表示される。検索結果が0件の場合は「検索結果が見つかりませんでした」と表示される。今回は
タイトル,日付,本文をここで取得する - 各セレクタ内のデータはajax通信により選択肢が動的に変化する。また、ニュースが存在しない条件は選択肢に表示されない。例えば
Yearを2019に指定した際、12月のニュースが存在していなければMonthを12に指定することはできない。
ポイント:検索条件をどのように取得するか
検索結果を表示するページ自体は簡単にスクレイピングできそうだが、問題はその前のプロセスである。
どのようにして動的に変化する検索条件を取得するかである。
というのもcheerioはHTML形式でページを取得してjQueryのように要素を指定することができるライブラリであって、ページ上のDOM操作をすることはできない。
もしセレクタ内のアイテムが静的であればDOM要素を分析するだけで検索条件を取得することができたが、今回のサイトは左のセレクタから選択していくことでajax通信が発生し、次のセレクタ内のアイテムが決定される。
また、国やテーマにおいては実際に通信しないとどのような選択肢があるのか検討つかないので検索条件を推測することもできない。
つまり何らかの方法で選択肢のデータを取得しなければならない。
アプローチ
ざっくりまとめるとこんな感じ
const year = 2019

// Monthの選択肢を取得
const months = getMonths(year);
for(let month of months) {

    // Countryの選択肢を取得
    const countries = getCountries(year, month);
    for(let country of countries) {

        // Categoryの選択肢を取得
        const categories = getCategories(year, month, country);
        for(let category of categories) {

            // 検索結果(タイトル, 日付, 本文)を取得
            const result = getResults(year, month, country, category)
            console.log(result.title, result.date, result.body)
        }
    }
}
多重ループを繰り返して選択肢を取得し、実行結果をひとつずつ出力してやるといった感じ。
あとはそれぞれの関数を実装してやればいけるだろう。
そのためにまずは実際に行われているAjax通信を解析してやらねばならない。
手順1 : Ajax通信を解析する
まずは実際に行われる通信を解析して必要な情報を割り出す必要がある。
私は実際に以下の手順で行った。
Google Developer Toolsを使ってajax通信のリクエストを解析
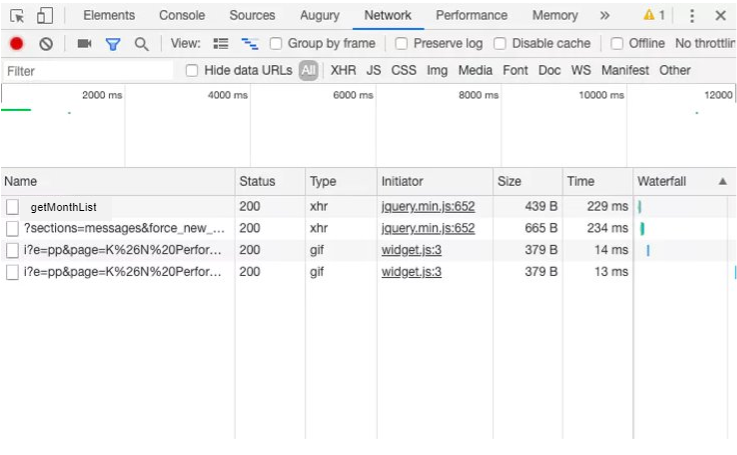
まずはGoogle Developer ToolsのNetworkを開く。すると、通信履歴が表示される。
履歴をクリアしておき、ajax通信を発生させると、図のようにNetwork内にあらたに履歴が表示され、通信が行われたことがわかる。
今回はセレクタを開いて選択肢を選択することで発生する。
はじめはYearセレクタを選択してMonthが取得されるまでの通信を確認する。
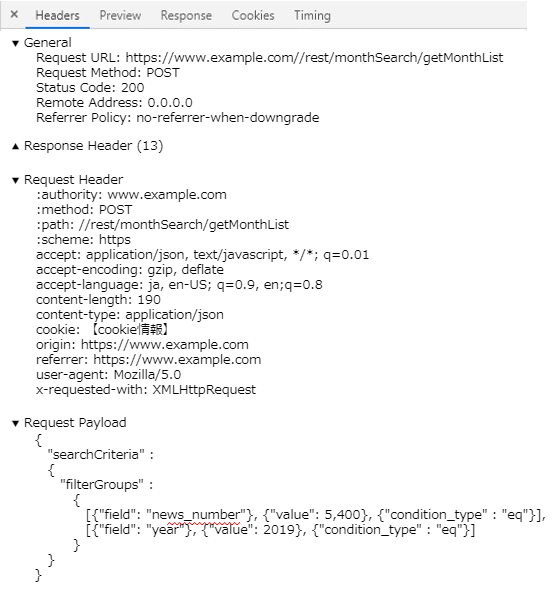
getMonthListをクリックしてHeader情報を開くと図のような情報が表示される。
…なるほど、POSTで通信しているのか。
他にもRequest URLやcookie情報、Request Payloadより送信したパラメータなどがわかる。
Postmanを使ってリクエスト送信に必要な情報を確認
手順1で得られた情報をもとにPostmanを使って通信に必要なパラメータを確認していく。
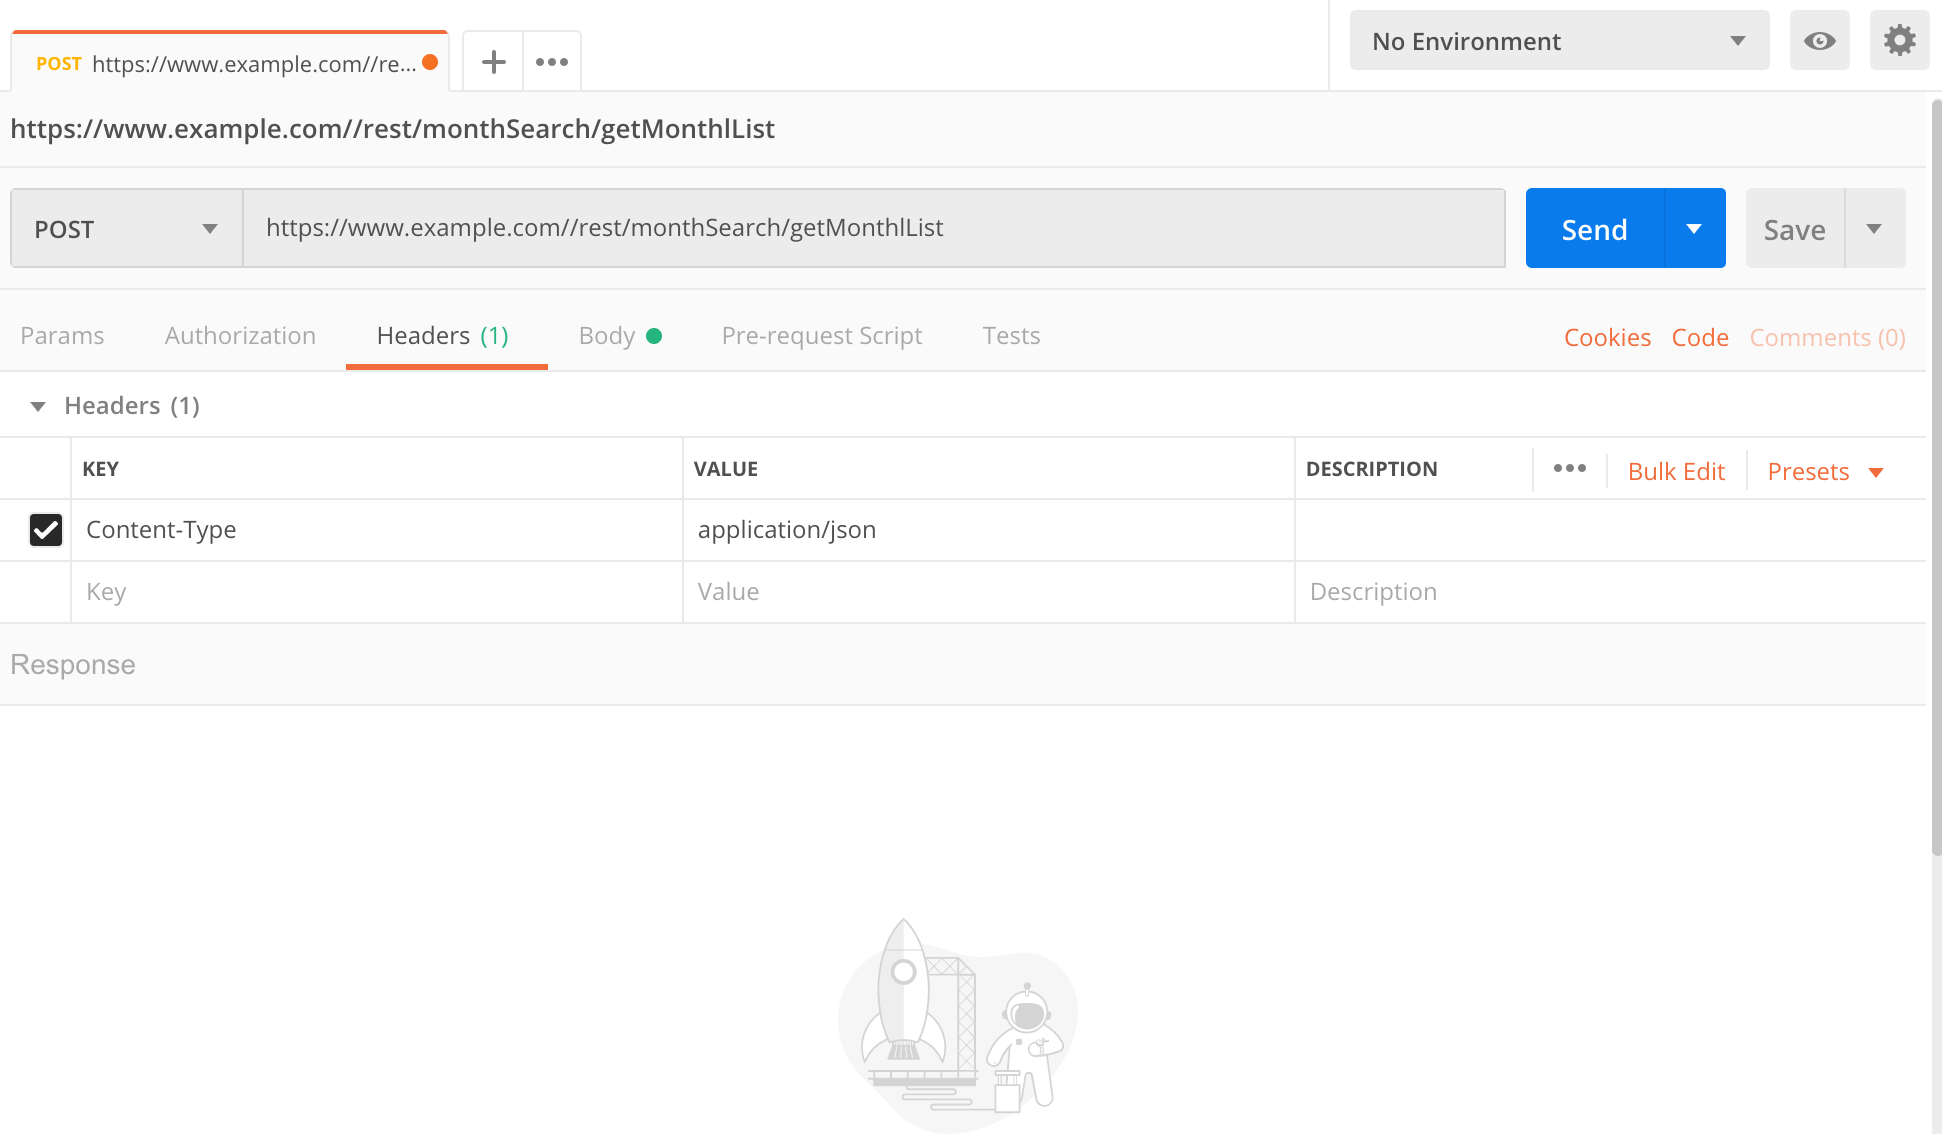
公式サイト https://www.getpostman.com/ よりダウンロードしたらpostmanを起動。
今回はPOSTで通信しているのでPOSTにする。
HeadersをクリックしてそこにContent-Type : application/jsonを追加。
BodyにはRequest Payloadの内容をそのままペーストすればいいのかな?
とりあえずこれでSendをクリックしてみる。
すると以下の実行結果が出力された。
[
    "January",
    "February",
    "March",
    "April",
    "May",
    "June",
    "July",
]
ひとまずこれでデータは取得できることが分かった。
パラメーター"field": "news_number"の意味がよくわかっていないが、固有パラメーターなのだろうと推測。
さすがにAPI側で定められている条件などはわからないので、具体的に何を意味しているのかまで把握することは難しい...
"field": "year"はセレクタより選択した年が代入されているので、このパラメータを変更すれば任意の年の情報が取得できる。
手順2: 同様に国、カテゴリーに対しても解析する
Monthを解析したときと同様の手順でCountry、Categoryの取得に必要なパラメータを確認していく。
手順3: request-promiseを用いて実装
解析した情報をもとにそれぞれgetMonths(year), getCountries(year, month), getCategories(year, month, country)を実装する。
実装は以下のようになる。
const rp = require('request-promise');


const filterByNewsNumber = {
    filters: [{
       field: "news_number",
       value: 5,400,
       condition_type: "eq"
    }]
};

let filterByYear = [];
let filterByMonth = [];
let filterByCountry = [];

// Monthセレクタの選択肢を取得する
async function getMonths(year) {
   fileterByYear = {
        filters: [{
            field: "year",
            value: year,
            condition_type: "eq"
        }]
    };
    const filterGroups = [].concat(filterByNewsNumber, fileterByYear);
    // Request Payloadと同じパラメータになるようにする
    let newRequest = {
        "searchCriteria": {
            "filterGroups": filterGroups
        }
    };

    let option = {
        uri: baseUrl + "/rest/monthSearch/getMonthList",
        method : "post",
        body : newRequest,
        json : true
    }

    // Monthリストを返す
    return rp(option).catch( () => console.log("取得できませんでした"))
}

// Countryセレクタの選択肢を取得
async function getCountries(year, month) {
   fileterByMonth = {
        filters: [{
            field: "month",
            value: month,
            condition_type: "eq"
        }]
    };
    const filterGroups = [].concat(filterByNewsNumber, fileterByYear, fileterByMonth);
    // Request Payloadと同じパラメータになるようにする
    let newRequest = {
        "searchCriteria": {
            "filterGroups": filterGroups
        }
    };

    let option = {
        uri: baseUrl + "/rest/countrySearch/getCountryList",
        method : "post",
        body : newRequest,
        json : true
    }
    // Countryリストを返す
    return rp(option).catch( () => console.log("取得できませんでした"))
}

// Categoryセレクタの選択肢を取得
async function getCategories(year, month, country) {
   fileterByCountry = {
        filters: [{
            field: "country",
            value: country,
            condition_type: "eq"
        }]
    };
    const filterGroups = [].concat(filterByNewsNumber, fileterByYear, fileterByMonth, filterByCountry);
    // Request Payloadと同じパラメータになるようにする
    let newRequest = {
        "searchCriteria": {
            "filterGroups": filterGroups
        }
    };

    let option = {
        uri: baseUrl + "/rest/countrySearch/getCountryList",
        method : "post",
        body : newRequest,
        json : true
    }

    // Categoryリストを返す
    return rp(option).catch( () => console.log("取得できませんでした"))
}
手順4 : URLを生成してcheerioでスクレイピング
これであとはURLを生成してcheerioを使って検索結果の画面を取得しに行けばいいだけ。
そのためにgetResultsを実装する。
const cheerio = require('cheerio');

async function getResult(year, month, country, category) {
    const url = `https://www.newsexample.com/$(year)/$(Month)/$(Country)/$(Category)`;
    // 記事一覧画面のHTMLを取得する
    html = await rp(url);
    $ = cheerio.load(html);

    // 情報を取得するためにそれぞれのhtml要素を指定する
    const title = $('#title');
    const date = $('#date');
    const context = $('#context');

    const data = {
       "title" : title,
       "date" : date,
       "body" : context,
    }
    return data;

}
手順5 : 逐次的に実行されるように修正する
ここまでスクレイピングに必要な処理を記載してきたが、このまま実行しようとするとそれぞれの処理が非同期で行われてしまうため、エラーが発生する。
全ての処理が逐次的に行われるように以下のように修正してまとめる。
const cheerio = require('cheerio');
const rp = require('request-promise');

const filterByNewsNumber = {
    filters: [{
       field: "news_number",
       value: 5,400,
       condition_type: "eq"
    }]
};
let filterByYear = [];
let filterByMonth = [];
let filterByCountry = [];

const year = 2019;

async function main(){
   // Monthの選択肢を取得
   const months = getMonths(year);
   for(let month of months) {

        // Countryの選択肢を取得
        const countries = await getCountries(year, month);
        for(let country of countries) {

            // Categoryの選択肢を取得
            const categories = await getCategories(year, month, country);
            for(let category of categories) {

                // 検索結果(タイトル, 日付, 本文)を取得
                const result = await getResults(year, month, country, category)
                console.log(result.title, result.date, result.body)
            }
        }
    }
}

// Monthセレクタの選択肢を取得する
async function getMonths(year) {
   fileterByYear = {
        filters: [{
            field: "year",
            value: year,
            condition_type: "eq"
        }]
    };
    const filterGroups = [].concat(filterByNewsNumber, fileterByYear);
    // Request Payloadと同じパラメータになるようにする
    let newRequest = {
        "searchCriteria": {
            "filterGroups": filterGroups
        }
    };

    let option = {
        uri: baseUrl + "/rest/monthSearch/getMonthList",
        method : "post",
        body : newRequest,
        json : true
    }

    // Monthリストを返す
    return rp(option).catch( () => console.log("取得できませんでした"))
}

// Countryセレクタの選択肢を取得
async function getCountries(year, month) {
   fileterByMonth = {
        filters: [{
            field: "month",
            value: month,
            condition_type: "eq"
        }]
    };
    const filterGroups = [].concat(filterByNewsNumber, fileterByYear, fileterByMonth);
    // Request Payloadと同じパラメータになるようにする
    let newRequest = {
        "searchCriteria": {
            "filterGroups": filterGroups
        }
    };

    let option = {
        uri: baseUrl + "/rest/countrySearch/getCountryList",
        method : "post",
        body : newRequest,
        json : true
    }
    // Countryリストを返す
    return rp(option).catch( () => console.log("取得できませんでした"))
}

// Categoryセレクタの選択肢を取得
async function getCategories(year, month, country) {
   fileterByCountry = {
        filters: [{
            field: "country",
            value: country,
            condition_type: "eq"
        }]
    };
    const filterGroups = [].concat(filterByNewsNumber, fileterByYear, fileterByMonth, filterByCountry);
    // Request Payloadと同じパラメータになるようにする
    let newRequest = {
        "searchCriteria": {
            "filterGroups": filterGroups
        }
    };

    let option = {
        uri: baseUrl + "/rest/countrySearch/getCountryList",
        method : "post",
        body : newRequest,
        json : true
    }

    // Categoryリストを返す
    return rp(option).catch( () => console.log("取得できませんでした"))
}
async function getResult(year, month, country, category) {
    const url = `https://www.newsexample.com/$(year)/$(Month)/$(Country)/$(Category)`;
    // 記事一覧画面のHTMLを取得する
    html = await rp(url);
    $ = cheerio.load(html);

    // 情報を取得するためにそれぞれのhtml要素を指定する
    const title = $('#title');
    const date = $('#date');
    const context = $('#context');

    const data = {
       "title" : title,
       "date" : date,
       "body" : context,
    }
    return data;

}
Asyncでmain関数を作成し、AwaitでgetMonths, getCountries, getCategories, getResultを順番に処理させることで正しく動作する。
まとめ
かなり荒技ではあったが動的サイトでもpuppeteerを使わずに、Networkからajaxを解析してWebスクレイピングすることができた。
また、HTTP通信を解析することにもなり非常に面白かった。
とはいえ非常に手間がかかるし、何より今回のようにPostリクエスト内に含まれているパラメータの意味がわからないということもあるので特に理由がなければ今後動的サイトをスクレイピングする際はpupeteerを採用しようと思う。


