はじめに
GKEでPodから外部にアクセスする場合、ノードのIPになる。そして、IPはエフェメラルでオートスケーリングしたときに動的に増減する。
要件によっては、GKEからのアクセスを固定IPにしなければならないことがある。(例えば、外部の連携サーバがIPアドレスによりフィルタリングをしている場合など。)
そういった場合にどのようにすればいいかについて考えてみた。
概要
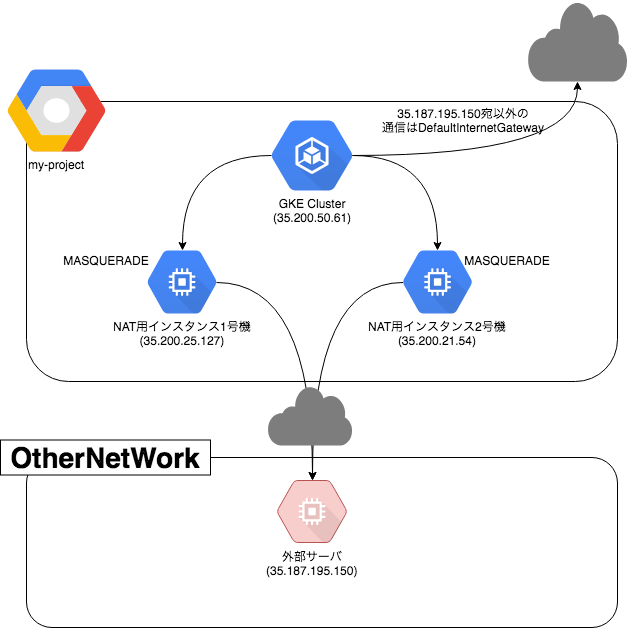
結論から言うと、NATGateWayとなるGCEインスタンスを作成して、特定の通信のルートのみNAT用インスタンスを通るようにする。
注意点としては、NatGatewayのGCEの帯域について考慮する必要がある。
GCEは2Gbps/coreのCapが存在するからだ。
帯域が必要となる場合は、NatGatewayのCore数を上げておかなければならない。
以下構成イメージ。
環境構築
VPC作成
NATGWと送信元となるGKEクラスタを動かすVPCを作成する。
gcloud compute --project=my-project networks create sakon-vpc --mode=custom

gcloud compute --project=my-project networks subnets create sakon-subnet-1 --network=sakon-vpc --region=asia-northeast1 --range=10.0.0.0/16
FWルール作成
GCPのコンソールからsshでポチポチしたかったから、source-rangeがガバガバな設定にしておく
gcloud compute --project=my-project firewall-rules create sakon-allow-ssh --direction=INGRESS --priority=1000 --network=sakon-vpc --action=ALLOW --rules=tcp:22 --source-ranges=0.0.0.0/0


GKEクラスタとNATGatewayが通信するためのFWルールを作成
gcloud compute --project=my-project firewall-rules create allow-gke-cluster --direction=INGRESS --priority=1000 --network=sakon-vpc --action=ALLOW --rules=tcp --source-tags=nat-test --target-tags=sakon-gw
Route確認
$ gcloud compute routes list | head -1 && gcloud compute routes list | grep sakon-vpc
NAME                                                            NETWORK                     DEST_RANGE     NEXT_HOP                                                                PRIORITY
default-route-96d12fd4308f701a                                  sakon-vpc                   10.0.0.0/16    sakon-vpc                                                               1000
default-route-e28dc9fb60f719d7                                  sakon-vpc                   0.0.0.0/0      default-internet-gateway                                                1000
GKE Cluster作成
※Nodeには--tags "nat-test"をつけている
gcloud beta container --project "my-project" clusters create "sakon-source-cluster" --zone "asia-northeast1-a" --username "admin" \
--cluster-version "1.10.5-gke.0" --machine-type "n1-standard-1" --image-type "COS" --disk-type "pd-standard" --disk-size "100" \
--scopes "https://www.googleapis.com/auth/devstorage.read_only","https://www.googleapis.com/auth/logging.write","https://www.googleapis.com/auth/monitoring","https://www.googleapis.com/auth/servicecontrol","https://www.googleapis.com/auth/service.management.readonly","https://www.googleapis.com/auth/trace.append" \
--num-nodes "1" --enable-cloud-logging --enable-cloud-monitoring --network "sakon-vpc" --tags "nat-test" \
--subnetwork "sakon-subnet-1" --addons HorizontalPodAutoscaling,HttpLoadBalancing --no-enable-autoupgrade --enable-autorepair
連携用サーバ作成
連携用サーバの例として、適当にNginxが可動するGCEを別のVPCに作成する。
(defaultのVPCに作成する)
gcloud beta compute --project=my-project instances create sakon-dest-nginx \
--zone=asia-northeast1-a --machine-type=n1-standard-1 --network=default \
--network-tier=PREMIUM --maintenance-policy=MIGRATE \
--service-account=XXXXXXXXXXXX-compute@developer.gserviceaccount.com \
--scopes=https://www.googleapis.com/auth/devstorage.read_only,https://www.googleapis.com/auth/logging.write,https://www.googleapis.com/auth/monitoring.write,https://www.googleapis.com/auth/servicecontrol,https://www.googleapis.com/auth/service.management.readonly,https://www.googleapis.com/auth/trace.append \
--tags=http-server,https-server --image=centos-7-v20180611 \
--image-project=centos-cloud --boot-disk-size=10GB --boot-disk-type=pd-standard --boot-disk-device-name=sakon-dest-nginx
Nginxを起動しておく
$ sudo yum -y install nginx
$ sudo systemctl start nginx
NATGateWay用インスタンスを作成
注目すべきは--can-ip-forwardを有効にしていることと、--tags=sakon-gwというタグをつけていること
gcloud beta compute --project=my-project instances create sakon-gw-1 --zone=asia-northeast1-a --machine-type=n1-standard-1 --subnet=sakon-subnet-1 --network-tier=PREMIUM --can-ip-forward --maintenance-policy=MIGRATE --service-account=XXXXXXXXXXXX-compute@developer.gserviceaccount.com --scopes=https://www.googleapis.com/auth/devstorage.read_only,https://www.googleapis.com/auth/logging.write,https://www.googleapis.com/auth/monitoring.write,https://www.googleapis.com/auth/servicecontrol,https://www.googleapis.com/auth/service.management.readonly,https://www.googleapis.com/auth/trace.append --image=centos-7-v20180611 --image-project=centos-cloud --boot-disk-size=10GB --boot-disk-type=pd-standard --boot-disk-device-name=sakon-gw-1 --tags="sakon-gw"

可用性を考慮して2号機も作成
gcloud beta compute --project=my-project instances create sakon-gw-2 --zone=asia-northeast1-b --machine-type=n1-standard-1 --subnet=sakon-subnet-1 --network-tier=PREMIUM --can-ip-forward --maintenance-policy=MIGRATE --service-account=XXXXXXXXXXXX-compute@developer.gserviceaccount.com --scopes=https://www.googleapis.com/auth/devstorage.read_only,https://www.googleapis.com/auth/logging.write,https://www.googleapis.com/auth/monitoring.write,https://www.googleapis.com/auth/servicecontrol,https://www.googleapis.com/auth/service.management.readonly,https://www.googleapis.com/auth/trace.append --tags=sakon-gw --image=centos-7-v20180611 --image-project=centos-cloud --boot-disk-size=10GB --boot-disk-type=pd-standard --boot-disk-device-name=sakon-gw-2
GW用インスタンスに IPマスカレード設定
※StartupScriptに入れてたほうが良さそう。
$ sudo cp -piv /etc/selinux/config /etc/selinux/config.`date "+%Y%m%d"`
$ sudo vi /etc/selinux/config
以下を変更
 SELINUX=disabled
$ sudo iptables -t nat -A POSTROUTING -o eth0 -j MASQUERADE
$ sudo sh -c "echo "net.ipv4.ip_forward = 1" | sudo tee /etc/sysctl.conf"
ルートを作成
GKEのノードからの通信(nat-testタグがあるもの)はhop-instanceがNatGateway(sakon-gw-1 or sakon-gw-2)となるようにしておく。
gcloud compute --project=my-project routes create sakon-route-1 --network=sakon-vpc --priority=900 --tags=nat-test --destination-range=35.187.195.150/32 --next-hop-instance=sakon-gw-1 --next-hop-instance-zone=asia-northeast1-a

gcloud compute --project=my-project routes create sakon-route-2 --network=sakon-vpc --priority=900 --tags=nat-test --destination-range=35.187.195.150/32 --next-hop-instance=sakon-gw-2 --next-hop-instance-zone=asia-northeast1-b
ルート再確認
$ gcloud compute routes list | head -1 && gcloud compute routes list | grep sakon-vpc
NAME                                                             NETWORK                     DEST_RANGE         NEXT_HOP                                                                         PRIORITY
default-route-96d12fd4308f701a                                   sakon-vpc                   10.0.0.0/16        sakon-vpc                                                                        1000
default-route-e28dc9fb60f719d7                                   sakon-vpc                   0.0.0.0/0          default-internet-gateway                                                         1000
gke-sakon-source-cluster-8-ab3dd62b-7d0f-11e8-a83e-42010a9200e8  sakon-vpc                   10.52.0.0/24       asia-northeast1-a/instances/gke-sakon-source-cluster-default-pool-4804ae70-h3wt  1000
sakon-route-1                                                    sakon-vpc                   35.187.195.150/32  asia-northeast1-a/instances/sakon-gw-1                                           900
sakon-route-2                                                    sakon-vpc                   35.187.195.150/32  asia-northeast1-b/instances/sakon-gw-2                                           900
検証
GKEのアクセス元用のPod立ち上げ
(今回はテスト用なので、--rm --restart=Neverとして終了(exit)後に消えるようにする)
$ kubectl run -it --rm --restart=Never access-source --image alpine /bin/sh
$ apk add --update curl
$ curl http://35.187.195.150/ > /dev/null
適当に何回か叩く
連携用サーバ側でアクセス確認
GKEノードのIP(35.200.56.61)ではなく、NAT Gateway用のIP(35.200.25.127 or 35.200.21.54)であることが分かる。
$ sudo tail -f /var/log/nginx/access.log
35.200.25.127 - - [01/Jul/2018:14:17:48 +0000] "GET / HTTP/1.1" 200 3700 "-" "curl/7.60.0" "-"
35.200.25.127 - - [01/Jul/2018:14:17:50 +0000] "GET / HTTP/1.1" 200 3700 "-" "curl/7.60.0" "-"
35.200.25.127 - - [01/Jul/2018:14:17:56 +0000] "GET / HTTP/1.1" 200 3700 "-" "curl/7.60.0" "-"
35.200.21.54 - - [01/Jul/2018:14:17:57 +0000] "GET / HTTP/1.1" 200 3700 "-" "curl/7.60.0" "-"
35.200.21.54 - - [01/Jul/2018:14:17:58 +0000] "GET / HTTP/1.1" 200 3700 "-" "curl/7.60.0" "-"
35.200.21.54 - - [01/Jul/2018:14:17:59 +0000] "GET / HTTP/1.1" 200 3700 "-" "curl/7.60.0" "-"
35.200.25.127 - - [01/Jul/2018:14:18:00 +0000] "GET / HTTP/1.1" 200 3700 "-" "curl/7.60.0" "-"
35.200.21.54 - - [01/Jul/2018:14:18:01 +0000] "GET / HTTP/1.1" 200 3700 "-" "curl/7.60.0" "-"
35.200.25.127 - - [01/Jul/2018:14:18:01 +0000] "GET / HTTP/1.1" 200 3700 "-" "curl/7.60.0" "-"
35.200.21.54 - - [01/Jul/2018:14:18:02 +0000] "GET / HTTP/1.1" 200 3700 "-" "curl/7.60.0" "-"
35.200.21.54 - - [01/Jul/2018:14:18:03 +0000] "GET / HTTP/1.1" 200 3700 "-" "curl/7.60.0" "-"