経緯
yolov4の推論を高速化させた推論ライブラリを使う機会があったのですが、自分で学習させたモデルを動かす際に少し詰まったので、手順を共有します。今回はdarknetの学習済みモデル(自前モデル)をtkDNNで使う方法を紹介します。
tkDNNとは
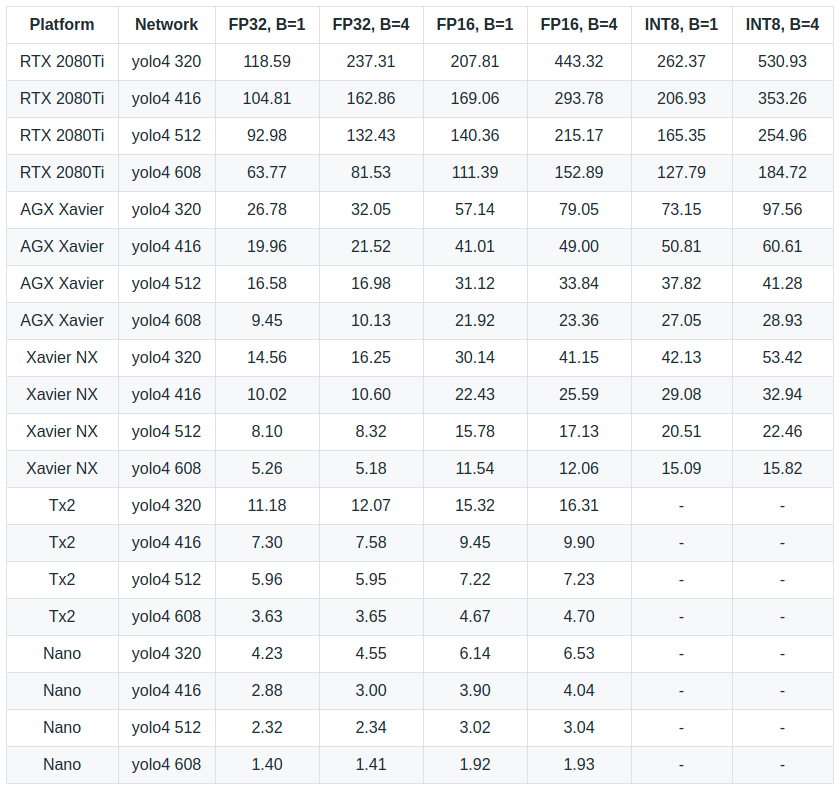
tkDNNとは、yolo darknetを高速化できる推論ライブラリです。学習済みのv3またはv4のweightsファイルとconfigファイル、クラス名のファイルを用意するだけで使うことができます。jetsonだと大体2倍~3倍高速化でき、量子化すると4倍以上速くなります。ちなみにdarknet以外にもResNetやCenterNet、MobileNetなども高速化できます。

手順
1. tkDNNのビルド
下の手順でtkDNNをビルドします。環境作成などはこちらを参考にしてください。
git clone https://github.com/ceccocats/tkDNN
cd tkDNN
mkdir build
cd build
cmake ..
make
rm yolo4_fp32.rt
./test_yolo4
2. weightsのexport
こちらのリポジトリを使って、weightsファイルをexportします。
git clone https://git.hipert.unimore.it/fgatti/darknet.git
cd darknet
make
mkdir layers debug
./darknet export <path-to-cfg-file> <path-to-weights> layers
path-to-cfg-fileにdarknet学習時のconfigファイルのパス、path-to-weithsに学習済みモデルのパスを入れてください。これが無事に終わると、debugとlayersにbinファイルが作成されているはずです。debugとlayersフォルダをtkDNN/build/yolo4の中に入れてください。すでにdebugとlayersフォルダがある場合は入れ替えてください。
3. tkDNNのソースコードの変更
デフォルトのコードままでは、自前のモデルのクラスや設定を反映できないので、tkDNNのソースコードを編集します。下はデフォルトのままですが、cfg_pathとname_pathを自分のものに設定してください。namesファイルは学習したクラスを記入したものを自分で作成してください。
int main() {
    std::string bin_path  = "yolo4";
    std::vector<std::string> input_bins = {
        bin_path + "/layers/input.bin"
    };
    std::vector<std::string> output_bins = {
        bin_path + "/debug/layer139_out.bin",
        bin_path + "/debug/layer150_out.bin",
        bin_path + "/debug/layer161_out.bin"
    };
    std::string wgs_path  = bin_path + "/layers";
    std::string cfg_path  = std::string(TKDNN_PATH) + "/tests/darknet/cfg/yolo4.cfg";
    std::string name_path = std::string(TKDNN_PATH) + "/tests/darknet/names/coco.names";
    downloadWeightsifDoNotExist(input_bins[0], bin_path, "https://cloud.hipert.unimore.it/s/d97CFzYqCPCp5Hg/download");

    ~~~~~~~~~~~~~~~~~~~~~~~~~~~~~~~~~~~~~~~~~~~~~~~~~~~~~~~~~~~~~~~~~~
}
4. tkdnnのビルド&weighsファイルをコンバート
下のコマンドを実行してください。fp16に量子化したい場合は、export TKDNN_MODE=FP16を実行すれば大丈夫です。
cd build
cmake ..
make
rm yolo4_fp32.rt
## (量子化)export TKDNN_MODE=FP16
./test_yolo4
完了すると、yolo4_fp32.rt(量子化した場合はyolo4_fp16.rt)というファイルが作成されていると思います。これで完了です。最後に、下のコマンドを実行すればデモ動画で試すことができます。
./demo yolo4_fp32.rt
まとめ
tkDNNを作った人はすごい!リポジトリでのissueも結構答えてくれます。
間違いや質問、ご意見等ありましたらお気軽にコメントください。頑張って答えますので(笑)。