本日の議題
- 前半
- 統合テストとはなんぞや
- 後半
- Vue.js・Nuxt.js での統合テストプレ構築
想定読者
・統合テストよくわからん!って人
・Vue.js で統合テストをこれから書こうとしている人
統合テストとはなんぞや
Microsoft にいいページがあるので、それを参考にしていきましょう!
https://microsoft.github.io/code-with-engineering-playbook/automated-testing/e2e-testing/
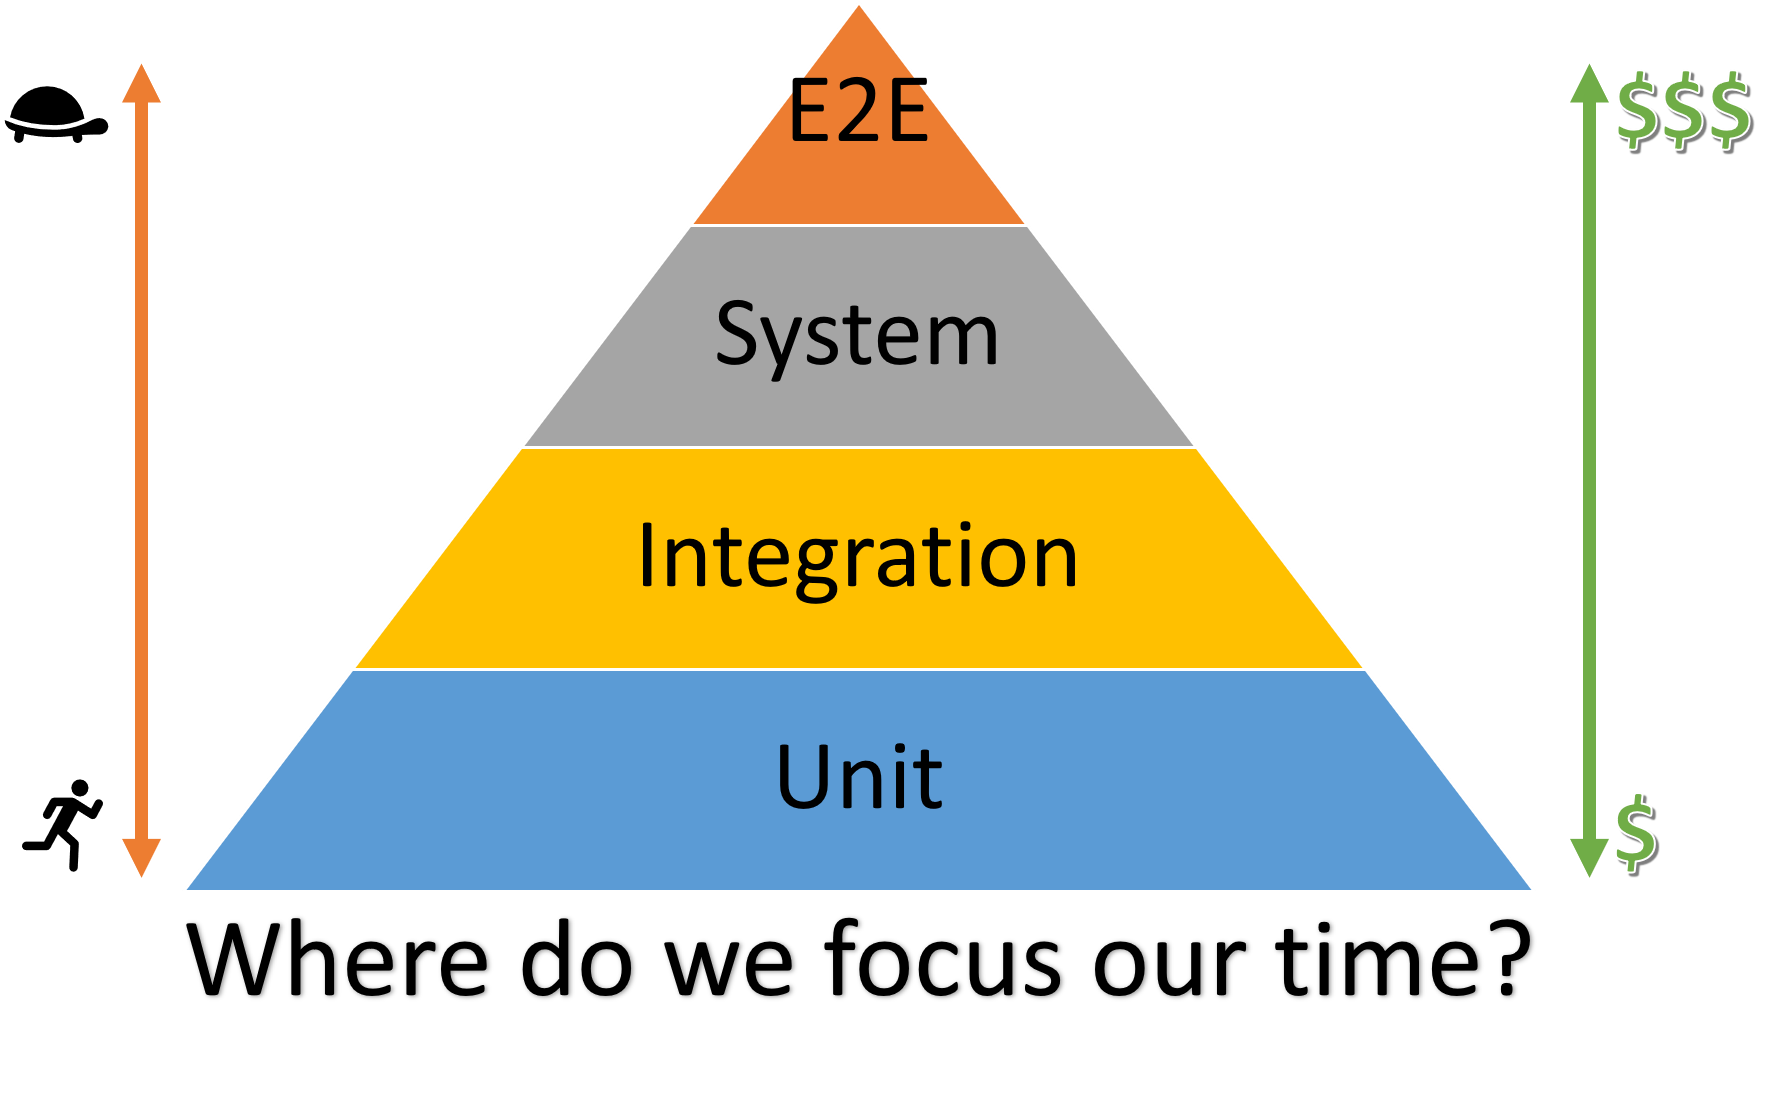
こんな感じでテスト構築には四つのピラミッドがあります。(システムテストが消えて 3 つになったりもします)
下に行くほど 実装速度高 テスト数大 実装コスト低になります。
1. 単体テスト(Unit Test)
最小単位のテスト。関数やコンポーネント単体の動作を確認
例:
- ボタンをクリックしたら数字が増加する
- 入力した文字列が正しくバリデーションされる
- 計算ロジックが正しい結果を返す
2. 統合テスト(Integration Test)
複数の部品を組み合わせたときの動作を確認
例:
- フォームに入力してAPIを呼び出す
- 親コンポーネントから子コンポーネントにデータを渡す
- Vuexストアとコンポーネントの連携
3. システムテスト(System Test)
システム全体の機能要件を確認
例:
- ユーザー登録からログインまでの一連の流れ
- 商品の検索から購入までの流れ
- 管理者による商品登録から一般ユーザーによる購入まで
4. E2Eテスト(End-to-End Test)
実際のブラウザで、ユーザーの操作を最初から最後まで確認
例:
- 実際のブラウザでログインから購入までを自動操作
- 複数のデバイスでの表示確認
- 実際のAPIサーバーとの通信
テストの特徴まとめ
まとめると
単体テスト → e2eテストの順で
- テストの実行速度:速い → 遅い
- 実装コスト:安い → 高い
- テストの範囲:狭い → 広い
- バグの特定:容易 → 困難
となるわけですね!
統合テストでなにを確認するの?
コンポーネント間の呼び出しを確認するってのが正直一番大きいかな。
感覚的には確認したい規模によってテストを使い分けるイメージ。
Vue.js・Nuxt.jsでの統合テストプレ実装
では、実際の統合テストの例を見ていきましょう。
今回使用する言語はVue.jsとNuxt.js。
ここでは、ユーザー登録フォームを例に、親子コンポーネントの連携と、それぞれのコンポーネントをマウントするテストを示します。
テスト対象のコンポーネント
まずはテスト対象となるコンポーネントを紹介します。
親コンポーネント (pages/UserRegistrationForm.vue)
FormInput 子コンポーネントを複数使用して、ユーザー登録フォームを構成。登録ボタンがクリックされたら、入力されたデータをまとめて submit イベントを発行する。
メインのコンポーネントです。
<script setup lang="ts">
import { ref, reactive } from 'vue'
import FormInput from '../components/FormInput.vue'

const formData = reactive({
  email: '',
  password: '',
  passwordConfirm: '',
})
const errorMessage = ref('')

const emit = defineEmits<{
  (e: 'submit', payload: { email: string; password: string }): void
}>()

const handleSubmit = () => {
  errorMessage.value = '' // エラーメッセージをリセット
  if (formData.password !== formData.passwordConfirm) {
    errorMessage.value = 'パスワードが一致しません。'
    return
  }
  // パスワード確認を除いたデータを送信
  const { passwordConfirm, ...submitData } = formData
  emit('submit', submitData)
}
</script>

<template>
  <form @submit.prevent="handleSubmit">
    <h2>ユーザー登録</h2>
    <FormInput label="メールアドレス" type="email" v-model="formData.email" />
    <FormInput label="パスワード" type="password" v-model="formData.password" />
    <FormInput label="パスワード確認" type="password" v-model="formData.passwordConfirm" />
    <button type="submit">登録する</button>
    <p v-if="errorMessage" style="color: red">{{ errorMessage }}</p>
  </form>
</template>
子コンポーネント (components/FormInput.vue)
単純なラベル付き入力フィールド。v-model を使って親コンポーネントとデータを双方向バインディングする仕様となっています。
<script setup lang="ts">
import type { PropType } from 'vue'

const props = defineProps({
  modelValue: {
    type: String as PropType<string>,
    default: ''
  },
  label: {
    type: String as PropType<string>,
    required: true
  },
  type: {
    type: String as PropType<string>,
    default: 'text'
  }
})
defineEmits<{
  (e: 'update:modelValue', value: string): void
}>()

const inputId = `input-${props.label.toLowerCase().replace(/\s+/g, '-')}`
</script>

<template>
  <div>
    <label :for="inputId">{{ label }}</label>
    <input
      :id="inputId"
      :type="type"
      :value="modelValue"
      @input="$emit('update:modelValue', ($event.target as HTMLInputElement).value)"
      :placeholder="label"
    />
  </div>
</template>
解説
テスト対象コンポーネント:
-
FormInput.vue: 入力フィールドとラベルを持つ再利用可能な子コンポーネント。v-modelを使って親とデータ連携 -
UserRegistrationForm.vue:FormInputを複数配置し、フォーム全体のロジック(パスワード一致確認、submitイベント発行)を管理する親コンポーネント
統合テストのコード
次に、これらのコンポーネントをテストコード。
@vue/test-utils の mount を使用して、子コンポーネントをマウントして、統合テストを行います。
// tests/integration/UserRegistration.integration.test.ts
import { describe, it, expect, vi } from 'vitest'
import { mount } from '@vue/test-utils'

// テスト対象のコンポーネントをインポート
import UserRegistrationForm from '~/components/UserRegistrationForm.vue'
import FormInput from '~/components/FormInput.vue' // 子コンポーネントもテストで利用(統合テストの特徴)

describe('ユーザー登録フォーム 統合テスト', () => {

  // --- 親コンポーネント (UserRegistrationForm) のテスト ---
  it('フォーム入力からsubmitイベント発行までの連携を確認する', async () => {
    // 親コンポーネントをマウント
    const wrapper = mount(UserRegistrationForm)

    // 子コンポーネント (FormInput) を見つけて値入力
    const emailInput = wrapper.findComponent({ // labelを元に見つける例
      element: 'input[type="email"]'
    }).find('input')
    const passwordInput = wrapper.findComponent({
       element: 'input[type="password"]' // 複数ある場合は注意が必要
    }).findAll('input')[0] // 1番目のパスワード入力
     const passwordConfirmInput = wrapper.findComponent({
       element: 'input[type="password"]'
    }).findAll('input')[1] // 2番目のパスワード入力


    await emailInput.setValue('test@example.com')
    await passwordInput.setValue('password123')
    await passwordConfirmInput.setValue('password123') // 確認用も入力

    // フォーム送信
    await wrapper.find('form').trigger('submit.prevent')

    // submitイベントが正しいデータで発行されたか確認
    expect(wrapper.emitted('submit')).toBeTruthy() // イベントが存在するか
    expect(wrapper.emitted<[SubmitData]>('submit')![0][0]).toEqual({ // 型を指定してペイロードを確認
      email: 'test@example.com',
      password: 'password123',
    })
    // エラーメッセージが表示されていないことを確認
     expect(wrapper.find('p[style="color: red"]').exists()).toBe(false)
  })

  it('パスワード不一致の場合にエラーメッセージを表示する', async () => {
    const wrapper = mount(UserRegistrationForm)

    const passwordInput = wrapper.findAllComponents(FormInput)[1] // パスワード入力
    const passwordConfirmInput = wrapper.findAllComponents(FormInput)[2] // パスワード確認入力

    await passwordInput.find('input').setValue('password123')
    await passwordConfirmInput.find('input').setValue('differentpassword') // 違うパスワード

    // フォーム送信
    await wrapper.find('form').trigger('submit.prevent')

    // submitイベントが発行されていないことを確認
    expect(wrapper.emitted('submit')).toBeFalsy()
    // エラーメッセージが表示されていることを確認
    const errorMessage = wrapper.find('p[style="color: red"]')
    expect(errorMessage.exists()).toBe(true)
    expect(errorMessage.text()).toContain('パスワードが一致しません')
  })
})
解説:
-
統合テストコード (
UserRegistration.integration.test.ts):-
親コンポーネントのテスト:
-
mount(UserRegistrationForm)で親コンポーネント全体をマウントします -
wrapper.findComponent()やwrapper.findAllComponents()を使って子コンポーネント (FormInput) のインスタンスを見つけ、その中のinput要素に値を設定します (.setValue()) - フォーム (
wrapper.find('form')) のsubmitイベントを発火させます (.trigger('submit.prevent')) - 親コンポーネントから
submitイベントが期待通りに発行されたか (wrapper.emitted('submit'))、正しいデータと共に発行されたかを確認します - パスワード不一致時のエラー表示ロジックもテスト
-
-
親コンポーネントのテスト:
まとめ
統合テストを書くことで、以下のようなメリットがあります:
- コンポーネント間の連携の問題を早期に発見できる
- リファクタリング時の安全性が向上する
- 実際のユーザーの使用シナリオに近いテストができる
ただし、単体テストに比べて:
- テストコードの実装に時間がかかる
- テストの実行時間が長い
個人的には今回のプレテストのようにコンポーネント間の呼び出しを確認するという認識。
親子間できちんと呼び出しと連携・描画ができているかどうか、
その担保をしてくれるテストというイメージですね。
参考文献