LVMを利用したディスク領域(ext4)の拡大と縮小について記録します。
下図の⑦~⑧を行います。
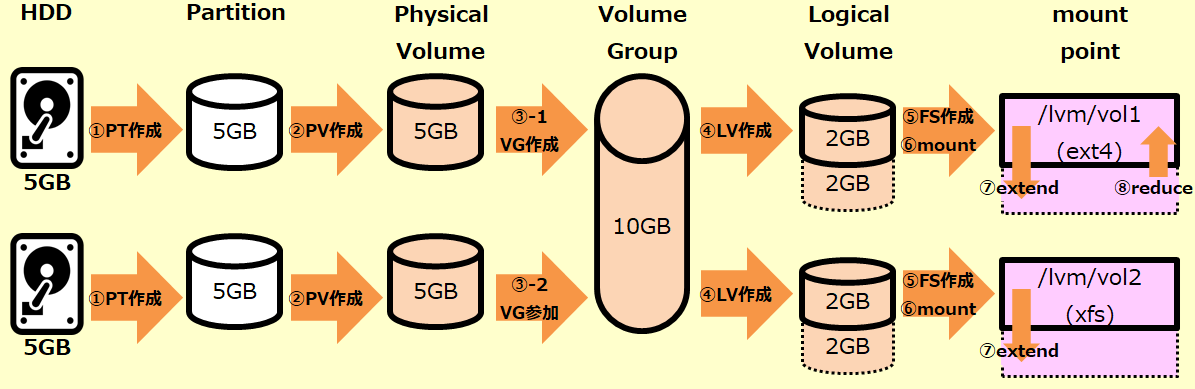
#以下の記事の続きとなります。①~⑥まではこちら。
| 環境 | 詳細 |
|---|---|
| OS | CentOS Linux release 8.3.2011 |
| Kernel | 4.18.0-240.el8.x86_64 |
| Machine | VM(vmware ESXi 6.7 update3) |
| LVM | lvm2-2.03.09-5.el8.x86_64 |
7.ディスク領域のextend
ディスク領域拡張(追加容量の割り当て)を行います。
流れとしては以下となります。
・ディスク領域のアンマウント
・LV容量の拡張
・ファイルシステムの拡張
・再マウント
なお、各設定は以下の通りです。
| 設定 | 詳細 |
|---|---|
| VG | test_vg01 |
| LV | /dev/test_vg01/test_lv01 |
| ファイルシステム | ext4 |
| マウントポイント | /lvm/vol1 |
| 拡大前の容量 | 2GB |
| 拡大後の容量 | 4GB |
7-1.ディスク領域のアンマウント
umount [LV]にてアンマウントします。
[root@centt83-02 ~]# umount /dev/test_vg01/test_lv01
[root@centt83-02 ~]#
7-2.LV容量の拡張
lvextend -n [LV] -L [Size]にてLVを作成します。
また、-l [number]%[suffix]オプションを利用して相対容量を入力可能です。
lvextend -l 30%VG -n [LV]:VGの30%を利用してLVを作成
lvextend -l 100%FREE -n [LV]:VGの残り100%(=残り全て)を利用してLVを作成
作成後、vgdisplay,lvdisplayで確認をします。
[root@centt83-02 ~]# lvextend -L +2g /dev/test_vg01/test_lv01
  Size of logical volume test_vg01/test_lv01 changed from 2.00 GiB (512 extents) to 4.00 GiB (1024 extents).
  Logical volume test_vg01/test_lv01 successfully resized.
[root@centt83-02 ~]#
[root@centt83-02 ~]# vgdisplay
  --- Volume group ---
  VG Name               test_vg01
  System ID
  Format                lvm2
  Metadata Areas        2
  Metadata Sequence No  5
  VG Access             read/write
  VG Status             resizable
  MAX LV                0
  Cur LV                2
  Open LV               1
  Max PV                0
  Cur PV                2
  Act PV                2
  VG Size               9.99 GiB
  PE Size               4.00 MiB
  Total PE              2558
  Alloc PE / Size       1536 / 6.00 GiB            ### 拡張前は 1024 / 4.00 GiB ###
  Free  PE / Size       1022 / 3.99 GiB            ### 拡張前は 1534 / 5.99 GiB ###
  VG UUID               zmBgH0-NSFy-QNFm-H5iq-xY7L-bBPN-SWlavx

[root@centt83-02 ~]# lvdisplay
  --- Logical volume ---
  LV Path                /dev/test_vg01/test_lv01
  LV Name                test_lv01
  VG Name                test_vg01
  LV UUID                DtXMWK-Z22z-OCS2-EfnX-YWPJ-4Wrc-tLHkvR
  LV Write Access        read/write
  LV Creation host, time centt83-02, 2022-01-30 19:04:46 +0900
  LV Status              available
  # open                 0
  LV Size                4.00 GiB           ### 拡張前は 2.00 GiB ###
  Current LE             1024               ### 拡張前は 512 ###
  Segments               3
  Allocation             inherit
  Read ahead sectors     auto
  - currently set to     8192
  Block device           253:2
7-3.ファイルシステムの拡張
e2fsck -k [PV]にてファイルシステムチェックを行った後、
resize2fs [PV]でファイルシステム拡張を行います。
[root@centt83-02 ~]# e2fsck -f /dev/test_vg01/test_lv01
e2fsck 1.45.6 (20-Mar-2020)
Pass 1: Checking inodes, blocks, and sizes
Pass 2: Checking directory structure
Pass 3: Checking directory connectivity
Pass 4: Checking reference counts
Pass 5: Checking group summary information
/dev/test_vg01/test_lv01: 12/131072 files (0.0% non-contiguous), 26156/524288 blocks
[root@centt83-02 ~]#

[root@centt83-02 ~]# resize2fs /dev/test_vg01/test_lv01
resize2fs 1.45.6 (20-Mar-2020)
Resizing the filesystem on /dev/test_vg01/test_lv01 to 1048576 (4k) blocks.
The filesystem on /dev/test_vg01/test_lv01 is now 1048576 (4k) blocks long.

[root@centt83-02 ~]#
7-4.再マウント
/etc/fstabには当該[PV]を記載済みなので、mount -aでマウントをします。
[root@centt83-02 ~]# mount -a
[root@centt83-02 ~]#
[root@centt83-02 ~]# mount
/dev/mapper/test_vg01-test_lv01 on /lvm/vol1 type ext4 (rw,relatime,seclabel)
[root@centt83-02 ~]#

[root@centt83-02 ~]# df -h
ファイルシス                    サイズ  使用  残り 使用% マウント位置
/dev/mapper/test_vg01-test_lv01   3.9G  8.0M  3.7G    1% /lvm/vol1
[root@centt83-02 ~]#
8.ディスク領域のreduce
ディスク領域縮小を行います。流れとしては以下となります。
・ディスク領域のアンマウント
・ファイルシステムの縮小
・LV容量の縮小
・再マウント
なお、各設定は以下の通りです。
| 設定 | 詳細 |
|---|---|
| VG | test_vg01 |
| LV | /dev/test_vg01/test_lv01 |
| ファイルシステム | ext4 |
| マウントポイント | /lvm/vol1 |
| 縮小前の容量 | 4GB |
| 縮小後の容量 | 2GB |
データ損失の可能性があるため、以下の作業前にディスク領域内のデータはバックアップをしてください。
8.1 ディスク領域のアンマウント
umount [LV]にてアンマウントします。
[root@centt83-02 ~]# umount /dev/test_vg01/test_lv01
[root@centt83-02 ~]#
8.2 ファイルシステムの縮小
e2fsck -k [PV]にてファイルシステムチェックを行った後、
resize2fs [PV] [Size]でファイルシステム縮小を行います。
[Size]は縮小後の容量を記入します。
[root@centt83-02 ~]# e2fsck -f /dev/test_vg01/test_lv01
e2fsck 1.45.6 (20-Mar-2020)
Pass 1: Checking inodes, blocks, and sizes
Pass 2: Checking directory structure
Pass 3: Checking directory connectivity
Pass 4: Checking reference counts
Pass 5: Checking group summary information
/dev/test_vg01/test_lv01: 12/262144 files (0.0% non-contiguous), 34894/1048576 blocks
[root@centt83-02 ~]#

[root@centt83-02 ~]# resize2fs /dev/test_vg01/test_lv01 2G
resize2fs 1.45.6 (20-Mar-2020)
Resizing the filesystem on /dev/test_vg01/test_lv01 to 524288 (4k) blocks.
The filesystem on /dev/test_vg01/test_lv01 is now 524288 (4k) blocks long.

[root@centt83-02 ~]#
8.3 LV容量の縮小
lvreduce -L [Size] [LV] にてLVを縮小します。
-L [Size]について、2GB縮小したい場合は-L -2gと入力します。
作成後、vgdisplay,lvdisplayで確認をします。
[root@centt83-02 ~]# lvreduce -L -2g /dev/test_vg01/test_lv01
  WARNING: Reducing active logical volume to 2.00 GiB.
  THIS MAY DESTROY YOUR DATA (filesystem etc.)
Do you really want to reduce test_vg01/test_lv01? [y/n]: y
  Size of logical volume test_vg01/test_lv01 changed from 4.00 GiB (1024 extents) to 2.00 GiB (512 extents).
  Logical volume test_vg01/test_lv01 successfully resized.
[root@centt83-02 ~]#
[root@centt83-02 ~]# vgdisplay
  --- Volume group ---
  VG Name               test_vg01
  System ID
  Format                lvm2
  Metadata Areas        2
  Metadata Sequence No  6
  VG Access             read/write
  VG Status             resizable
  MAX LV                0
  Cur LV                2
  Open LV               1
  Max PV                0
  Cur PV                2
  Act PV                2
  VG Size               9.99 GiB
  PE Size               4.00 MiB
  Total PE              2558
  Alloc PE / Size       1024 / 4.00 GiB            ### 縮小前は 1536 / 6.00 GiB ###
  Free  PE / Size       1534 / 5.99 GiB            ### 縮小前は 1022 / 3.99 GiB ###
  VG UUID               zmBgH0-NSFy-QNFm-H5iq-xY7L-bBPN-SWlavx

[root@centt83-02 ~]# lvdisplay
  --- Logical volume ---
  LV Path                /dev/test_vg01/test_lv01
  LV Name                test_lv01
  VG Name                test_vg01
  LV UUID                DtXMWK-Z22z-OCS2-EfnX-YWPJ-4Wrc-tLHkvR
  LV Write Access        read/write
  LV Creation host, time centt83-02, 2022-01-30 19:04:46 +0900
  LV Status              available
  # open                 0
  LV Size                2.00 GiB           ### 拡張前は 4.00 GiB ###
  Current LE             512                ### 拡張前は 1024 ###
  Segments               1
  Allocation             inherit
  Read ahead sectors     auto
  - currently set to     8192
  Block device           253:2
8.4 再マウント
/etc/fstabには当該[LV]を記載済みなので、mount -aでマウントをします。
[root@centt83-02 ~]# mount -a
[root@centt83-02 ~]#
[root@centt83-02 ~]# mount
/dev/mapper/test_vg01-test_lv01 on /lvm/vol1 type ext4 (rw,relatime,seclabel)
[root@centt83-02 ~]#

[root@centt83-02 ~]# df -h
ファイルシス                    サイズ  使用  残り 使用% マウント位置
/dev/mapper/test_vg01-test_lv01   2.0G  6.0M  1.8G    1% /lvm/vol1
[root@centt83-02 ~]#
9.まとめ
ext4とxfsの差分を記載します。
| 操作 | ext4 | xfs |
|---|---|---|
| LVの拡張 | lvextend | lvextend |
| ファイルシステムの拡張 | resize2fs,fsadm | xfs_growfs,fsadm |
| LVの縮小 | lvreduce | - |
| ファイルシステムの縮小 | resize2fs | - |
xfsファイルシステムの拡張/縮小はこちらから。
参考