■はじめに
本内容は、インストールしたてのCentOS 7.4 を、外部ssh出来るまでのNW設定を記載します。
■内容
手順1.host名設定
手順2.ipアドレス設定(デバイス設定)
手順3.ssh設定
■手順1.host名設定
・host名設定
hostnamectl set-hostname <ホスト名>
[root@localhost ~] # hostnamectl set-hostname test-01
・host名確認
hostnamectl
[root@localhost ~] # hostnamectl
   Static hostname: test-01
         Icon name: computer-vm
           Chassis: vm
        Machine ID: xxxxxxxxxxxxx mask xxxxxxxxxxxxx
           Boot ID: xxxxxxxxxxxxx mask xxxxxxxxxxxxx
    Virtualization: vmware
  Operating System: CentOS Linux 7 (Core)
       CPE OS Name: cpe:/o:centos:centos:7
            Kernel: Linux 3.10.0-693.el7.x86_64
      Architecture: x86-64
■手順2.ipアドレス設定(デバイス設定)
NW設定はnmcliより行います。
※NICについては、2portついている前提となります。
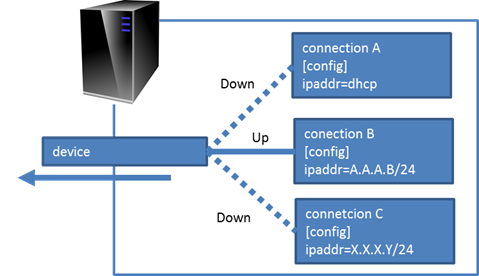
nmcliの概念は、1つのデバイス(NIC)に複数の接続設定(connection)がぶら下がっているイメージになります。利用中の接続設定はup、それ以外の接続設定はdownという構成になるため、最終的に使用したい接続設定は必ずupにする必要があります。

・デバイス認識状態の確認
nmcli device
[root@localhost ~] # nmcli device
デバイス  タイプ    状態      接続
ens160    ethernet  切断済み  --
ens192    ethernet  切断済み  --
lo        loopback  管理無し  --
・接続設定の新規作成
nmcli connection add type <デバイスタイプ> ifname <デバイス名> con-name <接続設定名>
[root@localhost ~] # nmcli connection add type ethernet ifname ens160 con-name eth0
接続 'eth0' (33d62189-7c9c-499a-9e30-aca4dd73c376) が正常に追加されました。
[root@localhost ~] # nmcli device
デバイス  タイプ    状態      接続
ens160    ethernet  接続済み  eth0
ens192    ethernet  切断済み  --
lo        loopback  管理無し  --
・接続設定にIPアドレス、サブネットマスク、デフォルトゲートウェイの設定
nmcli connection modify <接続設定名> ipv4.method manual ipv4.address <ipアドレス>/<サブネットマスク>
nmcli connection modify <接続設定名> ipv4.gateway <デフォルトゲートウェイ>
[root@localhost ~] # nmcli connection modify eth0 ipv4.method manual ipv4.address 12.34.56.78/24
[root@localhost ~] # nmcli connection modify eth0 ipv4.gateway 12.34.56.1
・接続設定の確認
cat /etc/sysconfig/network-scripts/ifcfg-<接続名>
[root@localhost ~] # cat /etc/sysconfig/network-scripts/ifcfg-eth0
TYPE=Ethernet
PROXY_METHOD=none
BROWSER_ONLY=no
BOOTPROTO=none
DEFROUTE=yes
IPV4_FAILURE_FATAL=no
IPV6INIT=yes
IPV6_AUTOCONF=yes
IPV6_DEFROUTE=yes
IPV6_FAILURE_FATAL=no
IPV6_ADDR_GEN_MODE=stable-privacy
NAME=eth0
UUID=1d0dc04b-2608-4b5c-acb5-fb73d97ff1d7
DEVICE=ens160
ONBOOT=yes
IPADDR=12.34.56.78
PREFIX=24
GATEWAY=12.34.56.1
静的IPにしたい場合、以下を確認。
4行目 BOOTPROTO=none ←noneまたはstaticとなっている(dhcpとなっていない)ことを確認
15行目 ONBOOT=yes ←yesとなっていることを確認(noだとOS起動時にNWがつながらない)
・接続接続の起動
nmcli connection up <接続名>
[root@cent74-gn01 ~]# nmcli connection up eth0
接続が正常にアクティベートされました (D-Bus アクティブパス: /org/freedesktop/NetworkManager/ActiveConnection/3)
・インターフェース状態確認
nmcli
[root@cent74-gn01 ~]# nmcli
ens160: 接続済み to eth0
        "VMware VMXNET3 Ethernet Controller"
        ethernet (vmxnet3), 00:0C:29:52:3B:4C, hw, mtu 1500
        ip4 デフォルト
        inet4 12.34.56.78/24
        inet6 AAAA::BBBB:CCCC:DDDD:EEEE/64

lo: 管理無し
        "lo"
        loopback (unknown), 00:00:00:00:00:00, sw, mtu 65536
・ネットワークの設定変更の反映
systemctl restart network.service
■手順3.ssh設定
こちらを参考
Linux(CentOS7)でSSHを利用する。
https://qiita.com/sango/items/816136188387221f05b3
※rootでsshは不可。sshログイン用ユーザを作成する。
■出典/参考
・IPアドレス系
https://go-journey.club/archives/4124