タイトルの通り、Nestedな環境からインターネットに通信を抜けるための設定になります。
vmware WorkstationではNATモードを利用します。

| layer | detail | ip address |
|---|---|---|
| VM(Linux) | CentOS 7.6 | 192.168.142.51/24 |
| Nested Hypervisor | vmware ESXi 6.7 | 192.168.142.10/24 |
| Hypervisor | vmware Workstation 15 player | - |
| (NAT) | (vmware Workstation vNIC) | 192.168.142.1 |
| host | windows 10 Home | DHCP |
1.vmware Workstation側の設定
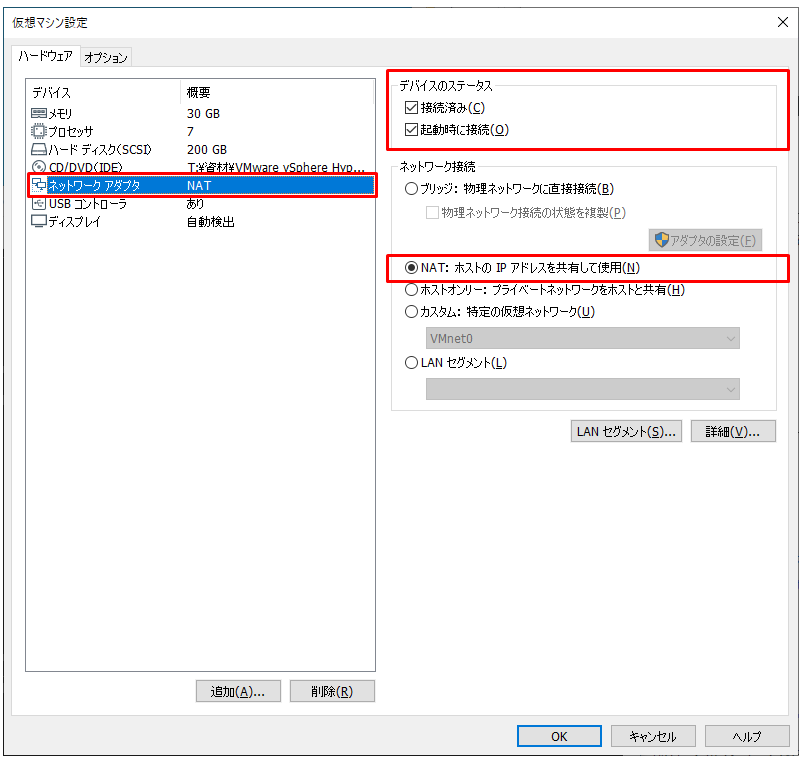
vmware Workstationの仮想マシン設定から、ネットワークアダプタを選択し、ネットワーク接続でNATを選択しておきます。

2.vmware ESXi側の設定
vmware Workstationで設定した仮想NICに対応するvSwitchを作成します。
このvSwitch上にVMのNWを接続します。

3.VM(Linux)側の設定
ESXiのvSwitch/ポートグループに所属するよう、VMのvmnicを設定しておきます。

4.Linux側の設定
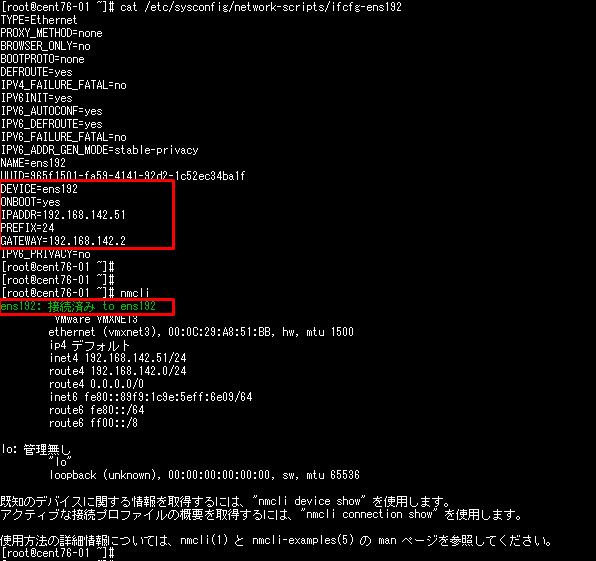
昔懐かしのifcfg周りを設定しておきます。
point:
利用するセグメントにおいて、default gatewayは第四オクテットを2としておきます。
例:
ip address: 192.168.0.3~127のどれか
default gateway: 192.168.0.2
subnet mask: 255.255.255.0 = /24
5.windows側の設定
5-1.vmnet8の設定
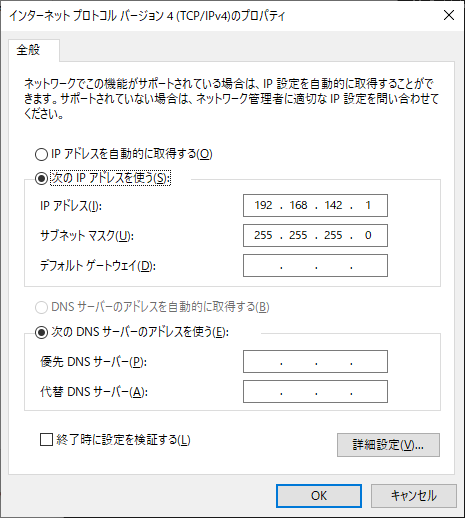
アダプタの設定から、セグメントの設定を投入します。
point
利用するセグメントにおいて、default gatewayは第四オクテットを1としておきます。
例:
ip address: 192.168.0.1
subnet mask: 255.255.255.0 = /24
#default gatewayは設定不要
5-2.confファイルの設定
以下、confファイルを設定する。利用するセグメントに合わせて内容を修正する。
C:\ProgramData\VMware\vmnetnat.conf
point:
利用するセグメントにおいて、第四オクテットを2としておきます。

C:\ProgramData\VMware\vmnetdhcp.conf
point:
利用するセグメントにおいて、第四オクテットを1としておきます。
設定箇所が多いので要注意。
5-3.レジストリの設定
2か所のレジストリ値を変更します。
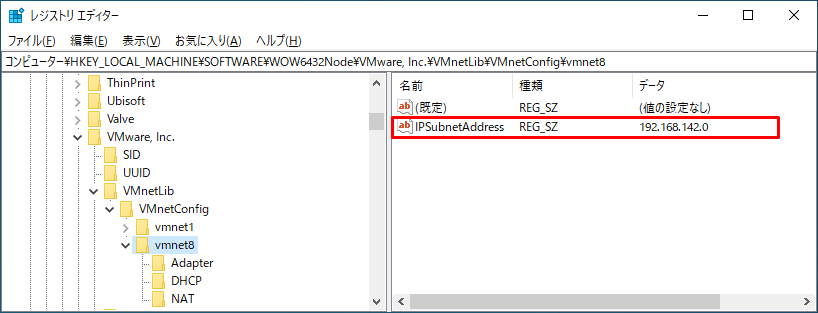
HKEY_LOCAL_MACHINE\SOFTWARE\Wow6432Node\VMware, Inc.\VMnetLib\VMnetConfig\vmnet8`
IPSubnetAddress = 192.168.142.0
point:
IPアドレスのセグメントを記載。
HKEY_LOCAL_MACHINE\SYSTEM\CurrentControlSet\Services\VMnetDHCP\Parameters\VirtualEthernetSegments\8
HostIpAddress = 0x018ea8c0
point:
IPアドレスの第四オクテットを1としたものを16進数にして、オクテットの並びを逆にしたものを記載。
192.168.142.1
↓octごとに16進数
c0.a8.8e.01
↓oct単位で逆転
018ea8c0
↓0xを記載
0x018ea8c0
5-4.リブート
windowsをリブートします。
6.疎通確認
6-1.ESXi shellから確認
ESXiにshellでログインし、Google-DNSの8.8.8.8にアクセス。
The ESXi Shell can be disabled by an administrative user. See the
vSphere Security documentation for more information.
[root@localhost:~]
[root@localhost:~]
[root@localhost:~] ping 8.8.8.8
PING 8.8.8.8 (8.8.8.8): 56 data bytes
64 bytes from 8.8.8.8: icmp_seq=0 ttl=128 time=8.187 ms
64 bytes from 8.8.8.8: icmp_seq=1 ttl=128 time=8.210 ms
64 bytes from 8.8.8.8: icmp_seq=2 ttl=128 time=9.022 ms

--- 8.8.8.8 ping statistics ---
3 packets transmitted, 3 packets received, 0% packet loss
round-trip min/avg/max = 8.187/8.473/9.022 ms

[root@localhost:~]
6-2.VM(Linux)から確認
VM(Linux)にsshでログインし、Google-DNSの8.8.8.8にアクセス。
[root@cent76-01 ~]# ping 8.8.8.8
PING 8.8.8.8 (8.8.8.8) 56(84) bytes of data.
64 bytes from 8.8.8.8: icmp_seq=1 ttl=128 time=9.94 ms
64 bytes from 8.8.8.8: icmp_seq=3 ttl=128 time=8.56 ms
64 bytes from 8.8.8.8: icmp_seq=4 ttl=128 time=8.29 ms
64 bytes from 8.8.8.8: icmp_seq=5 ttl=128 time=8.28 ms
^C
--- 8.8.8.8 ping statistics ---
5 packets transmitted, 4 received, 20% packet loss, time 4008ms
rtt min/avg/max/mdev = 8.289/8.775/9.947/0.685 ms
[root@cent76-01 ~]#
以上となります。
参考
VMware Player上のLinux (NAT + 固定IPアドレス)
https://www.nslabs.jp/linux-nat-on-vmware.rhtml
仮想マシンのネットワーク接続タイプの選択
https://docs.vmware.com/jp/VMware-Workstation-Pro/12.0/com.vmware.ws.using.doc/GUID-3B504F2F-7A0B-415F-AE01-62363A95D052.html


