はじめに
- 動作確認したAPI Versionは21〜23
- サポートライブラリ v7を使用
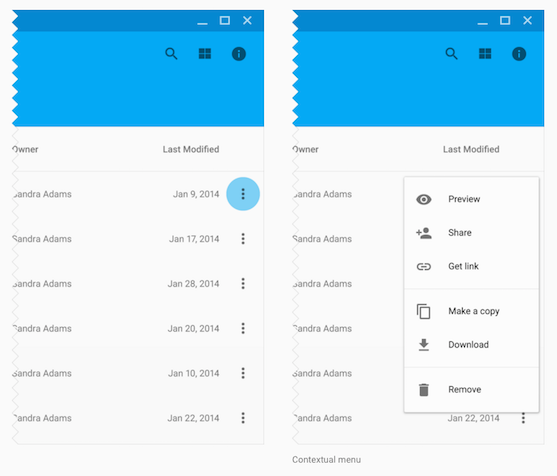
作るもの
Material Designのこれ
実装方法
PopupWindow(API Level1から存在)を使うと簡単でした。
Design Support Libraryとかに目が行きがちですが、昔からあるクラスで今風に実装できることも多いです。
RecyclerViewを作る
RecyclerViewの基本的な作り方は以下を参照してください。
【Android】RecyclerViewの基本的な実装
まずはこんな感じでRecyclerAdapterを用意しましょう
public class MenuRecyclerAdapter extends RecyclerView.Adapter<MenuRecyclerAdapter.ViewHolder> {

    /* ---------------------------------------------------------------------- */
    /* Field                                                                  */
    /* ---------------------------------------------------------------------- */

    // クラスタグ
    public static final String TAG = MenuRecyclerAdapter.class.getSimpleName();

    // 表示データのリスト
    private ArrayList<String> dataList;

    // コンテキスト
    private Context context;

    // RecyclerViewのアイテムクリックリスナー
    private OnRecyclerListener recyclerListener;

    /* ---------------------------------------------------------------------- */
    /* Listener                                                               */
    /* ---------------------------------------------------------------------- */

    /**
     * RecyclerViewのアイテムクリックリスナー
     */
    public interface OnRecyclerListener {
        void onItemClicked(int position, String data);
        void onMenuItemClicked(int position, String data, int menuId);
    }

    /* ---------------------------------------------------------------------- */
    /* Method                                                                 */
    /* ---------------------------------------------------------------------- */

    /**
     * コンストラクタ
     */
    public MenuRecyclerAdapter(Context context, ArrayList<String> data, OnRecyclerListener listener) {
        this.context = context;
        this.dataList = data;
        this.recyclerListener = listener;
    }

    /**
     * ViewHolderの生成
     */
    @Override
    public ViewHolder onCreateViewHolder(ViewGroup viewGroup, int i) {
        // 表示するレイアウトを設定
        return new ViewHolder(LayoutInflater.from(context).inflate(R.layout.list_item_recycler_menu, viewGroup, false), context, recyclerListener);
    }

    /**
     * ViewHolderへのデータセット
     */
    @Override
    public void onBindViewHolder(ViewHolder viewHolder, final int i) {
        // データセット
        viewHolder.position = i;
        viewHolder.data = dataList.get(i);

        // セルのクリック処理
        viewHolder.itemView.setOnClickListener(new View.OnClickListener() {
            @Override
            public void onClick(View v) {
                // セルの番号とデータを返す
                recyclerListener.onItemClicked(i, dataList.get(i));
            }
        });
    }

    /**
     * リスト数を返す
     */
    @Override
    public int getItemCount() {
        if (dataList != null) {
            return dataList.size();
        } else {
            return 0;
        }
    }

...
Adapterに特に変わった所はありません。
メニュー項目のクリックイベントを、RecyclerViewのクリックイベントリスナーについでに持たせてるくらいです。(onMenuItemClicked)
一応、Fragment側ではこんな感じで受け取る準備をしておきます。
public class RecyclerFragment extends Fragment implements MenuRecyclerAdapter.OnRecyclerListener {

...

    @Override
    public void onActivityCreated(Bundle savedInstanceState) {
        super.onActivityCreated(savedInstanceState);

        // 適当にデータ作成
        ArrayList<String> array = new ArrayList<>();
        for (int i = 0; i < 10; i++) {
            array.add("");
        }

        mAdapter = new MenuRecyclerAdapter(mActivity, array, this);
        mRecyclerView.setAdapter(mAdapter);
    }

...

    /* ---------------------------------------------------------------------- */
    /* OnRecyclerListener                                                     */
    /* ---------------------------------------------------------------------- */
    @Override
    public void onItemClicked(int position, String data) {
        String message = String.format("Position:%d Data:%s", position, data);
        Toast.makeText(mActivity, message, Toast.LENGTH_SHORT).show();
    }

    @Override
    public void onMenuItemClicked(int position, String data, int menuId) {
        String message = String.format("Position:%d MenuItem:%d", position, menuId);
        Toast.makeText(mActivity, message, Toast.LENGTH_SHORT).show();
    }

...

}
とりあえず押された物の情報をトースト表示するようにしています。
RecyclerViewのセルのレイアウトを作成
セルはとりあえずこんな感じです。
<?xml version="1.0" encoding="utf-8"?>
<FrameLayout xmlns:android="http://schemas.android.com/apk/res/android"
              android:orientation="vertical"
              android:layout_width="match_parent"
              android:layout_height="160dp">
    <!-- セルに表示する画像(システムアイコン) -->
    <ImageView
        android:src="@android:drawable/sym_def_app_icon"
        android:background="#4CAF50"
        android:tint="#e91e63"
        android:layout_width="match_parent"
        android:layout_height="match_parent"/>

    <!-- メニューを開くボタン(黒画像しか手元に無かったのでtintで白くしましたすみません) -->
    <ImageButton
        android:id="@+id/menu_button"
        android:tint="@color/white"
        android:src="@drawable/ic_more_vert_black_24dp"
        android:background="@drawable/selectable_button_default"
        android:layout_gravity="top|right"
        android:layout_width="wrap_content"
        android:layout_height="wrap_content"
        android:layout_margin="8dp"
        android:padding="8dp"/>

    <!-- 区切り線的なもの -->
    <View
        android:layout_height="1dp"
        android:layout_width="match_parent"
        android:background="@android:color/white"
        android:layout_gravity="bottom"/>
</FrameLayout>
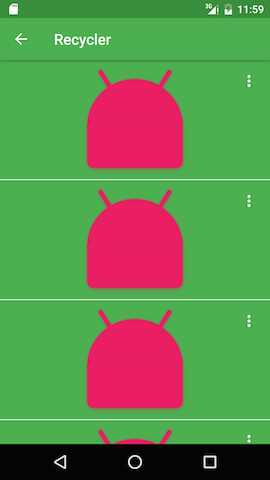
そうするとこんな感じのキモいリストが作れます。
ContextMenuのレイアウトを作成
表示したいメニューのレイアウトファイルを(今回は雰囲気で)作成します。
このレイアウトファイルの一番親でlayout_widthを設定しても、後で生成時にコード上で設定しないと無視されます。その為、基本的には一番親はwrap_contentです。
<?xml version="1.0" encoding="utf-8"?>
<LinearLayout xmlns:android="http://schemas.android.com/apk/res/android"
              android:orientation="vertical" android:layout_width="wrap_content"
              android:layout_height="wrap_content"
    android:background="@android:color/transparent">
    <LinearLayout
        android:orientation="vertical" android:layout_width="match_parent"
        android:layout_height="wrap_content"
        android:background="@drawable/menu_background"
        android:layout_marginEnd="8dp"
        android:layout_marginBottom="8dp"
        android:elevation="8dp"
        android:paddingTop="8dp"
        android:paddingBottom="8dp">

        <Button
            android:id="@+id/menu1"
            android:text="Item1"
            android:background="@drawable/selectable_button_default"
            android:paddingLeft="16dp"
            android:paddingRight="16dp"
            android:layout_width="match_parent"
            android:layout_height="56dp" />

        <Button
            android:id="@+id/menu2"
            android:text="Item2"
            android:background="@drawable/selectable_button_default"
            android:paddingLeft="16dp"
            android:paddingRight="16dp"
            android:layout_width="match_parent"
            android:layout_height="56dp" />

        <Button
            android:id="@+id/menu3"
            android:text="Item3"
            android:background="@drawable/selectable_button_default"
            android:paddingLeft="16dp"
            android:paddingRight="16dp"
            android:layout_width="match_parent"
            android:layout_height="56dp" />
    </LinearLayout>
</LinearLayout>
menu_backgroundとselectable_button_defaultは、ただの自作drawableです
<?xml version="1.0" encoding="utf-8"?>
<shape xmlns:android="http://schemas.android.com/apk/res/android"
    android:shape="rectangle">
    <solid android:color="@android:color/white"/>
    <corners android:radius="2dp"/>
</shape>
<?xml version="1.0" encoding="utf-8"?>
<ripple
    xmlns:android="http://schemas.android.com/apk/res/android"
    android:color="#42000000">
    <item android:id="@android:id/mask" android:drawable="@android:color/white" />
</ripple>
RecyclerAdapterのViewHolderにPopupWindowの生成・表示を実装
ここでようやくPopupWindowの生成になります。
さっきのAdapterクラスのViewHolderで、PopupWindowの生成と表示を行います。
    public class ViewHolder extends RecyclerView.ViewHolder implements View.OnClickListener {

        // このセルの番号
        public int position;

        // このセルのデータ
        public String data = null;

        // メニューを表示する為のボタン(縦の・・・みたいなやつ)
        public ImageButton button = null;

        // 表示するメニュー(PopupWindow)のインスタンス
        public PopupWindow popupWindow = null;

        // Adapterから受け取ったメニューのクリックリスナー
        private OnRecyclerListener recyclerListener = null;

        // コンストラクタ
        public ViewHolder(View itemView, Context context, OnRecyclerListener recyclerListener) {
            super(itemView);
            this.recyclerListener = recyclerListener;

            // PopupWindowのインスタンスを生成
            popupWindow = new PopupWindow(context);

            // PopupWindowに表示するViewを生成
            View contentView = LayoutInflater.from(context).inflate(R.layout.menu, null);

            // クリックイベントのやりとりはお好みの方法で
            contentView.findViewById(R.id.menu1).setOnClickListener(this);
            contentView.findViewById(R.id.menu2).setOnClickListener(this);
            contentView.findViewById(R.id.menu3).setOnClickListener(this);

            // PopupWindowに表示するViewをセット
            popupWindow.setContentView(contentView);

            // PopupWindowに表示するViewのサイズを設定
            float width = TypedValue.applyDimension(TypedValue.COMPLEX_UNIT_DIP, 140, context.getResources().getDisplayMetrics());
            popupWindow.setWindowLayoutMode((int) width, WindowManager.LayoutParams.WRAP_CONTENT);
            popupWindow.setWidth((int) width);

            // PopupWindowの外をタッチしたらPopupWindowが閉じるように設定
            popupWindow.setOutsideTouchable(true);

            // PopupWindow外のUIのタッチイベントが走らないようにフォーカスを持っておく
            popupWindow.setFocusable(true);

            // PopupWindow内のクリックを可能にしておく
            popupWindow.setTouchable(true);

            // レイアウトファイルで設定した背景のさらに背景(黒とか)が生成される為、ここで好みの背景を設定しておく
            popupWindow.setBackgroundDrawable(new ColorDrawable(context.getResources().getColor(android.R.color.transparent)));

            // メニューを表示するためのボタンを生成
            button = (ImageButton) itemView.findViewById(R.id.menu_button);

            // メニューを表示するためのクリックイベント設定
            button.setOnClickListener(this);
        }

        /**
         * クリックイベント
         */
        @Override
        public void onClick(View v) {
            if (v != null) {
                if (v.getId() == R.id.menu_button) {
                    // アンカーにするViewと、そのViewの左下から見た位置を指定してPopupWindowを表示する
                    popupWindow.showAsDropDown(v, v.getWidth(), -v.getHeight());
                } else {
                    // メニュー項目がクリックされたらFragmentに返して処理したりするのが多そう
                    recyclerListener.onMenuItemClicked(position, data, v.getId());
                }
            }
        }
    }
結果
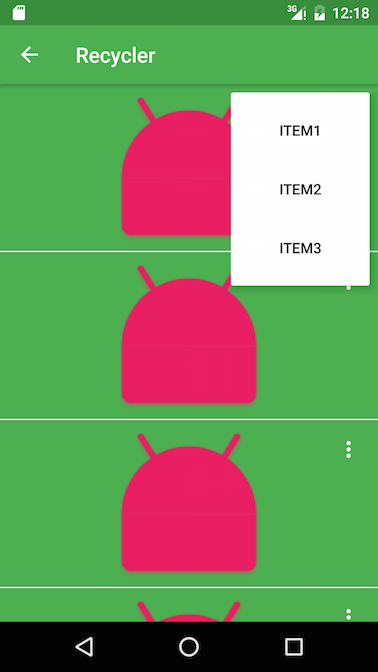
画面の半分を境に、自動的にアンカーから上向きか下向きの表示を切り替えてくれるのも便利です。
あとはデザインを調整して、理想のContextualMenuにしてみてください。
おわり