初めに
vyosを触ったのでその時のメモ。
[動作環境]
- windows10 pro
- Hyper-V
- vyos 1.3
※vyosはHyper-V上で動作させます。Virtual Box等でも問題ありません。
Virtual Boxのダウンロードはこちら
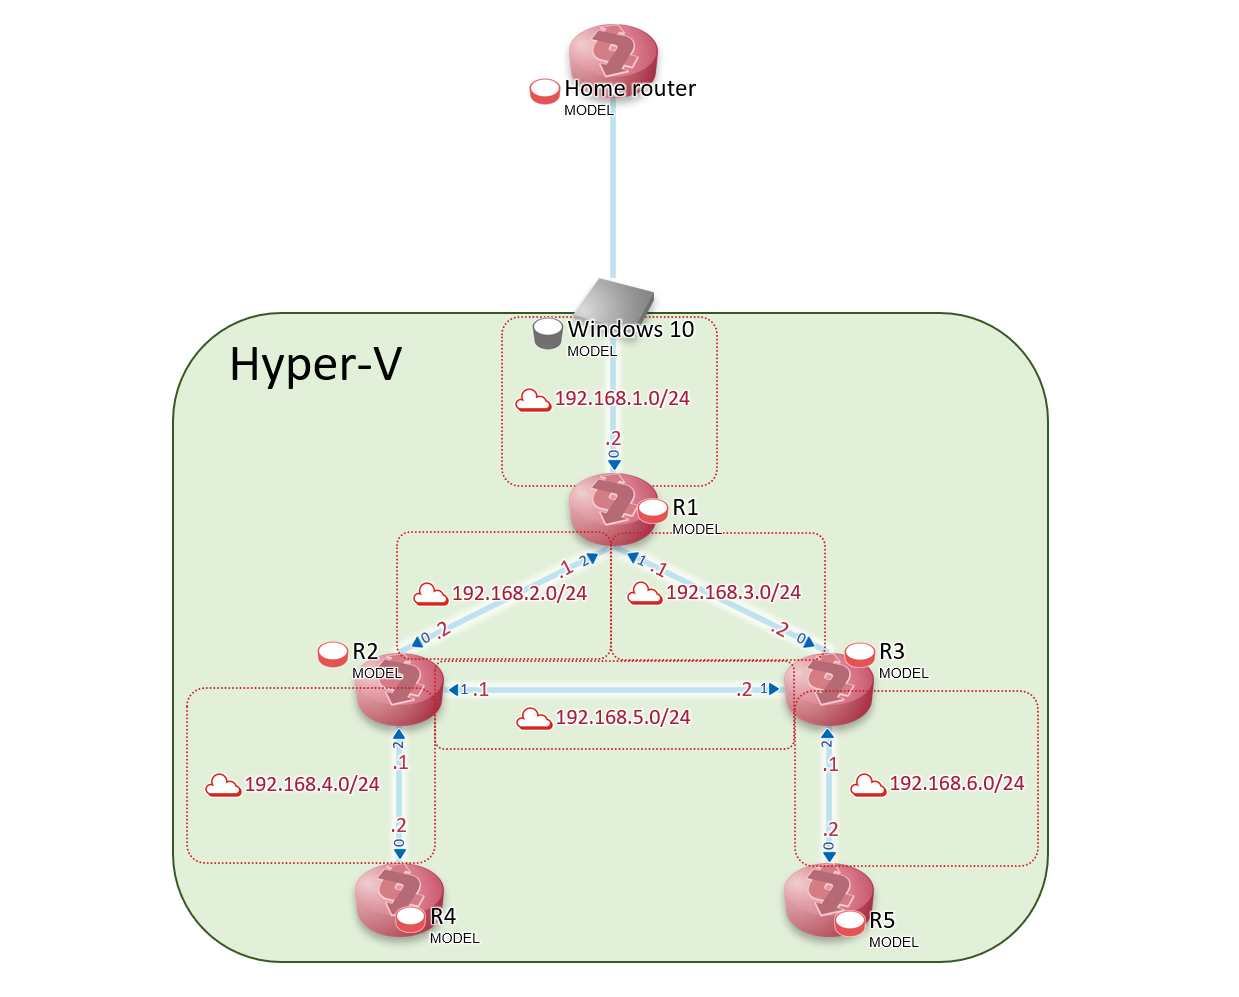
[構成]

※アイコンはshow netのものをお借りしました。
isoのダウンロード
下記のサイトよりダウンロード可能です。
ダウンロード
isoから仮想マシンを作成
- Hyper-Vの場合
Hyper-V マネージャーを開き、ウィンドウの右側の「操作」ウィンドウの「新規」メニューをクリックします。「仮想マシンの新規作成ウィザード」ダイアログの、インストールオプションでダウンロードしたisoを選択します。
仮想スイッチマネージャーより、構成図似合うように仮想スイッチの作成及びアダプターの追加を行います。 - Virtual Boxの場合
新規から手順に沿ってisoを選択します。その後仮想マシンの設定から、ネットワークアダプター(内部ネットワーク)を構成図に合うように追加していきます。
Vyosのインストール
起動が終わったら、ログインをします。user:vyos、passward:vyosでログインをすることが出来ます。
vyos login: vyos
password:vyos

vyos@vyos:~$
その後インストールをするため以下のコマンドを実行します。
vyos@vyos:~$ install image
設定に関してはユーザー名、パスワードなど自由に設定できます。今回は全てデフォルトのまま続けます。
Would you like to continue? (Yes/No) [Yes]: yes

Partition (Auto/Parted/Skip) [Auto]:

Install the image on? [sda]:

Continue? (Yes/No) [No]: yes

What would you like to name this image? [1.1.8]:

Which one should I copy to sda? [/config/config.boot]:

Enter password for user 'vyos':[ユーザー名]
Retype password for user 'vyos':[パスワード]

Which drive should GRUB modify the boot partition on? [sda]:
インストールが完了後そのままシャットダウンします。
vyos@vyos:~$ poweroff
Proceed with poweroff? (Yes/No) [No] yes
シャットダウン完了後設定よりisoを抜きます。
これを五台分繰り返します。
ホスト名の設定
以下のようにして各ルーターにR1~R5までのホスト名を設定していきます。下はR1の場合です。
$ configure
# set system host-name R1
# commit
# save
キーボードレイアウトの変更
$ set console keymap
※vyosではインストール時にキーボードレイアウトの設定が出来きず、初期設定ではUSになっているため設定の変更が必要です。以下のサイトを参照にしてください。
Vyatta/VyOSで利用するキーボードを日本語配列キーボードにする | 俺的備忘録 〜なんかいろいろ〜
ネットワークインタフェースの設定
内部ネットワークを設定したインターフェースにIPアドレスを設定します。R1から順位設定していきます。
R1
$ configure
# show interface
# set interfaces ethernet eth0 address 192.168.1.2/24
# set interfaces ethernet eth1 address 192.168.2.1/24
# set interfaces ethernet eth2 address 192.168.3.1/24
# commit
# save
R2
$ configure
# show interface
# set interfaces ethernet eth0 address 192.168.2.2/24
# set interfaces ethernet eth1 address 192.168.5.1/24
# set interfaces ethernet eth2 address 192.168.4.1/24
# commit
# save
R3
$ configure
# show interface
# set interfaces ethernet eth0 address 192.168.3.2/24
# set interfaces ethernet eth1 address 192.168.5.2/24
# set interfaces ethernet eth2 address 192.168.6.1/24
# commit
# save
R4
$ configure
# show interface
# set interfaces ethernet eth0 address 192.168.4.2/24
# commit
# save
R5
$ configure
# show interface
# set interfaces ethernet eth0 address 192.168.6.2/24
# commit
# save
おまけ
SSHの設定
# set service ssh
# commit
# save
# exit
$ reboot
タイムゾーンの設定
$ configure
# set system time-zone Asia/Tokyo
# commit
# save
# exit
コンフィグを修正
deleteコマンドで削除したいコンフィグを消します。
# delete interfaces ethernet eth0 address a.b.c.d/ef

setコマンドで新たな設定を入れます。
# set interfaces ethernet eth0 address a.b.c.d/ef
インタフェースの確認
$ show interfaces
設定の確認
$ show configuration
DHCPの設定
# set service dhcp-server shared-network-name MY_SUBNET subnet [xxx.xxx.xxx.xxx/xx] start [yyy.yyy.yyy.yyy] stop [zzz.zzz.zzz.zzz]
# set service dhcp-server shared-network-name MY_SUBNET subnet [xxx.xxx.xxx.xxx/xx] default-router [yyy.yyy.yyy.yyy]
# set service dhcp-server shared-network-name MY_SUBNET subnet [xxx.xxx.xxx.xxx/xx] dns-server [yyy.yyy.yyy.yyy]