はじめに
対象読者
- Jitsi Meet をオンプレ環境で構築した/しようとしている人
- オンプレ環境で構築した際に、 IP 制限などかけず、サイトを一般公開した上で、ホスト/ゲストの使い分けで運用していきたい人
オンプレ環境構築についての記事
前置き
- サブドメインは xxxxxx.xxx と表記します。自身のものに置き換えて読んでください
基本の理解
認証設定を導入した際の基本の流れ
ホスト側
- 部屋を立てる/入る際に、表示されるダイアログで「ホストとして」ログインするよう選択
- XAMPP に設定しておいたホストログイン情報を入れてログイン
- 部屋のパスワードを設定して、ゲストに部屋の URL とパスワードを知らせる
- なお、パスワードを設定しても、一度閉じてしまうと、再度またパスワードを設定し直さなくてはならない。あらかじめパスワードを決めておいたとしても、ミーティング開始前にホストが部屋に入り改めてパスワードを設定しておく必要がある
ゲスト側
- ホストから部屋の URL とパスワードが送られてくるのを待つ
- URL へアクセスした際、ホスト側がまだ URL を開いた状態になっていないと、開いた状態になるまで待たされる
- 部屋に入れるようになったら、パスワードを入力して入る
イタズラや不正アクセスされないの?
勝手にイタズラで部屋を立てられてしまわないか
- ホストとしてログインしない限り、部屋を立てることができない、という仕様になっていますので、ホストログイン情報をお漏らししたり、単純すぎる組み合わせで突破されてしまったりしない限りは、大丈夫です
荒らしゲストとして部屋に入って荒らされたりしないか
- Zoom 等の他サービスを利用する際にも全く同じと思いますが、以下のような対策をとっておきましょう
- 部屋の URL を複雑化する
- 入室パスワードを設定する。単純なものにしない
設定
設定後にサービスの再起動をおこなう必要があるもの
/etc/prosody/conf.avail/xxxxxx.xxx.cfg.lua
- xxxxxx.xxx の authentication を internal_hashed へ変更
- VirtualHost に guest.xxxxxx.xxx を追記
/etc/prosody/conf.avail/xxxxxx.xxx.cfg.lua
-- 前略

VirtualHost "xxxxxx.xxx"
        -- enabled = false -- Remove this line to enable this host
        -- authentication = "anonymous"
        authentication = "internal_hashed"
        -- Properties below are modified by jitsi-meet-tokens package config
        -- and authentication above is switched to "token"
        --app_id="example_app_id"
        --app_secret="example_app_secret"
        -- Assign this host a certificate for TLS, otherwise it would use the one
        -- set in the global section (if any).
        -- Note that old-style SSL on port 5223 only supports one certificate, and will always
        -- use the global one.
        ssl = {
                key = "/etc/prosody/certs/xxxxxx.xxx.key";
                certificate = "/etc/prosody/certs/xxxxxx.xxx.crt";
        }
        speakerstats_component = "speakerstats.xxxxxx.xxx"
        conference_duration_component = "conferenceduration.xxxxxx.xxx"
        -- we need bosh
        modules_enabled = {
            "bosh";
            "pubsub";
            "ping"; -- Enable mod_ping
            "speakerstats";
            "turncredentials";
            "conference_duration";
        }
        c2s_require_encryption = false

VirtualHost "guest.xxxxxx.xxx"
        authentication = "anonymous"
        modules_enabled = {
            "bosh";
            "pubsub";
            "ping"; -- Enable mod_ping
            "speakerstats";
            "turncredentials";
            "conference_duration";
        }
        c2s_require_encryption = false

-- 後略
/etc/jitsi/jicofo/sip-communicator.properties
- 末尾に追記
/etc/jitsi/jicofo/sip-communicator.properties
org.jitsi.jicofo.auth.URL=XMPP:xxxxxx.xxx
諸々再起動
service prosody restart
service jicofo restart
service jitsi-videobridge2 restart
nginx -s reload
設定後にサービスの再起動をおこなう必要はないもの
/etc/jitsi/meet/meet.to-on.com-config.js
- anonymousdomain の行をコメントインする
meet.to-on.com-config.js
// 前略

        // When using authentication, domain for guest users.
        anonymousdomain: 'guest.xxxxxx.xxx',

// 後略
- ランディングページを表示させないようにもできる。お好みで
- この設定を false にした場合、 index へアクセスしようとすると、ランダムに割り当てられた部屋名の URL へリダイレクトされるようになる
meet.to-on.com-config.js
// 前略

    // Whether to use a welcome page or not. In case it's false a random room
    // will be joined when no room is specified.
    enableWelcomePage: false,

// 後略
- 入室前に名前を入力させる画面を表示させることもできるので、上記のようにランディングページを無効化した上で、入室前画面を表示させるようにしたら良さそう
meet.to-on.com-config.js
// 前略
    // When 'true', it shows an intermediate page before joining, where the user can  configure its devices.
    prejoinPageEnabled: true,

// 後略

XAMPP にホストログイン情報の登録
コマンド
- 以下それぞれ、自身のものに置き換えてください
- username
- xxxxxx.xxx
- password
prosodyctl register username xxxxxx.xxx password
確認
部屋を作成しようとしてみる
- まず、適当に部屋 URL を叩いてみると、以下のようなダイアログが上部に表示されるようになります。最初はゲストとして入ろうとするようです。まだホストが不在なので、待つか、ホストとして入ろうとするか、どちらかになります

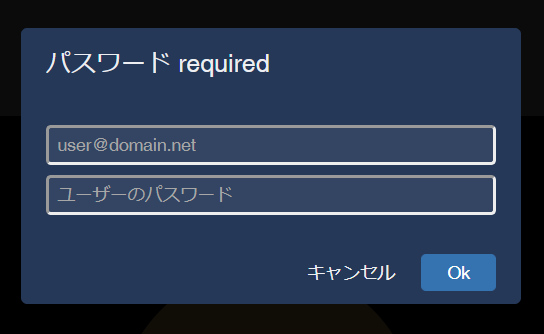
- 私はホストです、として進もうとすると、認証が求められます。 XAMPP に登録した情報を入力してください
- 認証されると、ホスト(モデレーター)として入室できます。右下にパスワード設定をおこなうダイアログが表示されているはずなので、そこからパスワードを設定しておきましょう
おわりに
感想
- 設定ファイルで VirtualHost に guest.xxxxxx.xxx みたいなことが書いてあるので、 DNS やら nginx やらの設定をいろいろしていって、ゲストにはそちらのサブドメインを指定してあげなくてはならないのか……🤔 と思ったりもしましたが、全然そんなことなく。終わってみればシンプルにいって良かったです
- ランディングページを表示させないようにすれば、ベーシック認証とか一切不要になりますね
- 「ホストを待っています」ダイアログのところ、英文なのですが、日本語に直せたら直したいですね