はじめに
こんにちは!今回は、Webアプリケーションにおけるユーザー認証について、私が取り組んだ「Firebase Authentication」の実装方法を共有したいと思います。
Firebase Authenticationは、手軽に導入できる認証サービスとして多くの開発者に利用されています。特に、バックエンドと連携してデータベースにユーザー情報を登録・管理できる点が便利です。
この記事では、以下の内容をカバーします。
- Firebase Authenticationの概要
- Firebaseによる認証の実装方法
- FirebaseUIDを使用したバックエンドとの統合
ぜひ、実際のプロジェクトに役立ててください。
基本的な説明は公式ドキュメントに任せます。この記事では、バックエンドとの統合のための実装がメインですので、Firebase Authenticationへの登録方法等はリンクをご覧ください。🙇
目次
Firebase Authenticationとは
Firebase Authenticationは、Googleが提供する認証サービスで、ユーザー管理を簡単に実装できる強力なツールです。特に、メール/パスワード認証、Google、Facebookなどのサードパーティログインを一括で提供しており、さまざまな認証シナリオに対応しています。
主な特徴:
- メール/パスワード認証
- サードパーティログイン(Google、Facebookなど)
- メール確認やパスワードリセット機能
- リアルタイム認証状態管理
準備
Firebase Authenticationを導入するには、まずFirebaseコンソールでプロジェクトを作成し、ウェブアプリケーションを登録する必要があります。
ステップ1: Firebaseプロジェクトの作成と初期化
Firebaseコンソールにアクセスしてプロジェクトを作成し、Firebase SDKをインストールして初期化します。
$ npm install firebase
次に、以下のコードでFirebaseアプリを初期化します。
import { initializeApp } from 'firebase/app';

const firebaseConfig = {
  apiKey: "API_KEY",
  authDomain: "PROJECT_ID.firebaseapp.com",
  projectId: "PROJECT_ID",
  storageBucket: "PROJECT_ID.appspot.com",
  messagingSenderId: "SENDER_ID",
  appId: "APP_ID"
};

const app = initializeApp(firebaseConfig);
// Firebase認証の取得
export const auth = getAuth(app)
ステップ2: 認証方法の設定と有効化
Firebaseコンソールで、使用する認証方法(メール/パスワード、Googleログインなど)を有効にします。

(補足)「テンプレート」タブから送信するメールの文章や言語設定が可能です!
Firebase Authenticationの実装
ステップ3: フロントエンドでのユーザー登録
ユーザー登録はcreateUserWithEmailAndPasswordを使います。これにより、ユーザーが登録され、Firebase側で認証されます。
import { createUserWithEmailAndPassword, sendEmailVerification } from 'firebase/auth';
import { auth } from './firebase-auth';
import axios from 'axios';

const registerUser = async (email: string, password: string, displayName: string) => {
  try {
    // Firebase Authenticationへのユーザー登録とuidの取得
    const userCredential = await createUserWithEmailAndPassword(auth, email, password);
    const firebaseUid = userCredential.user.uid;


    // 登録確認メールの送信
    await sendEmailVerification(userCredential.user);
    window.alert("メールアドレスに確認メールを送信しました。メール内のリンクをクリックして登録を完了してください。")

    // backend-api(統合先)へのユーザー登録
    await axios.post('https://your-backend-api.com/signup', {
      firebaseUid: firebaseUid,
      email: email,
      name: displayName || "Unknown",
    });

    console.log('User registered and data sent to backend');
  } catch (error) {
    console.error('Error during registration:', error);
  }
};
ステップ4: バックエンドでのユーザー情報管理
バックエンド側では、FirebaseUIDを使ってユーザー情報をデータベースに保存します。
package controller

import (
	"yourApp/model"
	"yourApp/usecase"
	"net/http"

	"github.com/labstack/echo/v4"
)

func (uc *userController) SignUp(c echo.Context) error {
	user := model.User{}
	if err := c.Bind(&user); err != nil {
		return c.JSON(http.StatusBadRequest, map[string]string{"error": "Invalid request data"})
	}

	userRes, err := uc.uu.SignUp(user)
	if err != nil {
		return c.JSON(http.StatusInternalServerError, map[string]string{"error": "Failed to create user"})
	}

	return c.JSON(http.StatusCreated, userRes)
}
動作確認
下記のように、自作のアプリケーションにFirebaseによるユーザー認証機能と
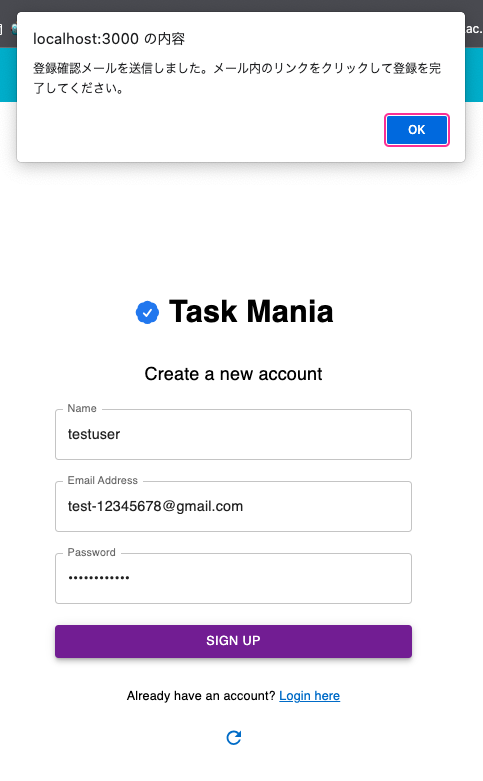

データベースへの登録を確認することができました!(passwordはDB設計変更前に存在していたカラムです)

まとめ
今回の記事では、Firebase Authenticationを使ったユーザー認証の導入方法から、バックエンドとの統合までを一貫して説明しました。Firebaseを使うことで、認証の構築が非常に簡素化され、セキュアでスケーラブルなユーザー管理システムを素早く実装できます。
さらに、FirebaseUIDをバックエンドで利用することで、アプリ全体で統一したユーザー情報を管理しやすくなります。これにより、ユーザー認証に関するコードを最小限に抑え、アプリケーションの開発に集中できるようになります。
ぜひ、この記事を参考にして、あなたのプロジェクトにもFirebase Authenticationを導入してみてください!