前の記事 Swift3 初心者ですがカレンダーを作る (1)
前の記事で見た目がカレンダーっぽくなったのでDateManager.swiftを作っていこうと思います。
DateManagerでとりあえず欲しい機能
DateManagerで必要な機能を考えたいと思います。
1)カレンダー始点になる左上の日が知りたい。
2)カレンダーの終点になる右下の日が知りたい。
3)始点の日から終点の日までの日数が必要なセルの数なのでこれを知りたい。
4)それぞれのセルに表示すべき日を知りたい
今の所はこれだけです。
それぞれの関数を実装していきます。まずは下準備としてロジックで使う変数などを記述します。
import UIKit

class DateManager: NSObject {
    var selectDay = Date()
    var biginDay = Date()
    var endDay = Date()

    let calendar = Calendar.current
}
1)カレンダー始点になる左上の日が知りたい。
コードにコメントを残してますが、大きな流れは
月の初めにする。
曜日を求める。
曜日が分かれば、何日戻らなければならないか分かる
という流れです。
    //月カレンダーの始点になる日を求める
    func BeginOfMonthCalender() -> Date{

        //日付の要素を1日にする
        var components = calendar.dateComponents([.year,.month,.day], from: selectDay)
        components.day = 1
        let firstOfMonth = Calendar.current.date(from: components)

        //曜日を調べて、その要素数だけ戻ったものがカレンダーの左上(日曜日=1 土曜日=7 なので1足した状態で戻る)
        let dayOfWeek = calendar.component(.weekday,from:firstOfMonth!)

        return calendar.date(byAdding: .day, value: 1-dayOfWeek, to: firstOfMonth!)!
    }
var components = calendar.dateComponents([.year,.month,.day], from: selectDay)で日付の要素を取得し、
components.day = 1で日の部分を1日にしています。
そして、それを改めて時間データに変換しているだけです。
2)カレンダーの終点になる右下の日が知りたい。
カレンダーの左下の求め方は、
次の月の初めを求める。
そこから1日戻った日が月末。
その曜日を求めれば、月末から進ませる日数が分かる。
ただ、ロジックの最後に日付の移動をするので、わざわざ月末に戻さなくても、次の月の初めの日の曜日で移動する日数を求めてます。
    //月カレンダーの終点になる日を求める
    func EndOfMonthCalendar() ->Date{

        //次の月初めを取得
        let nextmonth = calendar.nextDate(after: selectDay, matching: DateComponents(day:1), matchingPolicy: Calendar.MatchingPolicy.nextTime)

        //曜日を調べて、その要素数だけ進んだものが右下(次の月の初めで計算している事に注意)
        let dayOfWeek = calendar.component(.weekday,from: nextmonth!)

        return calendar.date(byAdding: .day, value: 7-dayOfWeek, to: nextmonth!)!
    }
注目すべきは
calendar.nextDate(after: selectDay, matching: DateComponents(day:1), matchingPolicy: Calendar.MatchingPolicy.nextTime)
です。
条件に当てはまる日付を探してくれます。
DateComponents(day:1)の意味は次に日付が1になる日=次月の初めとなります。
3)始点の日から終点の日までの日数が必要なセルの数なのでこれを知りたい。
上記2つのメソッドで始点と終点が分かりました
2点の日数を出すのはdateComponentsを使えば出ます。
   //月ごとのセルの数を出すメソッド
    func daysAcquisition() -> Int{

        //始まりの日と終わりの日を取得
        biginDay = BeginOfMonthCalender()
        endDay = EndOfMonthCalendar()

       //始点から終点の日数
        return calendar.dateComponents([.day], from:biginDay ,to:endDay).day! + 1
    }
日付の間隔を求めるのは
calendar.dateComponentsを使います。
calendar.dateComponents([.day], from:biginDay ,to:endDay).day!で2点の日数を出します。
2つの間隔なので+1すれは、必要なセル数になります
4)それぞれのセルに表示すべき日を知りたい
それぞれのセルに表示される日付ですが、セルのIndex番号が送られてきます。
つまり、始点になった左上の日時にIndex番号分、進ませた日が求める日時になります。
    //カレンダーの始点から指定した日数を加算した日付を返す
    func conversionDateFormat(index: Int)->String{

        let currentday = calendar.date(byAdding: .day, value: index, to: biginDay)

        return calendar.component(.day, from: currentday!).description
    }
以上です。
ほとんど日付の操作関数しか使っていないので難しい事はないと思います。
ViewControllerの書き換え
DateManagerをカレンダーの表示に組み込みます。
ViewController.swiftの関係する場所を書き換えます
1)セルの総数を問い合わせている部分
カレンダーの始点から終点の日数が分かりましたので以下のように書き換えます
    //データの個数(DataSourceを設定した場合に必要な項目)
    func collectionView(_ collectionView: UICollectionView, numberOfItemsInSection section: Int) -> Int {
        if(section == 0){   //section:0は曜日を表示
            return numOfDays
        }else{
            return dateManager.daysAcquisition()       //section:1は日付を表示  ※セルの数は始点から終点までの日数
        }
    }
2)セルにデータを返す部分
    //データを返すメソッド(DataSourceを設定した場合に必要な項目)
    //動作確認の為セルの背景を変える。曜日については表示する
    func collectionView(_ collectionView: UICollectionView, cellForItemAt indexPath: IndexPath) -> UICollectionViewCell {

        //コレクションビューから識別子「CalendarCell」のセルを取得する
        let cell = collectionView.dequeueReusableCell(withReuseIdentifier: "CalendarCell", for: indexPath) as! CalendarCell
        if(indexPath.section == 0){             //曜日表示
            cell.backgroundColor = UIColor.green
            cell.textLabel.text = weekArray[indexPath.row]

        }else{                                  //日付表示
            cell.backgroundColor = UIColor.white
            cell.textLabel.text = dateManager.conversionDateFormat(index: indexPath.row) //Index番号から表示する日を求める

        }
        return cell
    }
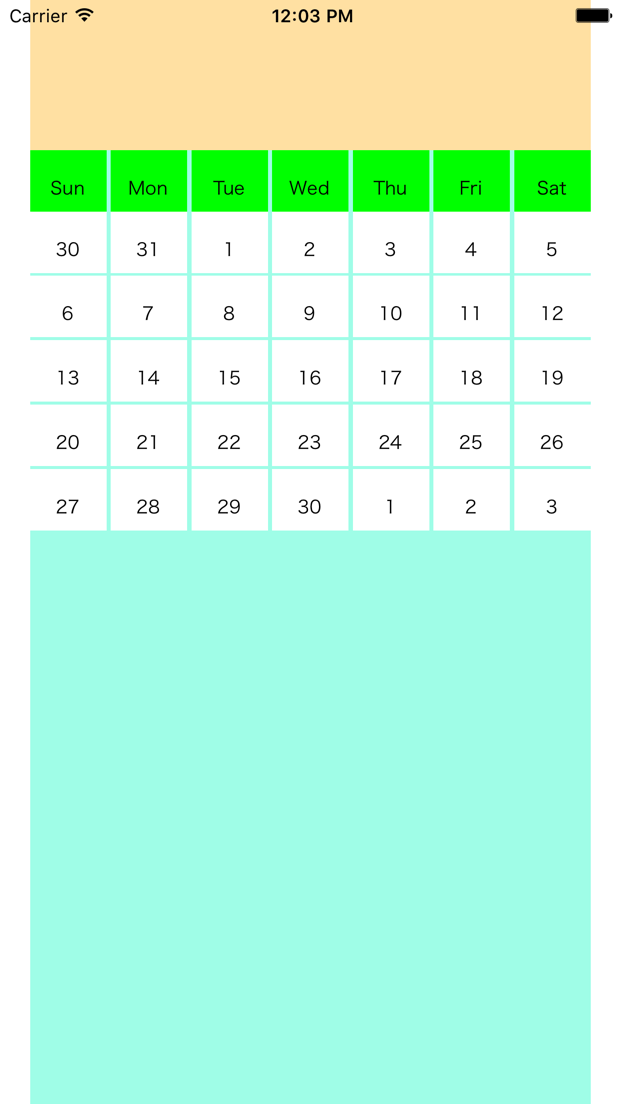
Runして動作確認します
日付が出てくれると安心します。
カレンダーの移動
もう少しカレンダーっぽくしたいので
年/月/日を表示させるLabelと、
前月、次月、次の日、前の日にするボタンを作ります。
次の日、前の日のボタンは必要ないのですが、動作確認の為につけました。
Labelもチェックしやすいように日まで表示してます。
ボタンを4個、ラベルを1つ配置しViewControllerに関連付けます。
@IBOutlet weak var headerTitle: UILabel!
@IBAction func prevMonthBtn(_ sender: UIButton) {}
@IBAction func nextMonthBtn(_ sender: UIButton) {}
@IBAction func preDayBtn(_ sender: UIButton) {}
@IBAction func nextDayBtn(_ sender: UIButton) {}
カレンダーの移動は基準になっているSelectDayを変えるだけです。
出力もSelectDayの中身を出力するだけです。
   //今セレクトされているselectDayの年月をテキストで出力
    func CalendarHeader()->String{
        let formatter = DateFormatter()
        formatter.dateFormat = "YYYY/MM/dd"

        return formatter.string(from: selectDay)
    }


    /*
     表示月を変える操作
     */

    //SelectDayを一ヶ月戻す
    func preMonthCalendar(){
        selectDay = calendar.date(byAdding: .month, value: -1, to: selectDay)!
    }

    //SelectDayを1か月進ませる
    func nextMonthCalendar(){
        selectDay = calendar.date(byAdding: .month, value: 1, to: selectDay)!
    }


    //SelectDayを1日戻す
    func preDayCalendar(){
        selectDay = calendar.date(byAdding: .day, value: -1, to: selectDay)!
    }

    //SelectDayを1日進む
    func nextDayCalendar(){
        selectDay = calendar.date(byAdding: .day, value: 1, to: selectDay)!
    }
Viewコレクターに実装します
まずはラベル部分
    override func viewDidLoad() {
        super.viewDidLoad()

        calenderCollectionView.delegate = self
        calenderCollectionView.dataSource = self

        headerTitle.text = dateManager.CalendarHeader()  //追加
    }
次に移動ボタン部分。
やることは同じなので、前月ボタンだけを載せます。
   //前月ボタン
    @IBAction func prevMonthBtn(_ sender: UIButton) {
        dateManager.preMonthCalendar()
        calenderCollectionView.reloadData()
        headerTitle.text = dateManager.CalendarHeader()
    }
以上です。
カレンダーを作って注意した点は、日付操作関数の中で要素再設定は注意が必要です。
例えば
calendar.date(bySetting: .month, value: 9, of: date)
というような感じです。
月を9に設定してくれるのですが、他の要素も勝手に変えてしまう事があります。
bySettingだけは使わない方がいいかもしれません。
calendar.dateComponentsなどを使う方がいいです。
最後にViewControllerとDateManagerのコードを載せます。
import UIKit

class ViewController: UIViewController ,UICollectionViewDataSource,UICollectionViewDelegate,UICollectionViewDelegateFlowLayout{ //← 追記
    let dateManager = DateManager()

    let weekArray = ["Sun", "Mon", "Tue", "Wed", "Thu", "Fri", "Sat"]
    let numOfDays = 7       //1週間の日数
    let cellMargin : CGFloat = 2.0  //セルのマージン。セルのアイテムのマージンも別にあって紛らわしい。アイテムのマージンはゼロに設定し直してる

    //OUTLET
    @IBOutlet weak var calenderCollectionView: UICollectionView!
    @IBOutlet weak var headerTitle: UILabel!


    override func viewDidLoad() {
        super.viewDidLoad()

        calenderCollectionView.delegate = self
        calenderCollectionView.dataSource = self

        headerTitle.text = dateManager.CalendarHeader()
    }

    override func didReceiveMemoryWarning() {
        super.didReceiveMemoryWarning()
        // Dispose of any resources that can be recreated.
    }


    //コレクションビューのセクション数 今回は2つに分ける
    func numberOfSections(in collectionView: UICollectionView) -> Int {
        return 2
    }

    //データの個数(DataSourceを設定した場合に必要な項目)
    func collectionView(_ collectionView: UICollectionView, numberOfItemsInSection section: Int) -> Int {
        if(section == 0){   //section:0は曜日を表示
            return numOfDays
        }else{
            return dateManager.daysAcquisition()       //section:1は日付を表示  ※セルの数は始点から終点までの日数
        }
    }

    //データを返すメソッド(DataSourceを設定した場合に必要な項目)
    //動作確認の為セルの背景を変える。曜日については表示する
    func collectionView(_ collectionView: UICollectionView, cellForItemAt indexPath: IndexPath) -> UICollectionViewCell {

        //コレクションビューから識別子「CalendarCell」のセルを取得する
        let cell = collectionView.dequeueReusableCell(withReuseIdentifier: "CalendarCell", for: indexPath) as! CalendarCell
        if(indexPath.section == 0){             //曜日表示
            cell.backgroundColor = UIColor.green
            cell.textLabel.text = weekArray[indexPath.row]

        }else{                                  //日付表示
            cell.backgroundColor = UIColor.white
            cell.textLabel.text = dateManager.conversionDateFormat(index: indexPath.row)   //Index番号から表示する日を求める

        }
        return cell
    }

    //セルをクリックしたら呼ばれる
    func collectionView(_ collectionView: UICollectionView, didSelectItemAt indexPath: IndexPath) {
        print("Num:\(indexPath.row) Section:\(indexPath.section)")
    }
    /*

     セルのレイアウト設定

     */
    //セルサイズの指定(UICollectionViewDelegateFlowLayoutで必須) 横幅いっぱいにセルが広がるようにしたい
    func collectionView(_ collectionView: UICollectionView, layout collectionViewLayout: UICollectionViewLayout, sizeForItemAt indexPath: IndexPath) -> CGSize {
        let numberOfMargin:CGFloat = 8.0
        let widths:CGFloat = (collectionView.frame.size.width - cellMargin * numberOfMargin)/CGFloat(numOfDays)
        let heights:CGFloat = widths * 0.8

        return CGSize(width:widths,height:heights)
    }

    //セルのアイテムのマージンを設定
    func collectionView(_ collectionView: UICollectionView, layout collectionViewLayout: UICollectionViewLayout, insetForSectionAt section: Int) -> UIEdgeInsets {
        return UIEdgeInsetsMake(0.0 , 0.0 , 0.0 , 0.0 )  //マージン(top , left , bottom , right)
    }

    //セルの水平方向のマージンを設定
    func collectionView(_ collectionView: UICollectionView, layout collectionViewLayout: UICollectionViewLayout, minimumInteritemSpacingForSectionAt section: Int) -> CGFloat {
        return cellMargin
    }
    //セルの垂直方向のマージンを設定
    func collectionView(_ collectionView: UICollectionView, layout collectionViewLayout: UICollectionViewLayout, minimumLineSpacingForSectionAt section: Int) -> CGFloat {
        return cellMargin
    }
    /*

     Action

     */

    //前月ボタン
    @IBAction func prevMonthBtn(_ sender: UIButton) {
        dateManager.preMonthCalendar()
        calenderCollectionView.reloadData()
        headerTitle.text = dateManager.CalendarHeader()
    }

    //次月ボタン
    @IBAction func nextMonthBtn(_ sender: UIButton) {
        dateManager.nextMonthCalendar()
        calenderCollectionView.reloadData()
        headerTitle.text = dateManager.CalendarHeader()
    }

    //前日ボタン
    @IBAction func preDayBtn(_ sender: UIButton) {
        dateManager.preDayCalendar()
        calenderCollectionView.reloadData()
        headerTitle.text = dateManager.CalendarHeader()
    }

    //次の日ボタン
    @IBAction func nextDayBtn(_ sender: UIButton) {
        dateManager.nextDayCalendar()
        calenderCollectionView.reloadData()
        headerTitle.text = dateManager.CalendarHeader()
    }
}
import UIKit

class DateManager: NSObject {

    var selectDay = Date()
    var biginDay = Date()
    var endDay = Date()

    let calendar = Calendar.current


    //月カレンダーの始点になる日を求める
    func BeginOfMonthCalender() -> Date{

        //日付の要素を1日にする
        var components = calendar.dateComponents([.year,.month,.day], from: selectDay)
        components.day = 1
        let firstOfMonth = Calendar.current.date(from: components)

        //曜日を調べて、その要素数だけ戻ったものがカレンダーの左上(日曜日=1 土曜日=7 なので1足した状態で戻る)
        let dayOfWeek = calendar.component(.weekday,from:firstOfMonth!)

        return calendar.date(byAdding: .day, value: 1-dayOfWeek, to: firstOfMonth!)!
    }


    //月カレンダーの終点になる日を求める
    func EndOfMonthCalendar() ->Date{

        //次の月初めを取得
        let nextmonth = calendar.nextDate(after: selectDay, matching: DateComponents(day:1), matchingPolicy: Calendar.MatchingPolicy.nextTime)

        //曜日を調べて、その要素数だけ進んだものが右下(次の月の初めで計算している事に注意)
        let dayOfWeek = calendar.component(.weekday,from: nextmonth!)

        return calendar.date(byAdding: .day, value: 7-dayOfWeek, to: nextmonth!)!
    }


    //月ごとのセルの数を出すメソッド
    func daysAcquisition() -> Int{

        //始まりの日と終わりの日を取得
        biginDay = BeginOfMonthCalender()
        endDay = EndOfMonthCalendar()

        //始点から終点の日数
        return calendar.dateComponents([.day], from:biginDay ,to:endDay).day! + 1
    }


    //カレンダーの始点から指定した日数を加算した日付を返す
    func conversionDateFormat(index: Int)->String{

        let currentday = calendar.date(byAdding: .day, value: index, to: biginDay)

        return calendar.component(.day, from: currentday!).description
    }


    //今セレクトされているselectDayの年月をテキストで出力
    func CalendarHeader()->String{
        let formatter = DateFormatter()
        formatter.dateFormat = "YYYY/MM/dd"

        return formatter.string(from: selectDay)
    }


    /*
     表示月を変える操作
     */

    //SelectDayを一ヶ月戻す
    func preMonthCalendar(){
        selectDay = calendar.date(byAdding: .month, value: -1, to: selectDay)!
    }

    //SelectDayを1か月進ませる
    func nextMonthCalendar(){
        selectDay = calendar.date(byAdding: .month, value: 1, to: selectDay)!
    }


    //SelectDayを1日戻す
    func preDayCalendar(){
        selectDay = calendar.date(byAdding: .day, value: -1, to: selectDay)!
    }

    //SelectDayを1日進む
    func nextDayCalendar(){
        selectDay = calendar.date(byAdding: .day, value: 1, to: selectDay)!
    }
}
