はじめに
研修でSpring BootでECサイトを作成しました。Javaはコード量が多くなりがちですが、Spring Bootを使うこと少ないコード量で開発できました!そこで学習したことを記事にしていきたいと思います。
目次
1-1 Spring Bootとは
1-2 DI、DIコンテナを理解
1-3 MVCとは
1-4 Spring BootでHello Worldを表示
2-1 データベースと接続
2-2 Viewを返すContollerを作成
2-3 その他のよく使うアノテーション
3-1 おわりに
1-1 Spring Bootとは
Spring Bootの特徴に以下のようなものがある。
1.app設定の自動化
Spring Bootはapplicationの設定を自動的に行うことができ、環境構築が簡単にできる。
2.DIとDIコンテナ
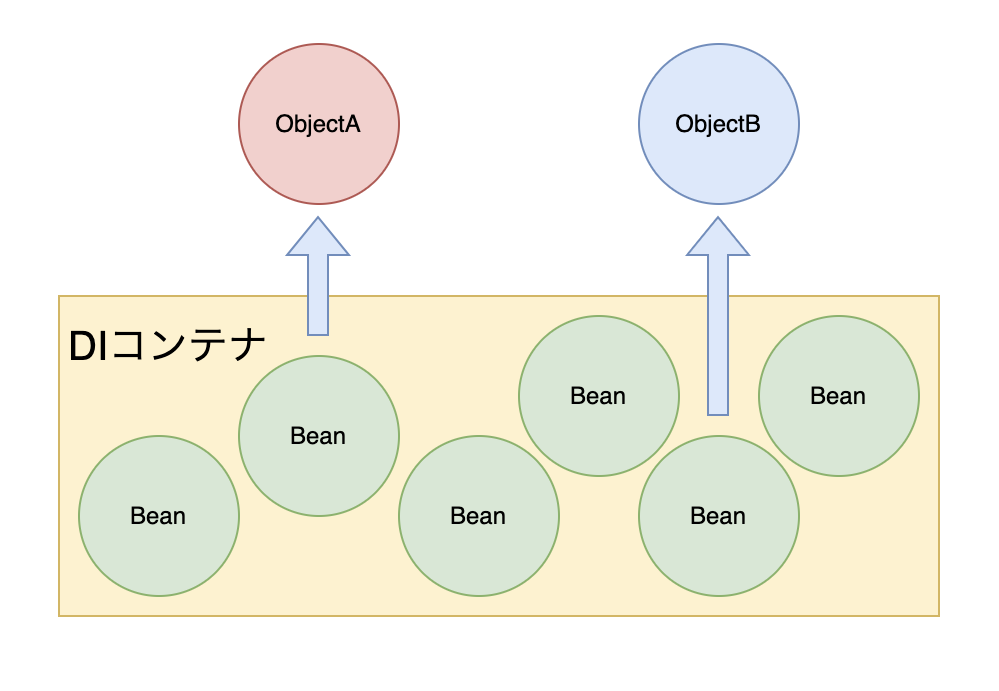
DIコンテナはアプリ内のクラスやコンポーネント間の依存関係を解析し、依存オブジェクトを管理する。コンテナ内のオブジェクトを 注入(DI) することでインスタンスを直接生成したり、取得する必要がなくなる。
3.Serverless
Spring BootはTomcatをapplicationに組み込むことで、デプロイすることなく applicationを実行できる。つまりServerlessなWebアプリを作成可能。
4.アノテーション
メタデータとして、クラス、フィールド、メソッドに@アノテーションを記述することで、構成や振る舞いを指定することができる。
1-2 DI、DIコンテナを理解
DI(dependency injection)は直訳すると、依存性の注入となるが、直感的によくわからない。調べていて腑に落ちた解釈は、必要なインスタンスの自動的な参照受け渡しである。
DIコンテナは作成されると、@Componentがついたクラスを検知し、インスタンス化したのちにDIコンテナに保存する。
以下のアノテーションは@Componentとしても機能する。
@Repository
@Service
@Controller
@Configuration
@ControllerAdvice
etc
自動的な参照受け渡しの方法として、①Constructor Injection、②Setter Injection、③Field Injectionがあるが、参照の上書きを不可能にする①Constructor Injectionが推奨されている。具体的には以下のようになる。
@Component
public class Sample_Component {
    private final Sample_DI sample_di;

    @Autowired
    public Sample_Component(Sample_DI sample_di){
      //newしないで参照受け渡し
      this.sample_di = sample_di;//←DIコンテナからやってきたオブジェクト
    }
}
このように記述することでDIを実現することができる。
またDIコンテナが@Componentを探す範囲は@ComponentScanで指定することができるが、@SpringBootApplicationは@SpringBootConfiguration、@EnableAutoConfiguration、@ComponentScan を宣言するのと同等の意味を持つので、このアノテーションがついたクラス以下のクラスファイル(サブパッケージ内も含む)がコンポーネントかどうかチェックする。SpringBootプロジェクトを作成すると自動的に以下のクラスファイルが追加されているので、開発者はこのパッケージおよびサブパッケージにコードを記述すれば良い。
package com.example;
//これがbasePackageでパッケージ内およびサブパッケージ内のクラスファイルがScan範囲
@SpringBootApplication
public class Application {
	public static void main(String[] args) {
        //ここでDIコンテナを作成
		SpringApplication.run(Application.class, args);
	}
}
1-3 MVCとは
MVC(Model-View-Controller)はWebアプリで主に使用されるソフトウェアアーキテクチャの一種で各種の特徴を以下にまとめる。
Model
Modelはデータの保持や処理を担当し、具体的にはデータベースのデータに対応するオブジェクトの操作などを行う。
View
ViewはUIを表現する。Springと互換性のあるThymeleafを用いるのが一般的らしい。th:~から始まる属性でControllerから受け取ったObjectを表現する。
Controller
Controllerはユーザーの入力やイベントを受け取り、それに基づいて適切な処理を実行し、Viewの更新や表示を制御する。具体的には@Controllerをクラスにつけて実装する。
2-1 Spring BootでHello Worldを表示
http://localhost:8080/ で「Hello World」を表示させるには@Controllerを実装したクラスでGET Methodを受け取ればいい。templatesフォルダ内にhell_world.htmlを用意して、以下のように@GetMappingを実装したString型を返すメソッドを記述する。
@Controller
public class Sample_Controller{
  @GetMapping("/")
  public String hell_world(){
      return "hello_world";
  }
}
<html>
   <body>
      <p>Hello World</p>
   </body>
</html>
2-1 データベースと接続
| OS | macOS 13.4.1 |
| IDE | Eclipse 4.27.0 |
| Framework | Spring 3.1.0 |
| Framework | Spring 3.1.0 |
| Java | JavaSE 17 |
| Database | MySQL 8.0.33 |
データベースとの接続にSpring Data JPAを使用するために、以下のコードをpom.xmlのdependenciesダグ内に追記する。
        <dependency>
    		<groupId>org.springframework.boot</groupId>
  			<artifactId>spring-boot-starter-jdbc</artifactId>
		</dependency>
		<dependency>
    		<groupId>mysql</groupId>
    		<artifactId>mysql-connector-java</artifactId>
    		<version>8.0.33</version>
		</dependency>
		<dependency>
            <groupId>org.springframework.boot</groupId>
            <artifactId>spring-boot-starter-data-jpa</artifactId>
        </dependency>
		<dependency>
  			<groupId>com.h2database</groupId>
  			<artifactId>h2</artifactId>
  			<scope>test</scope>
		</dependency>
application.propertiesは以下の通り。
spring.datasource.url=jdbc:mysql://localhost:3306/[database_name]
spring.datasource.username=root
spring.datasource.password=
spring.datasource.driver-class-name=com.mysql.cj.jdbc.Driver
CREATE TABLE accounts (
  id INT(11) AUTO_INCREMENT PRIMARY KEY,
  name VARCHAR(64),
  password VARCHAR(64)
);
INSERT INTO account (name,password) VALUES ('太郎','test');
上記のテーブルを作成し、Mainクラスのあるパッケージ内にbeans,repository,serviceパッケージを作成し、Accoutnsクラス、JapReposityインターフェースを継承したAccountsRepositoryインターフェース,AccountsServiceクラスを作成する。
package com.example.beans

@Entity
@Table(name = "accounts")
@Data
public class Accounts {
	@Id
	@Column(name = "id")
	@GeneratedValue(strategy = GenerationType.AUTO)
	private int id;

	@Column(name = "name")
	private String name;

    @Column(name = "password")
    private String password
}
@Idは主キーを指定し、@Columnはカラム名を指定、@GenerateValue(strategy = GenerationType.AUTO)は主キーを自動生成する注釈。
package com.example.repository;

@Repository
public interface AccountsRepository extends JpaRepository<Accounts,Integer>{
	public Accounts findByIdAndPassword(int id,String password);
}
@RepositoryでRepositoryとして使えるオブジェクトにして、JpaRepositoryを継承する。このインターフェースにはSQL文を実行するメソッドが用意されているが、命名規則により自動作成することもできる。以下の記事に詳しく書いてある。
findByIdAndNameメソッドでSELECT * FROM accounts WHERE id = ? AND name = ?;を実行し、その結果がそれぞれインスタンス変数に格納されたaccountsインスタンスを返す。(自動で作ってくれるすごい!)
package com.example.service;

@Service
public class AccountsService {
	@Autowired
	private final AccountsRepository accountsRepository;

	AccountsService(AccountsRepository accountsRepository){
		this.accountsRepository = accountsRepository;
	}

	public Accounts searchAccount(int id,String password) {
		return accountsRepository.findByIdAndPassword(id,password);
	}
}
2-2 View を返すControllerの作成
Sample_Controller、sample.htmlを以下のように変える。
@Controller
public class SampleController {
	@Autowired
	private final AccountsService accountsService;

	SampleController(AccountsService accountsService) {
		this.accountsService = accountsService;
	}

	@GetMapping("/")
	public String sample(Model model) {
		model.addAttribute("rs", new Accounts());
		return "sample";
	}

	@PostMapping("/search")
	public String showResult(Model model,
        @RequestParam(name = "id", required = false) id id,
		@RequestParam(name = "password", required = false) String password ) {
		  Accounts account = accountsService.searchAccount(id,password);
		  model.addAttribute("rs", account);
		  return "sample";
	}
}
<!DOCTYPE html>
<html xmlns:th="http://www.thymeleaf.org">
<head>
<meta charset="UTF-8">
<title>Spring</title>
</head>
<body>
  <p>Spring test</p>
  <form th:action="search" method="post">
	 <input type="number" name="id" />
     <input type="text" name="password" />
	 <button type="submit">send</button>
  </form>
  <th:block th:if="${rs != null}" th:object="${rs}">
     <span th:text='*{name}'></span>
  </th:block>
</body>
</html>
thymeleafを使うためにhtmlタグのxmlns:th属性にhttp://www.thymeleaf.orgを追加。
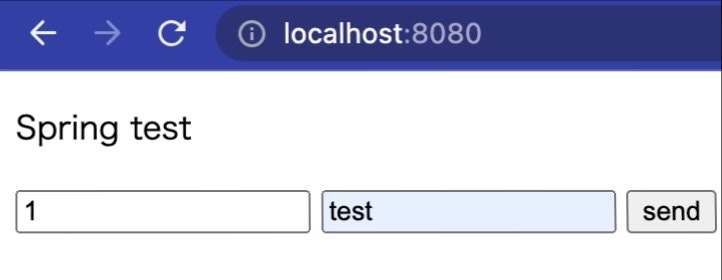
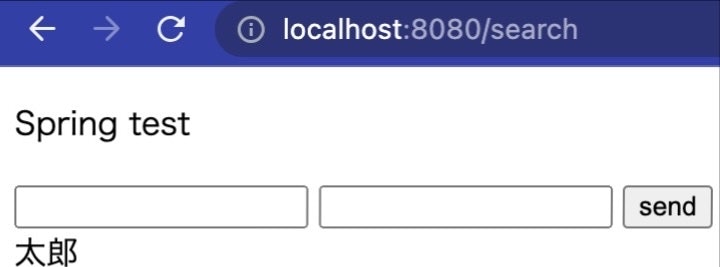
データベースにあるid,passwordを入力すると、オブジェクトに変換しviewで名前を出力できる。


2-3 その他のよく使うアノテーション
@ModelAttribute
value または nameを指定し、Model から取得する際の key を指定できる。省略した場合は、クラス名から Spring が自動的に決定する。
@SessionAttribute
セッションから特定のオブジェクトをキャストして持ってくる。
@Autowired
DIコンテナからオブジェクトを注入する。
@RequestHeader,@RequestBody,@RequestParam
リクエストスコープからデータを取り出す。
@PathVariable
URLからデータを取り出す。
詳しくはこちらの記事が参考になりました。
3-1 おわりに
Springを使うことで大幅にコード量を減らすことができる。特にデータベースに簡単な設定で接続できたり、SQL文なしでデータを取得できるのは便利すぎたし、1つのクラスに複数のページのマッピングできる点は、サーブレットよりも便利だと感じた!またSpringにはSpring SecurityやSpring CloudなどほかにもさまざまなFrameworkがあるので機会があったら触ってみたい。
何かご不明点、ご指摘などありましたら、コメントのほどよろしくお願いいたします。
