はじめに
Qiita初投稿のWeb系をやっている学生です。
先日開催されたIngress(位置情報ゲーム)のMissionDayという有志で開催されるイベントでの受付システムを構築しました。
受付ではユーザ名を事前登録されたリストから探し出し、チェックをするという作業をSpreadsheetなどの検索機能を用いて手作業で行っていました。しかし、受付開始直後は多くの人が並んでいるのでとても時間がかかってしまいます。そこでユーザ名を記録したQR-Codeを参加者に印刷してきてもらい受付ではこれを読み取るだけで、完了するようなシステムを作ってみました。
以下のTweetに動作している動画が貼ってあります。
このサイトで発行できるQRコードを使って受付システムも作りました。
— #𝚈𝚞-𝚝𝚊{𝚍𝚒𝚜𝚙𝚕𝚊𝚢: 𝚗𝚘𝚗𝚎;} (@hyuta555) September 21, 2019
QR-Codeをウェブカメラで読み込み→Apps Scriptにget→Spreadsheetから名前を探し、あれば時間を記入 というシステムです。Apps ScriptはStackDriverでLoggingもしっかりやってます!
400件以上を無障害で稼働できました👏 pic.twitter.com/j2ESuk7WKR
システム概要
Nuxt.jsを使ってWebブラウザで動作するようにしました。UIライブラリは定番のVuetifyです。ただし、iOSのSafariはカメラ関係のAPIで動作しません。これくらいの規模ならVue.js単体のほうが良さげですが、時間がなかったのでテンプレートとして利用しました。
GitHubでソースコードを公開しています。
https://github.com/yuta-hayashi/qr-reception
QR-Code読み取り
QR-Codeは単純にユーザ名をテキスト形式で表示しています。これは別で作ったイベントの情報サイトから生成できるようにしました。
読み取りはストリーム処理が出来て、精度も良いvue-qrcode-readerを使いました。
また、ウェブアプリケーション自体には認証はつけていないので、パスコードをGetリクエストに付けることで特定ユーザ以外が使えないようになっています。
さらに、それぞれのPCでの受付の履歴をLocalStorageを使って保存しています。
少しハマったのが読み込み結果を数秒間だけ表示して、表示している間にも新規に受付ができるようにするところです。setTimeout()とclearTimeout()で解決出来ました。
成功したときと失敗したときに効果音を再生しているのですが、受付時にとても役に立ちました。少し離れたところにいてもエラーが出たのを認識することができ、サウンドユーザーインターフェースの大切さを実感しました。
以下処理部分のコードの一部抜粋
<template>
  <div id="reader">
    <p class="error">{{ error }}</p>
    <h1 class="exo">
      <span>{{ result }}</span>
    </h1>
    <h2 class="exo">{{ response }}</h2>
    <br />
    <h3>QRコードをかざしてください</h3>
    <qrcode-stream @decode="onDecode" @init="onInit" :id="status" />
    <br />
    <div id="btns">
      <v-btn color="primary" dark @click="clearAll">Clear</v-btn>
      <div>
        <v-row justify="center">
          <v-dialog v-model="dialog" persistent max-width="600px">
            <template v-slot:activator="{ on }">
              <v-btn color="primary" dark v-on="on">パスコード</v-btn>
            </template>
            <v-card>
              <v-card-title>
                <span class="headline">パスコード入力</span>
              </v-card-title>
              <v-card-text>
                <p>パスコードは管理者に聞いてください</p>
                <v-container>
                  <v-row>
                    <v-col cols="12">
                      <v-text-field v-model="inputKey" label="Passcode" type="password" required></v-text-field>
                    </v-col>
                  </v-row>
                </v-container>
              </v-card-text>
              <v-card-actions>
                <div class="flex-grow-1"></div>
                <v-btn color="blue darken-1" text @click="dialog = false">保存</v-btn>
              </v-card-actions>
            </v-card>
          </v-dialog>
        </v-row>
      </div>
      <!--Safari用-->
      <v-btn @click="playSound('/success.mp3')">Play</v-btn>
    </div>
    <p>※同じ名前のQR-Codeは連続で読み込めないので、別のPCで試してください。</p>
    <p>このPCでの受付履歴です。</p>
    <v-simple-table>
      <template v-slot:default>
        <thead>
          <tr>
            <th class="text-left">Time</th>
            <th class="text-left">AgentName</th>
          </tr>
        </thead>
        <tbody>
          <tr v-for="item in agentList" :key="item.index">
            <td class="text-left">{{ item.time }}</td>
            <td class="text-left">{{ item.name }}</td>
          </tr>
        </tbody>
      </template>
    </v-simple-table>
  </div>
</template>

<script>
import axios from "@nuxtjs/axios";

export default {
  layout: "client/simple",
  data() {
    return {
      result: "",
      error: "",
      response: "",
      inputKey: "",
      dialog: false,
      agentList: [],
      status: "",
      timer: null
    };
  },
  methods: {
    onDecode(result) {
      if (result != "") {
        this.result = result;
        if (this.timer) {
          clearTimeout(this.timer);
        }
        this.response = "検索中...";
        //Apps Scriptの公開URLにパラメータをつけてGETリクエスト
        this.$axios
          .$get(
            "AppsScriptの公開URL",
            {
              params: {
                name: result,
                key: this.inputKey
              }
            }
          )
          .then(response => {
            if (response.length < 6) {
              this.response = "登録完了しました! 受付時間: " + response;
              this.status = "ok-res";
              this.playSound("/success.mp3");
            } else {
              this.response = "ERROR : " + response;
              this.status = "ng-res";
              this.playSound("/error.mp3");
            }
            const sKey = localStorage.length + 1;
            let dataObj = { time: response, name: result };
            localStorage.setItem(sKey, JSON.stringify(dataObj));
            this.agentList.push(dataObj);
            this.timer = setTimeout(this.changeStatus, 6000);
            //console.log("response:" + response);
            result = "";
          })
          .catch(err => {
            this.response = err;
            this.status = "ng-res";
            console.log("error:" + err);
          });
      }
    },
    //vue-qrcode-readerのエラーログ
    async onInit(promise) {
      try {
        await promise;
      } catch (error) {
        if (error.name === "NotAllowedError") {
          this.error = "ERROR: you need to grant camera access permisson";
        } else if (error.name === "NotFoundError") {
          this.error = "ERROR: no camera on this device";
        } else if (error.name === "NotSupportedError") {
          this.error = "ERROR: secure context required (HTTPS, localhost)";
        } else if (error.name === "NotReadableError") {
          this.error = "ERROR: is the camera already in use?";
        } else if (error.name === "OverconstrainedError") {
          this.error = "ERROR: installed cameras are not suitable";
        } else if (error.name === "StreamApiNotSupportedError") {
          this.error = "ERROR: Stream API is not supported in this browser";
        }
      }
    },
    clearAll() {
      this.response = "";
      this.result = "";
      this.status = "";
    },
    changeStatus() {
      this.clearAll();
    },
    playSound(sound) {
      if (sound) {
        var audio = new Audio(sound);
        audio.play();
      }
    }
  },
  mounted() {
    console.log("reading from localstorage.");
    for (let i = 1; i <= localStorage.length; i++) {
      this.agentList.push(JSON.parse(localStorage.getItem(i)));
    }
  }
};
</script>
Google Apps Scriptで処理
GASではSpreadSheetからユーザ名を探し出し、あればセルの横に時刻を記入します。ユーザ名が見つからないもしくは、すでに受付されている場合はエラーとしています。
GASではPOSTに対してCORSが許可されていないので、GETを使っています。送信データも2つだけなので大丈夫でした。
TextFinderは今年の4月に出来た新しい機能らしいです。デフォルトでは一部でも文字列が一致していると同じとみなすようなので、matchEntireCell(true)で完全一致している場合のみにしました。また、大文字小文字も区別する場合はmatchCase()で指定できます。
console.log()でStackdriverでログを見ることが出来ます(後術)。
function doGet(e) {
  //パスコードを検証
  var authResult = auth(e.parameter.key);
  if(authResult==true){
    var result = findName(e.parameter.name);
    //レスポンスをテキストに設定
    var output = ContentService.createTextOutput(result);
    output.setMimeType(ContentService.MimeType.TEXT);
    return output;
  }else{
    //警告ログ
    console.warn(authResult);
    var output = ContentService.createTextOutput(authResult);
    output.setMimeType(ContentService.MimeType.TEXT);
    return output;
    }
}

function auth(key){
  //スクリプトのプロパティに設定してある"key"を読み込み
  var keyValue = PropertiesService.getScriptProperties().getProperty("key");
  if(key==keyValue){
    return true;
  }else{
    return "Different Key: "+ key;
  }
}

function findName(name){
  Logger.log(name);
   // スプレッドシートを取得
  var ss = SpreadsheetApp.getActive()
  var sheet = ss.getActiveSheet();
  //TextFinerを使ってシート内から検索する
  var textFinder=sheet.createTextFinder(name).matchEntireCell(true);
  var ranges = textFinder.findNext();

  if(ranges!=null){
    time=Utilities.formatDate(new Date(), "JST", "HH:mm");
    //すでに受付されていないか確認
    if(sheet.getRange(ranges.getRow(),3).getValue()==''){
      sheet.getRange(ranges.getRow(),3).setValue(time);
      console.info("Sucess: "+ranges.getA1Notation()+" AgentName: "+ranges.getValue());
      return time;
    }else{
      //受付されていた場合は上書きしアプデートされたことをレスポンスで返す
      sheet.getRange(ranges.getRow(),3).setValue(time);
      sheet.getRange(ranges.getRow(),4).setValue("Updated");
      console.info("Sucess Updated: "+ranges.getA1Notation()+" AgentName: "+ranges.getValue());
      return time+" updated";
    }
  }else{
    console.error("Not Found Name: "+ name);
    return "Not Found Name: "+ name;
  }
}
StackdriverでLogging
doGetで実行したときに自分以外のユーザとして実行するとG Suite Developer Hubでログが見れないようなので、Stackdriverを連携させてログを収集しました。ログを収集することでSpreadheetのデータを消失した場合や不正なパスコードでアクセスされた場合にも対応できるようになります。また、Stackdriverでは多機能なログフィルタを利用できます。
※Stackdriverを使うにはGoogleCloudPlatformのアカウントが必要になります。
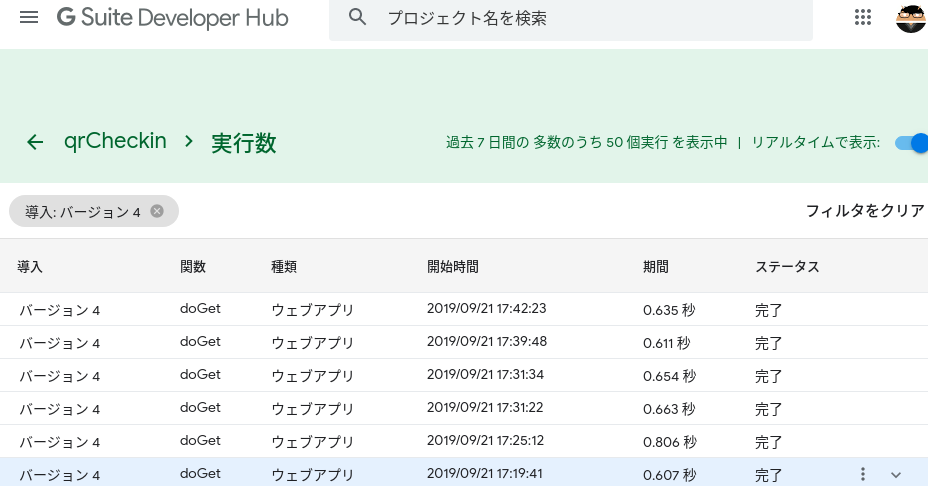
G Suite Developer Hubの実行ログ画像
AppsScriptの処理時間は1秒以下ですが、リクエストを送ってレスポンスが帰ってくるまで体感で2〜3秒程度かかっていました。
Stackdriverでのログ画像
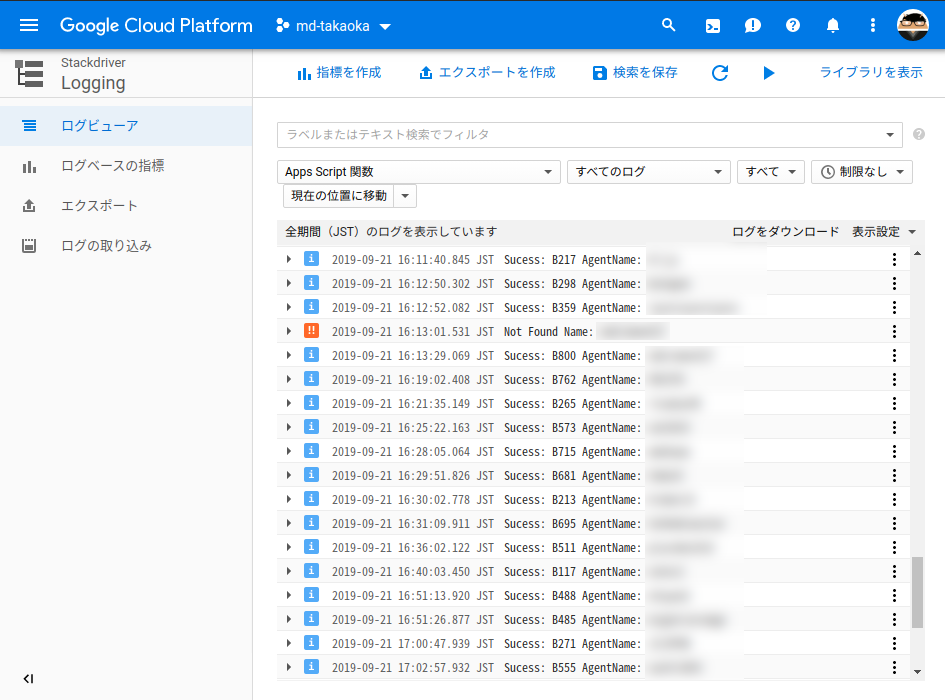
リアルタイムでログ収集ができるはずでしたが、タイムラグが最大で1時間程度あるときがありました![]()
まとめ
このシステムは実際に1分間で最大10人の受付を処理することが出来ました。
AppsScriptはSpreadsheetのスクリプト程度に考えていましたが、多機能になりログもしっかり取れることから、ちょっとしたシステムならこれで事足りるのかなと思いました。
こういったシステムは初めて作りましたが、トラブルもなく稼働してくれたので良かったです。