Web上にAdhocのiOSアプリを公開して、iPhoneでそのアプリをインストールする際、そのWeb環境がSSLに対応していないとアプリをiPhoneにインストールできません(iOS7.0以前はSSLじゃなくても問題なかったようです)。
普通にSSL対応すれば解決するのですが、わざわざそのためにSSL証明書を取得するのは微妙、、、という場合に本投稿が役立つかもしれない、と思ったので投稿しようと思います。
ちょっと長いです。
環境
- MacOS X 10.11 El Capitan
- WebServer はApache(MacOS X 10.11にpre-installされている)
- 社内LANを想定(Internetの場合も大体同じだと思いますが)
- 社内LANのWiFi環境。iPhoneで接続するため。
自己署名SSL証明書の作成/Https環境のWEBサイト準備
参考:http://niwaka.hateblo.jp/entry/2015/01/14/233555
この手順は、参考サイトとちょっと違うけど大体同じ内容です。
手順
※自分のPCにAdhocWEBサイトをたてる前提になっています。別のところにたてる場合はその環境にHTTPSアクセスできるIPアドレスにする。
- ifconfigコマンドや設定->ネットワークで、自分のIPアドレス確認。
・できれば固定IPにした方がよいが、DHCPの自動採番でもそんなに頻繁に変わらないのでどちらでもOKということにします。
2. 適当な作業フォルダを作成して、そのフォルダに移動(cdコマンド)。 3. サーバ秘密鍵用の乱数ファイルを作成。
$openssl dgst -md5 /var/log/system.log > rand.dat 4. サーバ秘密鍵を作成。passwordは適当で。
$openssl genrsa -des3 -rand rand.dat 1024 > server_key.pem 5. サーバ秘密鍵のパスワードを削除。※4のままだとapache再起動するたびにpasswordが求められるため
$openssl rsa -in server_key.pem -out server_key.pem 6. 証明書署名要求(CSR)ファイルを作成
$openssl req -new -key server_key.pem -out server_csr.pem
【入力例】
Country Name (2 letter code) [AU]:JP
State or Province Name (full name) [Some-State]:TOKYO
Locality Name (eg, city) []:TOKYO
Organization Name (eg, company) [Internet Widgits Pty Ltd]:adhocapp
Organizational Unit Name (eg, section) []:system
Common Name (e.g. server FQDN or YOUR name) []:(自分のPCのIPアドレス)
Email Address []:(自分のPCのIPアドレス)
A challenge password []:(入力なしでリターン)
An optional company name []:(入力なしでリターン) 7. 自己署名証明書を作成。有効期限10年。
$openssl req -days 3650 -in server_csr.pem -key server_key.pem -x509 -out crt.pem 8. Apacheのフォルダにコピー
sudo cp server_key.pem /private/etc/apache2/server.key
sudo cp crt.pem /private/etc/apache2/server.crt 9. /private/etc/apache2/httpd.confの編集。ApacheでSSL通信を使えるようにする。
・/private/etc/apache2/httpd.confを別のフォルダ(~/Documentsなど)にコピーして編集。編集後、元の場所にペースト。El CapitanはSIP(セキュリティシステム)が効いてて直接編集はできないため。
# LoadModule ssl_module libexec/apache2/mod_ssl.so
↓
LoadModule ssl_module /usr/libexec/apache2/mod_ssl.so

# LoadModule socache_shmcb_module libexec/apache2/mod_socache_shmcb.so
↓
LoadModule socache_shmcb_module /usr/libexec/apache2/mod_socache_shmcb.so
# El Capitanだとlibexec/apache2/xxxx.so は無くて(libexecフォルダがない)、すべて/usr/libexec/apache2フォルダ以下にある。
# libexec/apache2→/usr/libexec/apache2に全て置換でも良さそう。

# Secure (SSL/TLS) connections
# Include /private/etc/apache2/extra/httpd-ssl.conf
↓
Include /private/etc/apache2/extra/httpd-ssl.conf
10. /private/etc/apache2/extra/httpd-ssl.conf を編集(httpd.confと同じように別フォルダで編集してもとの場所にペースト)。SSLサーバー証明書/秘密鍵の場所を指定。
# SSLCertificateFile "/private/etc/apache2/server.crt"
↓
SSLCertificateFile "/private/etc/apache2/server.crt"

# SSLCertificateKeyFile "/private/etc/apache2/server.key"
↓
SSLCertificateKeyFile "/private/etc/apache2/server.key"

ServerName (自分のPCのIPアドレス):443
ServerAdmin hoge@(自分のPCのIPアドレス)
11. Apacheを再起動。
$sudo apachectl restart
・ブラウザで、https://(自分のPCのIPアドレス)にアクセスして、以下のような画面になったらOK。  →「(自分のPCのIPアドレス)にアクセスする(安全ではありません)」をクリックすると「It's Work!」がデフォルトのままだと表示される。
自己署名SSL証明書のプロジジョニングプロファイル作成
iPhone構成ユーティリティで1で作ったサーバー証明書(server.crt)を含んだプロジジョニングプロファイル(mobileconfigファイル)を作成する
- iPhone構成ユーティリティをインストール(インストールされていなかったら)
http://mac.softpedia.com/get/System-Utilities/iPhone-Configuration-Utility.shtml
・Apple 公式版が削除されているのか見当たらなかった
2. iPhone構成ユーティリティの左上の新規ボタンクリック。 3. 作成されたプロファイル行をクリック。 4. [一般]に以下をセット
名前:任意。iPhoneでこのプロファイルインストール時に表示される。
識別子:任意。com.company.profile など
ここも任意で、WEBサイトアクセスの信頼用。など  5. [資格情報]をクリックして、[構成]をクリック。 6. 作成したサーバー証明書(/private/etc/apache2/server.crt)を選択。 7. 左上の[書き出す]をクリック。 8. セキュリティ:[構成プロファイルに署名]を選択(デフォルト選択)して、[書き出す]をクリック。適当なフォルダにプロジジョニングプロファイル(mobileconfigファイル)を書き出す。
・以下の画像のように「構成プロファイルに署名する」が不活性になっていたら書き出せないので、~/Library/Preferences/com.apple.iPhoneConfigurationUtility.plist と~/Library/Preferences/com.apple.iPhoneConfigurationUtility.plist.lockfile とをゴミ箱に捨ててiPhone構成ユーティリティ再起動して、この手順をやり直してください。  参考:https://origin-discussions-jp.apple.com/thread/10111606?start=0&tstart=0
Adhoc配信用Webサイトの用意
コンテンツを用意して、WEBページに公開
- WEBページ用のフォルダを抵当なところに作成。
- 作成したフォルダに以下を置く。
・作成した自己署名SSL証明書のプロジジョニングプロファイル(mobileconfigファイル)
・AdhocのiOSアプリのipa
・アプリアイコン。512x512 のpng画像。
・ローディング中の画像。57×57 PNG画像
・AdhocのiOSアプリインストール用のplist。Xcodeで作成できます。
<?xml version="1.0" encoding="UTF-8"?>
<!DOCTYPE plist PUBLIC "-//Apple//DTD PLIST 1.0//EN" "http://www.apple.com/DTDs/PropertyList-1.0.dtd">
<plist version="1.0">
<dict>
  <key>items</key>
  <array>
      <dict>
          <key>assets</key>
          <array>
              <dict>
                  <key>kind</key>
                  <string>software-package</string>
                  <key>url</key>
                  <string>https://(自分のPCのIPアドレス)/(Adhocのipaファイル).ipa</string>
              </dict>
              <dict>
                   <key>kind</key>
                   <string>display-image</string>
                   <!-- optional.  ローディング中の画像。57×57-pixel PNG icon -->
                   <key>needs-shine</key>
                   <true/>
                   <key>url</key>
                   <string>https://(自分のPCのIPアドレス)/(ローディング中の画像57×57).png</string>
               </dict>
               <!-- full-size-image: 512x512 のpng画像。 -->
               <dict>
                   <key>kind</key>
                   <string>full-size-image</string>
                   <key>needs-shine</key>
                   <true/>
                   <key>url</key>
                   <string>https://(自分のPCのIPアドレス)/( 512x512 の画像).png</string>
               </dict>
          </array>
          <key>metadata</key>
          <dict>
              <key>bundle-identifier</key>
              <!-- adhocアプリのバンドルID -->
              <string>xxx.xxx.xxx</string>
              <key>bundle-version</key>
              <!-- adhocアプリのバージョン -->
              <string>0.0.1</string>
              <key>kind</key>
              <string>software</string>
              <key>title</key>
              <!-- adhocアプリ名。イントールするときに表示される。-->
              <string>Adhocアプリ</string>
          </dict>
      </dict>
  </array>
</dict>
・index.html
<html>
<html lang="ja">
<meta charset="utf-8"/>
  <head>
  <meta http-equiv="Content-Type" content="text/html; charset=UTF-8">
    <title>For Adhoc App</title>
    <style>
    body { font-family: Helvetica, Arial, sans-serif; }
    h1 { font-size: 60px; margin: 0; }
    p { font-size: 40px;  margin: 40px 0; }
    em { font-family: monospace; }
    a { color: #5298fc; text-decoration: none; }
    </style>
  </head>
  <body>

  <div>
      <h1>プロファイル</h1>
      <p><a href="https://(自分のPCのIPアドレス)/(自己署名SSL証明書のプロジジョニングプロファイル名).mobileconfig">profile install</a></p>
      <p>アプリインストール前にプロファイルをインストールしてください</p>
    </div>

    <br/>

    <div>
      <h1>アプリ</h1>
      <p><a href="itms-services://?action=download-manifest&url=https://(自分のPCのIPアドレス)/(plistの名前).plist">adhocアプリ</a></p>
    </div>
  </body>
</html>
3. /private/etc/apache2/extra/httpd-ssl.conf をもう一度編集(httpd.confと同じように別フォルダで編集してもとの場所にペースト)。WEBページ用のフォルダをDocumentRootにセット。
## DocumentRoot "/Library/WebServer/Documents"
↓
DocumentRoot "(WEBページ用のフォルダパス)"
4. Apacheを再起動。なにか間違ってなければ、これで準備完了です。 $sudo apachectl restart
iPhoneからAdhoc配信用Webサイト経由でアプリインストールできるか確認
-
自分のPCと同じネットワークのWiFiにiPhoneで接続。
-
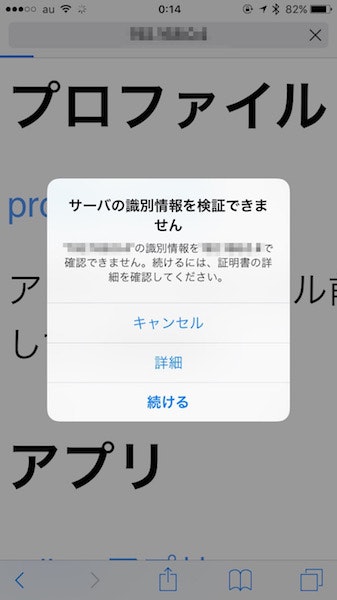
Safariでhttps://(自分のPCのIPアドレス)にアクセス。以下のように表示されますが、気にせず「続ける」をタップ。

-
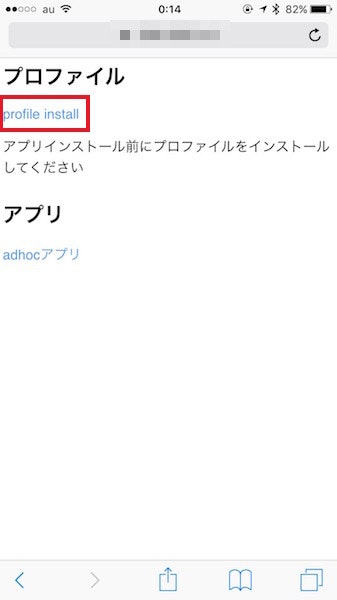
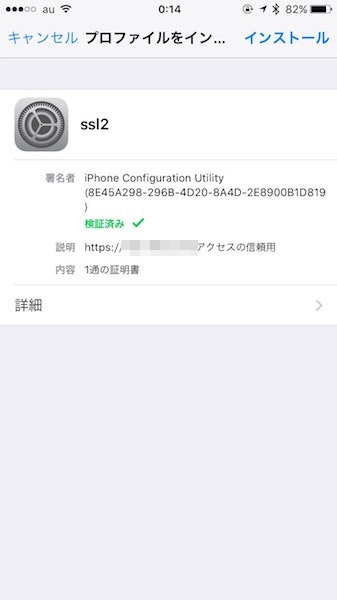
上記index.html内容例ベースですと、以下のようなページが表示されます。ページが表示されたら、"profile install"をタップ。


