概要
この記事ではSvelteKitのアプリケーションでパスキー認証をするための最低限の手順や必要事項をまとめます。
この記事内では以下の構成を前提に、順を追ってセットアップを解説をします。
- フレームワーク
- Svelte 5
- SvelteKit
- インフラ
- サーバー: Cloudflare Workers
- DB: Cloudflare D1
- KV Store: Cloudflare Workers KV
- ORM
- Drizzle
- セッション管理
- svelte-kit-sessions
- パスキーライブラリ
- SimpleWebAuthn
この記事の内容での登壇発表アーカイブがあります
この記事の内容の一部はSvelte Japan Offline Meetup #3にて発表しました。
音声で説明された方が分かりやすい部分もあると思うので、適宜アーカイブなども参照してみてください!
SvelteKitのセットアップ
まずはSvelteKitのセットアップを行います。
SvelteのCLIとしてsvコマンドが用意されているので、これを使ってセットアップをします。
以下のコマンドを実行して最低限の環境としてプロジェクトを初期化します。
パッケージマネージャーはお好みのものをどうぞ(僕はbunが大好きです)
bunx sv create --template minimal --types ts
$ bunx sv create --template minimal --types ts
┌  Welcome to the Svelte CLI! (v0.6.6)
│
◇  Where would you like your project to be created?
│  ./
│
◆  Project created
│
◇  What would you like to add to your project? (use arrow keys / space bar)
│  none
│
◇  Which package manager do you want to install dependencies with?
│  bun
│
◆  Successfully installed dependencies
│
◇  Project next steps ─────────────────────────────────────────────────────╮
│                                                                          │
│  1: git init && git add -A && git commit -m "Initial commit" (optional)  │
│  2: bun dev --open                                                       │
│                                                                          │
│  To close the dev server, hit Ctrl-C                                     │
│                                                                          │
│  Stuck? Visit us at https://svelte.dev/chat                              │
│                                                                          │
├──────────────────────────────────────────────────────────────────────────╯
│
└  You're all set!
svコマンドのオプションや引数などの詳細はドキュメントを確認してみてください。
Cloudflare Workersへデプロイできるようにする
Cloudflare Workersにアプリケーションをデプロイしたり、Cloudflare D1やCloudflare Workers KVを構成するには、CLIツールのWranglerと構成ファイルのwrangler.tomlを使います。
まずは以下の内容でプロジェクト直下にwrangler.tomlファイルを作ります。
nameとかはお好みで変えて大丈夫です。
name = "sveltekit-passkeys"
compatibility_date = "2024-12-09"

main = "./.cloudflare/worker.js"

site.bucket = "./.cloudflare/public"

build.command = "bun run build"

compatibility_flags = [ "nodejs_compat" ]
SvelteKitのアダプターもCloudflare Workers用のものがあるので、それを使うようにします。
まずはパッケージをインストールして、
bun i -D @sveltejs/adapter-cloudflare-workers
svelte.config.jsを書き換えます。
- import adapter from '@sveltejs/adapter-auto';
+ import adapter from '@sveltejs/adapter-cloudflare-workers';
import { vitePreprocess } from '@sveltejs/vite-plugin-svelte';

/** @type {import('@sveltejs/kit').Config} */
const config = {
	// Consult https://svelte.dev/docs/kit/integrations
	// for more information about preprocessors
	preprocess: vitePreprocess(),

	kit: {
		// adapter-auto only supports some environments, see https://svelte.dev/docs/kit/adapter-auto for a list.
		// If your environment is not supported, or you settled on a specific environment, switch out the adapter.
		// See https://svelte.dev/docs/kit/adapters for more information about adapters.
		adapter: adapter()
	}
};

export default config;
Cloudflare D1でDBを作る
このタイミングで一緒にDBも準備しておきます。
以下のコマンドを実行するとセットアップに必要な情報を取得することができます。
bunx wrangler d1 create sveltekit-passkeys
$ bunx wrangler d1 create sveltekit-passkeys
--------------------
🚧 D1 is currently in open alpha and is not recommended for production data and traffic
🚧 Please report any bugs to https://github.com/cloudflare/workers-sdk/issues/new/choose
🚧 To request features, visit https://community.cloudflare.com/c/developers/d1
🚧 To give feedback, visit https://discord.gg/cloudflaredev
--------------------

✅ Successfully created DB 'sveltekit-passkeys'!

Add the following to your wrangler.toml to connect to it from a Worker:

[[ d1_databases ]]
binding = "DB" # i.e. available in your Worker on env.DB
database_name = "sveltekit-passkeys"
database_id = "xxxxxxxx-xxxx-xxxx-xxxx-xxxxxxxxxxxx"
## ↑↑ 実際の出力ではIDっぽいものが表示されています
出力にある↓↓
[[d1_databases]]
binding = "DB"
database_name = "sveltekit-passkeys"
database_id = "xxxxxxxx-xxxx-xxxx-xxxx-xxxxxxxxxxxx"
の部分をコピーして自分のwrangler.tomlに貼り付けます。
これでCloudflare Workersの中からD1を使えるようになります。
Drizzleのセットアップ
次にORMとしてDrizzleをセットアップします。
SvelteKitやCloudflare D1と組み合わせて使えるように設定していきます。
まずは必要なパッケージをインストールします。
bun i -D drizzle-orm drizzle-kit @paralleldrive/cuid2 @cloudflare/workers-types dotenv
次に、以下の内容でプロジェクト直下にdrizzle.config.tsファイルを作ります。
import 'dotenv/config';
import { defineConfig } from 'drizzle-kit';

export default defineConfig({
  out: './drizzle',
  schema: './src/lib/db/schema.ts',
  dialect: 'sqlite',
  driver: 'd1-http',
  dbCredentials: {
    accountId: process.env.CLOUDFLARE_ACCOUNT_ID!,
    databaseId: process.env.CLOUDFLARE_DATABASE_ID!,
    token: process.env.CLOUDFLARE_D1_TOKEN!,
  },
});
ファイル内に記述のある./src/lib/db/schema.tsは、後ほど作成します。
この辺りの手順の詳細はDrizzleのドキュメントに記載があります。
Cloudflareの各種情報を揃える
dbCredentialsのところの各種値はDrizzle Kitを使ってマイグレーションをするのに使います。
必要な値はそれぞれ以下の手順で取得します。
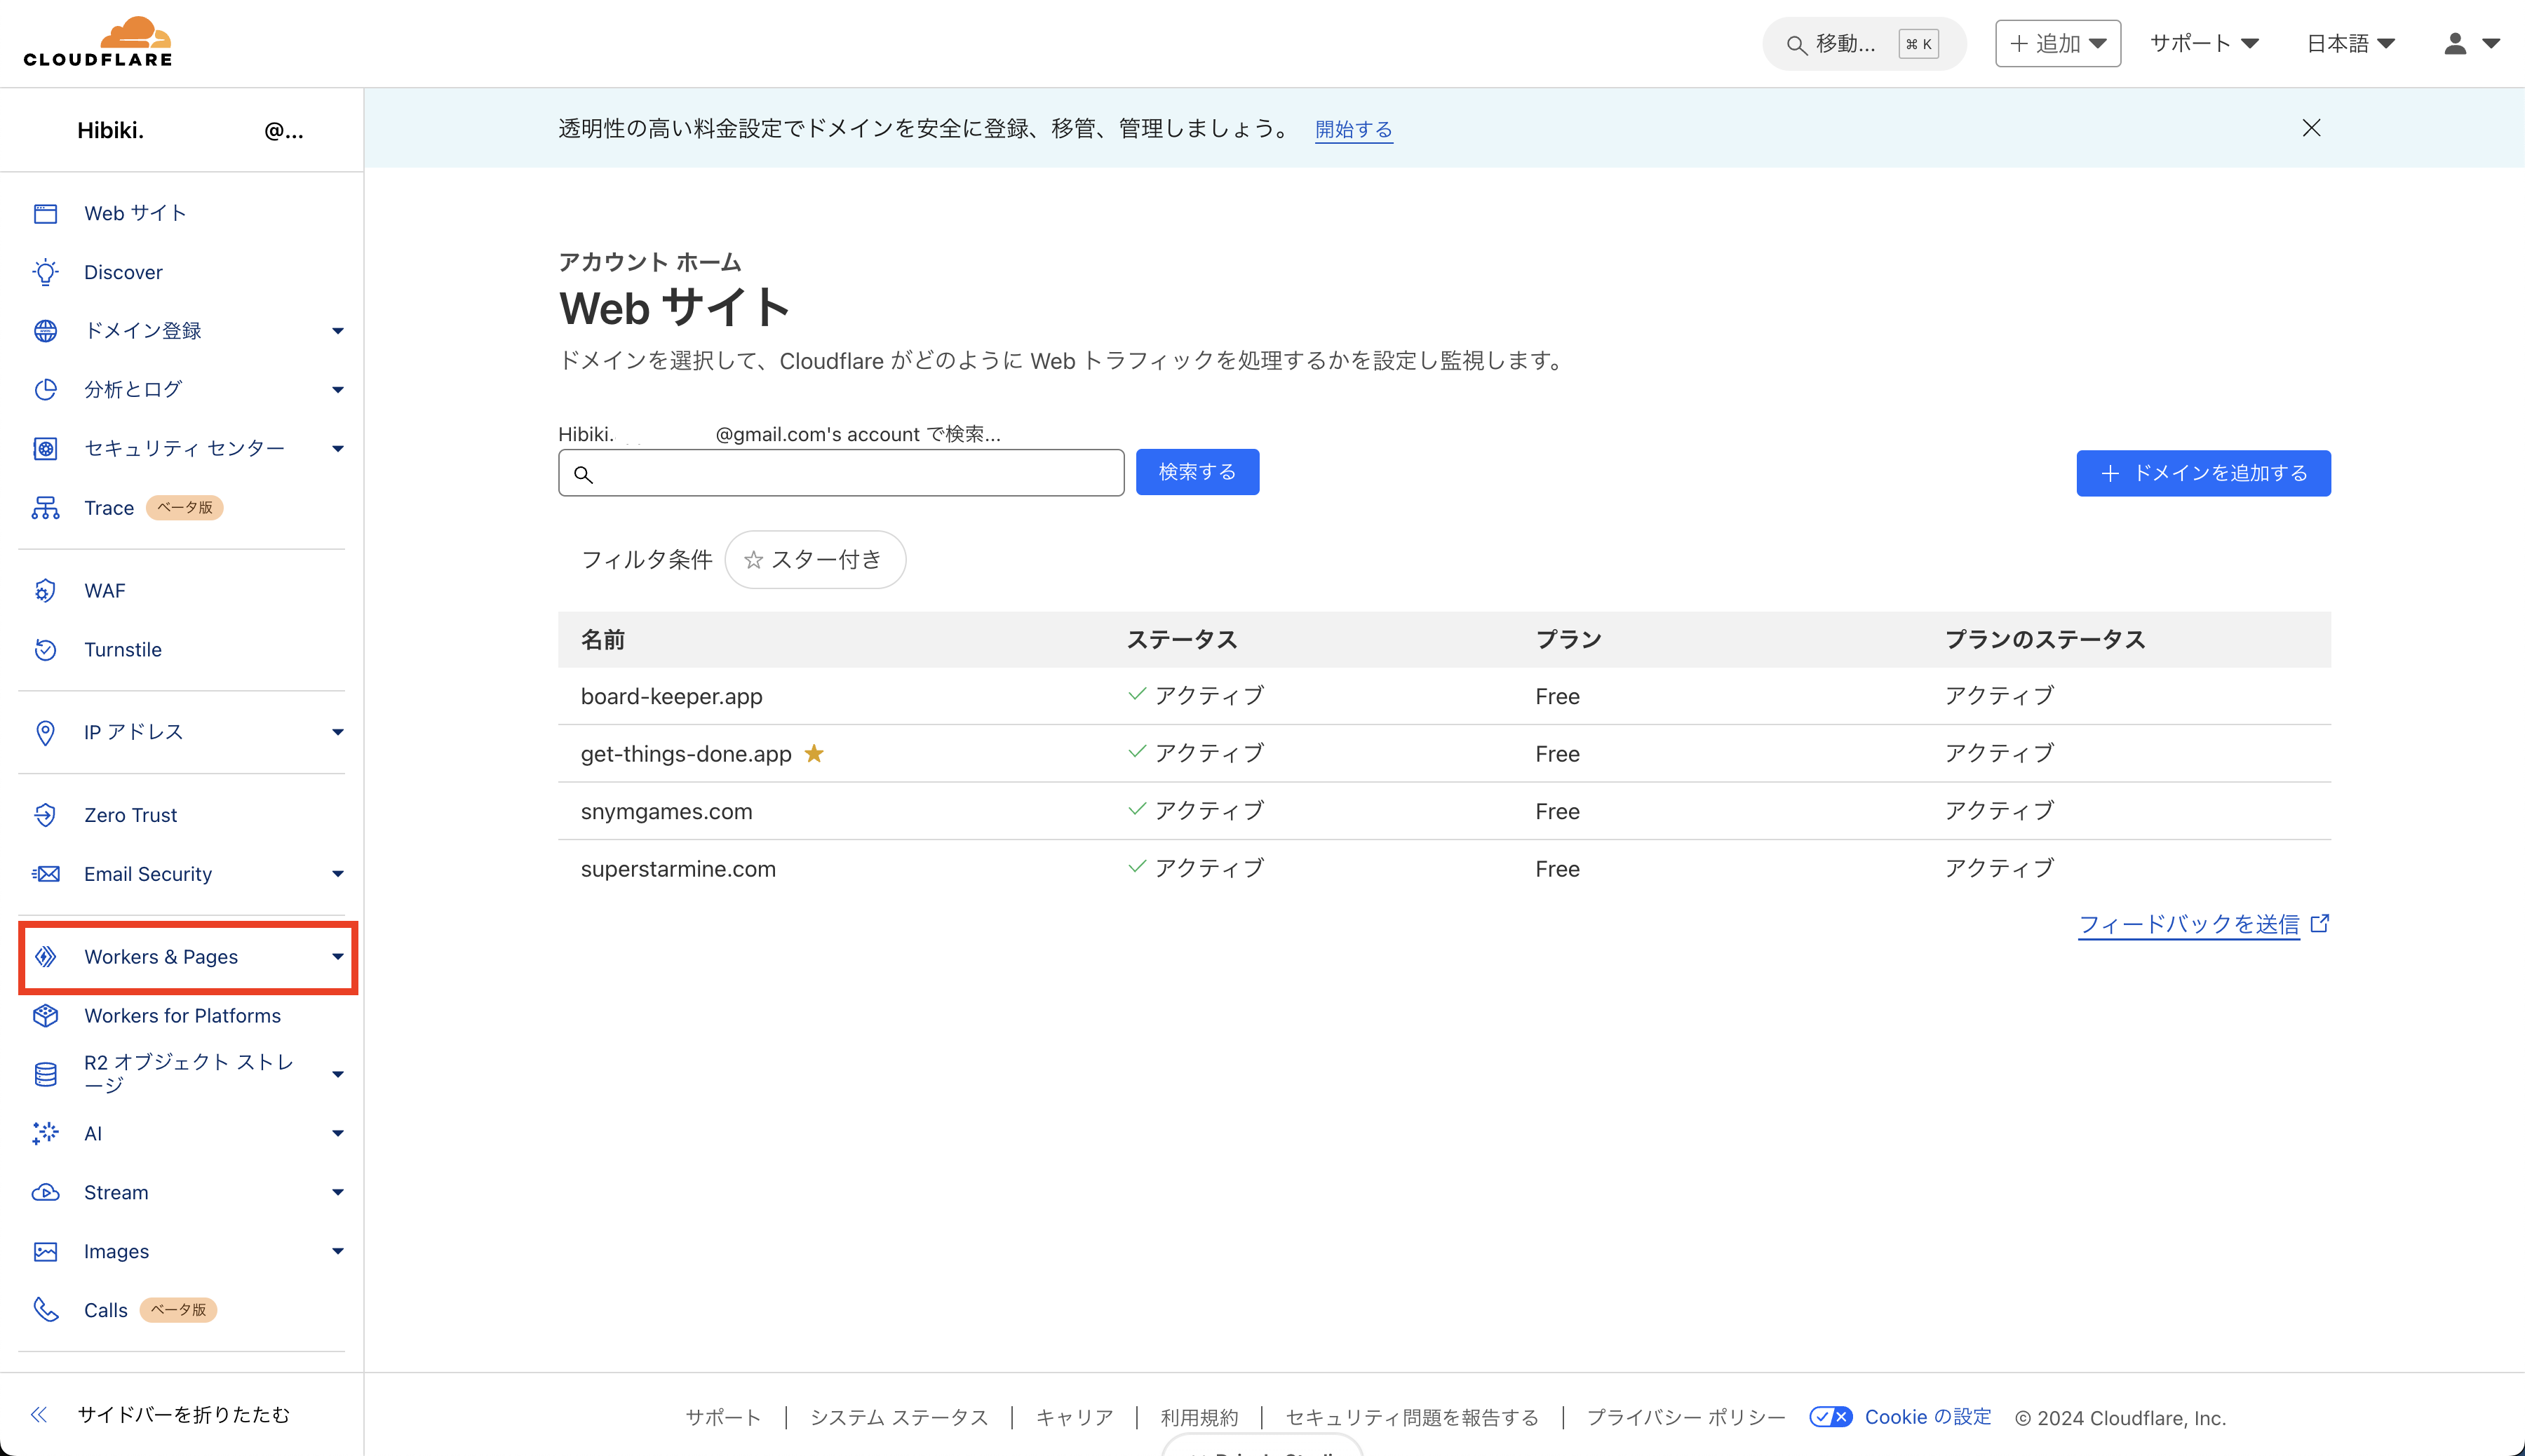
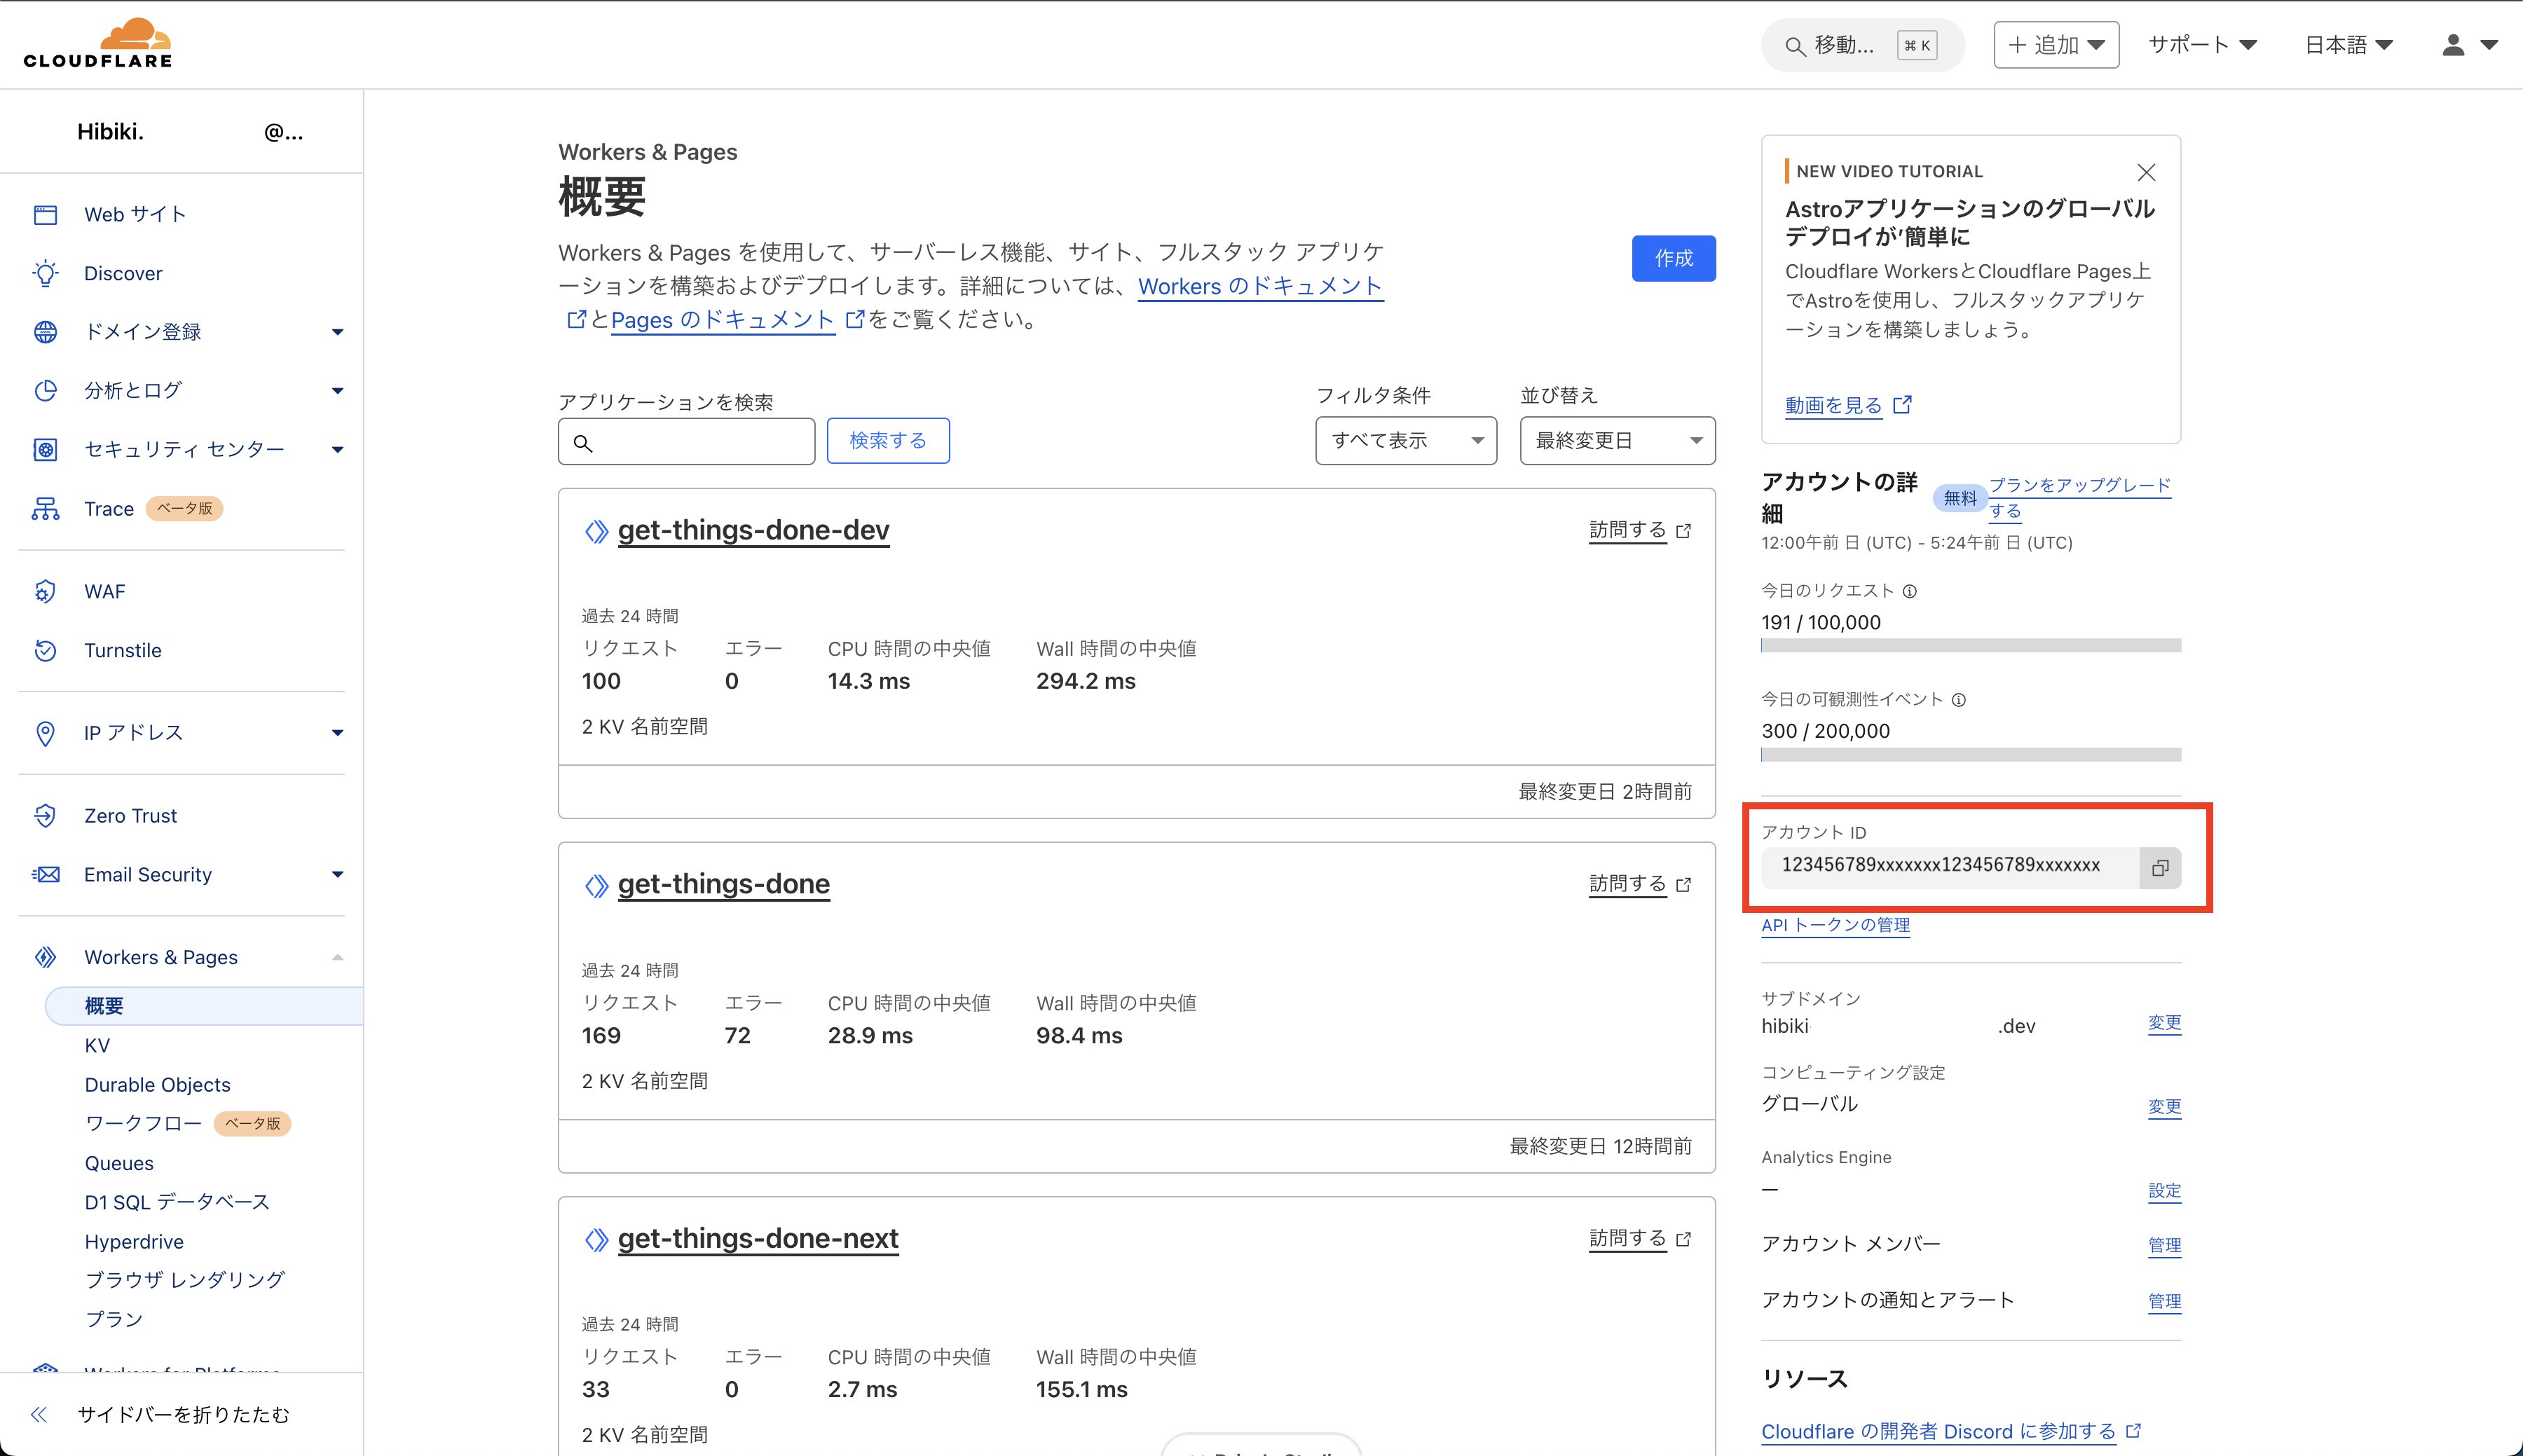
accountId
-
Cloudflareのダッシュボードにアクセスします
https://dash.cloudflare.com
databaseId
Cloudflare D1でDBを作るの手順でwrangler.tomlに貼り付けたdatabase_idと同じです。
token
- ユーザーAPIトークンの管理ページにアクセスします
https://dash.cloudflare.com/profile/api-tokens - トークンを新しく作成します

- カスタムトークンを選びます

- D1を編集する権限をつけます

- 作成を進めると、最後にトークンが表示されます

このAPIトークンは再度表示できないので、必ず控えておきます
得られた3つの認証情報は、.envファイルに記載しておきます。
CLOUDFLARE_ACCOUNT_ID=123456789xxxxxxx123456789xxxxxxx
CLOUDFLARE_DATABASE_ID=xxxxxxxx-xxxx-xxxx-xxxx-xxxxxxxxxxxx
CLOUDFLARE_D1_TOKEN=1234XXXX1234XXXX1234XXXX1234XXXX1234XXXX
SvelteKitからDrizzleを使いやすいようにする
最後に、SvelteKitの中でDrizzleを利用しやすくします。
以下のファイルを追加します。
import { env } from '$env/dynamic/private';
import { drizzle } from 'drizzle-orm/d1';
import * as schema from './db/schema';

export const db = drizzle(env.DB as unknown as D1Database, { schema });
このままだとD1Databaseの型が使えなくてエラーになってしまうので、以下のようにtsconfig.jsonを編集します。
{
	"extends": "./.svelte-kit/tsconfig.json",
	"compilerOptions": {
    "allowJs": true,
    "checkJs": true,
    "esModuleInterop": true,
    "forceConsistentCasingInFileNames": true,
    "resolveJsonModule": true,
+   "types": ["@cloudflare/workers-types/2023-07-01"],
    "skipLibCheck": true,
    "sourceMap": true,
    "strict": true,
    "moduleResolution": "bundler"
  }
	// Path aliases are handled by https://svelte.dev/docs/kit/configuration#alias
	// except $lib which is handled by https://svelte.dev/docs/kit/configuration#files
	//
	// If you want to overwrite includes/excludes, make sure to copy over the relevant includes/excludes
	// from the referenced tsconfig.json - TypeScript does not merge them in
}
これでDrizzleの準備は完了です。
DBのマイグレーション
次はユーザーやパスキーを管理するためのDBテーブルを作成します。
Cloudflare D1ではwranglerでコマンドを実行することでSQLを使ってDBを操作することができますが、今回はDrizzleを利用しているのでDrizzleのスキーマを用意するだけでマイグレーションまで一気に実施することができます。
まずは以下のスキーマを追加します。
import { createId } from '@paralleldrive/cuid2';
import { relations, sql } from 'drizzle-orm';
import { blob, integer, sqliteTable, text } from 'drizzle-orm/sqlite-core';

export const users = sqliteTable('User', {
  id:   text().primaryKey().$default(() => createId()),
  name: text(),
});

export const passkeys = sqliteTable('Passkey', {
  id:               text().primaryKey().$default(() => createId()),
  public_key:       blob().notNull(),
  user_id:          text().notNull(),
  webauthn_user_id: text().notNull().unique(),
  counter:          integer().notNull(),
  device_type:      text().notNull(),
  backed_up:        integer({ mode: 'boolean' }).notNull(),
  transports:       text(),
  created_at:       integer({ mode: 'timestamp' }).default(sql`(CURRENT_TIMESTAMP)`),
});

export const usersRelations = relations(users, ({ many }) => ({
  passkeys: many(passkeys),
}));

export const passkeyssRelations = relations(passkeys, ({ one }) => ({
  owner: one(users, {
    fields: [passkeys.user_id],
    references: [users.id],
  }),
}));
※見やすいようにスペースを入れてます
テーブルの構成や、それぞれのカラムが何に使われるかなどは、SimpleWebAuthnのページに詳しく記載があります。

出典: @simplewebauthn/server | SimpleWebAuthn
あとはスキーマの内容をDBに反映すれば完了です。
以下のコマンドでdrizzle/0000_hoge_fuga_piyo.sqlにマイグレーションファイルが作成されます。
bunx drizzle-kit generate
次に以下のコマンドを実行すれば実際のCloudflare D1にテーブルが作成されます。
bunx drizzle-kit migrate
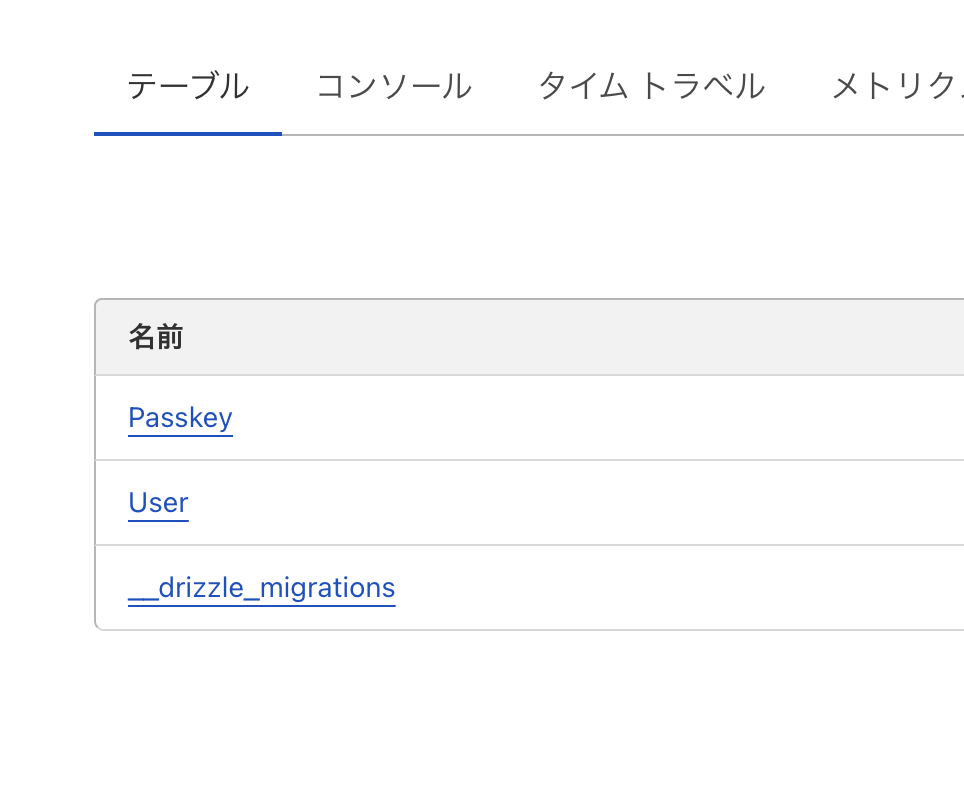
結果はCloudflareのダッシュボードから確認できます。

マイグレーションを反映するコマンドについて
bunx drizzle-kit push
だとうまくいきませんでした。
これだけだとCloudflare側でテーブルができただけなので、以下のコマンドでローカルのDBにもテーブルを作っておきます。
bunx wrangler d1 execute sveltekit-passkeys --file=drizzle/0000_hoge_fuga_piyo.sql
以下のコマンドでその結果を確認できます。
bunx wrangler d1 execute sveltekit-passkeys --command="select name from sqlite_master where type = 'table'"
$ bunx wrangler d1 execute sveltekit-passkeys --command="select name from sqlite_master whe
re type = 'table'"

 ⛅️ wrangler 3.93.0
-------------------

🌀 Executing on local database sveltekit-passkeys (xxxxxxxx-xxxx-xxxx-xxxx-xxxxxxxxxxxx) from .wrangler/state/v3/d1:
🌀 To execute on your remote database, add a --remote flag to your wrangler command.
🚣 1 command executed successfully.
┌─────────┐
│ name    │
├─────────┤
│ Passkey │
├─────────┤
│ User    │
└─────────┘
セッション管理の準備
認証後にログイン状態を維持できるように、セッション管理の仕組みを導入します。
今回はsvelte-kit-sessionsを使います。
まずは必要なパッケージをインストールします。
bun i -D svelte-kit-sessions svelte-kit-connect-cloudflare-kv
セッションに関する処理は毎アクセスごとに必要なので、SvelteKitのHooksを使います。
以下の内容でhooks.server.tsを作成します。
import type { Handle } from '@sveltejs/kit';
import type { SessionData as OriginalSessionData } from 'svelte-kit-sessions';
import { env } from '$env/dynamic/private';
import KvStore from 'svelte-kit-connect-cloudflare-kv';
import { sveltekitSessionHandle } from 'svelte-kit-sessions';

declare module 'svelte-kit-sessions' {
  interface SessionData {
    userId?: string;
    challenge?: string;
  }
}

// 型情報が正しく動くようにするためのWorkaround
declare module 'svelte-kit-connect-cloudflare-kv' {
  interface SessionData extends OriginalSessionData {}
}

export const handle: Handle = async ({ event, resolve }) => {
  let sessionHandle: Handle | null = null;

  if (event.platform && event.platform.env) {
    // https://kit.svelte.dev/docs/adapter-cloudflare#bindings
    const store = new KvStore({ client: event.platform.env.session });
    sessionHandle = sveltekitSessionHandle({
      secret: env.SESSION_SECRET,
      store,
      cookie: {
        maxAge: 3600 * 8,
        httpOnly: true,
        sameSite: 'strict',
        secure: true,
        path: '/',
      },
      rolling: true,
    });
  }

  return sessionHandle ? sessionHandle({ event, resolve }) : resolve(event);
};
これでアクセスしたユーザーごとにセッションが作られるようになります。
また、パスキーでの認証の過程で必要なチャレンジも一緒に保存するようにしています。
sveltekitSessionHandle()の初期化の中でsecret: env.SESSION_SECRETを指定していますが、これはセッション情報の暗号化に使うシークレットです。
充分長い英数の文字列として、.envファイルの中に追記しておいてください。
CLOUDFLARE_ACCOUNT_ID=123456789xxxxxxx123456789xxxxxxx
CLOUDFLARE_DATABASE_ID=xxxxxxxx-xxxx-xxxx-xxxx-xxxxxxxxxxxx
CLOUDFLARE_D1_TOKEN=1234XXXX1234XXXX1234XXXX1234XXXX1234XXXX

+ SESSION_SECRET=enough-long-random-string-hoge-fuga
また、型情報を正しく扱えるようにするためにapp.d.tsも編集します。
// See https://svelte.dev/docs/kit/types#app.d.ts
// for information about these interfaces
declare global {
  namespace App {
    // interface Error {}
    // interface Locals {}
    // interface PageData {}
    // interface PageState {}
+   interface Platform {
+     env: Env;
+     cf: CfProperties;
+     ctx: ExecutionContext;
+   }
  }
}

export {};
この辺りの詳細はそれぞれのライブラリのREADME.mdに記載があります。
また、今回の使用にあたってこちらの記事も参考にさせていただきました。ありがとうございます。
最後に、セッションの保存先としてCloudflare Workers KVをセットアップします。
以下のコマンドを実行するとKVが作成されて必要な設定情報が出力されます。
bunx wrangler kv namespace create session
出力にある↓↓
[[kv_namespaces]]
binding = "session"
id = "12345xxxxx12345xxxxxx12345xxxxxx"
の部分をコピーして自分のwrangler.tomlに貼り付けます。
これでCloudflare Workersの中からKVを使えるようになります。
パスキーの準備
ここからいよいよパスキーを使えるようにしていきます。
まずは必要なパッケージをインストールします。
bun i -D @simplewebauthn/browser @simplewebauthn/server
次に、パスキーに必要な定数を.envファイルの中で定義します。
CLOUDFLARE_ACCOUNT_ID=123456789xxxxxxx123456789xxxxxxx
CLOUDFLARE_DATABASE_ID=xxxxxxxx-xxxx-xxxx-xxxx-xxxxxxxxxxxx
CLOUDFLARE_D1_TOKEN=1234XXXX1234XXXX1234XXXX1234XXXX1234XXXX

SESSION_SECRET=enough-long-random-string-hoge-fuga

+ PUBLIC_RP_NAME=Your App Name
+ PUBLIC_RP_ID=example.com
+ PUBLIC_ORIGIN=https://example.com
ここで登場した「RP」とはRelying Partyの略で、サービス提供者、もっと端的に言えばサイトのことです。
RPの名前とドメイン、オリジンをそれぞれ指定します。
なお、ローカル開発環境においては以下のようにします。
CLOUDFLARE_ACCOUNT_ID=123456789xxxxxxx123456789xxxxxxx
CLOUDFLARE_DATABASE_ID=xxxxxxxx-xxxx-xxxx-xxxx-xxxxxxxxxxxx
CLOUDFLARE_D1_TOKEN=1234XXXX1234XXXX1234XXXX1234XXXX1234XXXX

SESSION_SECRET=enough-long-random-string-hoge-fuga

+ PUBLIC_RP_NAME=Your App Name
+ PUBLIC_RP_ID=localhost
+ PUBLIC_ORIGIN=http://localhost:8787
また、SESSION_SECRETは別途.dev.varsを作成してにローカル用のものを記載しておきます。
SESSION_SECRET=enough-long-random-string-hoge-fuga
ユーザー登録の実装
パスキーでログインができるようにするには、まずパスキーでユーザー登録ができる必要があります。
ID / パスワード形式のユーザー管理に後付けする形でパスキーを実装することもできますが、今回はパスキーを唯一のユーザー認証方法とする前提で実装を進めます。
まずは、ユーザー登録用のページを新しく作ります。
<script lang='ts'>
  let username = $state('');

  async function createPasskey() {
  }
</script>

<form action="">
  <label>ユーザー名
    <input type='text' required bind:value={username}>
  </label>
  <button onclick={createPasskey} disabled={username === ''}>登録</button>
</form>
今の状態だと登録ボタンを押しても何も起きないので、createPasskey()関数の中身と必要なAPIを実装していきます。
パスキーでのユーザー登録の手順

出典: パスキーはパスワード代わり?どうすれば使えるのか | サイバーセキュリティ情報局
ここで一旦パスキーによるユーザー登録・認証のフローを確認します。
パスキーはパスワードなしでユーザーを認証する技術です。その背後では公開鍵暗号が重要な役割を果たしています。
今回実装しているUIにおいては、ユーザーがユーザー名を入力して登録ボタンを押すと、ブラウザからサーバーにその情報が送られます。また、それと同時にチャレンジの情報も要求します。
サーバー側では受け取った情報をもとに新規ユーザーを作成し、一緒にチャレンジの情報も生成します。
これらの情報をセッションに保存した上で、チャレンジをレスポンスとして返します。
チャレンジとはパスキーの認証に使われるランダムな文字列で、チャレンジを受け取ったブラウザはこれをデバイス上の秘密鍵で署名し、有効な鍵を持っていることを証明します。
サーバー側は署名されたチャレンジを、それと一緒に送られてくる公開鍵を使って検証することで、正しく認証が行われていることを確かめることができます。
正確な情報は改めて確認してください
嘘を書いているつもりはありませんが、詳細は省いてなんとなくの理解で説明している部分が多々あるので、正確な情報は各自様々な情報を調べてみてください。
API
パスキーでのユーザー登録のフローがわかったところで、まずは必要なAPIを作成します。
必要なのは
- ユーザー登録とチャレンジ生成を行うエンドポイント
- チャレンジを検証し、パスキーを登録するエンドポイント
の2つです。
まずは1つ目のユーザー登録とチャレンジ生成を行うエンドポイントを作成します。
import type { PublicKeyCredentialCreationOptionsJSON } from '@simplewebauthn/types';
import type { RequestHandler } from './$types';
import { users } from '$lib/db/schema';
import { db } from '$lib/drizzle';
import { generateRegistrationOptions } from '@simplewebauthn/server';
import { error, json } from '@sveltejs/kit';
import { PUBLIC_RP_ID, PUBLIC_RP_NAME } from '$env/static/public';

export const POST: RequestHandler = async ({ request, locals: { session } }) => {
  const body: { username?: string } = await request.json();
  const userName = body.username;
  if (!userName)
    return error(400, 'Parameter missing');
  const [user] = await db.insert(users).values({ name: userName }).returning();

  const options: PublicKeyCredentialCreationOptionsJSON = await generateRegistrationOptions({
    rpName: PUBLIC_RP_NAME,
    rpID: PUBLIC_RP_ID,
    userName,
    userID: new TextEncoder().encode(user.id),
    attestationType: 'none',
    // Prevent users from re-registering existing authenticators
    excludeCredentials: undefined, // TODO: Get existing credentials,
    // See "Guiding use of authenticators via authenticatorSelection" below
    authenticatorSelection: {
      residentKey: 'required',
      userVerification: 'preferred',
      authenticatorAttachment: 'platform',
    },
  });

  await session.regenerate();
  session.cookie.path = '/';
  await session.setData({
    userId: user.id,
    challenge: options.challenge,
  });
  await session.save();

  return json({ options });
};
4つのブロックで、それぞれ順に
- 新規ユーザー作成
- チャレンジの生成
- セッションへの保存
- レスポンス返却
を行っています。
次に、チャレンジを検証し、パスキーを登録するエンドポイントを作成します。
import type { RegistrationResponseJSON } from '@simplewebauthn/types';
import type { RequestHandler } from './$types';
import { Buffer } from 'node:buffer';
import { passkeys } from '$lib/db/schema';
import { db } from '$lib/drizzle';
import { verifyRegistrationResponse } from '@simplewebauthn/server';
import { json } from '@sveltejs/kit';
import { PUBLIC_ORIGIN, PUBLIC_RP_ID } from '$env/static/public';

export const POST: RequestHandler = async ({ request, locals: { session } }) => {
  const registrationResponseJSON: RegistrationResponseJSON = await request.json();

  const expectedChallenge = session.data.challenge;
  if (!expectedChallenge)
    return json({ error: 'Parameters incorrect' }, { status: 400, statusText: 'Bad Request' });

  const verification = await (async () => {
    try {
      return await verifyRegistrationResponse({
        response: registrationResponseJSON,
        expectedChallenge,
        expectedOrigin: PUBLIC_ORIGIN,
        expectedRPID: PUBLIC_RP_ID,
      });
    }
    catch (error) {
      console.error(error);
    }
  })();

  if (!verification)
    return json({ error: 'Challenge verification failed' }, { status: 400, statusText: 'Bad Request' });

  const { verified } = verification;
  const { registrationInfo } = verification;

  const user = await db.query.users.findFirst({
    where: ({ id }, { eq }) => eq(id, session.data.userId ?? ''),
  });

  if (verified && registrationInfo && user) {
    const {
      credential,
      credentialDeviceType,
      credentialBackedUp,
    } = registrationInfo;

    await db.insert(passkeys)
      .values({
        user_id: user.id,
        webauthn_user_id: user.id,
        id: credential.id,
        public_key: Buffer.from(credential.publicKey),
        counter: credential.counter,
        transports: credential.transports?.join(',') ?? null,
        device_type: credentialDeviceType,
        backed_up: credentialBackedUp,
      });

    session.cookie.path = '/';
    await session.setData({ userId: user.id });
    await session.save();
  }

  return json({ verified });
};
verifyRegistrationResponse()の部分で、ブラウザから送り返されてきた署名済みチャレンジを検証しています。
この辺りの詳細はSimpleWebAuthnのドキュメントに記載があります。
チャレンジの検証が終わったら、パスキーの情報をDBに保存しています。
また、セッションの情報も改めて保存しています。(冗長な気もしますが念のため)
ブラウザ側のでの処理
続いてブラウザ側では、先ほど作った2つのエンドポイントに対してリクエストを行う各種処理を実装していきます。
先ほどのsrc/routes/register/+page.svelteの中で未実装だったcreatePasskey()の処理を以下のように実装します。
<script lang='ts'>
  import type { VerifiedRegistrationResponse } from '@simplewebauthn/server';
  import type { PublicKeyCredentialCreationOptionsJSON } from '@simplewebauthn/types';
  import { goto, invalidateAll } from '$app/navigation';
  import { startRegistration } from '@simplewebauthn/browser';

  let username = $state('');
  async function createPasskey() {
    if (username === '') {
      return;
    }
    const { options } = await (await fetch('/api/auth/register', {
      method: 'POST',
      body: JSON.stringify({ username }),
      credentials: 'same-origin',
      headers: {
        'Content-Type': 'application/json',
      },
    })).json().catch((err) => {
      console.error(err);
    }) as { options: PublicKeyCredentialCreationOptionsJSON | null };
    if (!options)
      return;
    const registrationResponse = await startRegistration({ optionsJSON: options });

    const verificationJSON: VerifiedRegistrationResponse = await (await fetch('/api/auth/register/verify-challenge', {
      method: 'POST',
      credentials: 'same-origin',
      headers: {
        'Content-Type': 'application/json',
      },
      body: JSON.stringify(registrationResponse),
    })).json();

    if (verificationJSON.verified) {
      await invalidateAll();
      goto('/');
    }
  }
</script>

<form action="">
  <label>ユーザー名
    <input type='text' required bind:value={username}>
  </label>
  <button onclick={createPasskey} disabled={username === ''}>登録</button>
</form>
上から順に、
-
const { options } = ...: ユーザー名の受け渡しとチャレンジの取得 -
startRegistration(): 認証器に対して認証(署名やパスキーの保存など)の要求 -
const verificationJSON: ...: 認証結果の送信 - ページデータ(表示)のリフレッシュとトップページへの遷移
ユーザーからすると、2番のステップのタイミングでTouch IDやFace IDなどによるパスキーの認証を求められることになります。
ログインユーザーの表示
ログインができたら現在のユーザーを確認できた方が便利です。
今回は簡易的にユーザー名を表示してみたいと思います。
トップページに相当するsrc/routes/+page.svelteを以下のようにします。
<script lang='ts'>
  import type { LayoutServerData } from './$types';

  const layout: { data: LayoutServerData } = $props();
</script>

{#if layout.data.user}
  {layout.data.user?.name}さん、こんにちは!
{/if}
+layout.server.tsでセッション情報からユーザーを取得して、ページ側に渡す前提になっています。
これに必要な+layout.server.tsは次のようになります。
import type { LayoutServerLoad } from './$types';
import { db } from '$lib/drizzle';

export const load: LayoutServerLoad = async ({ locals: { session } }) => {
  const { userId } = session.data;
  if (!userId) {
    return {
      user: undefined,
    };
  }

  const user = await db.query.users.findFirst({
    where: ({ id }, { eq }) => eq(id, userId),
  });

  return { user };
};
セッションに入っているユーザーIDをもとに実際のユーザーデータをDBから取得しています。
この時点での動作をローカル開発環境で確かめてみます。
まず次のコマンドを実行します。
bunx wrangler dev
SvelteKitのビルドやD1、KVの準備が行われます。
以下の表示が出たら
⎔ Starting local server...
╭──────────────────────────────────────────────────────────────────────────────────────────────────╮
│  [b] open a browser, [d] open devtools, [l] turn off local mode, [c] clear console, [x] to exit  │
╰──────────────────────────────────────────────────────────────────────────────────────────────────╯
bを押してブラウザを開きます。(たぶん http://localhost:8787/ が開くはず)

ここにはまだ何もないので、 http://localhost:8787/register にアクセスします。
すると例の登録画面が現れるので、適当なユーザー名を入力します。

これで登録ボタンを押すとユーザー認証を要求されます。

認証が完了すると自動的にトップページに遷移し、先ほど入力したユーザー名に対して挨拶が表示されているはずです。![]()

このページでリロードなどをしてもログイン状態は維持され続けていることが確認できると思います。
ログイン
無事にユーザー登録ができたので、次はログインをできるようにします。
ユーザー登録と同じく、必要なのはそのためのUIとエンドポイント2つです。
API
ログインのAPIとして必要なエンドポイントは
- ログイン用のチャレンジ生成を行うエンドポイント
- チャレンジを検証し、ログイン処理を完了するエンドポイント
の2つです。
まずは1つ目のログイン用のチャレンジ生成を行うエンドポイントを作成します。
import { PUBLIC_RP_ID } from '$env/static/public';
import type { RequestHandler } from './$types';
import { generateAuthenticationOptions } from '@simplewebauthn/server';
import { json } from '@sveltejs/kit';

export const GET: RequestHandler = async ({ locals: { session } }) => {
  const options = await generateAuthenticationOptions({
    rpID: PUBLIC_RP_ID,
    userVerification: 'preferred',
    allowCredentials: [],
  });

  await session.regenerate();
  session.cookie.path = '/';
  await session.setData({
    challenge: options.challenge,
  });
  await session.save();

  return json({ options });
};
3つのブロックで、それぞれ順に
- チャレンジの生成
- セッションへの保存
- レスポンス返却
を行っています。
次に、チャレンジを検証し、ログイン処理を完了するエンドポイントを作成します。
import type { AuthenticationResponseJSON, AuthenticatorTransportFuture } from '@simplewebauthn/types';
import type { RequestHandler } from './$types';
import { passkeys } from '$lib/db/schema';
import { db } from '$lib/drizzle';
import { verifyAuthenticationResponse } from '@simplewebauthn/server';
import { json } from '@sveltejs/kit';
import { eq } from 'drizzle-orm';
import { PUBLIC_ORIGIN, PUBLIC_RP_ID } from '$env/static/public';

export const POST: RequestHandler = async ({ request, locals: { session } }) => {
  const response: AuthenticationResponseJSON = await request.json();
  const expectedChallenge = session.data.challenge;

  const passkey = await db.query.passkeys.findFirst({
    where: ({ id }, { eq }) => eq(id, response.id),
  });

  if (!expectedChallenge || !passkey)
    return json({ error: 'challenge or user not found' }, { status: 400, statusText: 'Bad Request' });

  const verification = await (async () => {
    try {
      return await verifyAuthenticationResponse({
        response,
        expectedChallenge,
        expectedOrigin: PUBLIC_ORIGIN,
        expectedRPID: PUBLIC_RP_ID,
        credential: {
          id: passkey.id,
          publicKey: passkey.public_key as Uint8Array,
          counter: passkey.counter,
          transports: passkey.transports?.split(',') as AuthenticatorTransportFuture[],
        },
      });
    }
    catch (error) {
      console.error(error);
    }
  })();

  if (!verification)
    return json({ error: 'challenge or user not found' }, { status: 400, statusText: 'Bad Request' });

  const { verified } = verification;
  const { newCounter } = verification.authenticationInfo;

  if (verified) {
    await db.update(passkeys)
      .set({ counter: newCounter })
      .where(eq(passkeys.id, passkey.id));
    session.cookie.path = '/';
    await session.setData({ userId: passkey.user_id });
    await session.save();
  }

  return json({ verified });
};
上から順に、
- チャレンジとパスキーの取得
- チャレンジの検証
- パスキーの利用に関する情報の更新(カウンターというのがインクリメントします)
- セッションの更新
を行っています。
ブラウザ側のでの処理
続いてブラウザ側では、ユーザー登録を実装した時と同じようにこれら2つのエンドポイントに対してリクエストを行う各種処理をログインボタンとして実装していきます。
AuthButton.svelteとして新しいコンポーネントを以下のように実装します。
<script lang='ts'>
  import type { VerifiedRegistrationResponse } from '@simplewebauthn/server';
  import type { PublicKeyCredentialRequestOptionsJSON } from '@simplewebauthn/types';
  import { invalidateAll } from '$app/navigation';
  import { startAuthentication } from '@simplewebauthn/browser';

  async function login() {
    const { options } = await (await fetch(`/api/auth/login`)).json().catch((err) => {
      console.error(err);
    }) as { options: PublicKeyCredentialRequestOptionsJSON | null };
    if (!options)
      return;
    const authenticationResponse = await startAuthentication({
      optionsJSON: options,
    });

    const verificationJSON: VerifiedRegistrationResponse = await (await fetch('/api/auth/login/verify-challenge', {
      method: 'POST',
      credentials: 'same-origin',
      headers: {
        'Content-Type': 'application/json',
      },
      body: JSON.stringify(authenticationResponse),
    })).json();

    if (verificationJSON.verified) {
      await invalidateAll();
    }
    else {
      throw new Error(`Verification failed: ${verificationJSON}`);
    }
  }
</script>

<button onclick={login}>ログインする</button>
login()の中で、上から順に
-
const { options } = ...: チャレンジの取得 -
startAuthentication(): 認証器に対して認証(署名など)の要求 -
const verificationJSON: ...: 認証結果の送信 - ページデータ(表示)のリフレッシュ
を行っています。
ユーザーからすると、2番のステップのタイミングでパスキーの選択を求められたり、Touch IDやFace IDなどによるパスキーの認証を求められることになります。
ログアウト
これでログインはできるようになったので、ログアウトの処理も一気に作ってしまいます。
API
ログアウトで使うAPIは1つだけ & シンプルです。
パスキーとしてはログアウトのためにやることは特にないので、セッション情報を更新するだけになります。
実装は以下のようになります。
import type { RequestHandler } from './$types';
import { json } from '@sveltejs/kit';

export const GET: RequestHandler = async ({ locals: { session } }) => {
  session.cookie.path = '/';
  await session.setData({ });
  await session.save();

  return json({ });
};
単にセッションの中身を空にしているだけです。
ブラウザ側のでの処理
最後に、AuthButton.svelteコンポーネントでログアウトもできるようにします。
以下の部分をAuthButton.svelteに追加します。
<script lang='ts'>
  import type { VerifiedRegistrationResponse } from '@simplewebauthn/server';
  import type { PublicKeyCredentialRequestOptionsJSON } from '@simplewebauthn/types';
+ import type { InferSelectModel } from 'drizzle-orm';
  import { invalidateAll } from '$app/navigation';
+ import { users } from '$lib/db/schema';
  import { startAuthentication } from '@simplewebauthn/browser';

+ const { user }: { user: InferSelectModel<typeof users> | undefined } = $props();

  async function login() {
    const { options } = await (await fetch(`/api/auth/login`)).json().catch((err) => {
      console.error(err);
    }) as { options: PublicKeyCredentialRequestOptionsJSON | null };
    if (!options)
      return;
    const authenticationResponse = await startAuthentication({
      optionsJSON: options,
    });

    const verificationJSON: VerifiedRegistrationResponse = await (await fetch('/api/auth/login/verify-challenge', {
      method: 'POST',
      credentials: 'same-origin',
      headers: {
        'Content-Type': 'application/json',
      },
      body: JSON.stringify(authenticationResponse),
    })).json();

    if (verificationJSON.verified) {
      await invalidateAll();
    }
    else {
      throw new Error(`Verification failed: ${verificationJSON}`);
    }
  }

+ async function logout() {
+   await fetch('/api/auth/logout', {
+     credentials: 'same-origin',
+   });
+   await invalidateAll();
+ }
</script>

+{#if user?.id}
+ <button onclick={logout}>ログアウトする</button>
+{:else}
  <button onclick={login}>ログインする</button>
+{/if}
ユーザー情報を引数として受け取るようにし、それがあれば(=ログイン状態であれば)ログアウトボタンを出すようにしています。
logout()関数の中では先ほど作成したエンドポイントを叩き、ページデータ(表示)のリフレッシュを行なっています。
仕上げ
最後に、AuthButton.svelteコンポーネントをトップページに表示してみます。
<script lang='ts'>
  import type { LayoutServerData } from './$types';
+ import AuthButton from '$lib/components/AuthButton.svelte';

  const layout: { data: LayoutServerData } = $props();
</script>

{#if layout.data.user}
  {layout.data.user?.name}さん、こんにちは!
{/if}

+ <AuthButton user={layout.data.user} />
この状態で再度ローカル開発環境を立ち上げると、以下のようにログイン処理ができるはずです![]()
デプロイ
ではいよいよこれをCloudflare Workersにデプロイしてみます。
以下のコマンドを実行します。
bunx wrangler deploy
このあとCloudflareのダッシュボードにアクセスすると、以下の箇所でURLを確認できます。

ページが正常に動作するには、これをRP IDやオリジンとして環境変数に登録する必要があります。
.envを以下のように編集します。
CLOUDFLARE_ACCOUNT_ID=123456789xxxxxxx123456789xxxxxxx
CLOUDFLARE_DATABASE_ID=xxxxxxxx-xxxx-xxxx-xxxx-xxxxxxxxxxxx
CLOUDFLARE_D1_TOKEN=1234XXXX1234XXXX1234XXXX1234XXXX1234XXXX

- SESSION_SECRET=enough-long-random-string-hoge-fuga

+ PUBLIC_RP_NAME=SvelteKit Passkeys
+ PUBLIC_RP_ID=sveltekit-passkeys.your-account-hoge.workers.dev
+ PUBLIC_ORIGIN=https://sveltekit-passkeys.your-account-hoge.workers.dev
環境変数の管理について
Gitで管理することや今後もローカルで開発することなどを考えるともうちょっと別の方法をとった方がいいのですが、今は一旦動くことを優先します
また、SESSION_SECRETは機密性のある情報なので、以下のコマンドを実行して別途設定します。
bunx wrangler secret put SESSION_SECRET
プロンプトが出るので、シークレットの内容を入力します。
ここまで完了したら、再度デプロイを行います。
bunx wrangler deploy
これで再度ページにアクセスすると、ユーザー登録やログイン / ログアウトが動くはずです!![]()
ローカル開発で作ったユーザーは使えません。
- Cloudflare D1の情報はローカルとサーバー側で同期しない
- パスキーはパスキーに登録されているオリジンと実際のオリジンを比較している
上記の理由により、オリジンが変わるとパスキーも新たに登録する必要があります。
(回避策は色々と考えられそうではありますが)
おわり!
かなり長くなりましたが、これでSvelteKitでパスキーを使ったユーザー認証ができるようになりました!
ここまでお読みいただいてありがとうございました。
ここで使ったコードの一式はGitHubで公開しているので、ライセンスの範囲で自由に活用してください。


