PleasanterのAzureAppService環境のSAML設定
Pleasanter(プリザンター)はオープンソースのビジネスアプリケーションプラットフォームです。顧客管理や営業支援、プロジェクト管理など様々な業務をノンプログラミングでWebデータベース化することができます。動作が軽く、汎用性が高いため、日常的なコミュニケーションやマネジメントの支援ツールとして利用できます。
- https://github.com/Implem/Implem.Pleasanter 参照
- インストール等は、こちらのサイトに詳しく書かれています。
はじめに
・非常に優れたアプリをオープンソースで提供しているImplem社に感謝。
・もともとPlesanterは、AD(LDAP)にてユーザー認証を行ってましたが、今回SAML認証を使ってみようとした備忘録です。
前提
- 以下の前提とした記事です。
- Pleasanterは、既にAzureAppServiceにインストールしている。
- Pleasanterのパラメータ設定を変更するAzure上の権限がある。
- EntraIDの設定権限(クラウド管理者等)がある。(今回は、365で使用しているEntraIDでの利用)
アプリケーションの登録
Microsoft Entra 管理センター(IdP)にPleasanterの登録
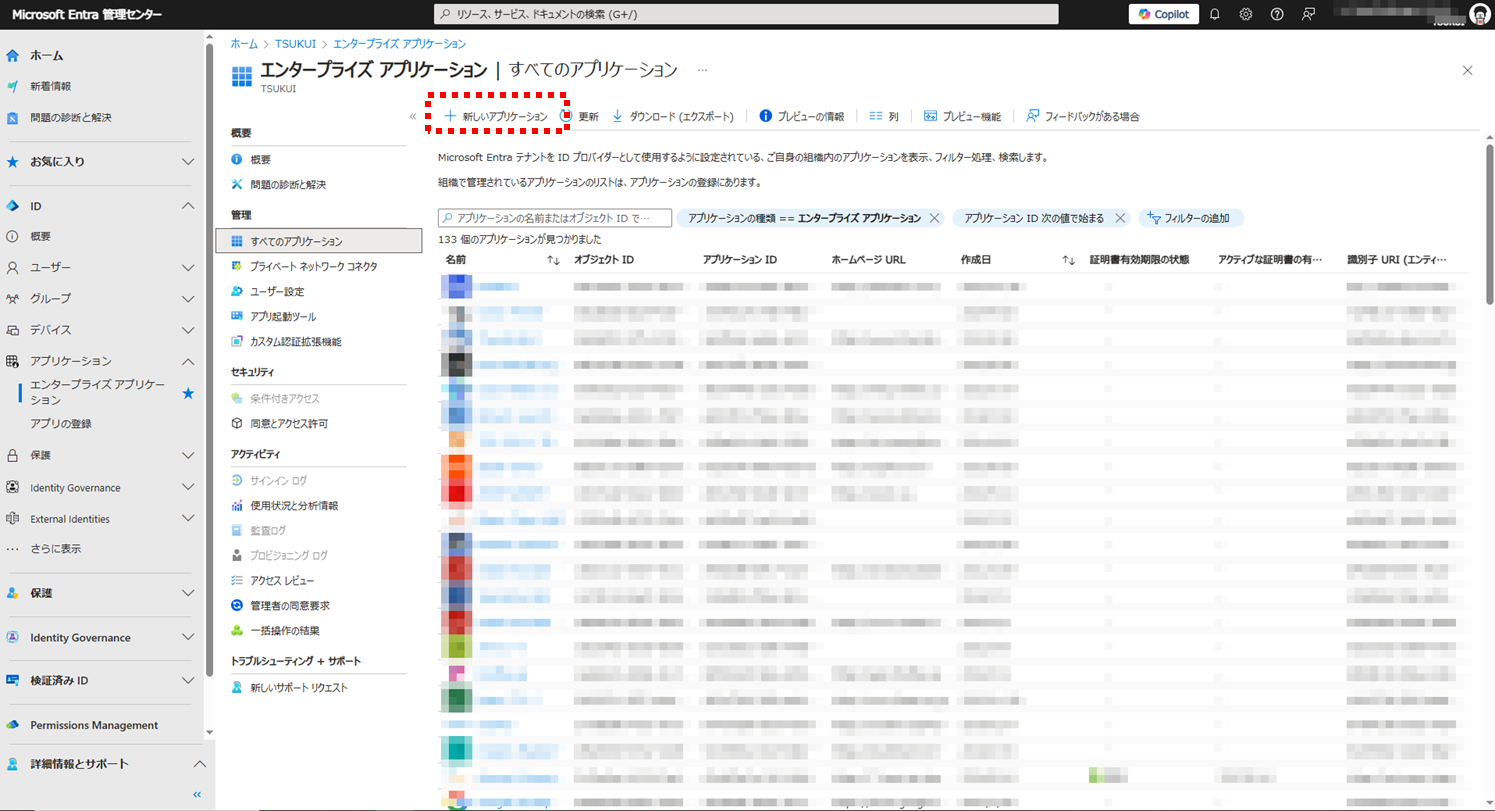
- Microsoft Entra 管理センター > アプリケーション > エンタープライズアプリケーション > 新しいアプリケーションを選択
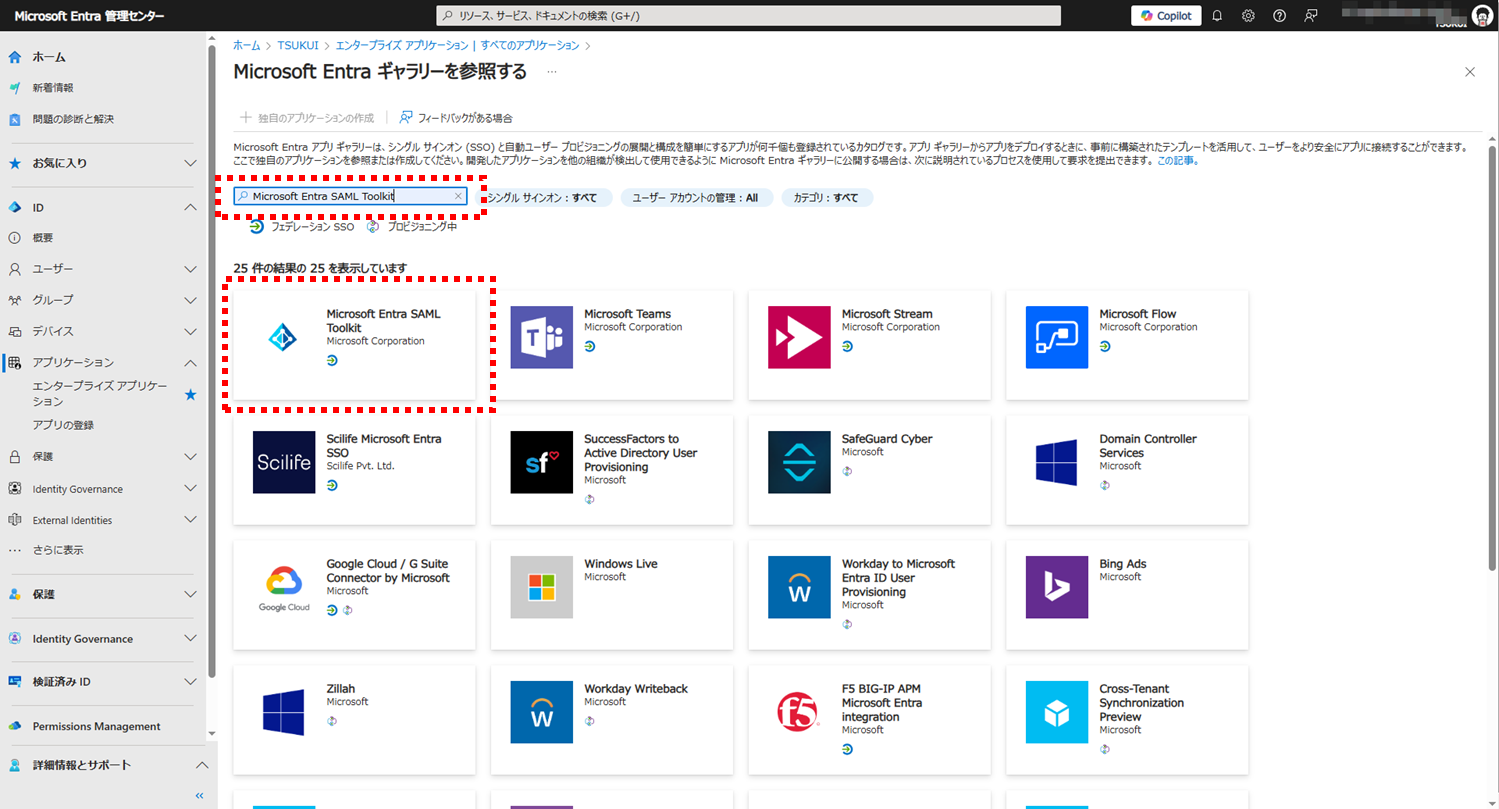
- 検索バーに「Microsoft Entra SAML Toolkit」と入力し、検索された結果から「Microsoft Entra SAML Toolkit」を選択
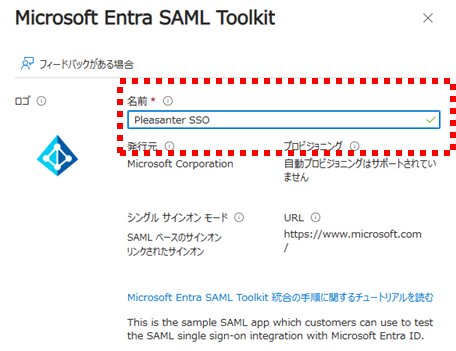
- 名前を「Microsoft Entra SAML Toolkit」から「Pleasanter SSO」に変更して、作成ボタンを選択
- 名前は、自由です。
ユーザー、グループの割り当て
- 「ユーザーとグループの割り当て」を選択 > SSOを行いたい対象者もしくはグループを選択して割り当て

- 「ユーザーまたはグループの追加」を選択し、PleasanterのSSOを行いたいグループまたは、ユーザーを追加します。

SAML設定
1.基本的なSAML構成
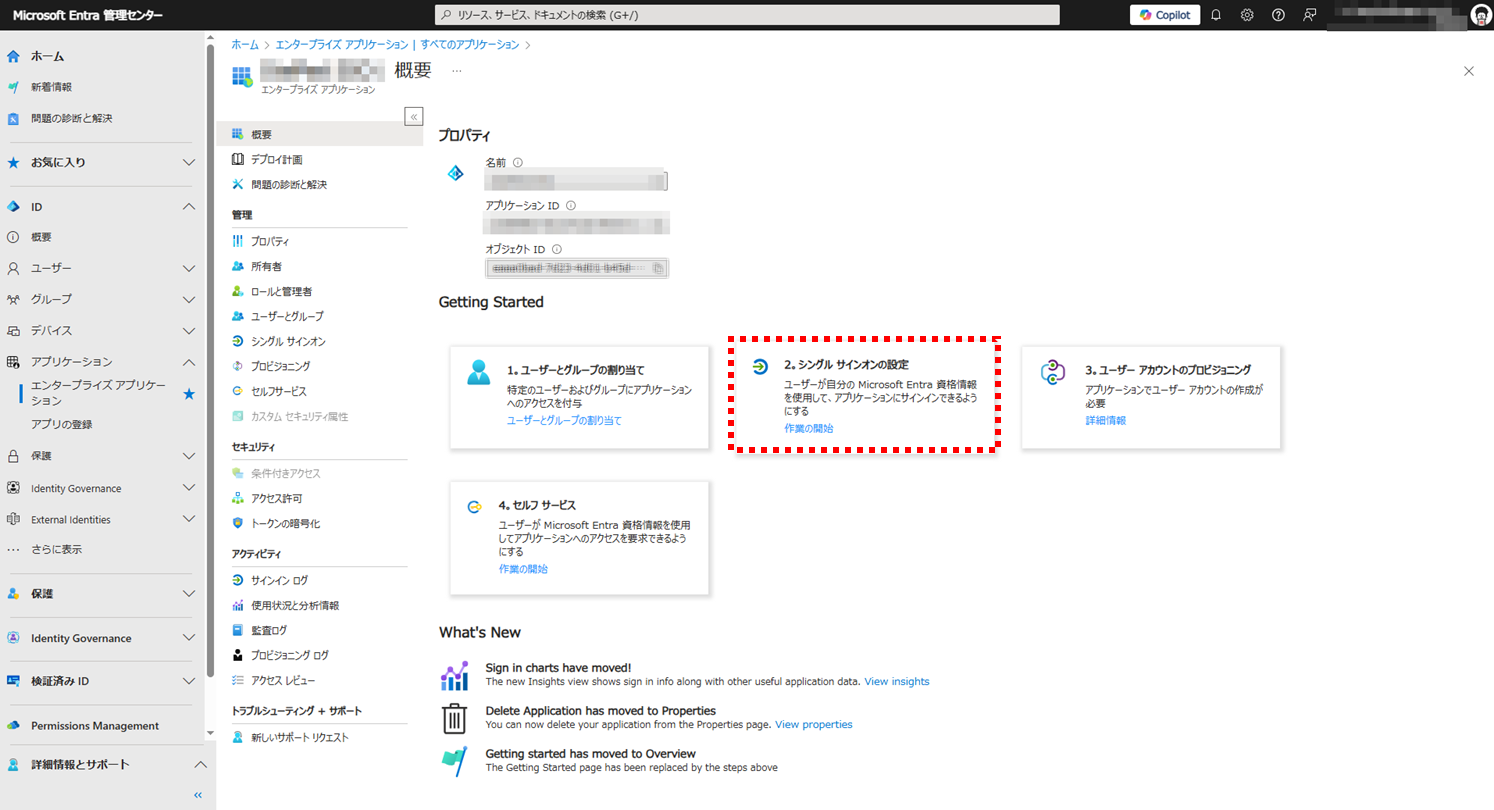
- 「シングルサインオンの設定」を選択
- 「基本的なSAML構成」の「編集」選択

- 識別子(エンティティID)の「識別子の追加」を選択
- 「PleasanterのURL」+「/Saml2」を入力する
- 例:
https://{プリザンターのURL}/Saml2 -
Authentication.jsonのEntityId
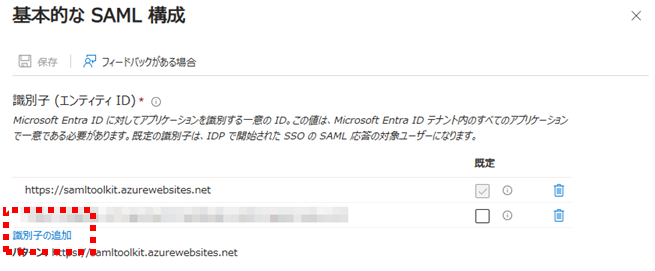
- 「https://samltoolkit.azurewebsites.net」 は、ごみ箱アイコンから削除する。

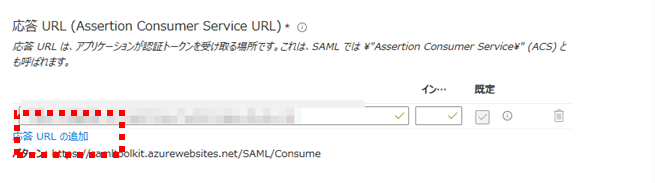
- 「応答 URL (Assertion Consumer Service URL)の「応答URLの追加」を選択
- 「PleasanterのURL」+「/Saml2/Acs」を入力する
- 例:
https://{プリザンターのURL}/Saml2/Acs -
Authentication.jsonのSPOptionsのEntityIdに設定します。
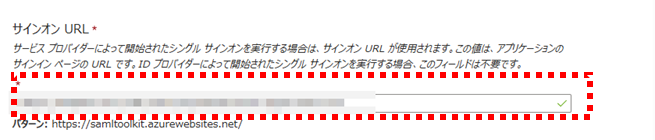
- 「サインオンURL」の入力
- 「PleasanterのURL」+「/users/login」を入力する
- 例:
https://{プリザンターのURL}/users/login
2.属性とクレーム
- 「属性とクレーム」の「編集」を選択

- 「新しいクレームの追加」を選択

- 以下の入力を行い、「保存」を選択
| 項目 | 内容 |
|---|---|
| 名前 | Name |
| ソース属性 | user.displayname |

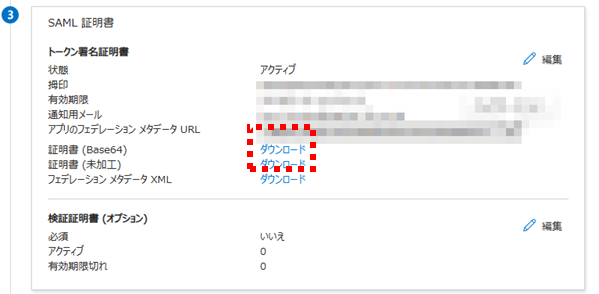
3.SAML証明書
- 「SAML証明書」の「編集」を選択
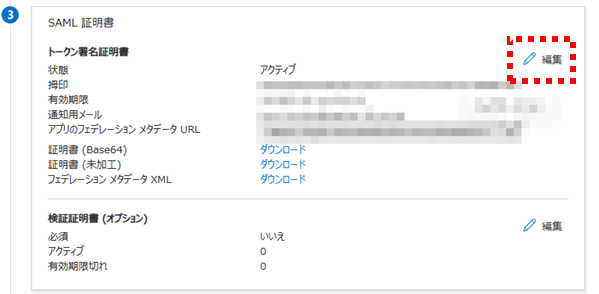
- 「新しい証明書」を選択し、「保存」を選択

- 「証明書(Base64)」のファイルをダウンロードしておきます。
- 「拇印」は、
Authentication.jsonのFindValueに設定します。
- 「拇印」は、
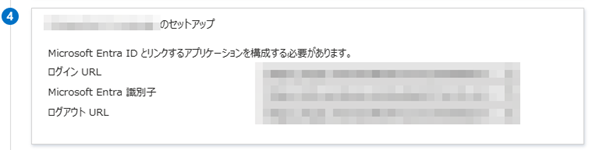
4.Pleasanter のセットアップ
- 以下の項目を控えておきます。
| 項目 | 内容 |
|---|---|
| ログイン URL |
Authentication.jsonIdentityProvidersのSignOnUrl |
| Microsoft Entra 識別子 |
Authentication.jsonIdentityProvidersのEntityId |
証明書のインストール
PleasanterのAzure AppServiceに証明書インストール
- Azureポータル > プリザンターのWebアプリ > 証明書 > 公開キー証明書(.cer) > 証明書の追加 を選択

- Microsoft Entra管理センターからダウンロードした証明書を選択し、「追加」を選択
- 上の手順で作成したSAML証明書

Pleasanter(SP)のAuthentication.jsonの登録
- Azureポータル > プリザンターのWebアプリ > App Service Editor(プレビュー) > エディタを開く を選択
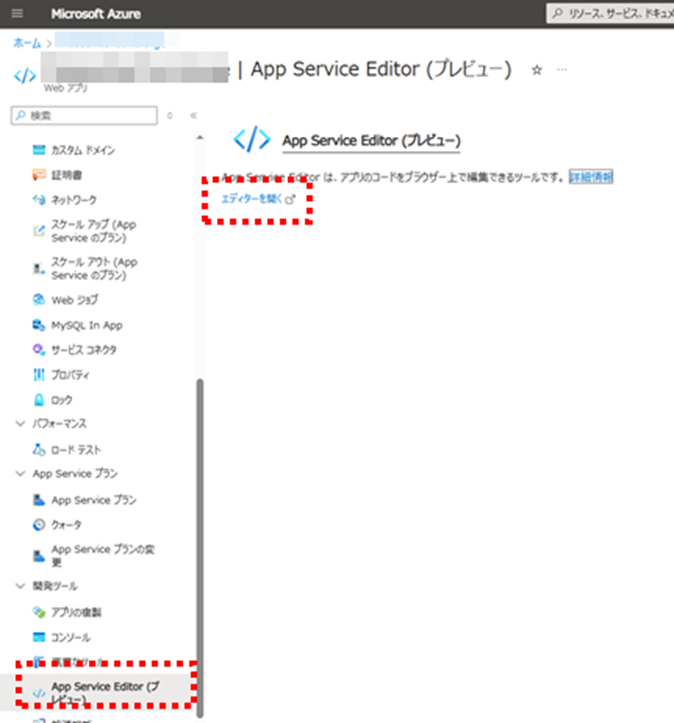
-
Authentication.jsonを選択

- Authentication.jsonの必要項目を入力
| JSON | 項目 | 内容 |
|---|---|---|
| SamlParameters | Attributes | 各属性クレームに合わせて修正してください。 |
| SPOptions | EntityId | https://{プリザンターのURL}/Saml2 |
| SPOptions | ReturnUrl | https://{プリザンターのURL}/Users/SamlLogin |
| IdentityProviders | EntityId | 4.Pleasanter のセットアップで控えたMicrosoft Entra 識別子 |
| IdentityProviders | SignOnUrl | 4.Pleasanter のセットアップで控えたログイン URL |
| IdentityProviders/SigningCertificate | FindValue | 3.SAML証明書で控えた拇印 |
- 以下の様に必要項目を修正し、「SAVE」を選択
Authentication.json
    "SamlParameters": {
        "Attributes": {
            "Name": "Name",
            "UserCode": "employeeId",
            "Birthday": "Birthday",
            "Gender": "Gender",
            "Language": "Language",
            "TimeZone": "TimeZone",
            "TenantManager": "TenantManager",
            "DeptCode": "Department",
            "Dept": "PhysicalDeliveryOfficeName",
            "Body": "JobTitle",
            "MailAddress": "{NameId}"
        },
        "SamlTenantId": 1,
        "DisableOverwriteName": false,
        "NotCreatePersistentCookie": false,
        "SPOptions": {
            "EntityId": "https://{PleasanterのURL}/Saml2",
            "ReturnUrl": "https://{PleasanterのURL}/Users/SamlLogin",
            "AuthenticateRequestSigningBehavior": "IfIdpWantAuthnRequestsSigned",
            "OutboundSigningAlgorithm": "http://www.w3.org/2001/04/xmldsig-more#rsa-sha256",
            "MinIncomingSigningAlgorithm": "http://www.w3.org/2001/04/xmldsig-more#rsa-sha256",
            "IgnoreMissingInResponseTo": false,
            "PublicOrigin": "https://{PleasanterのURL}",
            "ServiceCertificates": []
        },
        "IdentityProviders": [
            {
                "EntityId": "{控えておいたMicrosoft Entra 識別子}",
                "SignOnUrl": "{控えておいたログイン URL}",
                "LogoutUrl": null,
                "AllowUnsolicitedAuthnResponse": true,
                "Binding": "HttpPost",
                "WantAuthnRequestsSigned": false,
                "DisableOutboundLogoutRequests": true,
                "LoadMetadata": false,
                "MetadataLocation": null,
                "SigningCertificate": {
                    "StoreName": "My",
                    "StoreLocation": "CurrentUser",
                    "X509FindType": "FindByThumbprint",
                    "FindValue": "{SAML証明画面の拇印}"
                }
            }
        ]
    }
起動確認
- Azureポータル上から再起動を行う。

- 「SSO ログイン」がログイン画面に表示される
- ユーザー名、パスワードは空欄のままで、「SSO ログイン」を選択し、ログインができるか確認。
