はじめに
この記事は研究室の学生の教育用に作成してゆきます.
現在はROS2がメジャーとなってきておりますが,まずは自習が出来るよう文献が豊富なROS1でROSの扱いに慣れてみます.
ROSは既に多くの文献があり,それだけでも自習可能ですが解説されているバージョンや環境が違い,初心者には躓きやすい内容だと思ったため,改めてまとめてみます.
前回はこちら
Raspberry Pi 4 を使ったROS入門 第3回 Hello world
次回はこちら
Raspberry Pi 4 を使ったROS入門 第5回 RvizとSLAM体験
動作環境
Raspberry Piを使用します.(用意できるならUbuntu入りのPCが◎)
ROSはUbuntu上で動くソフトなのですが,設定の違いによってトラブルが起きやすいので,クリーンインストールしてから始めることをお勧めします.
ROSのバージョンはUbuntuのバージョンとリンクしてます.
本記事で使用する機器とバージョン
| 使用機器 | Ubuntuバージョン | ROSバージョン |
|---|---|---|
| Raspberry Pi 4 Model B / 8GB | 20.04 | Noetic Ninjemys |
※RAMが2GB,4GBだとビルドが途中で落ちることが多々ありました.
出来れば8GBが良いかもしれません.
1. Gazeboとは
Gazeboはオープンソースのロボットシミュレータソフトです.ODE(Open Dynamics Engine)と呼ばれる物理演算エンジンがデフォルトで組み込まれていますが、他の物理演算エンジンを利用することもできます.ROS用のパッケージも用意されているため,ロボットの実機がなくても,ロボットの姿勢や動作などを確認できます.
最近はUnityとROSを連携させて機械学習などを行うことも流行っています.
2. 環境構築
ネット上にはGazeboとROSに対応したロボットモデルが存在していますので,今回はそちらを使って講義を進めていきます.まずは下記コマンドをターミナルで実行し,関連するパッケージをダウンロードします.
sudo apt update
sudo apt install ros-noetic-joy ros-noetic-ecl-build ros-noetic-ecl-threads ros-noetic-ecl-geometry ros-noetic-ecl-console ros-noetic-ecl-mobile-robot ros-noetic-ecl-devices ros-noetic-ecl-sigslots ros-noetic-ecl-command-line ros-noetic-ecl-streams ros-noetic-base-local-planner ros-noetic-move-base ros-noetic-kobuki-ftdi ros-noetic-rgbd-launch ros-noetic-depthimage-to-laserscan
sudo apt install python3-vcstool libusb-dev libftdi-dev pyqt5-dev-tools curl
curl https://bootstrap.pypa.io/get-pip.py -o get-pip.py
sudo python3 get-pip.py
pip3 install -U pip
catkin_ws/srcのディレクトリ上で下記コマンドを実行していきます.
git clone https://github.com/yujinrobot/kobuki_desktop.git
git clone https://github.com/yujinrobot/yocs_msgs.git
git clone https://github.com/yujinrobot/yujin_ocs.git
git clone https://github.com/yujinrobot/kobuki_msgs.git
git clone https://github.com/yujinrobot/kobuki_core.git
git clone https://github.com/yujinrobot/kobuki.git
git clone https://github.com/turtlebot/turtlebot_create.git
git clone https://github.com/turtlebot/turtlebot_create_desktop.git
git clone https://github.com/turtlebot/turtlebot_msgs.git
git clone https://github.com/turtlebot/turtlebot.git
git clone https://github.com/turtlebot/turtlebot_simulator.git
git clone https://github.com/turtlebot/turtlebot_interactions.git
厄介なことにこのパッケージはnoeticに対応していないため,
少しだけ書き換え作業が必要となります.(C++のコンパイラのバージョンを変更しないとビルドエラーとなります)
下記ファイルを開き18行目に追記します.
add_compile_options(-std=c++14)
noeticからPython3になってますので下記ファイルの1行目を書き換えます.
#!/usr/bin/env python
↓
#!/usr/bin/env python3
他,今回は使用しないファイルは削除しておきます.(同様に書き換えれば使用可能です)
rm -rIf yujin_ocs/yocs_ar_pair_tracking/
rm -rIf yujin_ocs/yocs_ar_marker_tracking/
rm -rIf yujin_ocs/yocs_waypoint_provider/
rm -rIf yujin_ocs/yocs_navigator/
rm -rIf turtlebot_create_desktop/create_gazebo_plugins/
rm -rIf linux_Peripheral_interfaces/libsensors_monitor/
ビルドします.このコマンドを実行するときは~/catkin_wsに移動しなければいけませんので注意が必要です.
cd ..
catkin_make
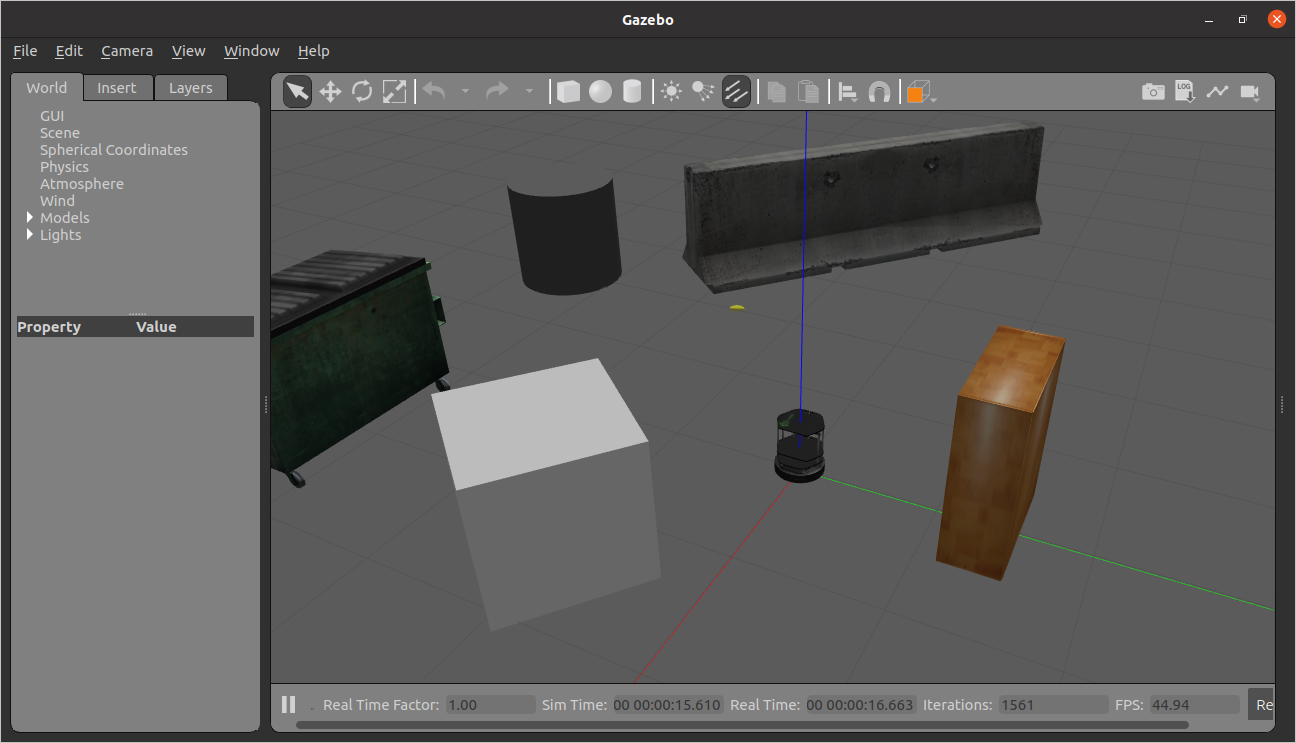
一度ターミナルを再起動したあと,下記コマンドでtartlebot2を読み込んだ状態でGazeboを起動できます.
source devel/setup.bash
roslaunch turtlebot_gazebo turtlebot_world.launch
3. ROSを使ってGazebo上のロボットを動かす
それではこのロボットモデルをキーボードで操作するプログラムを作成してゆきましょう.
下記コマンドでVSCodeを起動します.
cd ~/catkin_ws/src
code .
catkin_ws/src/beginner_tutorials/scriptsにmy_teleop.pyというファイルを作り,下記内容を書き込み保存します.
#!/usr/bin/env python3
# ROS pythonで必要なモジュールです.
import rospy
# geometry_msgsというパッケージからTwistというMessage型をimportしています.
# これからこの型でTopicにPublishしていくという事になります.
from geometry_msgs.msg import Twist

# ノードの初期化ノードに名前をつけます.
rospy.init_node('vel_publisher')
# Publisherのtopic名を/cmd_vel_mux/input/teleopとし,Twist型のtopicにPublishするようにしています.
# queue_size=10はバッファとして10つ値を保持するという意味です.
pub = rospy.Publisher('/mobile_base/commands/velocity', Twist, queue_size=10)
#プログラムがCtrl+cで終了されるまでの無限ループを定義しています.
while not rospy.is_shutdown():
    # Twist型のメッセージを変数velとして作っています.
    vel = Twist()
    # キーボード入力を受け付けます.inputはPython3の標準関数で入力があるまでプログラムを停止させます.
    # そして,エンターキーが押されるまでに入力された文字列がdirection変数に入ります.
    direction = input('f: forward, b: backward, l: left, r: right > ')
    # 入力された文字列を確認し,文字によって速度の成分に代入する数字を変えています.
    # 例えばfの入力があった場合並進成分(vel.linear.x)に0.5m/sを代入しています.
    # Qが入力されるとプログラムを終了しています.
    if 'f' in direction:
        vel.linear.x = 0.5
    if 'b' in direction:
        vel.linear.x = -0.5
    if 'l' in direction:
        vel.angular.z = 1.0
    if 'r' in direction:
        vel.angular.z = -1.0
    if 'q' in direction:
        break
    print(vel)
    pub.publish(vel)
ターミナルで下記コマンドを実行し,Pythonのファイルを実行可能な状態にします.
roscd beginner_tutorial/scripts/
chmod +x my_teleop.py
下記コマンドで実行します.
rosrun beginner_tutorial my_teleop.py
下記のように表示されたらfキーを入力しエンターを押してみてください.シミュレーター上のロボットが前へ進んだはずです.
(動かない場合はGazeboも再起動してください)
f: forward, b: backward, l: left, r: right > f
linear:
x: 0.5
y: 0.0
z: 0.0
angular:
x: 0.0
y: 0.0
z: 0.0
プログラムをいじって,ロボットの進行速度を早くしたり,キーボード割当を増やしたりしてみてください.
4.センサーデータの取り込み
続いて,次に先ほど作成したmy_teleop.pyを少し改造して,バンパーに物体が当たるとバックするプログラムを作ってみます.同じディレクトリ内にmy_teleop_bumper.pyとして保存してください.
#!/usr/bin/env python3
import rospy
from geometry_msgs.msg import Twist
from kobuki_msgs.msg import BumperEvent

rospy.init_node('vel_bumper')
pub = rospy.Publisher('/mobile_base/commands/velocity', Twist, queue_size=10)

# callbackという関数を作成
def callback(bumper):
    # Twist型のメッセージをvelとして作成
    vel = Twist()
    # 並進速度に-1.0をセット
    vel.linear.x = -1.0
    # 速度を発行
    pub.publish(vel)

# /mobile_base/events/bumperという名前でBumperEventという型Topicを購読し
# 受信したデータについて上記で作成したcallback関数を呼び出し.
sub = rospy.Subscriber('/mobile_base/events/bumper', BumperEvent, callback)

while not rospy.is_shutdown():
    vel = Twist()
    direction = input('f: forward, b: backward, l: left, r: right > ')
    if 'f' in direction:
        vel.linear.x = 0.5
    if 'b' in direction:
        vel.linear.x = -0.5
    if 'l' in direction:
        vel.angular.z = 1.0
    if 'r' in direction:
        vel.angular.z = -1.0
    if 'q' in direction:
        break
    print(vel)
    pub.publish(vel)
いつものようにターミナルで下記コマンドを実行し,Pythonのファイルを実行可能な状態にします.
roscd beginner_tutorial/scripts/
chmod +x my_teleop_bumper.py
下記コマンドで実行してみてください.
rosrun beginner_tutorial my_teleop_bumper.py
障害物にあたってバックすれば成功です.
5.Parameterを使ってみる
さっきまではロボットの進行速度が決め打ちでした.
ROSのParameterの仕組みを使って速度がセットできるようにしてみます.
下記ファイルをmy_teleop_bumper2.pyとして作成します.
#!/usr/bin/env python3
import rospy
from geometry_msgs.msg import Twist
from kobuki_msgs.msg import BumperEvent

rospy.init_node('vel_bumper')
# ここでパラメータをセットしています.
vel_x = rospy.get_param('~vel_x', 0.5)
vel_rot = rospy.get_param('~vel_rot', 1.0)
pub = rospy.Publisher('/mobile_base/commands/velocity', Twist, queue_size=10)

def callback(bumper):
    vel = Twist()
    vel.linear.x = -vel_x
    pub.publish(vel)

sub = rospy.Subscriber('/mobile_base/events/bumper', BumperEvent, callback)

while not rospy.is_shutdown():
    vel = Twist()
    direction = input('f: forward, b: backward, l: left, r: right > ')
    # 固定値ではなく,セットしたパラメータを代入しています
    if 'f' in direction:
        vel.linear.x = vel_x
    if 'b' in direction:
        vel.linear.x = -vel_x
    if 'l' in direction:
        vel.angular.z = vel_rot
    if 'r' in direction:
        vel.angular.z = -vel_rot
    if 'q' in direction:
        break
    print(vel)
    pub.publish(vel)
いつものようにターミナルで下記コマンドを実行し,Pythonのファイルを実行可能な状態にします.
roscd beginner_tutorial/scripts/
chmod +x my_teleop_bumper2.py
下記コマンドで実行してみてください.
rosrun beginner_tutorial my_teleop_bumper2.py
見た目は先程と変わりません.
今回のプログラム中に登場したパラメータは
rosparamコマンドを使って下記のようにセットできます.
./my_teleop_bumper2.py _vel_x:=1.0
./my_teleop_bumper2.py _vel_rot:=1.5
rosparamを実行するにはroscoreが走っている必要が有ります.
パラメータをセットしてもう一度動かすと,ロボットの速度が変わったと思います.
また以下の通り,launchファイルで指定することもできます.
下記の通りファイルを作ってみてください.
<launch>
  <node pkg="beginner_tutorial" type="my_teleop_bumper2.py" name="vel_bumper">
    <param name="vel_x" value="0.1"/>
  </node>
</launch>
下記コマンドで実行してみてください.
roslaunch beginner_tutorials bumper.launch
直進速度だけ遅くなっていれば成功です.
6. 他のロボットへの適応
今回自作したプログラムでturtlesim_nodeを動かしてみましょう.
turtlesimを起動します.
rosrun turtlesim turtlesim_node
下記コマンドで実行してみてください.
rosrun beginner_tutorial my_teleop_bumper2.py /mobile_base/commands/velocity:=/turtle1/cmd_vel
/mobile_base/commands/velocity:=/turtle1/cmd_velの部分でプログラムが実行する際のトピックの名前を書き換えています.
このように,ROSではTopicの名前を実行時に自由に変更できます.
ROSではTopic名の実行時の変更やパラメータのセットなどによって同一のプログラムでいろんなロボットを動かすことが出来ます.これはROSだからなんでもつながるという事ではなく,Topicの型を合わせたり,Parameterで柔軟に変更できるようにしているプログラムならばつながるというのが正しいです.
この機能のお陰で世界の天才が作ったプログラムを簡単に拝借できるのです.
トピック名の書き換えはLaunchファイルでも行えます.下記の通りファイルを作成すると,
turtlesimを起動しつつ,先程作ったプログラムを参照し,キーボード操作することができます.
<launch>
  <node name="turtlesim" pkg="turtlesim" type="turtlesim_node" />
  <node pkg="beginner_tutorial" type="my_teleop_bumper2.py" name="vel_bumper">
    <param name="vel_x" value="1.0"/>
    <param name="vel_rot" value="1.0"/>
    <remap from="/mobile_base/commands/velocity" to="/turtle1/cmd_vel"/>
  </node>
</launch>
remap from="/mobile_base/commands/velocity" to="/turtle1/cmd_vel"/
でトピック名を書き換えています.
おわりに
ようやくシミュレータ上でロボットが動き出し面白くなってきました.
ここまでくれば独学でいろんな人のプログラムを観察してシミュレーター上のロボットを動かして遊ぶことができるようになります.
よいROSライフを.
