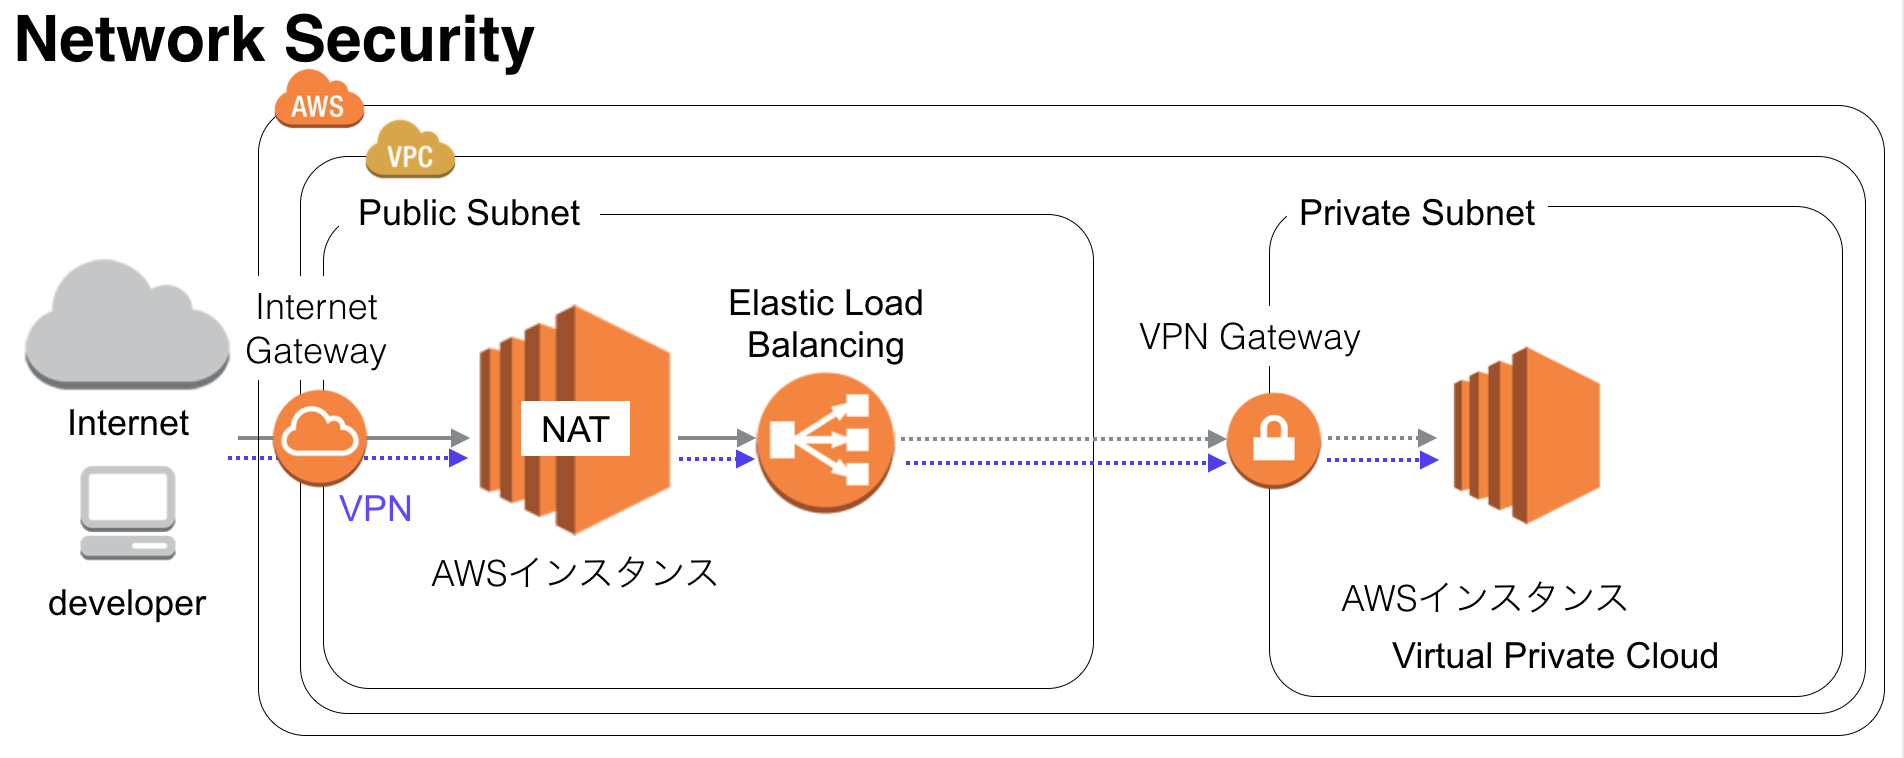
AWSの運用者は上記のような構成を作成してくれと頼まれることが多いのではないでしょうか?
特にDatabaseのインスタンスはprivateなSubnetで管理してセキュアな環境でアクセス管理をしたい人も多いはず。
今回はterraformを用いてインスタンスの自動設定から、VPNの設定、AnsibleによるVPN設定用のコンテナの作成からVPNを用いた接続まで行ってみます。
ちなみに著者はAWSのインフラ周りが専門ではありません。
対象読者
- インフラ担当者
- アプリ担当だけどリソースの関係でインフラもしないといけない人
この記事を読んで得られること
- プライベートな環境とパブリックな環境に分けてインスタンスを分けて作成する方法
- Dockerコンテナを用いてVPNを用いる方法
- terraformでAWSインスタンスを自動生成する方法。
- カジュアルに研究開発の環境を作成したい人
作成手順
VPN

VPNの設定にはOpenVPNを使用します。
OpenVPNの下記の特徴があります。
- セキュアなアクセス
- どこにいてもアクセス可能
- エンタープライズな環境でも使用されている
terraform

terraformはクラウド環境の構築の自動ツールです。
今回はAWSの環境構築を自動化しています。
Mac環境だと下記のコマンドでインストールできます。
brew update && brew install terraform
インストールしたterraformのPATHを通して、実行すると下記のコマンドが確認できます。
usage: terraform [--version] [--help] <command> [<args>]

Available commands are:
    apply      Builds or changes infrastructure
    destroy    Destroy Terraform-managed infrastructure
    get        Download and install modules for the configuration
    graph      Create a visual graph of Terraform resources
    init       Initializes Terraform configuration from a module
    output     Read an output from a state file
    plan       Generate and show an execution plan
    pull       Refreshes the local state copy from the remote server
    push       Uploads the the local state to the remote server
    refresh    Update local state file against real resources
    remote     Configures remote state management
    show       Inspect Terraform state or plan
    version    Prints the Terraform version
今回の記事で使用するのは3つです。
文法チェック
terraform plan
インスタンス作成
terraform plan
インスタンス破棄
terraform destroy
terraform初心者の方は下記をご覧下さい。
Step by stepで学ぶTerraformによる監視付きAWS構築
Ansible

Ansibleの初心者は公式ドキュメントと下記をご覧になってから読まれた方が良いです。
インフラ自動構築エンジン "Ansible"の勘所を1日でつかむ ~基礎入門編~
Docker

Dockerはアプリケーション実行環境を抽象化する技術の一つです。VMWareとの違いは実行環境の軽さによるポータビリティがあります。
今回、Dockerを使用する理由は下記です。
1:同一性、ポータビリティにより、新規参入者にすぐに環境の提供が行える。
2:今回、使用するElastic Searchの設定を部署ごとにコンテナを用意して変えるなどがしやすい
Dockerに関して詳細を知りたい方は下記をご覧ください。
Docker入門 - 基礎編 いまから始めるDocker管理
terraformを用いてインスタンス作成
値の設定
下記の設定を行います。Subnetの設定は将来立てたいインスタンス数に関連してくるので、慎重に決めた方が良いです。小さくしすぎるとインスタンスが将来足りなくなるので適切な設定が必要です。
- AWSのリージョン
- Subnetの設定
- AWSのamiの設定
- キーファイルの設定
variables.tf
variable "access_key" {}
variable "secret_key" {}

variable "aws_region" {
  description = "The AWS region to create things in."
  default = "ap-northeast-1"
}

variable "aws_region_subnet" {
  description = "The AWS region to create things in."
  default = "ap-northeast-1a"
}

variable "vpc_cidr" {
  description = "CIDR for VPC"
  default     = "10.128.0.0/16"
}

variable "public_subnet_cidr" {
  description = "CIDR for public subnet"
  default     = "10.128.0.0/24"
}

variable "private_subnet_cidr" {
  description = "CIDR for private subnet"
  default     = "10.128.1.0/24"
}

# CentOS:7 (x86_x64)
variable "aws_amis" {
  default = {
      ap-northeast-1 = "ami-1431de75"
  }
}

variable "key_name" {
  description = "Name of the SSH keypair to use in AWS."
  default = {your setting key file }
}
VPCの設定
aws-vpc.tf
注意:terraform.tfvarsでaccess_keyとsecret_keyの設定が必要です。
下記からやり方を参照下さい。
awsのs3を操作する為のaccess keyとsecret keyを取得する(IAM)
VPCの設定を先ほど設定した値を使用する
- アクセスキー
- シークレットキー
- リージョン
- vpc_cidr
/* Setup our aws provider */
provider "aws" {
  access_key  = "${var.access_key}"
  secret_key  = "${var.secret_key}"
  region      = "${var.aws_region}"
}

/* Define our vpc */
resource "aws_vpc" "default" {
  cidr_block = "${var.vpc_cidr}"
  enable_dns_hostnames = true
  tags {
    Name = {your setting tags}
  }
}
publicのサブネット設定
public-subnets.tf
- デフォルトゲートウェイの設定
- サブネットの設定
/* Internet gateway for the public subnet */
resource "aws_internet_gateway" "default" {
  vpc_id = "${aws_vpc.default.id}"
}

/* Public subnet */
resource "aws_subnet" "public" {
  vpc_id            = "${aws_vpc.default.id}"
  cidr_block        = "${var.public_subnet_cidr}"
  availability_zone = "${var.aws_region_subnet}"
  map_public_ip_on_launch = true
  depends_on = ["aws_internet_gateway.default"]
  tags {
    Name = "public"
  }
}

/* Routing table for public subnet */
resource "aws_route_table" "public" {
  vpc_id = "${aws_vpc.default.id}"
  route {
    cidr_block = "0.0.0.0/0"
    gateway_id = "${aws_internet_gateway.default.id}"
  }
}

/* Associate the routing table to public subnet */
resource "aws_route_table_association" "public" {
  subnet_id = "${aws_subnet.public.id}"
  route_table_id = "${aws_route_table.public.id}"
}
セキュリティグループの設定
セキュリティグループの設定
各インスタンスにおけるポートの設定を行います。"ingress"がインスタンスへの入力。"engress"がインスタンスからの出力する際のポートの設定。
- default
- nat
- web
/* Default security group */
resource "aws_security_group" "default" {
  name = "default-research"
  description = "Default security group that allows inbound and outbound traffic from all instance in the VPC"
  vpc_id = "${aws_vpc.default.id}"

  ingress {
    from_port = "0"
    to_port   = "0"
    protocol  = "-1"
    self      = true
  }

  egress {
    from_port = "0"
    to_port   = "0"
    protocol  = "-1"
    self      = true
  }

  tags {
    Name = "research-default-vpc"
  }
}

/* Security group for the nat server */
resource "aws_security_group" "nat" {
  name = "nat-research"
  description = "Default security group that allows inbound and outbound traffic from all instance in the VPC"
  vpc_id = "${aws_vpc.default.id}"

  # ssh
  ingress {
    from_port = "22"
    to_port   = "22"
    protocol  = "tcp"
    cidr_blocks = ["0.0.0.0/0"]
  }

  ingress {
    from_port = "1194"
    to_port   = "1194"
    protocol  = "udp"
    cidr_blocks = ["0.0.0.0/0"]
  }

  ingress {
      from_port = -1
      to_port = -1
      protocol = "icmp"
      cidr_blocks = ["0.0.0.0/0"]
  }

  # http
  egress {
    from_port = "80"
    to_port   = "80"
    protocol  = "tcp"
    cidr_blocks = ["0.0.0.0/0"]
  }

  # https
  egress {
    from_port = "443"
    to_port   = "443"
    protocol  = "tcp"
    cidr_blocks = ["0.0.0.0/0"]
  }

  egress {
      from_port = -1
      to_port = -1
      protocol = "icmp"
      cidr_blocks = ["0.0.0.0/0"]
  }

  tags {
    Name = "nat-research-vpc"
  }
}

/* Security group for the web */
resource "aws_security_group" "web" {
  name = "web"
  description = "Default security group that allows inbound and outbound traffic from all instance in the VPC"
  vpc_id = "${aws_vpc.default.id}"

  # http
  ingress {
    from_port = "80"
    to_port   = "80"
    protocol  = "tcp"
    cidr_blocks = ["0.0.0.0/0"]
  }

  # https
  ingress {
    from_port = "443"
    to_port   = "443"
    protocol  = "tcp"
    cidr_blocks = ["0.0.0.0/0"]
  }

  tags {
    Name = "elasticsearch-crawler-vpc"
  }
}
ssh のキーペアを作成
sshアクセス用の鍵を作成
ssh-keygen -t rsa -C "insecure-deployer" -P '' -f ssh/insecure-deployer
key-pairs.tfを作成
key-pairs.tfでインスタンス先にssh用の鍵を設定
resource "aws_key_pair" "deployer" {
  key_name = "deployer-key"
  public_key = "${file(\"ssh/insecure-deployer.pub\")}"
}
NATサーバーの設定
nat-serverはOpenVPNを使用するためのコンテナを立てるためのサーバーです。ansibleで環境構築を行うためにsecurity_groupsを緩めにしています。構築が終われば、不要なポートは閉じる必要があります。
/* NAT/VPN server */
resource "aws_instance" "nat" {
  ami = "${lookup(var.aws_amis, var.aws_region)}"
  instance_type = "t2.micro"
  subnet_id = "${aws_subnet.public.id}"
  security_groups = ["${aws_security_group.default.id}", "${aws_security_group.nat.id}"]
  key_name = "${var.key_name}"
  associate_public_ip_address = true
  source_dest_check = false
  tags = {
    Name = "nat-staging"
  }
  connection {
    user = "centos"
  }
}
プライベートなサブネットの設定
private-subnets.tf
プライベートなサブネットの設定
"aws_route_table"でnatインスタンスを通ってアクセスするようになっています。
/* Public subnet */
resource "aws_subnet" "private" {
  vpc_id            = "${aws_vpc.default.id}"
  cidr_block        = "${var.private_subnet_cidr}"
  availability_zone = "${var.aws_region_subnet}"
  map_public_ip_on_launch = false
  depends_on = ["aws_instance.nat"]
  tags {
    Name = "private"
  }
}

/* Routing table for public subnet */
resource "aws_route_table" "private" {
  vpc_id = "${aws_vpc.default.id}"
  route {
    cidr_block = "0.0.0.0/0"
    instance_id = "${aws_instance.nat.id}"
  }
}

/* Associate the routing table to public subnet */
resource "aws_route_table_association" "private" {
  subnet_id = "${aws_subnet.private.id}"
  route_table_id = "${aws_route_table.private.id}"
}
webサーバーの設定
サーバーの作成とロードバランサーの作成も行う。
サーバーはプライベートな空間に置く
/* App servers */
resource "aws_instance" "app" {
  count = 2
  ami = "${lookup(var.amis, var.region)}"
  instance_type = "t2.micro"
  subnet_id = "${aws_subnet.private.id}"
  security_groups = ["${aws_security_group.default.id}"]
  key_name = "${aws_key_pair.deployer.key_name}"
  source_dest_check = false
  tags = {
    Name = "airpair-app-${count.index}"
  }
}

/* Load balancer */
resource "aws_elb" "app" {
  name = "airpair-elb"
  subnets = ["${aws_subnet.public.id}"]
  security_groups = ["${aws_security_group.default.id}", "${aws_security_group.web.id}"]
  listener {
    instance_port = 80
    instance_protocol = "http"
    lb_port = 80
    lb_protocol = "http"
  }
  instances = ["${aws_instance.app.*.id}"]
}
出力の確認
作成したインスタンスのipアドレスの確認方法
output "app.0.ip" {
  value = "${aws_instance.app.0.private_ip}"
}

output "app.1.ip" {
  value = "${aws_instance.app.1.private_ip}"
}

output "nat.ip" {
  value = "${aws_instance.nat.public_ip}"
}

output "elb.hostname" {
  value = "${aws_elb.app.dns_name}"
}
terraformの動作確認
文法のチェック
terraform plan
インスタンスの作成
terraform apply
Ansibleの環境設定
注意:Ubuntu 14.04 LTSのインスタンスでの動作を確認していますが、他のディストリビューションだと動作するか不明です。
NATサーバーの環境設定を行う。
ansibleの構成
- nat_host
- site_nat.yml
- - roles
- - - nat
- - - - tasks
- - - - - main.yml
- - - - - common.yml
- - - - - docker_nat.yml
秘密鍵は下記を使用
人によって変わります。terarformで使用した公開鍵と対になっている秘密鍵を使用してください
insecure-deployer
NATサーバーのホストの設定
nat_host
[ubuntu]
{NATサーバーのIPアドレス} ansible_ssh_private_key_file={上記の秘密鍵を使用} ansible_ssh_user=ubuntu
設定を行うためのansible
site_nat.yml
---
- name: apply development to all nodes
  hosts: ubuntu
  remote_user: ubuntu
  roles:
  - nat
実際の設定を行う部分
- - roles
- - - nat
- - - - tasks
- - - - - main.yml
- - - - - common.yml
- - - - - docker_nat.yml
- - - vars
- - - - main.yml
nat/tasks/main.yml
共通の設定とOpenVPNを設定するためのDockerの設定
---
- include: common.yml
- include: docker_nat.yml
common.yml
dockerに必要な共通の設定を行う。
---
- name: apt-get updates a server
  apt: update_cache=yes
  sudo: yes
  tags: initial_setup

- name: apt-get upgrade a server
  apt: upgrade=full
  sudo: yes
  tags: initial_setup

- name: apt-get install basic pkg
  apt: pkg={{ item }} state=installed
  sudo: yes
  with_items:
  - git
  - gcc
  - build-essential
  - gfortran
  - e2fslibs-dev
  - openjdk-7-jre-headless
  - dstat
  - sysstat
  tags: initial_setup
docker_nat.yml
DockerのOpenVPNの設定
注意:再起動の部分で繋がらなくて落ちるかもしれません。もし落ちた場合は再起動以降から実行するようにしてください。
---
- name: apt-get updates a server
  apt: update_cache=yes
  sudo: yes
  tags: initial_setup

- name: apt-get install basic pkg
  apt: pkg={{ item }} state=installed
  sudo: yes
  with_items:
  - apt-transport-https
  - ca-certificates

- name: Add Docker repository key
  shell: apt-key adv --keyserver hkp://p80.pool.sks-keyservers.net:80 --recv-keys 58118E89F3A912897C070ADBF76221572C52609D
  sudo: yes
  tags: docker

- name: make lsit
  shell: touch /etc/apt/sources.list.d/docker.list && echo deb https://apt.dockerproject.org/repo ubuntu-trusty main >> /etc/apt/sources.list.d/docker.list
  sudo: yes
  tags: docker

- name: apt-get updates a server restart
  apt: update_cache=yes
  sudo: yes
  tags: initial_setup

- name: purge docker
  shell: apt-get purge lxc-docker
  sudo: yes
  tags: docker

- name: cache docker
  shell: apt-cache policy docker-engine
  sudo: yes
  tags: initial_setup

- name: apt-get install linux extra image pkg
  apt: pkg=linux-image-extra-3.13.0-79-generic state=installed
  sudo: yes
  tags: initial_setup

- name: apt-get updates a server
  apt: update_cache=yes
  sudo: yes
  tags: initial_setup

- name: apt-get install linux image generic pkg
  apt: pkg=linux-image-generic-lts-trusty state=installed
  sudo: yes
  tags: initial_setup

- name: Restart the server
  shell: reboot now
  sudo: yes

- name: Wait until the virtual machine stop ssh port stop responding
  local_action: wait_for host={{ inventory_hostname }} port=22 state=stopped
  sudo: false

- name: Wait for server to come up
  local_action: wait_for host={{ inventory_hostname }} port=22 delay=30
  sudo: false

- name: apt-get updates a server
  apt: update_cache=yes
  sudo: yes
  tags: initial_setup

- name: apt-get install docker-engine
  shell: apt-get install --force-yes -y docker-engine
  sudo: yes
  tags: docker

- name: usermod -aG docker ubuntu
  shell: usermod -aG docker ubuntu
  sudo: yes
  tags: docker

- name: nat setting
  shell: iptables -t nat -A POSTROUTING -j MASQUERADE
  sudo: yes
  tags: nat

- name: nat setting2
  shell: echo 1 | sudo tee /proc/sys/net/ipv4/conf/all/forwarding > /dev/null
  sudo: yes
  tags: nat

- name: nat setting3
  shell: mkdir -p /etc/openvpn && docker run --name ovpn-data -v /etc/openvpn busybox
  sudo: yes
  tags: nat

- name: nat setting4
  shell: docker run --volumes-from ovpn-data --rm gosuri/openvpn ovpn_genconfig -p {{ vpc_cidr }} -u udp://{{ public_ip }}
  sudo: yes
  tags: nat
ansible-playbook -i ansible_host site.yml
ansible_hostでご自身で作成したインスタンスのipアドレスの設定をしてください。
nat/tasks/main.yml
ここで再起動用のためにインスタンスのipアドレスを指定下さい。
---
inventory_hostname: {your instance ip}
dockerの起動からVPNの開通まで
OpenVPN用のDockerコンテナを起動し、VPN接続まで行うステップです。
dockerのOpenVPNコンテナの初期設定
ここで設定した秘密鍵を使用
人によって変わります。terarformで使用した公開鍵と対になっている秘密鍵を使用してください
insecure-deployer
ssh -t -i {秘密鍵} \
"ubuntu@{IPアドレス}" -p {ポート} \
sudo docker run --volumes-from ovpn-data --rm -it gosuri/openvpn ovpn_initpki
dockerのOpenVPNコンテナ起動
ssh -t -i {秘密鍵} \
"centos@{IPアドレス}" -p {ポート} \
sudo docker run --volumes-from ovpn-data -d -p 1194:1194/udp --cap-add=NET_ADMIN gosuri/openvpn
クライアント側にdockerの設定を反映
ssh -t -i {秘密鍵} \
"ubuntu@{IPアドレス}" -p {ポート} \
sudo docker run --volumes-from ovpn-data --rm -it gosuri/openvpn easyrsa build-client-full $USER nopass
Tunnelblickに設定するためのファイル作成
*注意点:作成されたファイルのIPアドレスが適切でない場合があります。Dockerが動作しているコンテナのIPアドレスを設定しましょう。
ssh -t -i {秘密鍵} \
"ubuntu@{IPアドレス}" -p {ポート} \
sudo docker run --volumes-from ovpn-data --rm gosuri/openvpn ovpn_getclient $USER > "test.ovpn"
VPNの接続

TunnelBlickの設定を行いましょう。
作成したtest.ovpnをインストールしたTunnelBlickにドラッグ&ドロップして設定を行いましょう。
パスワードの入力が求められるのでパスワードの入力をすれば設定可能です。
sshで動作確認
ssh -i 秘密鍵 ubuntu@プライベートipアドレス
上記で接続可能です。
後片付け
terraformのフォルダに移動して今回使用したインスタンスは破棄しおきましょう。
インスタンス破棄
terraform destroy
コード