tui-rs ![]() GitHub,Docs
GitHub,Docs
crossterm ![]() GitHub,Docs
GitHub,Docs
ratatui ![]() Github, Docs
Github, Docs
💡 crosstermのアップデートがあったので記事の内容を動かせるようにした
💡 tui-rsのウィジェットの説明を追加した
💡 tui-rsの代替のratatuiの依存関係に変更した(2023/5/dd)
💡 ratatuiの機能を追加した(2023/5/dd)
入れるクレート
[dependencies]
-- tui = "0.19.0"
++ ratatui = "0.29"
cargo add ratatui
ratatui
issueにあるように、tui-rsがメンテナンスできないのでフォークがされていた
こちらのほうで熱心に開発が続けられている
気づいていなかった...
crossterm
このcrosstermはバックエンド(ターミナル内の処理)として使われる
これにより色付けやカーソル移動、ターミナルの入力受付などを担当している
重要なのはratatuiのwidgetは必ずBlockが使われるということ
曲線などは作れず必ず、Blockが元になった図形になる
ドットが利用できるようになった
ドット絵で丸などの複雑な図形を描くこともできる

入力系(キー入力のみ)
crosstermのバージョンが0.26からwindowsでは入力が重複するバグあるので注意
なんかいろいPRができてっ修正されているっぽい?
kindで押した判定を取得すれば重複は発生しない
日本語などのマルチバイト文字を利用する場合は文字数と実際の大きさが一致しないため,位置が右へずれていく(アルファベッド2文字が日本語1文字)
そのため,dependenciesにあるようにuniwidthを使って文字サイズを測ってカーソル位置を移動させる必要がある(ここでは書かない)
以下が基本的なキー入力処理になる
Event::Key(key) = event::read()?
これをif letで受け取ったら一文字の入力になりwhile letにしたら一行の入力になる
バリアントの詳細はcrosstermに載っているため省略するが大雑把説明する
Char('a'), Char('#')などの一文字
Modifier(LeftShift), Modifier(LeftAlt)などの修飾キー
Escなどの固有のキー
このようにenumのバリアントで力入を受け取る
例えば、Alt-Ctrl-Shift-Aを受け取ったとすると
KeyEvent {
    code: Char('A'),
    modifiers: (SHIFT | CONTROL | ALT),
    kind: Press,
    state: KeyEventState(0x0),
}
このような形で渡される
上のコードの(key)をの()の中身をKeyEvent{ code, modifier, kind, state }と記述すると、それぞれでマッチングを取ることができる
KeyEvent{code, ..}と書いて他の箇所を省略することもできる
基本ロジックの構造はこんな感じ
fn print_events(button: &mut ButtonDeath) -> Result<(), io::Error> {
    loop {
        button.inspect();
        match event::read()? {
            Event::Mouse(event) => button.handle_mouse_event(event),
            Event::Key(event) => button.handle_key_event(event),
            _ => {}
        }
        let (msg, fg, bg) = button.show_button()?;
        let (left_x, left_y) = button.get_left_top();
        execute!(
            stdout(),
            MoveTo(left_x, left_y),
            Clear(ClearType::CurrentLine),
            Print(msg.with(fg.into()).on(bg.into()))
        )?;
    }
}

fn main() {
    let mut button = ButtonDeath::new(2, 2, 4, 1);
    execute!(stdout(), Clear(ClearType::All), EnableMouseCapture).unwrap();
    let _ = print_events(&mut button);
    execute!(stdout(), DisableMouseCapture).unwrap();
}
ボタンもどき構造体はこのような感じ
カーソルの位置がボタンの範囲にいるかどうかをチェックやイベントごとの状態を管理している
先程の入力情報をマッチングさせて状態を変化させて、色を変えている
#[derive(Debug)]
enum ButtonState {
    Normal,
    Hover,
    Pressed,
}

#[derive(Debug)]
struct ButtonDeath {
    x: u16,
    y: u16,
    width: u16,
    height: u16,
    state: ButtonState,
}

impl ButtonDeath {
    fn new(x: u16, y: u16, width: u16, height: u16) -> Self {
        Self {
            x,
            y,
            width,
            height,
            state: ButtonState::Normal,
        }
    }

    fn is_in_button(&self, x: u16, y: u16) -> bool {
        self.x <= x && x < self.x + self.width && self.y <= y && y < self.y + self.height
    }

    fn get_left_top(&self) -> (u16, u16) {
        (self.x, self.y)
    }

    fn set_state(&mut self, state: ButtonState) {
        self.state = state;
    }

    fn inspect(&self) {
        println!("rect: {:?}, state: {:?}", self.rect, self.state);
    }

    fn handle_mouse_event(&mut self, event: MouseEvent) {
        if self.is_in_button(event.column, event.row) {
            self.state = ButtonState::Hover;
            match event.kind {
                MouseEventKind::Down(MouseButton::Left) => {
                    self.state = ButtonState::Pressed;
                }
                MouseEventKind::Up(_) => {
                    self.state = ButtonState::Hover;
                }
                _ => {}
            }
        } else {
            self.state = ButtonState::Normal;
        }
    }

    fn handle_key_event(&mut self, event: KeyEvent) {
        match event.code {
            self.state = ButtonState::Normal;
            KeyCode::Esc => ButtonState::Normal,
            _ => {}
        }
    }

    fn show_button(&self) -> Result<(&str, Color, Color), io::Error> {
        let (msg, fg, bg) = match self.state {
            ButtonState::Normal => (self.label, Color::White, Color::Black),
            ButtonState::Hover => (self.label, Color::Black, Color::White),
            ButtonState::Pressed => (self.label, Color::Green, Color::Black),
        };
        Ok((msg, fg, bg))
    }
}
更により具体的なキーにマッチングさせて任意の入力をさせようとすると以下のようにmatchで書ける
これの弱点?としてキー入力がハードコーディングになっているため、ユーザーの設定でいろいろキーコンフィグを変化させたいときには別の処理が必要になる
use std::io::Result;
use std::io::stdout;

use ratatui::crossterm::{
    cursor::{MoveDown, MoveTo, Show},
    event::{self, Event, KeyCode, KeyEvent, KeyEventKind},
    execute,
    style::Print,
    terminal::{Clear, ClearType},
};

const WIDTH: u16 = 2;
const HEIGHT: u16 = 1;
fn input() -> Result<()> {
    let mut stdout = stdout();
    'sub: loop {
        let mut line = String::new();
        while let Event::Key(KeyEvent { code, kind, .. }) = event::read()? {
            // Enter: 確定
            // Esc: 取り消し
            // others: Inputs
            // BS: 一文字取り消し
            if kind != KeyEventKind::Press {
                continue;
            }
            match code {
                KeyCode::Enter => {
                    execute!(
                        stdout,
                        MoveTo(WIDTH, HEIGHT),
                        Clear(ClearType::CurrentLine),
                        Print(&line)
                    )
                    .unwrap();
                    break;
                }
                KeyCode::Esc => {
                    line.clear();
                    execute!(
                        stdout,
                        MoveTo(WIDTH, HEIGHT),
                        Clear(ClearType::CurrentLine),
                        Print(&line)
                    )
                    .unwrap();
                    break;
                }
                KeyCode::Backspace => {
                    line.pop();
                }
                KeyCode::Char('Q') => break 'sub,
                KeyCode::Char(c) => line.push(c),
                _ => {}
            }
            execute!(
                stdout,
                MoveTo(WIDTH, HEIGHT),
                Clear(ClearType::CurrentLine),
                Print(&line)
            )
            .unwrap();
        }

        let line_length = line.len();
        execute!(
            stdout,
            MoveTo(WIDTH, HEIGHT),
            Clear(ClearType::CurrentLine),
            MoveDown(1),
            Print(format!("{line_length} chars and `{line}`")),
        )
        .unwrap();
    }
    Ok(())
}

fn main() {
    let mut stdout = stdout();
    execute!(stdout, MoveTo(WIDTH, HEIGHT), Clear(ClearType::All), Show).unwrap();
    let _ = input();
}

一行だけの入力になるので複数行欲しい場合は別の処理が必要になる
こういった処理でwhile letを見ると代入式は便利だなと思う
ターミナル操作などしてしまうと、入力として受け取られるため文字の後ろから結果が表示されたりする
また冒頭でも説明した通り日本語の文字サイズとアルファベットの文字サイズは違うため日本語を入力すると左にずれるのがたりなくなる
入力を可視化
ratatui-rsのexamplesと上のを利用する
シンプルな複数入力なため,行をまたいでの削除や確定した入力の取り消しはできなく,メモを保存する機能などもない
ただ,文字列として保持されているので,メソッドを追加すれば消したりFileに保存もできる

![]()
SpansがなくなりLineになった
![]() Pressedを追加
Pressedを追加
すこし長めのコード
use ratatui::crossterm::{
    event::{
        DisableMouseCapture, EnableMouseCapture, Event, KeyCode, KeyEvent, KeyEventKind,
        KeyModifiers, read,
    },
    execute,
    terminal::{EnterAlternateScreen, LeaveAlternateScreen, disable_raw_mode, enable_raw_mode},
};
use ratatui::{
    Frame, Terminal,
    backend::{Backend, CrosstermBackend},
    layout::Position,
    layout::{Constraint, Direction, Layout},
    style::{Color, Modifier, Style},
    text::{Line, Span, Text},
    widgets::{Block, Borders, List, ListItem, Paragraph, Wrap},
};

use std::{collections::HashMap, io};

enum InputMode {
    Normal,
    Editing,
}

/// App holds the state of the application
struct App {
    input: String,
    current_with: usize,
    input_width: HashMap<usize, u16>,
    input_mode: InputMode,
    messages: Vec<String>,
    lines: usize,
}

impl App {
    fn count_newline(&self) -> u16 {
        self.input.chars().filter(|&x| x == '\n').count() as u16
    }

    fn set_input_width(&mut self) {
        let lines = self.input_width.get_mut(&self.lines).unwrap();
        *lines = (self.input.chars().count() - self.current_with) as u16;
    }

    fn input_width(&self) -> &u16 {
        let index = self.input_width.get(&self.lines).unwrap();
        index
    }

    fn input_width_init(&mut self) {
        self.input_width = HashMap::from([(0, 0)]);
        self.current_with = 0;
        self.lines = 0;
    }

    fn add_newline(&mut self) {
        self.lines += 1;
        self.set_newline_input_width(self.lines, 0);
        self.set_current_input_width();
    }

    fn set_newline_input_width(&mut self, index: usize, width: u16) {
        self.input_width.insert(index, width);
    }

    fn set_current_input_width(&mut self) {
        self.current_with = self.input.chars().count();
    }
}

impl Default for App {
    fn default() -> App {
        App {
            input: String::new(),
            current_with: 0,
            input_width: HashMap::from([(0, 0)]),
            input_mode: InputMode::Normal,
            messages: Vec::new(),
            lines: 0,
        }
    }
}

fn main() -> io::Result<()> {
    // setup terminal
    enable_raw_mode()?;
    let mut stdout = io::stdout();
    execute!(stdout, EnterAlternateScreen, EnableMouseCapture)?;
    let backend = CrosstermBackend::new(stdout);
    let mut terminal = Terminal::new(backend)?;

    // create app and run it
    let app = App::default();
    let res = run_app(&mut terminal, app);

    // restore terminal
    disable_raw_mode()?;
    execute!(
        terminal.backend_mut(),
        LeaveAlternateScreen,
        DisableMouseCapture
    )?;
    terminal.show_cursor()?;

    if let Err(err) = res {
        println!("{:?}", err)
    }

    Ok(())
}

fn run_app<B: Backend>(terminal: &mut Terminal<B>, mut app: App) -> io::Result<()> {
    loop {
        // 描画する内容は全てui関数にまかせてる
        terminal.draw(|f| ui(f, &app))?;
        // ここら辺はさきほどのcrosstermの例にあったように入力を受け取った処理をしてる
        if let Event::Key(KeyEvent {
            code,
            modifiers,
            kind,
            state: _,
        }) = read()?
        {
            match app.input_mode {
                // ノーマルモードはeとesc以外の入力は無視される
                InputMode::Normal => match (code, modifiers, kind) {
                    (KeyCode::Char('e'), KeyModifiers::NONE, KeyEventKind::Press) => {
                        app.input_mode = InputMode::Editing;
                    }
                    (KeyCode::Esc, KeyModifiers::NONE, KeyEventKind::Press) => {
                        return Ok(());
                    }
                    _ => {}
                },
                // 編集モードは入力をappに保存する
                InputMode::Editing => match (code, modifiers, kind) {
                    (KeyCode::Enter, KeyModifiers::CONTROL, KeyEventKind::Press) => {
                        app.messages.push(app.input.drain(..).collect());
                        app.input_width_init();
                    }
                    (KeyCode::Enter, KeyModifiers::NONE, KeyEventKind::Press) => {
                        app.input.push('\n');
                        app.add_newline();
                    }
                    (KeyCode::Char(c), _, KeyEventKind::Press) => {
                        app.input.push(c);
                        app.set_input_width();
                    }
                    (KeyCode::Backspace, KeyModifiers::NONE, KeyEventKind::Press) => {
                        if let Some(last) = app.input.chars().last() {
                            if last != '\n' {
                                app.input.pop();
                                app.set_input_width();
                            }
                        }
                    }
                    (KeyCode::Esc, KeyModifiers::NONE, KeyEventKind::Press) => {
                        app.input_mode = InputMode::Normal;
                    }
                    _ => {}
                },
            }
        }
    }
}

fn ui(f: &mut Frame, app: &App) {
    let chunks = Layout::default()
        .direction(Direction::Vertical)
        .margin(2)
        .constraints(
            [
                // 文字を入力する下の部分と固定の文章を書きこむ部分の二つに分かれている
                Constraint::Length(1),
                Constraint::Percentage(90),
            ]
            .as_ref(),
        )
        .split(f.area());

    let windows = Layout::default()
        .direction(Direction::Horizontal)
        .constraints(
            [
                // 先程の90%分をさらに左右に分割している
                Constraint::Percentage(50),
                Constraint::Percentage(50),
            ]
            .as_ref(),
        )
        .split(chunks[1]);

    let (msg, style) = match app.input_mode {
        // uiでモードをわけているけど、分けて書いた方が良い
        InputMode::Normal => (
            vec![
                Span::raw("Press "),
                Span::styled("Esc", Style::default().add_modifier(Modifier::BOLD)),
                Span::raw(" to exit, "),
                Span::styled("e", Style::default().add_modifier(Modifier::BOLD)),
                Span::raw(" to start editing."),
            ],
            Style::default().add_modifier(Modifier::RAPID_BLINK),
        ),
        InputMode::Editing => (
            vec![
                Span::raw("Press "),
                Span::styled("Esc", Style::default().add_modifier(Modifier::BOLD)),
                Span::raw(" to stop editing, "),
                Span::styled("Ctrl+Enter", Style::default().add_modifier(Modifier::BOLD)),
                Span::raw(" to record the message"),
            ],
            Style::default(),
        ),
    };
    let text = Text::from(Line::from(msg)).patch_style(style);
    let help_message = Paragraph::new(text);
    f.render_widget(help_message, chunks[0]);

    let input = Paragraph::new(app.input.clone())
        .style(match app.input_mode {
            InputMode::Normal => Style::default(),
            InputMode::Editing => Style::default().fg(Color::Yellow),
        })
        .block(Block::default().borders(Borders::ALL).title("Input"))
        .wrap(Wrap { trim: false });
    f.render_widget(input, windows[0]);
    match app.input_mode {
        InputMode::Normal => {}
        InputMode::Editing => f.set_cursor_position(Position::new(
            windows[0].x + app.input_width() + 1,
            windows[0].y + app.count_newline() + 1,
        )),
    }
    // println!("{:#?}", app.messages);
    let messages: Vec<ListItem> = app
        .messages
        .iter()
        .flat_map(|x| x.split('\n').collect::<Vec<&str>>())
        .enumerate()
        .map(|(i, m)| {
            let content = vec![Line::from(Span::raw(format!("{}: {}", i, m)))];
            ListItem::new(content)
        })
        .collect();
    let messages =
        List::new(messages).block(Block::default().borders(Borders::ALL).title("Messages"));
    f.render_widget(messages, windows[1]);
}
ブロック単体描画
先ほど述べた通り,ratatui-rsでは四角形(Block)が基本的な図形となる
widgetのほぼすべてがこの四角形を作成するのでこれの作り方を覚えていれば応用が利くと思う
use ratatui::crossterm::{
    event::{self, DisableMouseCapture, EnableMouseCapture},
    execute,
    terminal::{disable_raw_mode, enable_raw_mode},
};
use ratatui::{
    Frame, Terminal,
    backend::CrosstermBackend,
    layout::{Alignment, Constraint, Layout},
    style::{Color, Style},
    widgets::{Block, BorderType, Borders},
};
use std::{error::Error, io};

fn main() -> Result<(), Box<dyn Error>> {
    // rawモードの詳細は以下のURL
    // https://docs.rs/crossterm/latest/crossterm/terminal/index.html#raw-mode
    enable_raw_mode()?;
    let mut stdout = io::stdout();
    execute!(stdout, EnableMouseCapture)?; // マウスの入力を受け取らない

    let backend = CrosstermBackend::new(stdout);
    let mut terminal = Terminal::new(backend)?;

    loop {
        terminal.draw(ui)?;
        if let event::Event::Key(key) = event::read()? {
            if key.kind == event::KeyEventKind::Press && key.code == event::KeyCode::Char('q') {
                break;
            }
        }
    }

    // 後処理
    // ここをきちんとやらないとアプリが閉じても機能が継続した状態になるので気を付ける
    disable_raw_mode()?; // rawモードの解除
    execute!(terminal.backend_mut(), DisableMouseCapture)?;
    terminal.show_cursor()?;

    Ok(())
}

fn ui(f: &mut Frame) {
    // ターミナルの大きさ
    let size = f.area();

    // 描画する四角の大きさを求める
    // splitするとスライスが渡されるため今回の一つだけの時もchunk[0]の添え字が必要
    let chunk = Layout::default()
        .constraints([Constraint::Percentage(100)].as_ref()) // 切り出す四角形の制約が一つだけ
        .split(size); // 切り取る基準をターミナルの大きさにする

    // 色を決める時はStyle::default()までが必須になる
    // bgで背景,fgで前景となり,今回使っていないがadd_modifierで太字などの修飾もできる
    // Color::Rgb(u8, u8, u8)でカラーコードで色を追加することもできる
    let brdr_style = Style::default().bg(Color::Cyan).fg(Color::Black); // ボーダーラインの背景と線の両方に色を付けれる
    let blck_style = Style::default().bg(Color::White); // この場合は背景のみで前景(fg)が意味ない
    let block = Block::default() // ウィジェットを使うときはとりあえずdefault()を使う
        .title("Block Title") // String型では代入できないので注意
        .title_alignment(Alignment::Center) // Left, Center, Right
        .borders(Borders::ALL) // これを追加しないと境界線が描画されない
        .border_type(BorderType::Double) // Double, Plain, Round, Thick
        .border_style(brdr_style) // ボーダーラインの色を追加する
        .style(blck_style); // 四角形の色を追加する

    // ウィジェット(Block)と描画する四角形の大きさ(Rect)を入力することで描画される
    // ここの部分を書かないと描画されない
    f.render_widget(block, chunk[0]);
}
描画領域の大きさ
tumxやi3wmなどを使ったことがある人ならわかると思うがターミナルを割合で分割していくイメージである
基本的にはターミナルの大きさ(f.size())を基準として縦か横で分割してく
縦か横かはその都度指定が必要で,その上で分割された四角形の大きさの制約を記述してく
use ratatui::crossterm::{
    event::{DisableMouseCapture, EnableMouseCapture},
    execute,
    terminal::{disable_raw_mode, enable_raw_mode},
};
use ratatui::{
    Frame, Terminal,
    backend::CrosstermBackend,
    crossterm::{
        event::{self, Event, KeyCode, KeyEventKind},
        terminal::{EnterAlternateScreen, LeaveAlternateScreen},
    },
    layout::Direction,
    layout::{Alignment, Constraint, Layout},
    style::{Color, Style},
    widgets::{Block, BorderType, Borders},
};
use std::{error::Error, io};

fn main() -> Result<(), Box<dyn Error>> {
    enable_raw_mode()?;
    let mut stdout = io::stdout();
    execute!(stdout, EnableMouseCapture, EnterAlternateScreen)?;
    let backend = CrosstermBackend::new(stdout);
    let mut terminal = Terminal::new(backend)?;

    let mut index = 0;
    // 描画開始
    terminal.draw(full_window_ui)?;
    loop {
        if let Event::Key(key) = event::read()? {
            match (key.code, key.kind) {
                (KeyCode::Char('q') | KeyCode::Esc, KeyEventKind::Press) => break,
                (KeyCode::Right, KeyEventKind::Press) => {
                    index = (index + 1) % 4;
                }
                (KeyCode::Left, KeyEventKind::Press) => {
                    index -= 1;
                    if index < 0 {
                        index = 3;
                    }
                }
                _ => {}
            }
        }
        match index {
            0 => terminal.draw(full_window_ui),
            1 => terminal.draw(split_vertical_ui),
            2 => terminal.draw(split_horizontal_ui),
            3 => terminal.draw(split_vertical_and_horizontal_ui),
            _ => panic!("Invalid index"),
        }?;
    }

    disable_raw_mode()?;
    execute!(
        terminal.backend_mut(),
        DisableMouseCapture,
        LeaveAlternateScreen
    )?;
    terminal.show_cursor()?;

    Ok(())
}

fn full_window_ui(f: &mut Frame) {
    let size = f.area();

    let chunk = Layout::default()
        .constraints([Constraint::Percentage(100)].as_ref())
        .split(size);

    let brdr_style = Style::default().bg(Color::Cyan).fg(Color::Black);
    let blck_style = Style::default().bg(Color::White);
    let block = Block::default()
        .title("full window")
        .title_alignment(Alignment::Center)
        .borders(Borders::ALL)
        .border_type(BorderType::Double)
        .border_style(brdr_style)
        .style(blck_style);

    f.render_widget(block, chunk[0]);
}

fn split_vertical_ui(f: &mut Frame) {
    let size = f.area();
    let chunks = Layout::default()
        .direction(Direction::Vertical)
        .constraints([Constraint::Percentage(50), Constraint::Percentage(50)].as_ref())
        .split(size);
    let brdr_style = Style::default().bg(Color::Blue).fg(Color::Black);
    let blck_style = Style::default().bg(Color::White);

    let block = Block::default()
        .title("split vertical")
        .title_alignment(Alignment::Center)
        .borders(Borders::ALL)
        .border_type(BorderType::Plain)
        .border_style(brdr_style)
        .style(blck_style);

    f.render_widget(block.clone(), chunks[0]);
    f.render_widget(block, chunks[1]);
}

fn split_horizontal_ui(f: &mut Frame) {
    let size = f.area();
    let chunks = Layout::default()
        .direction(Direction::Horizontal)
        .constraints([Constraint::Percentage(50), Constraint::Percentage(50)].as_ref())
        .split(size);
    let brdr_style = Style::default().bg(Color::White).fg(Color::Black);
    let blck_style = Style::default().bg(Color::LightMagenta);

    let block = Block::default()
        .title("split horizontal")
        .title_alignment(Alignment::Center)
        .borders(Borders::ALL)
        .border_type(BorderType::Thick)
        .border_style(brdr_style)
        .style(blck_style);

    f.render_widget(block.clone(), chunks[0]);
    f.render_widget(block, chunks[1]);
}

fn split_vertical_and_horizontal_ui(f: &mut Frame) {
    let size = f.area();
    let chunks = Layout::default()
        .direction(Direction::Vertical)
        .constraints(
            [
                Constraint::Percentage(33),
                Constraint::Percentage(33),
                Constraint::Percentage(33),
            ]
            .as_ref(),
        )
        .split(size);

    for chunk in chunks.into_iter() {
        let horz_chunks = Layout::default()
            .direction(Direction::Horizontal)
            .constraints(
                [
                    Constraint::Percentage(33),
                    Constraint::Percentage(33),
                    Constraint::Percentage(33),
                ]
                .as_ref(),
            )
            .split(*chunk);

        let brdr_style = Style::default().bg(Color::Black).fg(Color::White);
        let blck_style = Style::default().bg(Color::White);

        let block = Block::default()
            .title("split vertical and horizontal")
            .title_alignment(Alignment::Center)
            .borders(Borders::ALL)
            .border_type(BorderType::Rounded)
            .border_style(brdr_style)
            .style(blck_style);

        let block_style_left = Style::default().bg(Color::LightBlue);
        let block_style_center = Style::default().bg(Color::LightYellow);
        let block_style_right = Style::default().bg(Color::LightRed);
        f.render_widget(block.clone().style(block_style_left), horz_chunks[0]);
        f.render_widget(block.clone().style(block_style_center), horz_chunks[1]);
        f.render_widget(block.clone().style(block_style_right), horz_chunks[2]);
    }
}

これは推測なので申し訳ないが,これは制約解決アルゴリズム?(cassoway.rs)の充足問題を解決するように画面が描画されるかららしい
helix-editorもこれを使って画面の大きさの指定をしている
最終的にそれら切り分けられた四角形をrender()に代入するかどうかで描画するかしないかを決める
コードのf.render_widget()の箇所をコメントアウトするとその箇所の描画がされなくなる
fn center_ui(f: &mut Frame) {
    let chunks = Layout::default()
        .direction(Direction::Horizontal)
        .constraints(
            [
                Constraint::Percentage(100),
                Constraint::Percentage(100),
                Constraint::Percentage(100),
            ]
            .as_ref(),
        )
        .split(f.area());

    let left_block = Paragraph::new("Block01")
        .block(Block::default().borders(Borders::ALL))
        .alignment(Alignment::Left);
    f.render_widget(left_block, chunks[0]);

    let middle_chunks = Layout::default()
        .direction(Direction::Vertical)
        .constraints(
            [
                Constraint::Percentage(33),
                Constraint::Percentage(33),
                Constraint::Percentage(33),
            ]
            .as_ref(),
        )
        .split(chunks[1]);
    let middle_top_block = Paragraph::new("Middle01")
        .block(Block::default().borders(Borders::ALL))
        .alignment(Alignment::Center);
    f.render_widget(middle_top_block, middle_chunks[0]);

    let center_block = Paragraph::new("Middle02")
        .block(Block::default().borders(Borders::ALL))
        .alignment(Alignment::Center);
    // f.render_widget(center_block, middle_chunks[1]);

    let middle_bottom = Paragraph::new("Middle03")
        .block(Block::default().borders(Borders::ALL))
        .alignment(Alignment::Center);
    f.render_widget(middle_bottom, middle_chunks[2]);

    let right_block = Paragraph::new("Block02")
        .block(Block::default().borders(Borders::ALL))
        .alignment(Alignment::Right);
    f.render_widget(right_block, chunks[2]);
}

また、popupの例があるようにターミナル内の大きさであることが保証されていればRect(x, y, width, height)を指定すれば四角形を任意の場所と大きさで作成することができる
もちろん大きすぎるとパニックを起こし、埋まっていれば描画されない
なので,f.size()のwidthとheightの割合を使ってターミナル内に収まるよう,描画エリアを消すなどの工夫をする必要がある
例えば左上(0, 0)からx軸に10,y軸10,幅20,高さ20で描画を消す
恐らくこの数値は文字の縦幅と横幅を利用していると思われる
したがって,Constraints::Length()と同じだと思う
先程のコードの下に追加する
    let right_block = Paragraph::new("Block02")
        .block(default_block)
        .alignment(Alignment::Right);
    f.render_widget(right_block, chunks[2]);

++  f.render_widget(
++        ratatui::widgets::Clear,
++        Rect {
++            x: 10,
++            y: 10,
++            width: 20,
++            height: 20,
++        },
++    )
}

左下の線がターミナルの枠よりもはみ出た時点でpanicを起こす
ターミナルが小さければそもそも起動できなかったりする
テキストの整列
テキストはLayoutのalignmentを持つParagraph,titleくらいしか寄せることができないListやTableなどは内部のテキストを整列させられない
なので,テキストの整列が必要な場合はLayoutを細かく分割し,その中でParagraphやList,Tableを使うのが一番楽にできる
先ほどの分割したブロック内に日本語や英語のテキストを代入する
fn inner_text_ui(f: &mut Frame) {
    let chunks = Layout::default()
        .direction(Direction::Horizontal)
        .constraints(
            [
                Constraint::Percentage(33),
                Constraint::Percentage(33),
                Constraint::Percentage(33),
            ]
            .as_ref(),
        )
        .split(f.area());

    let left_block_text = "このように日本語も表示される\n'\\n'を入れれば改行される\nwrapすれば改行をせずに一文で表示できる\n長すぎると見切れるるうううううう";
    let left_block = Paragraph::new(left_block_text)
        .block(Block::default().borders(Borders::ALL))
        .alignment(Alignment::Left);
    f.render_widget(left_block, chunks[0]);

    let middle_chunks = Layout::default()
        .direction(Direction::Vertical)
        .constraints(
            [
                Constraint::Percentage(33),
                Constraint::Percentage(33),
                Constraint::Percentage(33),
            ]
            .as_ref(),
        )
        .split(chunks[1]);
    let middle_block_text = "This is a sentence.\ntomorrow and tomorrow and tomorrow\nThis is a 🖊.";
    let middle_top_block = Paragraph::new(middle_block_text)
        .block(Block::default().borders(Borders::ALL))
        .alignment(Alignment::Center);
    f.render_widget(middle_top_block, middle_chunks[0]);

    let center_block = Paragraph::new(middle_block_text)
        .block(Block::default().borders(Borders::ALL))
        .alignment(Alignment::Center);
    // f.render_widget(center_block, middle_chunks[1]);

    let middle_bottom = Paragraph::new(middle_block_text)
        .block(Block::default().borders(Borders::ALL))
        .alignment(Alignment::Center);
    f.render_widget(middle_bottom, middle_chunks[2]);

    let right_block_text = "This is a right block's text.\n Do you see me?\nToday is the day";
    let right_block = Paragraph::new(right_block_text)
        .block(Block::default().borders(Borders::ALL))
        .alignment(Alignment::Right);
    f.render_widget(right_block, chunks[2]);
}

テキスト入力と移動
分割と整列、入力を機能として追加する
use ratatui::crossterm::{
    cursor::SetCursorStyle,
    event::{
        self, DisableMouseCapture, EnableMouseCapture, Event, KeyCode, KeyEvent, KeyEventKind,
        MouseEvent, MouseEventKind,
    },
    execute,
    terminal::{EnterAlternateScreen, LeaveAlternateScreen, disable_raw_mode, enable_raw_mode},
};
use ratatui::{
    Frame, Terminal,
    backend::CrosstermBackend,
    layout::{Alignment, Constraint, Direction, Layout, Position, Size},
    style::{Color, Style, Stylize},
    widgets::{Block, BorderType, Borders, Paragraph},
};

use std::{error::Error, io};
エディタもどきの時と同じように書き込みと移動で切り替える
#[derive(Debug, PartialEq, Eq)]
enum State {
    Normal,
    Exit,
}

struct AppState {
    selected: (usize, usize),
    texts: [[String; 3]; 3],
    text_positions: [[(usize, usize); 3]; 3],
    state: State,
}

impl AppState {
    fn new() -> Self {
        Self {
            selected: (1, 1),
            texts: Default::default(),
            text_positions: [[(0, 0); 3]; 3],
            state: State::Normal,
        }
    }

    fn get_selected_text(&mut self) -> &mut String {
        &mut self.texts[self.selected.0][self.selected.1]
    }

    fn set_position(&mut self) {
        let (old_row, old_col) = self.text_positions[self.selected.0][self.selected.1];
        self.text_positions[self.selected.0][self.selected.1] = (old_row, old_col + 1);
    }

    fn set_newline_position(&mut self) {
        let (old_row, _) = self.text_positions[self.selected.0][self.selected.1];
        self.text_positions[self.selected.0][self.selected.1] = (old_row + 1, 0);
    }

    fn set_remove_position(&mut self, chr: char) {
        let (old_row, old_col) = self.text_positions[self.selected.0][self.selected.1];
        if chr == '\n' {
            let Some(line_str) = self.texts[self.selected.0][self.selected.1]
                .split('\n')
                .last()
            else {
                return;
            };
            self.text_positions[self.selected.0][self.selected.1] = (old_row - 1, line_str.len());
        } else {
            self.text_positions[self.selected.0][self.selected.1] = (old_row, old_col - 1);
        }
    }

    // キーボード入力
    fn handle_key_event(&mut self, event: KeyEvent) -> Result<(), Box<dyn Error>> {
        match (event.code, event.kind) {
            (KeyCode::Esc, KeyEventKind::Press) => {
                self.state = State::Exit;
                return Ok(());
            }
            (KeyCode::Char('C'), KeyEventKind::Press) => {
                self.get_selected_text().clear();
            }
            (KeyCode::Left, KeyEventKind::Press) => {
                if self.selected.1 > 0 {
                    self.selected.1 -= 1;
                }
            }
            (KeyCode::Right, KeyEventKind::Press) => {
                if self.selected.1 < 2 {
                    self.selected.1 += 1;
                }
            }
            (KeyCode::Up, KeyEventKind::Press) => {
                if self.selected.0 > 0 {
                    self.selected.0 -= 1;
                }
            }
            (KeyCode::Down, KeyEventKind::Press) => {
                if self.selected.0 < 2 {
                    self.selected.0 += 1;
                }
            }
            (KeyCode::Char(c), KeyEventKind::Press) => {
                let line = self.get_selected_text();
                line.push(c);
                self.set_position();
            }
            (KeyCode::Enter, KeyEventKind::Press) => {
                let line = self.get_selected_text();
                line.push('\n');
                self.set_newline_position();
            }
            (KeyCode::Backspace, KeyEventKind::Press) => {
                let line = self.get_selected_text();
                let Some(chr) = line.pop() else {
                    return Ok(());
                };
                self.set_remove_position(chr);
            }
            _ => {}
        }
        Ok(())
    }

    // マウスイベント入力
    fn handle_mouse_event(&mut self, event: MouseEvent, area: &Size) -> Result<(), Box<dyn Error>> {
        if let MouseEventKind::Down(_) = event.kind {
            let (row, col) = block_index_from_pos(event.row, event.column, &area);
            if let (Some(r), Some(c)) = (row, col) {
                self.selected = (r, c);
            }
        }
        Ok(())
    }
}
エリアを9つに分割する
fn block_index_from_pos(row: u16, col: u16, area: &Size) -> (Option<usize>, Option<usize>) {
let block_height = area.height / 3;
let block_width = area.width / 3;
let r = (row as usize) / (block_height as usize);
let c = (col as usize) / (block_width as usize);
(
if r < 3 { Some(r) } else { None },
if c < 3 { Some(c) } else { None },
)
}
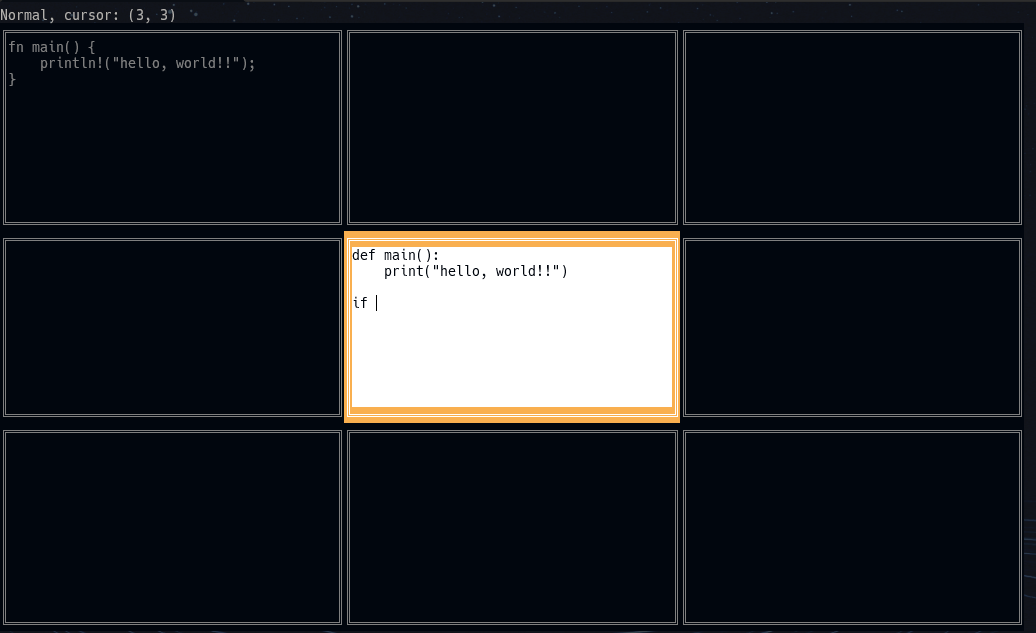
fn split_vertical_and_horizontal_ui(f: &mut Frame, app: &AppState) {
let size = f.area();
let tabs = Layout::default()
.direction(Direction::Vertical)
.constraints([Constraint::Length(1), Constraint::Percentage(100)].as_ref())
.split(size);
f.render_widget(
Paragraph::new(format!(
"{:?}, cursor: ({}, {})",
app.state,
app.text_positions[app.selected.0][app.selected.1].0,
app.text_positions[app.selected.0][app.selected.1].1,
)),
tabs[0],
);
let chunks = Layout::default()
.direction(Direction::Vertical)
.constraints([Constraint::Percentage(33); 3].as_ref())
.split(tabs[1]);
for (i, chunk) in chunks.into_iter().enumerate() {
let horz_chunks = Layout::default()
.direction(Direction::Horizontal)
.constraints([Constraint::Percentage(33); 3].as_ref())
.split(*chunk);
for (j, hchunk) in horz_chunks.into_iter().enumerate() {
let is_selected = app.selected == (i, j);
let brdr_style = if is_selected {
Style::default().bg(Color::Yellow).fg(Color::White)
} else {
Style::default().bg(Color::Black).fg(Color::White)
};
let blck_style = if is_selected {
Style::default().fg(Color::Black).bg(Color::White).bold()
} else {
Style::default().fg(Color::White).bg(Color::Black).dim()
};
let block = Block::default()
.title_alignment(Alignment::Center)
.borders(Borders::ALL)
.border_type(BorderType::Double)
.border_style(brdr_style)
.style(blck_style);
let text = app.texts[i][j].clone();
let lines = Paragraph::new(text).block(block).left_aligned();
f.render_widget(lines, hchunk.clone());
let (row, col) = app.text_positions[i][j];
if is_selected {
let pos = hchunk.as_position();
f.set_cursor_position(Position::new(
pos.x + col as u16 + 1,
pos.y + row as u16 + 1,
));
}
}
}
}
fn run(
terminal: &mut Terminal<CrosstermBackend<io::Stdout>>,
app: &mut AppState,
) -> Result<(), Box<dyn Error>> {
loop {
terminal.draw(|f| split_vertical_and_horizontal_ui(f, app))?;
match event::read()? {
Event::Key(ke) => app.handle_key_event(ke)?,
Event::Mouse(me) => app.handle_mouse_event(me, &terminal.size()?)?,
_ => {}
}
if app.state == State::Exit {
break Ok(());
}
}
}
fn main() -> Result<(), Box<dyn Error>> {
let mut stdout = io::stdout();
enable_raw_mode()?;
execute!(
stdout,
EnableMouseCapture,
EnterAlternateScreen,
SetCursorStyle::BlinkingBar
)?;
let mut terminal = Terminal::new(CrosstermBackend::new(stdout))?;
let mut app = AppState::new();
run(&mut terminal, &mut app)?;
execute!(
terminal.backend_mut(),
DisableMouseCapture,
LeaveAlternateScreen,
SetCursorStyle::DefaultUserShape,
)?;
disable_raw_mode()?;
Ok(())
}
余談
私はwindowsでwindows terminalを,linuxではweztermやurxvtを使っている
その折,linux上で開発をしていたらtui-rsで指定した色がくすんで見える現象に遭遇した
左上: cmd,右上:vscodeのpowershell,左下:window terminal,右下:powershell

いろいろ検索してみたらよくあることらしく,urxvtはそもそもtrue colorじゃなかったりした
テーマを作るのは大変なんだなあと思った
色合いやデザインにこだわりがある人はこのような問題で大変そうだと思った
ちなみに私はある程度色合いが違っていても,好みであれば仔細は問題ないと思っている
    let default_colors = [
        Color::Black,
        Color::Blue,
        Color::Cyan,
        Color::DarkGray,
        Color::Gray,
        Color::Green,
        Color::LightBlue,
        Color::LightCyan,
        Color::LightGreen,
        Color::LightMagenta,
        Color::LightRed,
        Color::LightYellow,
        Color::Magenta,
        Color::Red,
        Color::White,
    ];

fn ui<B: Backend>(f: &mut Frame<B>, colors: [Color; 15]) {
    let size = f.size();
    let mut colors_iter = colors.into_iter().cycle();//5*3以上でも表示できる
    let w = 5;
    let h = 3;
    let wx = size.width / w;
    let hy = size.height / h;
    for i in 0..w {
        for j in 0..h {
            let color = colors_iter.next().unwrap();
            let default_block = Block::default()
                .borders(Borders::ALL)
                .style(Style::default().bg(color).fg(color));
            let rect = Rect {
                x: i * wx,
                y: j * hy,
                width: wx,
                height: hy,
            };
            f.render_widget(default_block, rect);
        }
    }
}