はじめに
近々STPの設定を実装してSwitchの冗長化を行うので復習を兼ねて作る
筆者の環境
・Packet Tracer8.0.1 64bit
・Windows10
ネットワーク構成図
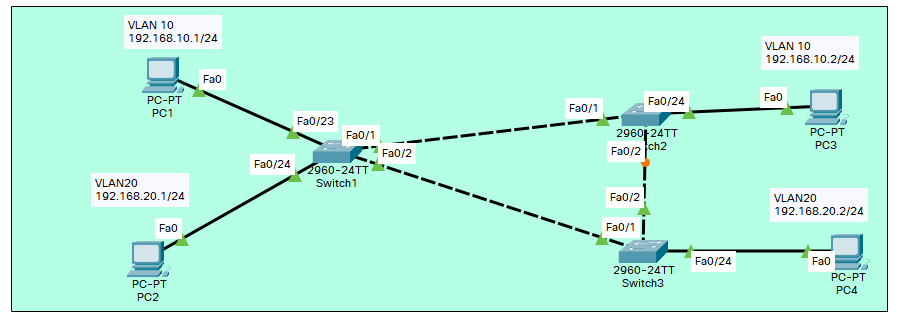
概要
STPによる経路の選択を行う。
今回はSTP機能が実装されているのを分かりやすくするために
VLAN10の通信をSwitch1<=>Switch3<=>Switch2経由
VLAN20の通信をSwitch1<=>Switch2<=>Switch3経由とあえて遠回りをしている。


最後に実際にケーブルに障害を起こしその時の経路の移り変わりを観測する。
IPアドレス管理表
PCを選択後、DesktopのタブからIP Configurationへ遷移
下記の通りにネットワークアドレスにIPアドレスとサブネットマスクを設定する。
| ネットワーク機器 | IPアドレス | サブネットマスク |
|---|---|---|
| PC1 | 192.168.10.1 | 255.255.255.0 |
| PC2 | 192.168.20.1 | 255.255.255.0 |
| PC3 | 192.168.10.2 | 255.255.255.0 |
| PC3 | 192.168.20.2 | 255.255.255.0 |
STPプライオリティ
下記の通りにプライオリティを設定する。
| VLAN10 | VLAN20 | |
|---|---|---|
| Switch1 | デフォルト | デフォルト |
| Switch2 | 4096 | 0 |
| Switch3 | 0 | 4096 |
コマンドリスト
Switch1
#  グローバルコンフィグレーションモードに遷移

enable
configure terminal

#  VLANの作成
#  今回はVLAN10,20を使用

vlan 10
name VLAN10
exit
vlan 20
name VLAN20
exit

#  2つのvlanトラフィックを伝送するためトランクポートで設定
#  不要だが一応allowed vlanでvlan10,20のトラフィックがトランクポート上で流れるのを許可する。

interface range FastEthernet0/1-2
switchport mode trunk
switchport trunk allowed vlan 10,20
exit

#  PCが繋がっているインターフェイスをアクセスポートにする
#  インターフェイスに対応するVLANを設定、上記のネットワーク構成図を参考

interface FastEthernet0/23
switchport mode access
switchport access vlan 10
exit
interface FastEthernet0/24
switchport mode access
switchport access vlan 20
exit

#  VLANをスパニングツリーと対応付ける

spanning-tree vlan 10
spanning-tree vlan 20
Switch2
enable
configure terminal
vlan 10
name VLAN10
exit
vlan 20
name VLAN20
exit
interface range FastEthernet0/1-2
switchport mode trunk
switchport trunk allowed vlan 10,20
exit
interface FastEthernet0/24
switchport mode access
switchport access vlan 10
exit

#  VLANをスパニングツリーと対応付ける
#  プライオリティ値は上記STPプライオリティを参考

spanning-tree vlan 10 priority 4096
spanning-tree vlan 20 priority 0
Switch3
enable
configure terminal
vlan 10
name VLAN10
exit
vlan 20
name VLAN20
exit
interface range FastEthernet0/1-2
switchport mode trunk
switchport trunk allowed vlan 10,20
exit
interface FastEthernet0/24
switchport mode access
switchport access vlan 20
exit
spanning-tree vlan 10 priority 0
spanning-tree vlan 20 priority 4096
ステータス確認
作成した内容を確認していく
STP情報
プライオリティ値が正しく設定されているか、ルートポート、指定ポート、非指定ポートが正しく選出されているかを確認する。
# show spanning-tree
Switch1

Switch2

Swith3

検証
今回は一本ケーブルを削除して障害が起きたと仮定する。

この時VLAN10のSTP情報を確認してルートポートが移り変わるのを確認する。
swithc1

終わりに
showコマンドの見方を忘れていたりしたので良い復習になった。