やっほー
今をときめく最新技術、色々便利で楽しそう!
だが今回は今更APILevel24におけるDatePickerDialogの作り方のお話だ!
所謂古のお話ってやつだ。
DatePickerDialogって知ってるか?
DatePickerDialog、こいつぁ日付を選択したりするときに用いる。
ビャっとダイアログが出てきてイカしたカレンダーが出てきて?さっと日付を選択するかっちょいい奴だ。
…だがこいつには弱点が有る。
年 の選択がめちゃくちゃ苦手なのだ。
実は 年 の部分をタップすると、直接 年 の選択ができるようになってるのだが、誰も気づかなかったようだ。
MaterialDatePickerでデザインが変わってその辺りの弱点も解消されつつ有る。とは思うけれども。
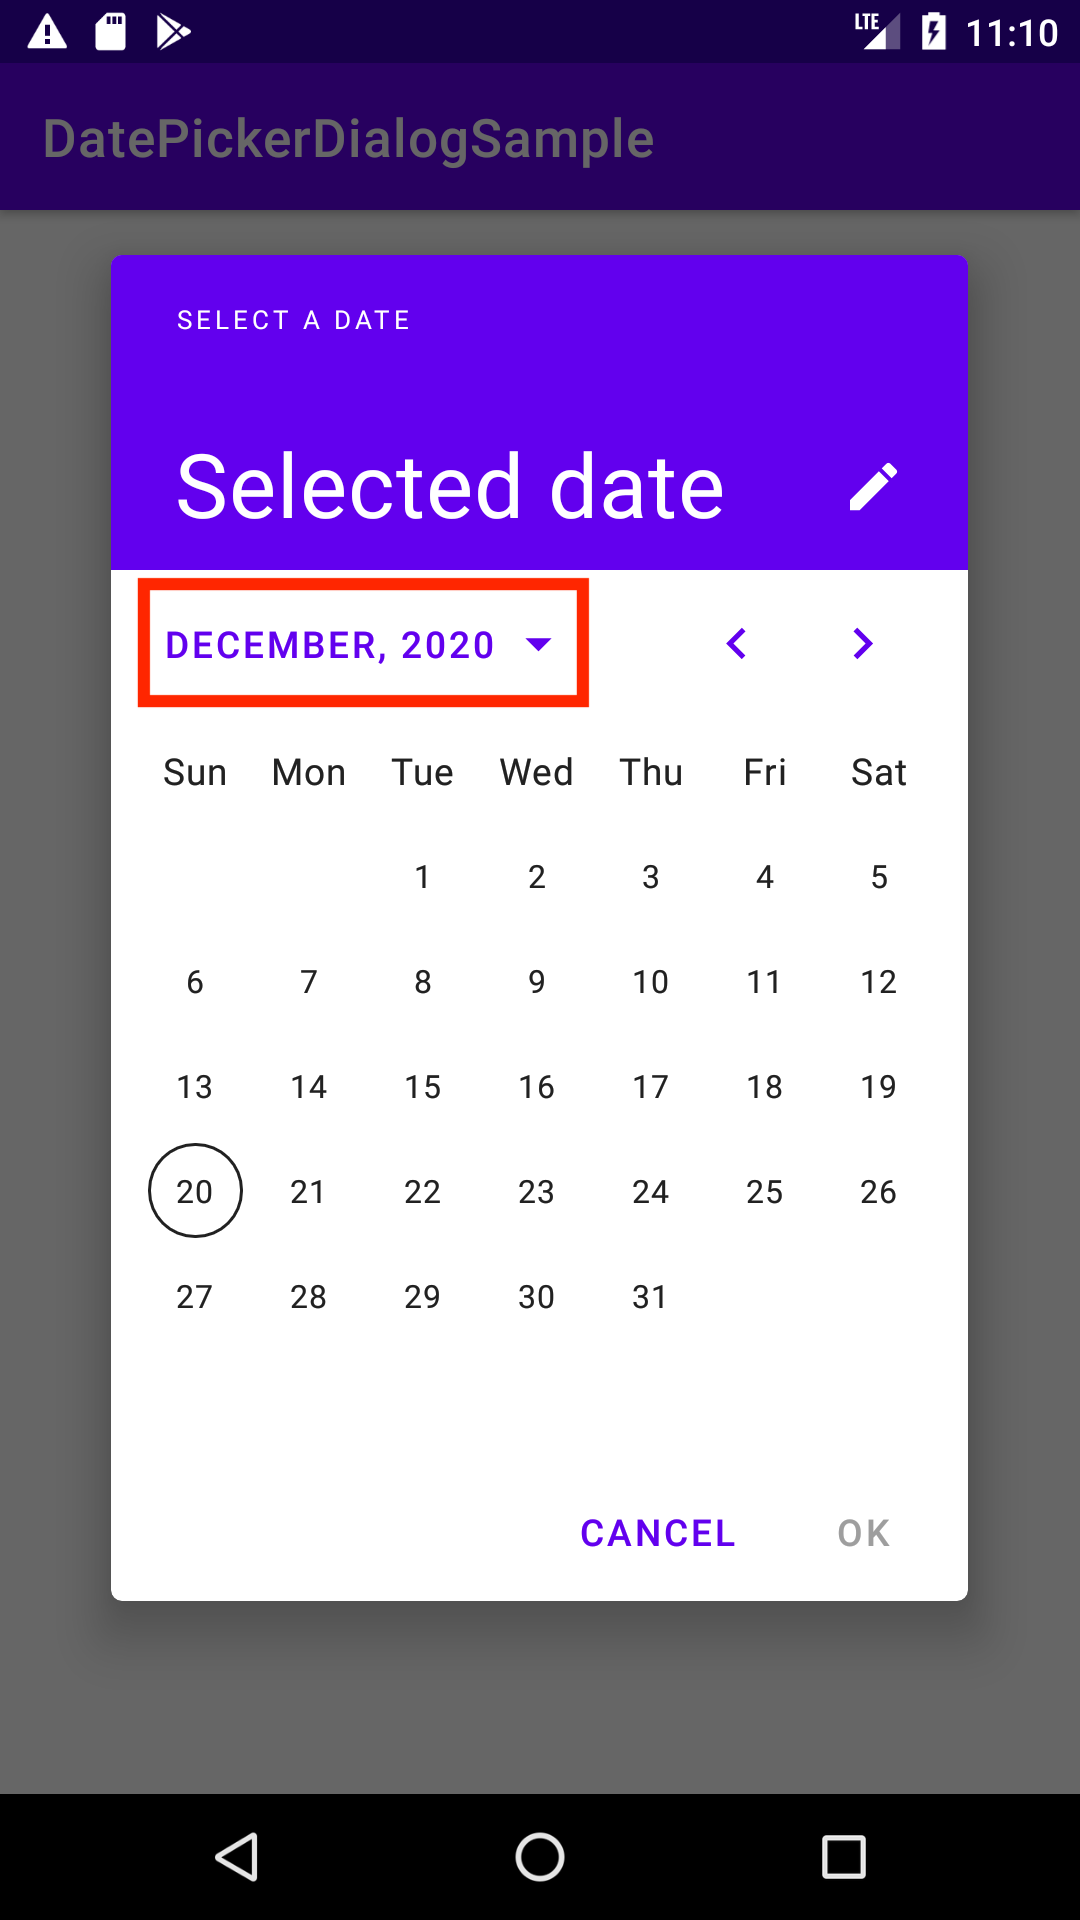
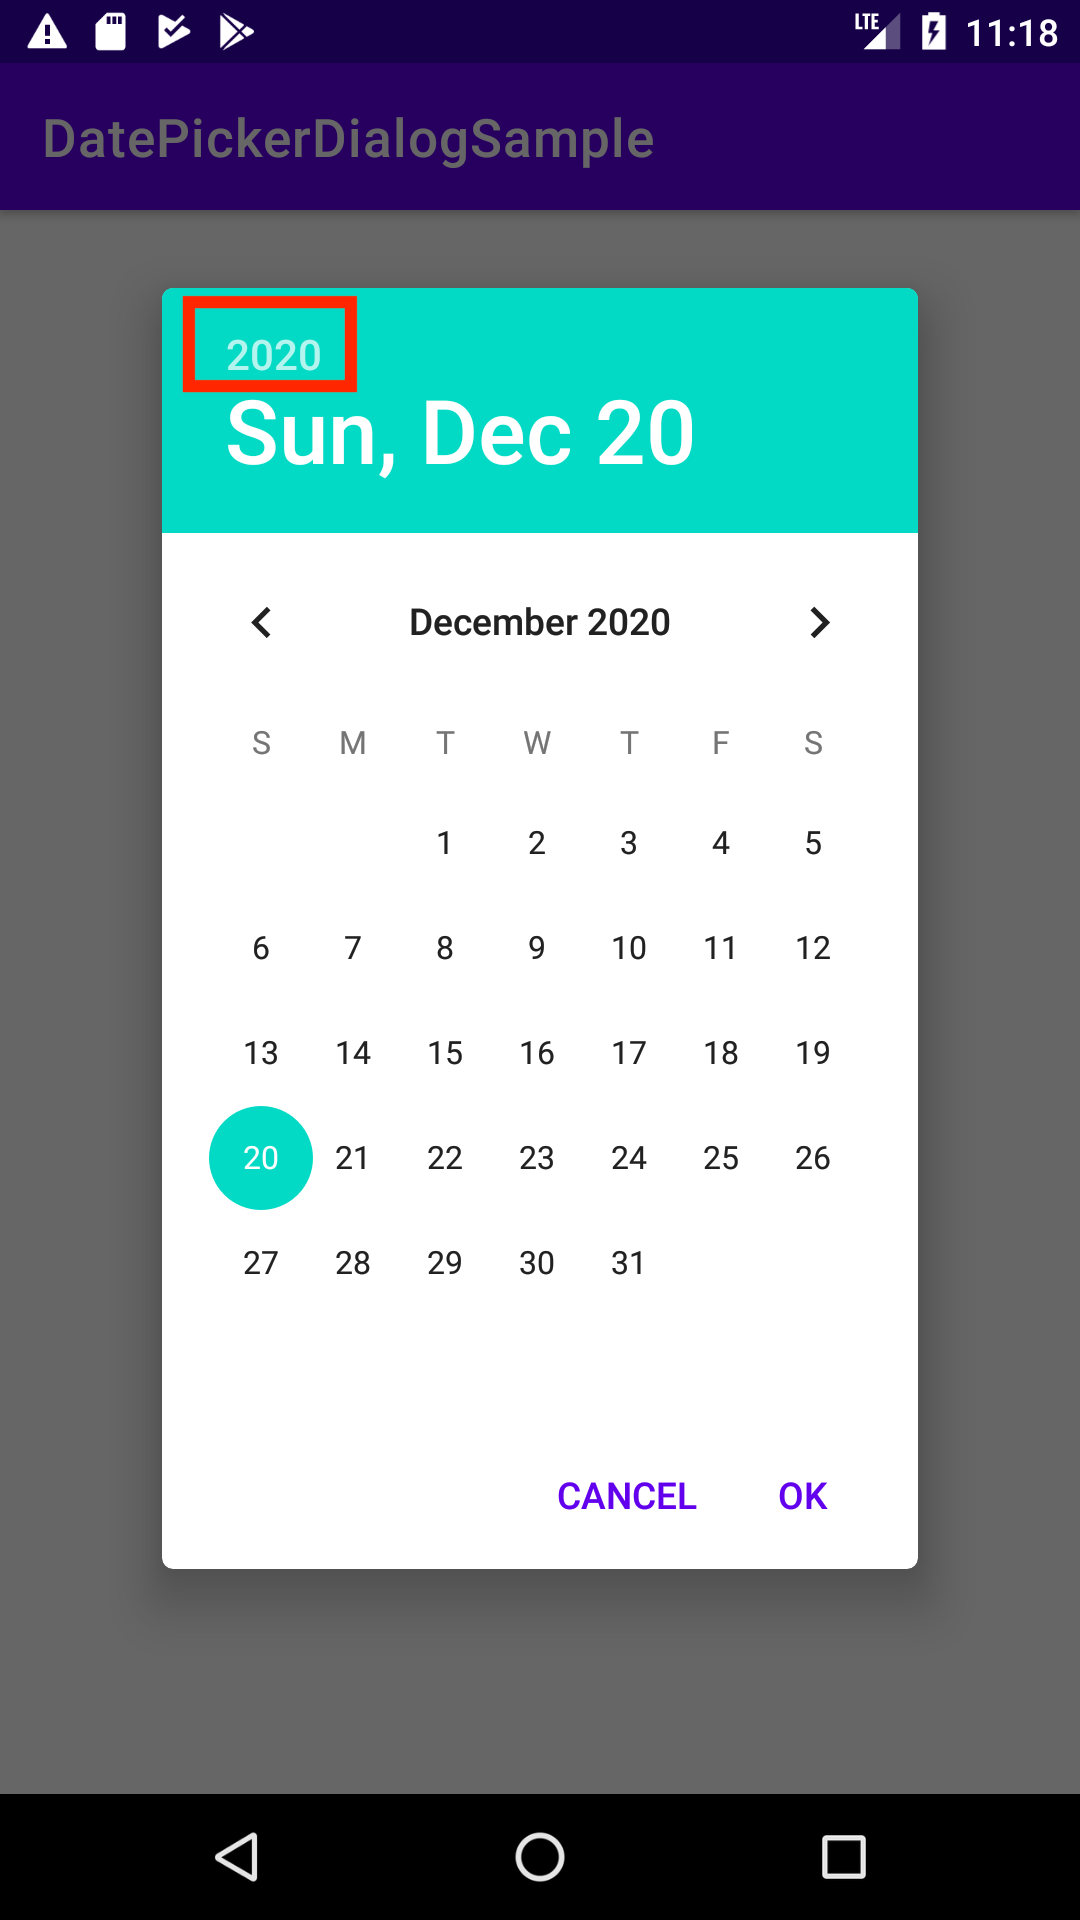
あぁ、ちなみにコレがMateriDatePickerでのDatepickerだね。やっつけ仕事でつけた赤い枠に注目してほしい。ちゃんと 年 の選択ができるっぽい見た目に変わってる。
知ってた?昔のカレンダー表示なDatepickerってね、年の部分選択できるんだぜ?
| MaterialDatePicker | DatePicker |
|---|---|
 |
 |
えー、昔のやつもmode=spinnerでイケるんじゃね?
フフフ…そいつはどうかな?
はい、ここタイトル回収です。
こういった 年 の選択が難しいって問題は、カレンダー表示であることに問題が有るわけで、スピナー形式だったら何も問題ないわけだ。
で、真っ先に考えるのが、DatepickerのThemeをいじって mode=spinner を設定する方法だよね?
こんな感じで設定した人は多いんじゃないかな?
<resources xmlns:tools="http://schemas.android.com/tools">
    <!-- Base application theme. -->
    <style name="Theme.DatePickerDialogSample" parent="Theme.MaterialComponents.DayNight.DarkActionBar">
        <!-- デフォルトのカラー設定とか色々省略するぞっと! -->
        <!-- Customize your theme here. -->
        <item name="android:datePickerDialogTheme">@style/MyDialogTheme</item>
    </style>

    <style name="MyDialogTheme" parent="Theme.AppCompat.Light.Dialog" >
        <item name="android:datePickerStyle">@style/MyDatePickerStyle</item>
        <item name="materialButtonStyle">@style/Widget.MaterialComponents.Button.TextButton.Dialog</item>
        <item name="colorPrimary">@color/purple_500</item>
    </style>

    <style name="MyDatePickerStyle" parent="android:Widget.Material.DatePicker" >
        <item name="android:datePickerMode">spinner</item>
        <item name="android:calendarViewShown">false</item>
    </style>
</resources>
実際それはうまくいくんだ。

そう、一部のAPILevelを除いてね…
APILevel24だけうまく動作しない!?
そう、APILevel24だけうまく動作しない。バージョンで言うと7.0だったかな?
同じ設定でDatePickerDialogを表示すると、このようになる。
…苦い記憶が蘇るねぇ。

じゃあ、どうするんだよぅ
コレは DatePickerDialog だから発生するバグのようだ。
実際、ViewとしてDatePickerを使うと、こういった問題は発生しない。
<androidx.constraintlayout.widget.ConstraintLayout xmlns:android="http://schemas.android.com/apk/res/android"
    xmlns:app="http://schemas.android.com/apk/res-auto"
    xmlns:tools="http://schemas.android.com/tools"
    android:layout_width="match_parent"
    android:layout_height="match_parent"
    tools:context=".MainActivity">

    <!-- セットしてるstyleはさっき定義したやつとおんなじだよ! -->
    <DatePicker
        android:layout_width="wrap_content"
        android:layout_height="wrap_content"
        style="@style/MyDatePickerStyle"
        app:layout_constraintBottom_toBottomOf="parent"
        app:layout_constraintLeft_toLeftOf="parent"
        app:layout_constraintRight_toRightOf="parent"
        app:layout_constraintTop_toTopOf="parent" />

</androidx.constraintlayout.widget.ConstraintLayout>
わぁ、スピナーがちゃんと反映される。
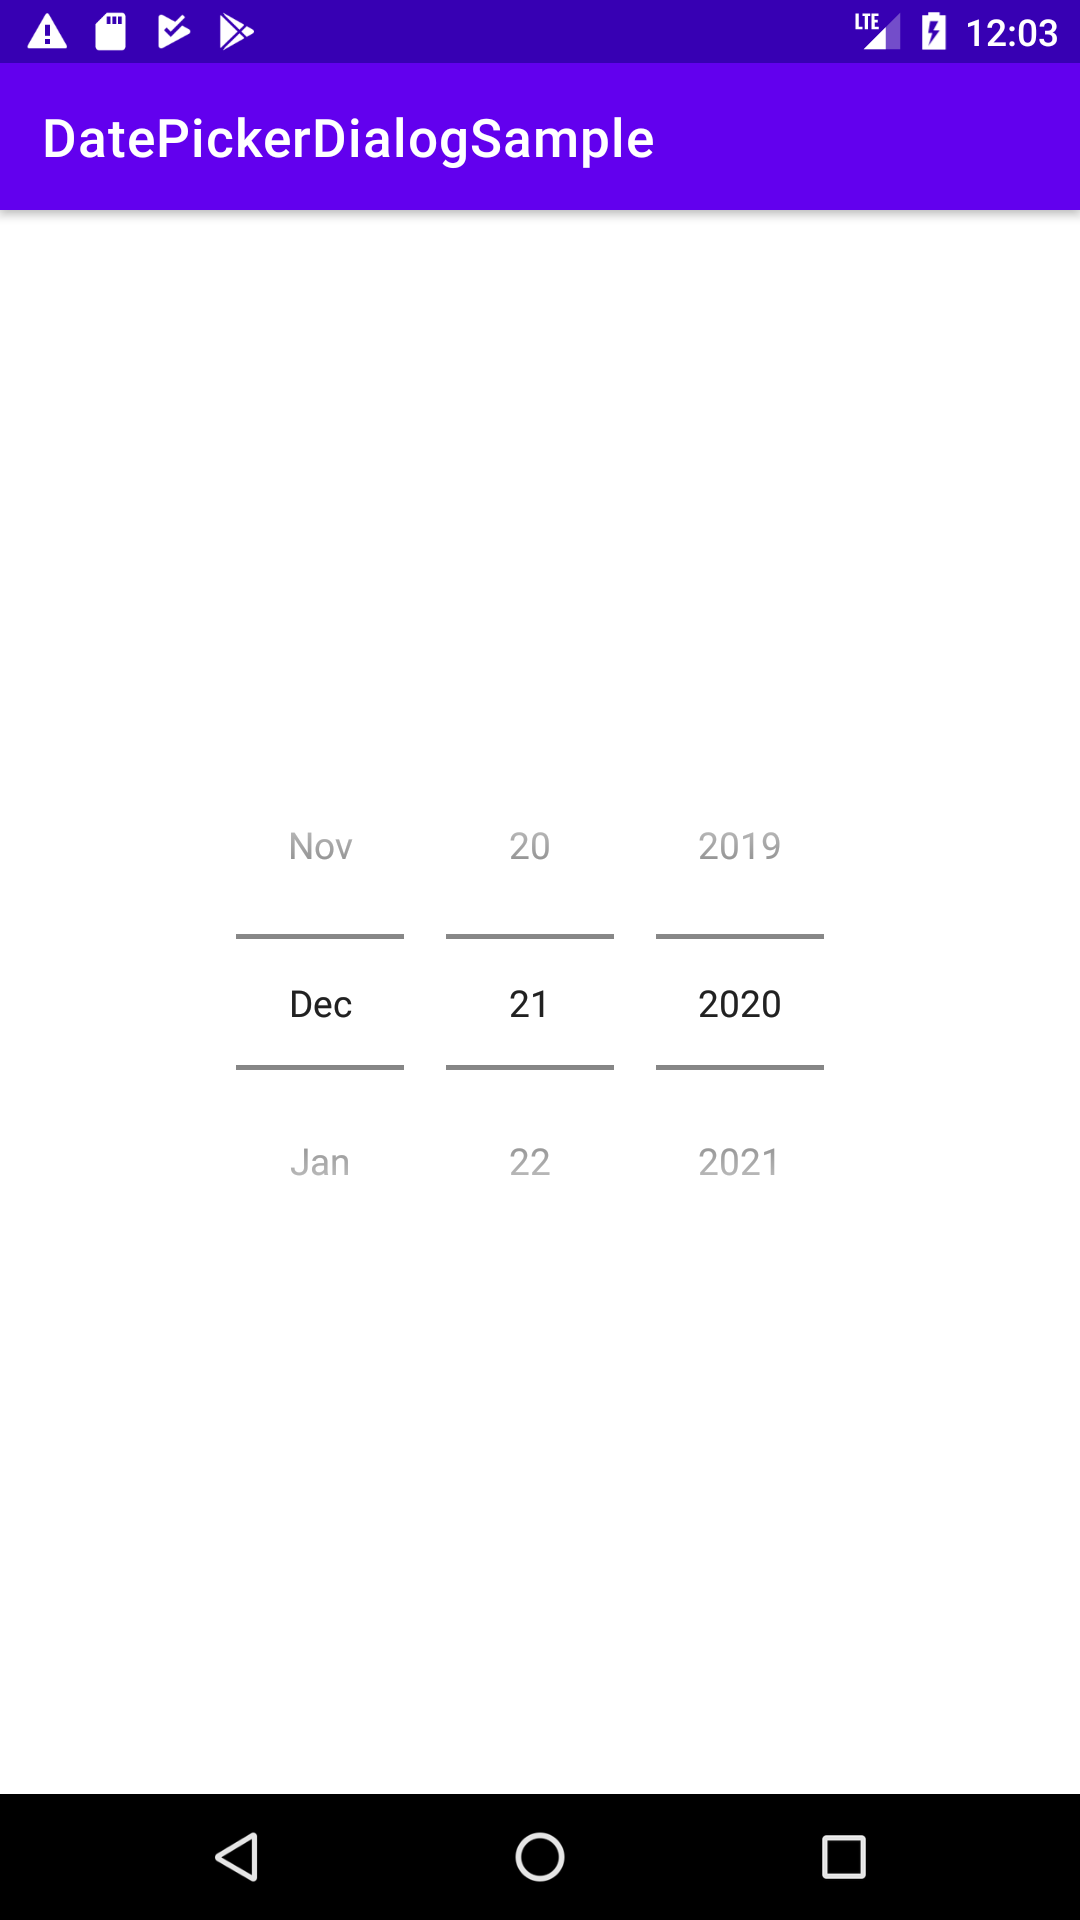
…と、言うことは?Dialogに何かしらのCustomViewを埋め込んでしまえば問題無くスピナー形式のDatePickerが表示できるのでは?
フフフその通り、ViewをinflateしてAlertDialogに埋め込んでしまえば良い!
では早速、APILevel24のワークアラウンドを差し込んだダイアログを作ってみよう。
兎にも角にもSpinner形式のDialogの中身を作ろう
再掲するよん、まずはDialogの中身としてコレを使う。
あ、そうそう、 dialog_v24_work_around.xml として新しくLayoutファイルを切り出したよ。違いは初期値設定のためにpickerにIDを振ったところくらいかな…?
<androidx.constraintlayout.widget.ConstraintLayout xmlns:android="http://schemas.android.com/apk/res/android"
    xmlns:app="http://schemas.android.com/apk/res-auto"
    xmlns:tools="http://schemas.android.com/tools"
    android:layout_width="match_parent"
    android:layout_height="match_parent"
    tools:context=".MainActivity">

    <!-- セットしてるstyleはさっき定義したやつとおんなじだよ! -->
    <DatePicker
        android:id="@+id/picker"
        android:layout_width="wrap_content"
        android:layout_height="wrap_content"
        style="@style/MyDatePickerStyle"
        app:layout_constraintBottom_toBottomOf="parent"
        app:layout_constraintLeft_toLeftOf="parent"
        app:layout_constraintRight_toRightOf="parent"
        app:layout_constraintTop_toTopOf="parent" />

</androidx.constraintlayout.widget.ConstraintLayout>
次に、Dialogに指定してやるThemeを作ろう
コレも再掲、冒頭で定義したThemeと全く同じ
…最近はダークモードとかそのへんの事情が有るし、もうちょいいい感じに分離して定義したほうが良いかもねぇ?
<style name="MyDialogTheme" parent="Theme.AppCompat.Light.Dialog" >
    <item name="android:datePickerStyle">@style/MyDatePickerStyle</item>
    <item name="materialButtonStyle">@style/Widget.MaterialComponents.Button.TextButton.Dialog</item>
    <item name="colorPrimary">@color/purple_500</item>
</style>

<style name="MyDatePickerStyle" parent="android:Widget.Material.DatePicker" >
    <item name="android:datePickerMode">spinner</item>
    <item name="android:calendarViewShown">false</item>
</style>
最後にDialgFragmentを作ろう
ソースコードを、ドーン!
Fragmentのボイラープレートは削除してるから、呼び出す側で値を渡したかったりとかするときは適宜ボイラープレートを適用するように!ViewBindingもDataBindingも使っていないので、これまたそういうのを利用したいときは適宜コードを書き換えて適用すると良いでしょうなあ。
class DatePickerDialogFragment : DialogFragment() {

    override fun onCreate(savedInstanceState: Bundle?) {
        super.onCreate(savedInstanceState)
    }

    override fun onCreateDialog(savedInstanceState: Bundle?): Dialog {
        return if(Build.VERSION.SDK_INT == Build.VERSION_CODES.N) {
            createV24WorkAround()
        } else {
            DatePickerDialog(
                requireActivity(),
                DatePickerDialog.OnDateSetListener { _, _, _, _ ->
                    Toast.makeText(activity, "DateSelected", Toast.LENGTH_SHORT).show()
                }, // listener とかは適宜設定
                2020,
                12,
                20)
        }
    }

    private fun createV24WorkAround(): Dialog {
        val view = LayoutInflater.from(requireActivity()).inflate(R.layout.dialog_v24_work_around, null, false)
        view.findViewById<DatePicker>(R.id.picker).apply {
            init(2020, 12, 20, null)
        }
        // PositiveButtonのリスナー辺りでinflateしたviewから日付を取り出してなんやかんやすると良いと思う
        return AlertDialog
            .Builder(requireActivity(), R.style.MyDialogTheme)
            .setView(view)
            .setPositiveButton(android.R.string.ok) { _, _ ->
                Toast.makeText(activity, "V24WorkAround", Toast.LENGTH_SHORT).show()
            }
            .setNegativeButton(android.R.string.cancel, null)
            .create()
    }
}
色々設定したな?Dialogさんを呼び出してみよう
class MainActivity : AppCompatActivity() {
    override fun onCreate(savedInstanceState: Bundle?) {
        super.onCreate(savedInstanceState)
        setContentView(R.layout.activity_main)

        // ここね!
        DatePickerDialogFragment().show(supportFragmentManager, null)
    }
}
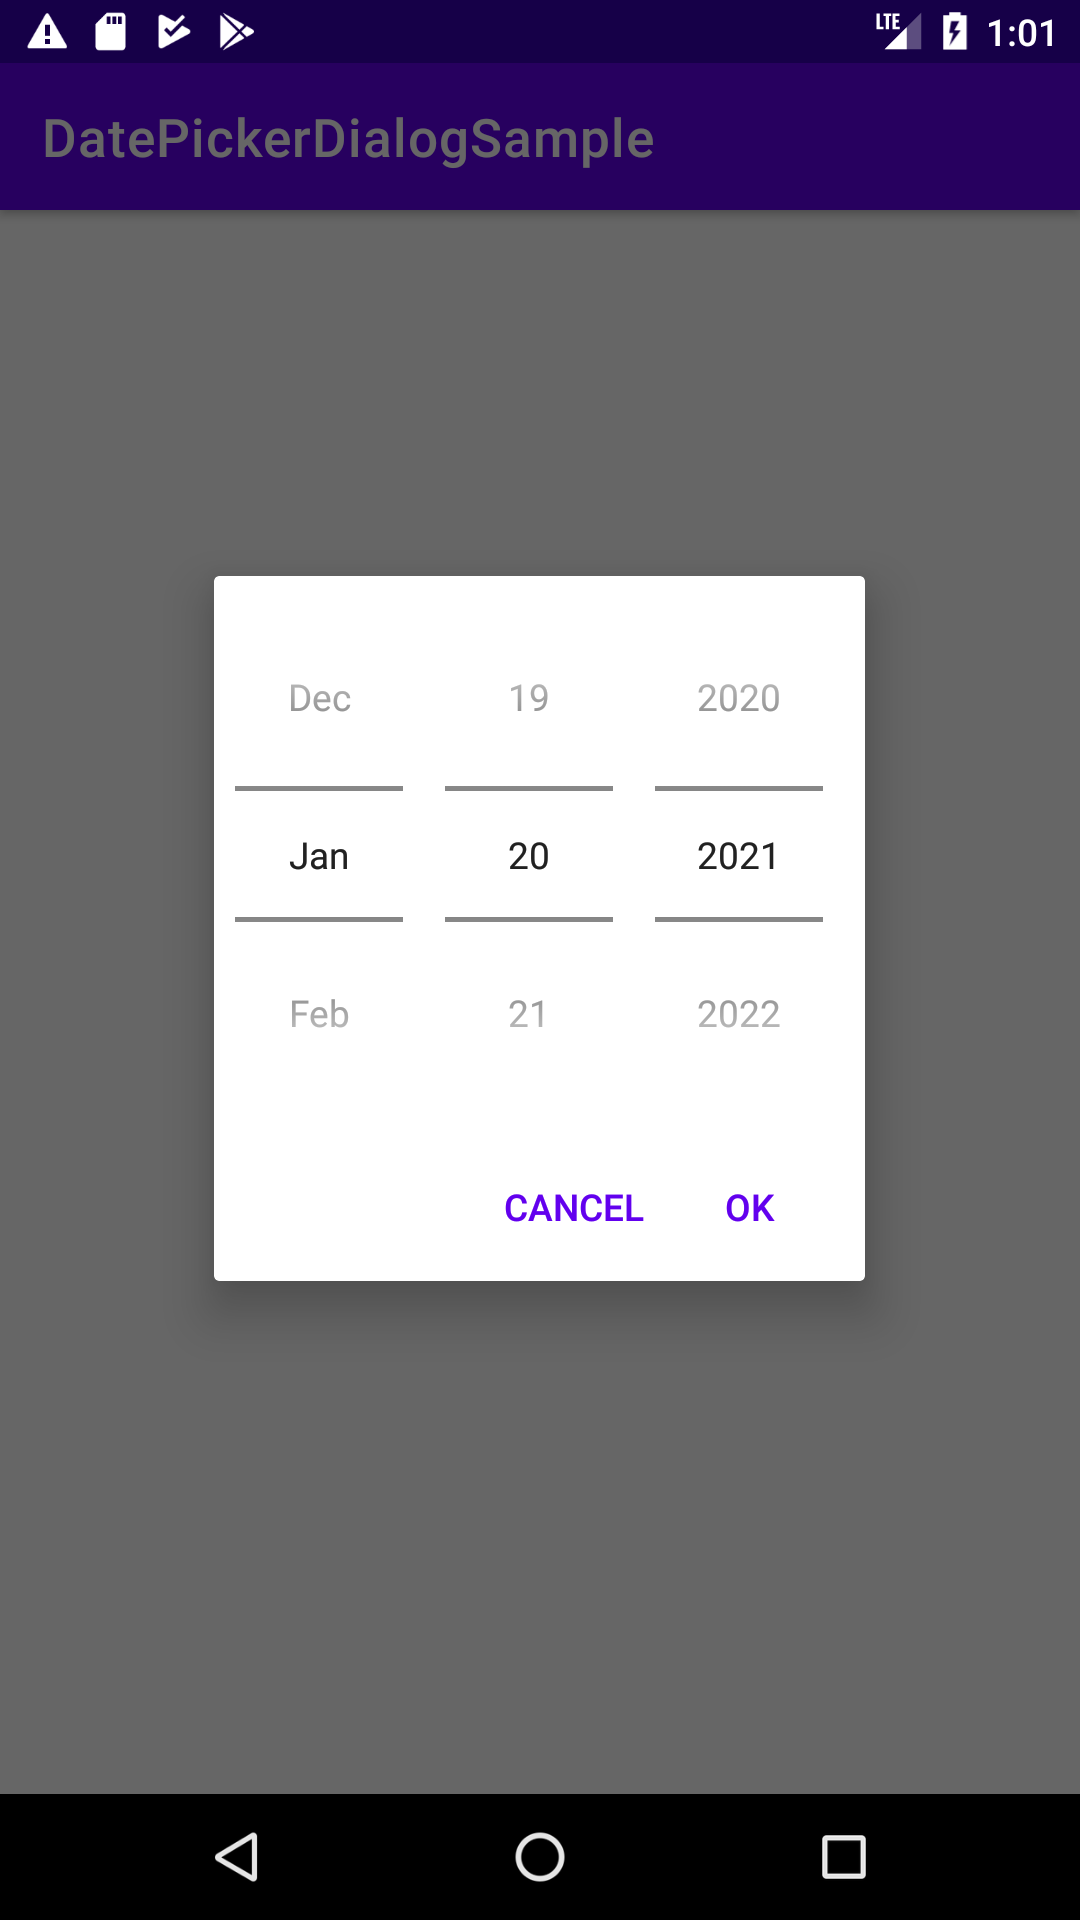
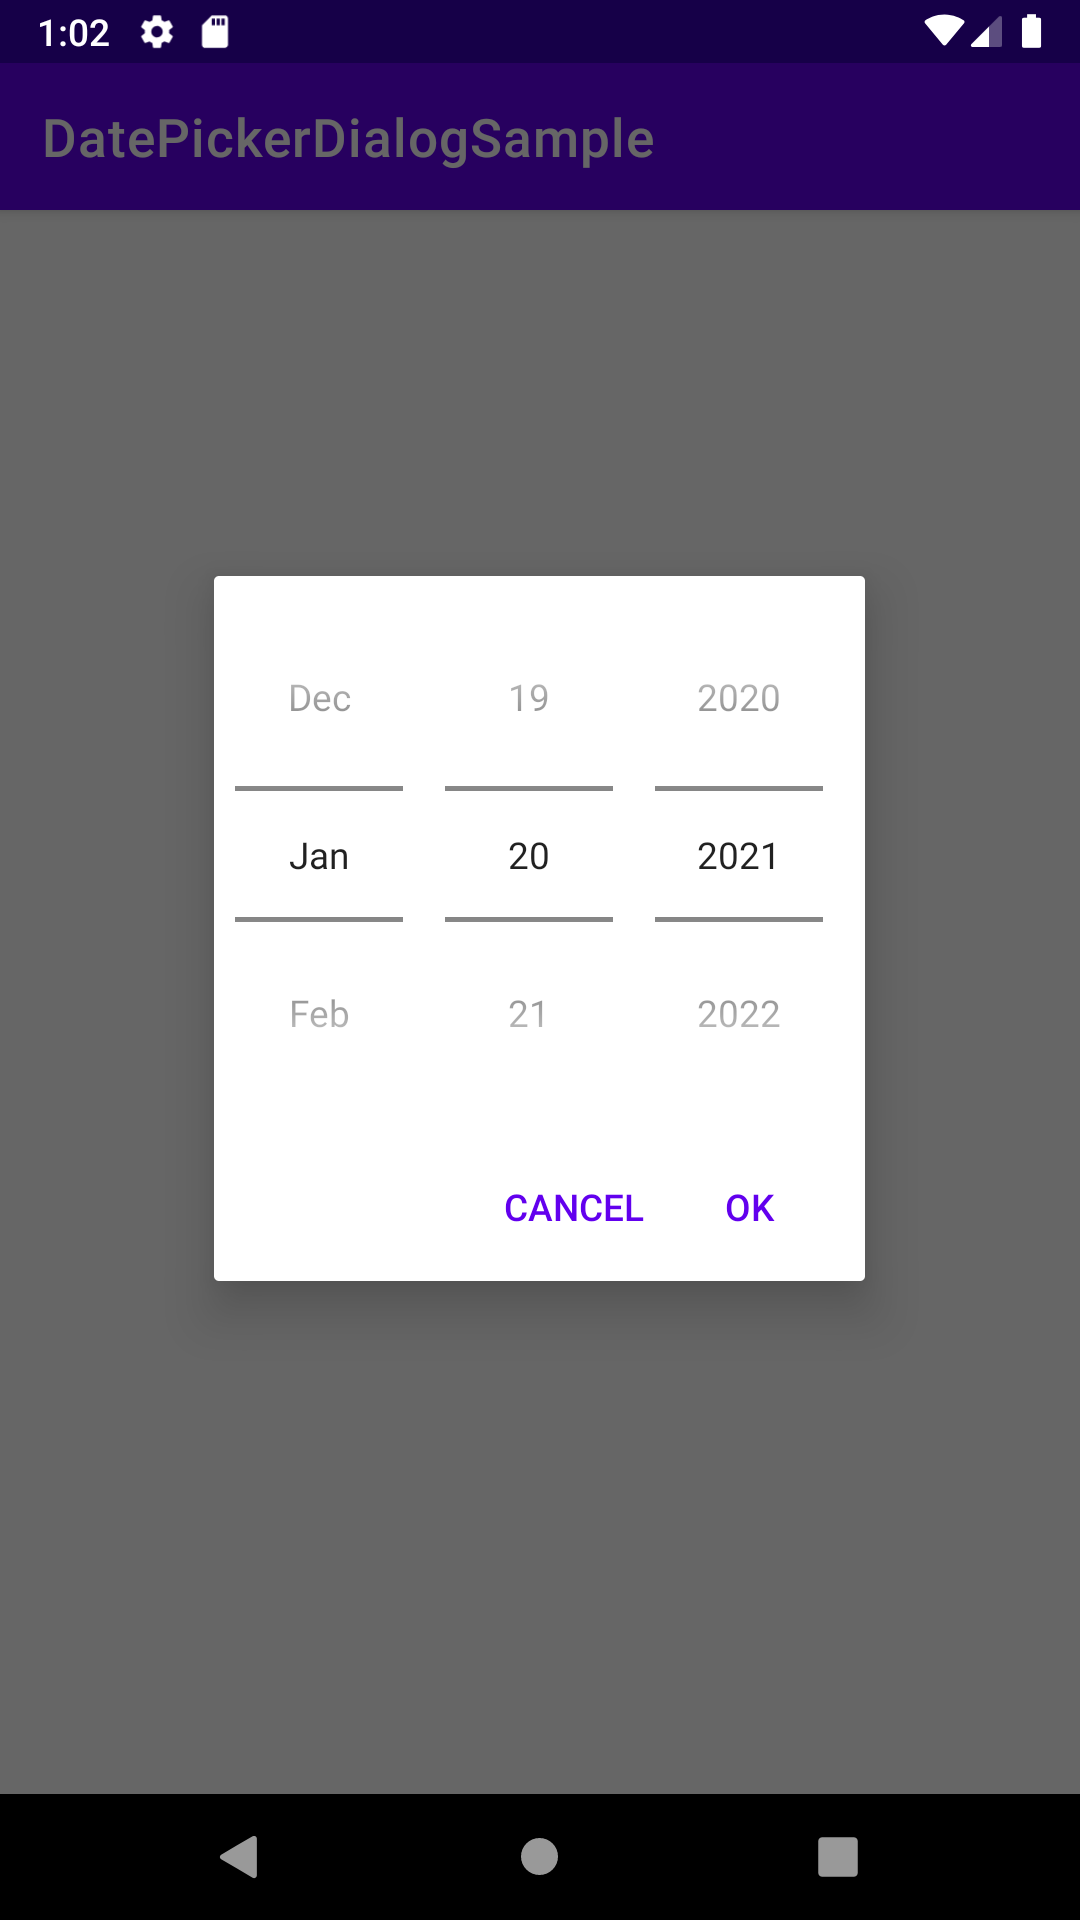
呼び出した姿がこちらッ!
わーい ![]()
| v24 | それ以外 |
|---|---|
 |
 |
…以上!
ああ、そうそう、ダイアログ自身の幅が気に入らないッ!ってなった時は、DialogのThemeに
android:windowMinWidthMajorandroid:windowMinWithMinor
この2つをいじってみると良いかもねぇ