はじめに
本記事は、Webアプリを作るための基礎知識の習得を目的とした学習記事です。主に、
- windows上でExcelVBA等、プログラミングの基礎知識は持っているものの
- Linuxなどサーバは全く扱ったことがなくバックエンドサーバが全くのブラックボックスで
- Webブラウザの挙動がよくわからず、何を使ってどこをどう見れば理解していることになるのか不安
という人を対象にしています。
まず、Webサーバを実装してHTTP通信の実体を確認していきます。
開発環境の構築
Windows PCにWebサーバを導入します。Webサーバを作るので処理系をインストール。
nodejs
nodejsはJavascriptの処理系です。
- nodejs公式からwindows用のパッケージをダウンロード
- 展開して実行
- コマンドプロンプトを開いてnodeと入力
- 終了は.exit
Visual Studio Code(VSCode)
VSCodeは各種プログラミング言語の統合開発環境です。便利なアドインがたくさんあります。オススメのアドインは次の通りです。
- Bracket Pair Colorizer2
- Debugger for Chrome
- (Emacs Keymap)
- Git graph
- indent-rainbow
- Japanese-language-pack
nodejsによるHTTP通信
まずは公式ドキュメントから始めましょう。書籍を買うのはその後です(基本)。
ポートlisten
コンピュータには、通信するための資源として「通信ポート」がOSから提供されています。公式のサンプルコードは3000番を使用しています。
(1) VSCodeで新しいワークスペースを開く; ファイル>名前を付けてワークスペースを保存> httpserverで保存
ワークスペースを新しく作ります
(2) ファイルを編集する; ファイル>新規ファイル
Webサーバプログラムを記述する新しいファイルを作ります。
これはポート3000番でHTTP通信接続を待ち受けるWebサーバプログラムで、"Hello World"をWebブラウザに表示する、というサンプルプログラムです。
サンプルプログラムは、HTTPヘッダであるContent-TypeにMIME-typeである'text/plain'を、HTTPボディに"Hello World"文字列を設定しています。
const http = require('http');

const hostname = '127.0.0.1';
const port = 3000;

const server = http.createServer((req, res) => {
  res.statusCode = 200;                         // HTTPステータスコード(1)
  res.setHeader('Content-Type', 'text/plain');  // MIME-type(2)
  res.end('Hello World');
});

server.listen(port, hostname, () => {
  console.log(`Server running at http://${hostname}:${port}/`);
});
(3) 保存する; ファイル>名前を付けて保存
(4) nodejsプログラムの実行; 実行>デバッグの開始>Node.js

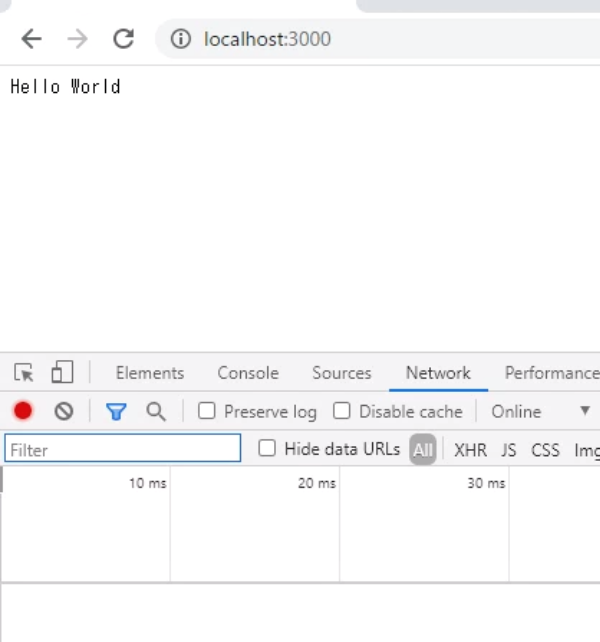
(5) WebブラウザからWebサーバへアクセス; Chromeを起動>http://localhost:3000と入力> Hello worldと表示される
(7) WebブラウザからWebサーバへアクセスして拒否される; Chromeに切り替えてリロード

サーバサイドデバッグ
nodejsプログラムには、VSCode上で実行を一時停止するブレークポイントが設定できます。
(1) ブレークポイントの設定
(2) Webブラウザでhttp://localhost:3000を入力すると、VSCode上で設定したブレークポイントで停止
(3) ブレークポイントからステップ実行/再開
クライアントサイドデバッグ
Webブラウザは二種類の通信をしています。Webサーバに要求した リクエスト通信と、応答するレスポンス通信です。WebブラウザChromeでは メニューボタン > その他メニュー > デベロッパーツール > Network を選んでおきます。

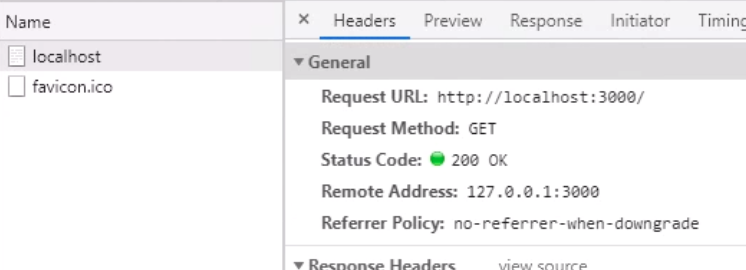
(1) HTTPリクエストの実体確認; Webブラウザにhttp://localhost:3000と入力 > リクエスト通信(localhost)を選択 > Headersタブを選択 > General > Request URL に注目

- Headers > Response Headers > view source
- Headers > Request Headers > view source
このview sourceのアンカーをクリックすると、パース前の、通信内容が確認できます。
(2) HTTPレスポンスの実体確認; Responseタブを選択

(3) HTTPステータスコード
- おなじみの200, 404, 500などあります。詳しくはRFCを参照のこと
- Webサーバに接続に成功して、レスポンス通信が受け取れたら200と思ってください
- 接続に成功しても、サーバ側でエラーが生じた場合は400番台や500番台のステータスコードが返ってきます
- 接続に失敗したら、そもそもHTTP通信が始められなかったということです
実習: Webサーバ実装
サーバサイドのnodejsプログラムを順次書き換えていくことで、HTTPの通信実態を理解します。
HTTPヘッダContent-TypeとHTTPボディの関係とWebブラウザの解釈
MIME-type: text/plain
HTTP通信は、基本テキストデータを送受信しています。
(1) res.write()
server.jsを書き換えたらデバッグ実行中のメニューで回転矢印のリロードボタンを押すと、デバッグプロセスの停止、ファイル保存、再読込、デバッグの開始と、一連の動作をまとめてやってくれます。
const http = require('http');

const hostname = '127.0.0.1';
const port = 3000;

const server = http.createServer((req, res) => {
  res.statusCode = 200;                         // HTTPステータスコード(1)
  res.setHeader('Content-Type', 'text/plain');  // MIME-type(2)
  res.write('Hello World');
  res.end();
});

server.listen(port, hostname, () => {
  console.log(`Server running at http://${hostname}:${port}/`);
});
(2) 繰り返し
const http = require('http');

const hostname = '127.0.0.1';
const port = 3000;

const server = http.createServer((req, res) => {
  res.statusCode = 200;                         // HTTPステータスコード(1)
  res.setHeader('Content-Type', 'text/plain');  // MIME-type(2)
  for(var i = 0; i < 5; i++)
    res.write('Hello World');
  res.end();
});

server.listen(port, hostname, () => {
  console.log(`Server running at http://${hostname}:${port}/`);
});
(3) writeしたからといって直ちに通信しているわけではない(重要)
- res.write行にブレークポイントを仕掛けておく
- http://localhost:3000/でアクセス
- ブレークポイントで止まったら、ステップ実行
- res.end()で初めてレスポンス通信が開始していることがわかるでしょう
MIME-type: text/html
(1) HTTPヘッダがtext/htmlの場合、HTTPボディの中身はHTML文書です、という意味です
const http = require('http');

const hostname = '127.0.0.1';
const port = 3000;

const server = http.createServer((req, res) => {
  res.statusCode = 200;                         // HTTPステータスコード(1)
  res.setHeader('Content-Type', 'text/html');  // MIME-type(2)
  res.write('<html><body><strong>Hello world</strong></body></html>')
  res.end('');
});

server.listen(port, hostname, () => {
  console.log(`Server running at http://${hostname}:${port}/`);
});

WebブラウザはHTML文書として解釈して、Hello worldが強調されていますね。
(2) HTTPヘッダでMIME-typeがtext/plainなのにHTTPボディがHTMLなら...?
const http = require('http');

const hostname = '127.0.0.1';
const port = 3000;

const server = http.createServer((req, res) => {
  res.statusCode = 200;                         // HTTPステータスコード(1)
  res.setHeader('Content-Type', 'text/plain');  // MIME-type(2)
  res.write('<html><body><strong>Hello world</strong></body></html>')
  res.end('');
});

server.listen(port, hostname, () => {
  console.log(`Server running at http://${hostname}:${port}/`);
});

HTML文書であっても、text/plainで送るとWebブラウザはHTML文書とは解釈してくれません。HTTPレスポンス通信のsetHeader()で設定されるHTTPヘッダ情報で、Webブラウザ側の挙動が変わることがこれで理解できると思います。
HTTPヘッダの指定で、Webブラウザの挙動を指定できたりします。例えば、ファイルをダウンロードさせる時には、Content-Dispositionヘッダを使用します。おいおい触れていきます。
HTTPレスポンスにファイルシステムから読み込んだ内容で通信
(1) サーバサイドでのモジュール組込方法(1); require
モジュールはrequire関数を使います。ここではconfigモジュールを組み込みます。
...
const config = require('./config');
...
config.jsを新しいファイルとして作成し、exportsという名前のオブジェクトに値を設定します。
exports.port = 3000;
server.jsは以下の通りになります。
const http   = require('http');
const config = require('./config');
const hostname = '127.0.0.1';

const server = http.createServer((req, res) => {
  res.statusCode = 200;                         // HTTPステータスコード(1)
  res.setHeader('Content-Type', 'text/plain');  // MIME-type(2)
  res.write('<html><body><strong>Hello world</strong></body></html>')
  res.end('');
});

server.listen(config.port, hostname, () => {
  console.log(`Server running at http://${hostname}:${config.port}/`);
});
(2) ファイルシステムにアクセスする時はfsモジュール; 非同期アクセスでエラーになりがち
const http   = require('http');
const fs     = require('fs');
const config = require('./config');
const hostname = '127.0.0.1';

const server = http.createServer((req, res) => {
   fs.readFile(__dirname + '/server.js', 'utf-8', function (err, text) {
        // エラー発生時
        if (err) {
            res.writeHead(404, {'Content-Type' : 'text/plain'});
            res.write('page not found');
            // returnでreadFile関数を抜ける
            return res.end();
        }

        res.statusCode = 200;                         // HTTPステータスコード(1)
        res.setHeader('Content-Type', 'text/plain');  // MIME-type(2)
        res.write(text);
  });
  res.end('');
});

server.listen(config.port, hostname, () => {
  console.log(`Server running at http://${hostname}:${config.port}/`);
});
VSCode上でNodeError: Cannot set headers after they are sent to the clientと出る。以下が正解。
const http   = require('http');
const fs     = require('fs');
const config = require('./config');
const hostname = '127.0.0.1';

const server = http.createServer((req, res) => {
   fs.readFile(__dirname + '/server.js', 'utf-8', function (err, text) {
        // エラー発生時
        if (err) {
            res.writeHead(404, {'Content-Type' : 'text/plain'});
            res.write('page not found');
            // returnでreadFile関数を抜ける
            return res.end();
        }

        res.statusCode = 200;                         // HTTPステータスコード(1)
        res.setHeader('Content-Type', 'text/plain');  // MIME-type(2)
        res.write(text);
        res.end('');
  });
  // res.end(''); 間違い
});

server.listen(config.port, hostname, () => {
  console.log(`Server running at http://${hostname}:${config.port}/`);
});
まとめ(講座一時間)
- 生粋のwindowsプログラマ向けにJavascriptでWebサーバ実装
- nodejs/VSCodeをインストール
- ポートlisten
- サーバサイドデバッグ
- クライアントサイドデバッグ
- 改修実習では、自力でnodejsサーバプログラムをアイデアを出して改修可能になった
- MIME-type: text/plain
- MIME-type: text/html
- HTTPヘッダContent-TypeとHTTPボディの関係
- レスポンス通信は直ちに発生するわけではない
- サーバサイドでのモジュール組込方法(1); require
- ファイルシステムへのアクセス(非同期)
- 次回の内容はHTTP/GET, POSTでのパラメータ解析です
- 発展的な話題; そのうちやります
- Content-Typeに指定するMIME-typeが他にどんなものがあるか
- HTTPステータスコードの意味を押さえよう
- nodejsプログラムでのモジュール組込を押さえよう
- nodejsプログラムを保存したら自動でプロセス再起動してもらいたいんだけど...
- VSCode/launch.jsonで何ができるの?
- クライアントサイドのデバッグもVSCodeでやりたいんだけど...
