始めに、ここに書いてる事は前回の内容を取り入れて書いてます。
https://qiita.com/Galaxy/items/88aa9de34af0312cf790
まずAndroidアプリを動かす基本プログラムのActivityにはライフサイクルと呼ばれる仕組みがある。クラスをActivityとして使う場合にはAppCompatActivityを継承する必要がある。
継承はextendsと書いて行う
public class MainActivity extends AppCompatActivity {
}
アプリが起動した時:
・onCreate(): どのアプリでも必ずと言って良いほど書く。これはActivityが生成される時に呼び出される。ここでView含めて初期化を行う事が多い。
・onStart(): Activityが開始する時に呼ばれる
・onResume(): Activityが開始/再開した時両方で呼ばれる。
他にもあったような気もするが、この中で重要なのはonCreate()とonResume()くらい。
アプリがホームボタンとか何かしらの条件で中断した時
・onPause(): アプリが中断・終了する時に呼ばれる
アプリが終了する時
・onPause(): ここでも呼ばれる
・onStop(): Activityがストップするタイミングで呼ばれる
・onDestroy(): Activityが破棄されるタイミングで呼ばれる
※公式に書いてあるライフサイクルと一部違ったり、足りない部分があると思うが、それくらい使う事が少ないのだ。。
まずはonCreate()を見ていく。
@Override
protected void onCreate(Bundle savedInstanceState) {
    super.onCreate(savedInstanceState);
    setContentView(R.layout.activity_main);
}
setContentView();
これは指定したlayoutを画面にセットするメソッド。大体の場合はAndroidのResourceから設定するので、
R.layout.[レイアウトファイル名]
という感じで使う。このRにはlayoutの他に id, string, mipmap, drawable, menu, color等と種類があり、アプリ内でResourceを使う場合は大体この方法を使う。
ここではactivity_mainという名前のlayoutファイルが指定されているので、それを見に行く。
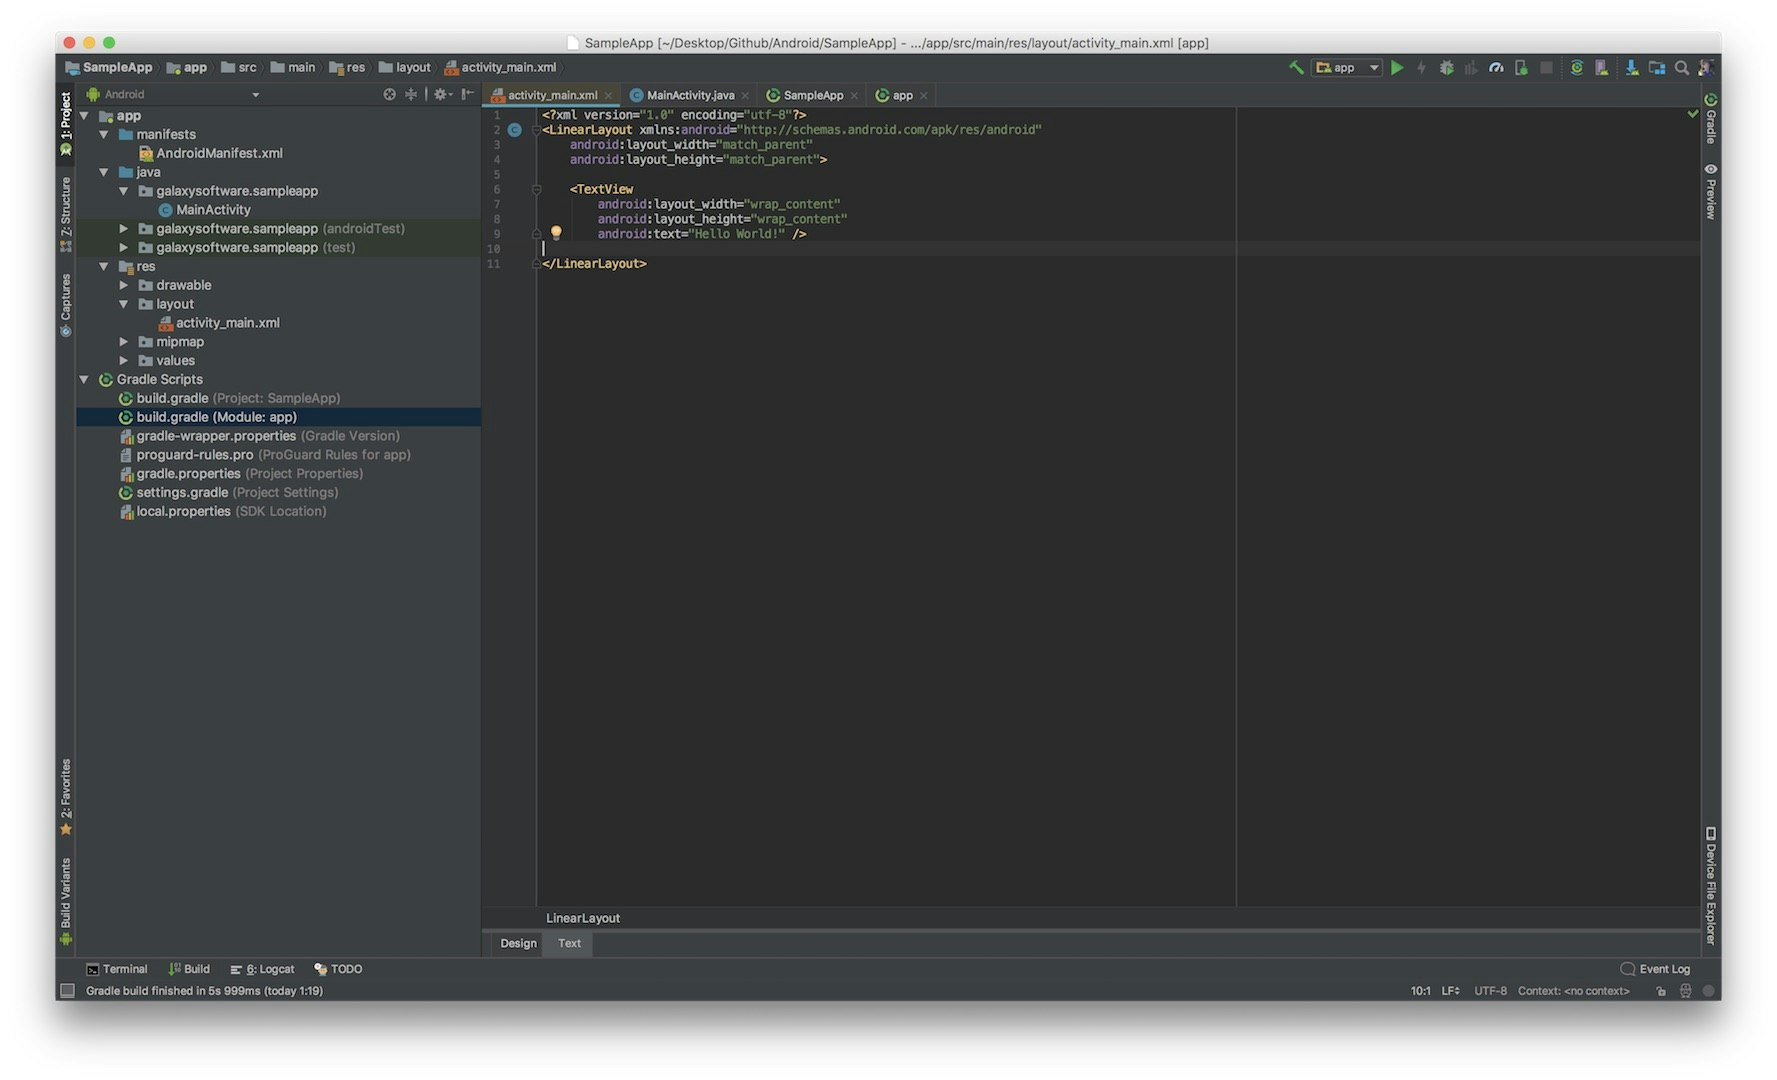
そのファイルを開くとベースのレイアウトが「android.support.constraint.ConstraintLayout」となっているが、今回は触れないので、この部分を「LinearLayout」という風に置き換える。あと以下の部分(主に制約の設定値)
xmlns:app="http://schemas.android.com/apk/res-auto"
app:layout_constraintBottom_toBottomOf="parent"
app:layout_constraintLeft_toLeftOf="parent"
app:layout_constraintRight_toRightOf="parent"
app:layout_constraintTop_toTopOf="parent"
と(Activityと紐づけるような物)
xmlns:tools="http://schemas.android.com/tools"
tools:context=".MainActivity"
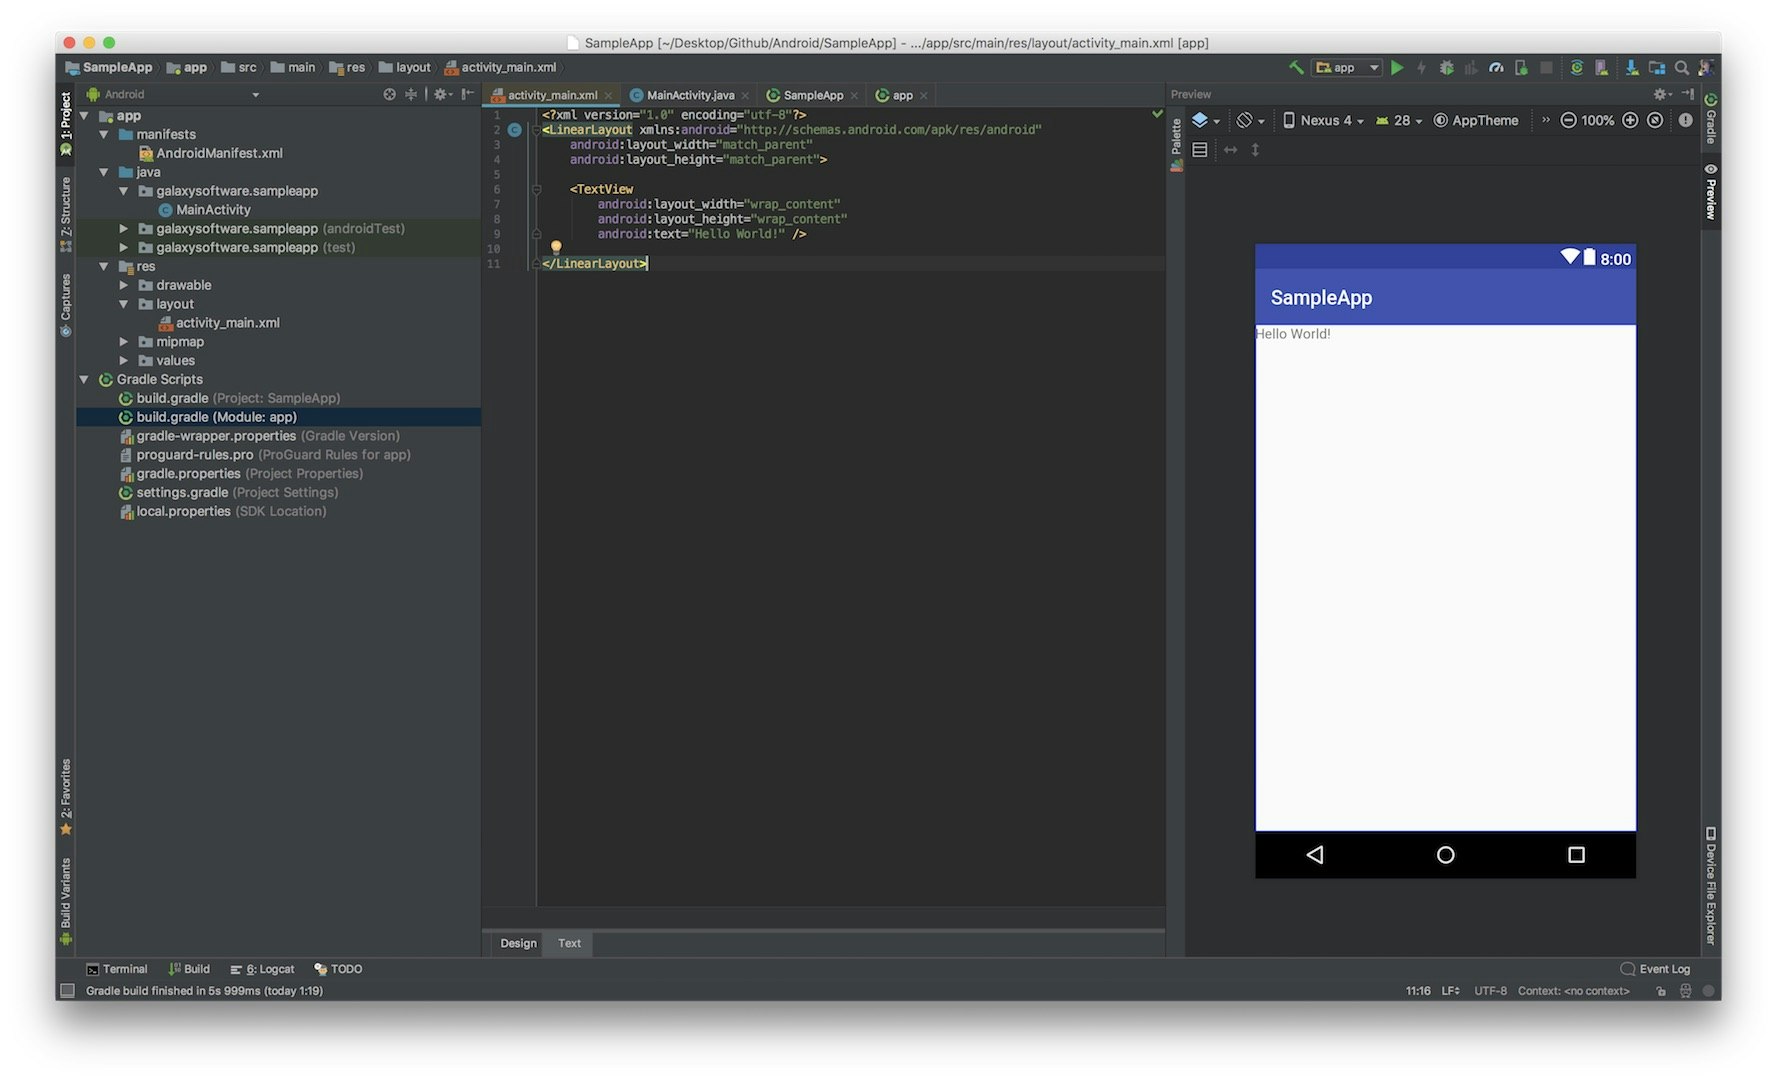
も今回は使わないので、消す。でこんな感じになる。

ここで右上の方にあるPreviewを押すと端末やOSバージョンに応じたレイアウトのプレビューも見れる。もう一度押すと消せる。

LinearLayoutは縦 or 横にView(ここでいう「TextView」などのレイアウトパーツ)を整列して配置するタイプのレイアウト。デフォルトでは横配置。縦か横かはちゃんと指定してあげた方が良いので、LinearLayoutの枠に
android:orientation="vertical"
を追加する。縦配置は「vertical」で、横配置は「horizontal」になる。
android:layout_width="match_parent"
android:layout_height="match_parent"
この二つはViewの幅と高さを決めるものでどのViewにも必ず必要。
・match_parent: そのViewの親Viewで表示可能エリアを全部使う
・wrap_content: そのViewのコンテンツに応じて必要なサイズになるように指定
・指定サイズ: 自らそのViewのサイズを100dpなどと指定することもできる。dpはレイアウトのサイズ指定に必要な単位みたいなもの。ただ、画面サイズによってレイアウトが崩れる可能性があるので気を付けよう。
TextViewは文字を表示する為のView。
表示は android:text="" で行う。表示する文字はstrings.xmlから参照しないと、「ちゃんと参照しろや!!!」って注意されるから、ちゃんと参照しましょう。
TextViewで文字を表示するだけでは全く面白くないので、Buttonを追加してみる。Viewの追加方法は以下がある。
・①: Textタブで直接「<」と打って各種View(今回はButton)を追加する
・②: 下のタブのDesignから、Designタブのちょうど上の方にあるPaletteにViewがあるのでそれをドラッグ&ドロップする
・③: ActivityでButtonインスタンスを生成してViewに追加するコードを書く
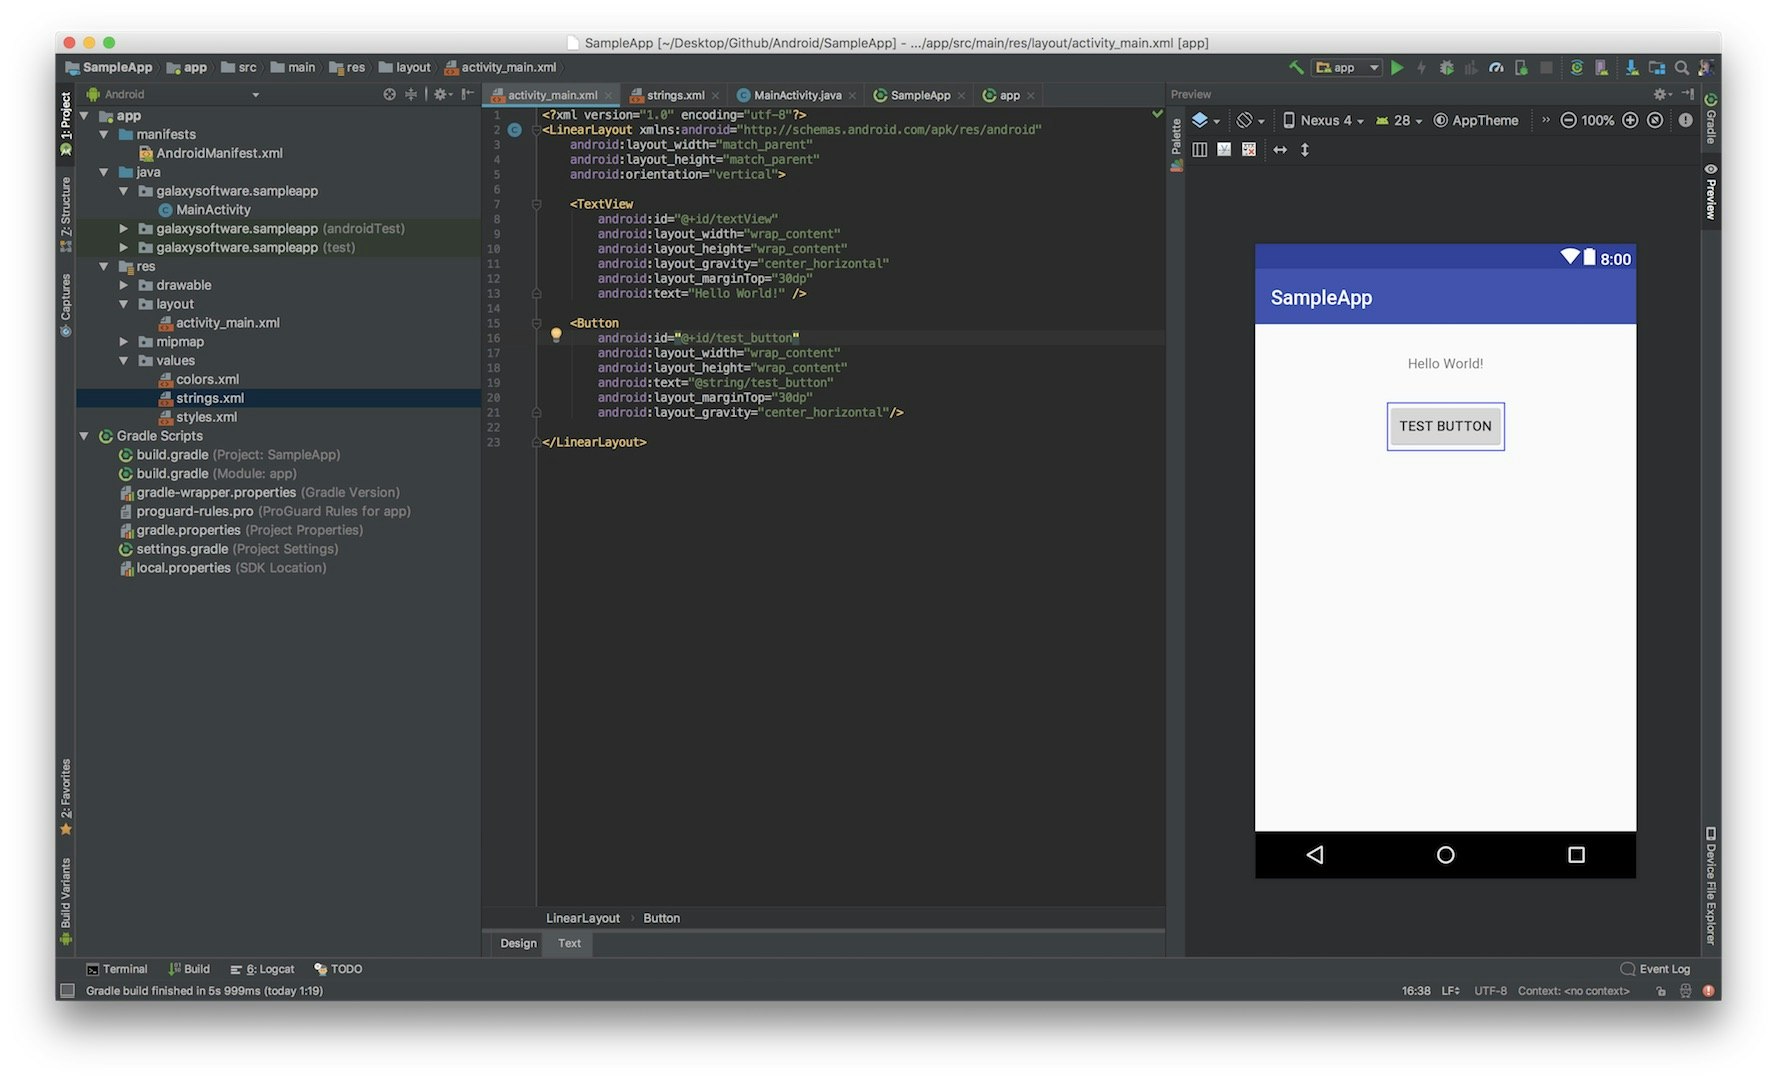
今回は①で行く。こんな感じ。
<Button
    android:id="@+id/button"
    android:layout_width="wrap_content"
    android:layout_height="wrap_content"
    android:layout_gravity="center_horizontal"
    android:layout_marginTop="30dp"
    android:text="@string/count_button" />
・id: ViewをActivity等のクラスから参照する為のもの。このidは数字のみとかの指定があるわけじゃなく、普通に文字列を指定できるが、スネークもしくはキャメルケースで書いた方がいい。
・layout_gravity: LinearLayout内でのViewの位置を指定。center_horizontalは横ベースに中央配置を意味する。
・layout_marginTop: Viewを隣接してるレイアウト・親Viewから上方向にどれくらいのマージンを取るかを指定。単位はdpで指定する。
で、こんな感じのレイアウトを用意した。

で、このレイアウトをActivityから操作する (やっとだぜ・・・
やる事:Buttonを押したらTextViewの内容を変える
本当にこれだけなら7行で終わる。ちなみにKotlinで書いた場合は1行で終わるよw
final TextView text = findViewById(R.id.textView);
findViewById(R.id.test_button).setOnClickListener(new View.OnClickListener() {
   @Override
   public void onClick(View view) {
       text.setText(R.string.button_pressed);
   }
});
まずTextViewのインスタンスを定義して、findViewById()で先ほどレイアウトで定義したidを紐付ける。これでActivity等のクラスからlayout内のViewを参照する。(これが古いやり方だと (TextView) findViewById()とTextViewにキャストする形が取られていた)
次にButtonに押した時に「押されたよ」と通知してくれるコールバック、「setOnClickListener」を設定する。ここで、あれボタンは初期化してないって思う人もいるだろうが、リスナーを設定するだけならButtonをインスタンスにしなくてもfindViewById()で直接設定できる。
勿論、Button button = findViewById(R.id.test_button);のようにインスタンスにしてリスナーつけるのも可能だし、逆にButtonにリスナーだけじゃなくて文字や色を変えたり、見た目を弄りたいとなるとインスタンス化は必須となる。
あとButtonにリスナーつけてクリックを検知するやり方として、よくあるサンプルがもう一つある。
public class MainActivity extends AppCompatActivity implements View.OnClickListener{
}
Activity継承後に続けてimplements(実行)でView.OnClickListenerをくっ付けるやり方。
これを実装するとクラス内でこの実装が必ず必要になる。
@Override
public void onClick(View view) {

}
このやり方を使うと先程Buttonに付けていたリスナーを
[ボタン名].setOnClickListener(this);
とクラス内で実装されているonClick()を呼ぶようにできる。
ちなみに、View.OnClickListenerをimplementsした状態でも、thisせずにボタンに直接リスナーを付けることはできる。
もしボタンを複数設置してそれぞれのクリックを検知する場合、それぞれのボタンに.setOnClickListener(this);してクリック検知をonClick()にまとめて**引数のviewからview.getId()**でクリックされたボタンを判別する事ができる。
@Override
public void onClick(View view) {
    switch (view.getId()){
        case R.id.button:
            break;
        case R.id.count_button:
            break;
    }
}
もちろんそれぞれのボタンに直接リスナー付ける方法もありだし、個人的にはこっちをオススメ。
とりあえず、LayoutにViewを追加してActivityで操作するまでの流れはこんな感じ
・LayoutファイルにViewを定義する
↓
・Viewにidやサイズなどの設定をする
↓
・Activity側でViewのインスタンスを生成してfindViewById()で紐付ける (Javaのみ)
↓
・そのインスタンスを使ってそれぞれのViewの機能でやりたい事を設定する (TextviewならtextView.setText()とか)
一応これで動かす準備は整ったんだけど、これだとね、**一回しか使えないんだよね!!!**ボタンを押してTextViewに特定の文字を表示しておしまい。
だからこれにBooleanを持たせてオンオフみたいにしたり、Intを持たせればカウンターにしてみようと思う。
Booleanスイッチ: isOnはグローバル変数として定義する。一応ボタンを押すたびに動作は変わる。
Boolean isOn = false;

@Override
protected void onCreate(Bundle savedInstanceState) {
    super.onCreate(savedInstanceState);
    setContentView(R.layout.activity_main);
    final TextView textView = findViewById(R.id.textView);
    findViewById(R.id.button).setOnClickListener(new View.OnClickListener() {
        @Override
        public void onClick(View view) {
            isOn =! isOn;
            textView.setText(isOn ? R.string.button_isOn: R.string.button_isOff);
            textView.setTextColor(isOn ? Color.RED : Color.BLACK);
        }
    });
}
Intカウンター: textViewをonCreate()外から操作するので、グローバル変数にする。Viewを追加するので、レイアウトファイルも弄る必要がある。
    TextView textView;
    int cnt = 0;

    @Override
    protected void onCreate(Bundle savedInstanceState) {
        super.onCreate(savedInstanceState);
        setContentView(R.layout.counter_layout);
        textView = findViewById(R.id.textView);
        findViewById(R.id.count_button).setOnClickListener(new View.OnClickListener() {
            @Override
            public void onClick(View view) {
                cnt++;
                updateText();
            }
        });
        findViewById(R.id.reset).setOnClickListener(new View.OnClickListener() {
            @Override
            public void onClick(View view) {
                cnt = 0;
                updateText();
            }
        });
    }

    private void updateText() {
        textView.setText(String.format("%s: %s", getString(R.string.count), String.valueOf(cnt)));
    }
レイアウト
<?xml version="1.0" encoding="utf-8"?>
<LinearLayout xmlns:android="http://schemas.android.com/apk/res/android"
    android:layout_width="match_parent"
    android:layout_height="match_parent"
    android:orientation="vertical">

    <TextView
        android:id="@+id/textView"
        android:layout_width="wrap_content"
        android:layout_height="wrap_content"
        android:layout_gravity="center_horizontal"
        android:layout_marginTop="30dp"
        android:text="Hello World!" />

    <LinearLayout
        android:layout_width="wrap_content"
        android:layout_height="wrap_content"
        android:layout_gravity="center_horizontal"
        android:layout_marginTop="30dp">
        <Button
            android:id="@+id/reset"
            android:layout_width="wrap_content"
            android:layout_height="wrap_content"
            android:text="@string/reset"
            android:layout_marginTop="30dp"
            android:layout_gravity="center_horizontal"/>

        <Button
            android:id="@+id/count_button"
            android:layout_width="wrap_content"
            android:layout_height="wrap_content"
            android:text="@string/count_button"
            android:layout_marginTop="30dp"
            android:layout_gravity="center_horizontal"/>
    </LinearLayout>

</LinearLayout>
おまけ:
これらをKotlinで書いたらどうなるか (Kotlin-Android-Extensions適用時)
・ボタンを押してTextView更新: たったの1行で済んじゃう!
button.setOnClickListener{ textView.text = getString(R.string.button_pressed) }
・Booleanスイッチ:
   var isOn = false

    override fun onCreate(savedInstanceState: Bundle?) {
        super.onCreate(savedInstanceState)
        setContentView(R.layout.activity_main)
        button.setOnClickListener {
            isOn =! isOn
            textView.text = if (isOn) getString(R.string.button_isOn) else getString(R.string.button_isOff)
            textView.setTextColor(if (isOn) Color.RED else Color.BLACK)
        }
    }
・Intカウンター:
    var cnt = 0

    override fun onCreate(savedInstanceState: Bundle?) {
        super.onCreate(savedInstanceState)
        setContentView(R.layout.counter_layout)
        count_button.setOnClickListener {
            cnt++
            updateText()
        }
        reset.setOnClickListener {
            cnt = 0
            updateText()
        }
    }

    private fun updateText() {
        textView.text = getString(R.string.count)+cnt
    }
KotlinではKotlin-Android-Extensionsを使う事で、findViewById()を使わない。
とにかくスッキリ書ける。
以上。