はじめに
こんにちは!
ガク(@Necono_Engineer)と申します。
未経験からエンジニア転職を目指して、日々学習をしています。
この度、( Gallery.ai ) を開発しました。
サービス名 : Gallery.ai
▼ サービスURL
▼ Githubリポジトリ
サービス概要
AIイラスト生成機能を搭載したオンラインギャラリーサービスです。
例えば、
| ゴッホ風 | LINEスタンプ風 | ディズニー風 |
|---|---|---|

|

|

|
| ピカソ風 | 浮世絵風 | 水彩画風 |
|---|---|---|

|

|

|
| ロゴ風 | 鉛筆画風 | コミック風 |
|---|---|---|

|

|

|
自分だけのオリジナル個展を作成できます!
開発背景
当サービスを作ろうと思ったきっかけはスクールの自主的なチーム開発でした。
「サービスで使う画像はどうしよう...🤔」
オリジナリティのあるイラストが欲しい...!!
この問題を解決してくれたのが、
画像生成AIでした。
AIが生成した画像を使用することで、
「ユニークな世界観」 「これまでに見たことがないサービス」 といった多くのフィードバックをいただくことができました!!
この体験から画像生成AIに興味を持ちはじめます。
🤔「だけど、あんまり画像生成AIを使っている人がいないな...」
...待てよ?
「もっと手軽に、ドラマチックに、画像生成AIを提供できれば、よりその魅力に気づく人が増えるのでは?」
そうした思いから「Gallery.ai」の構想に至りました。
機能一覧
| AI画像生成 |
|---|
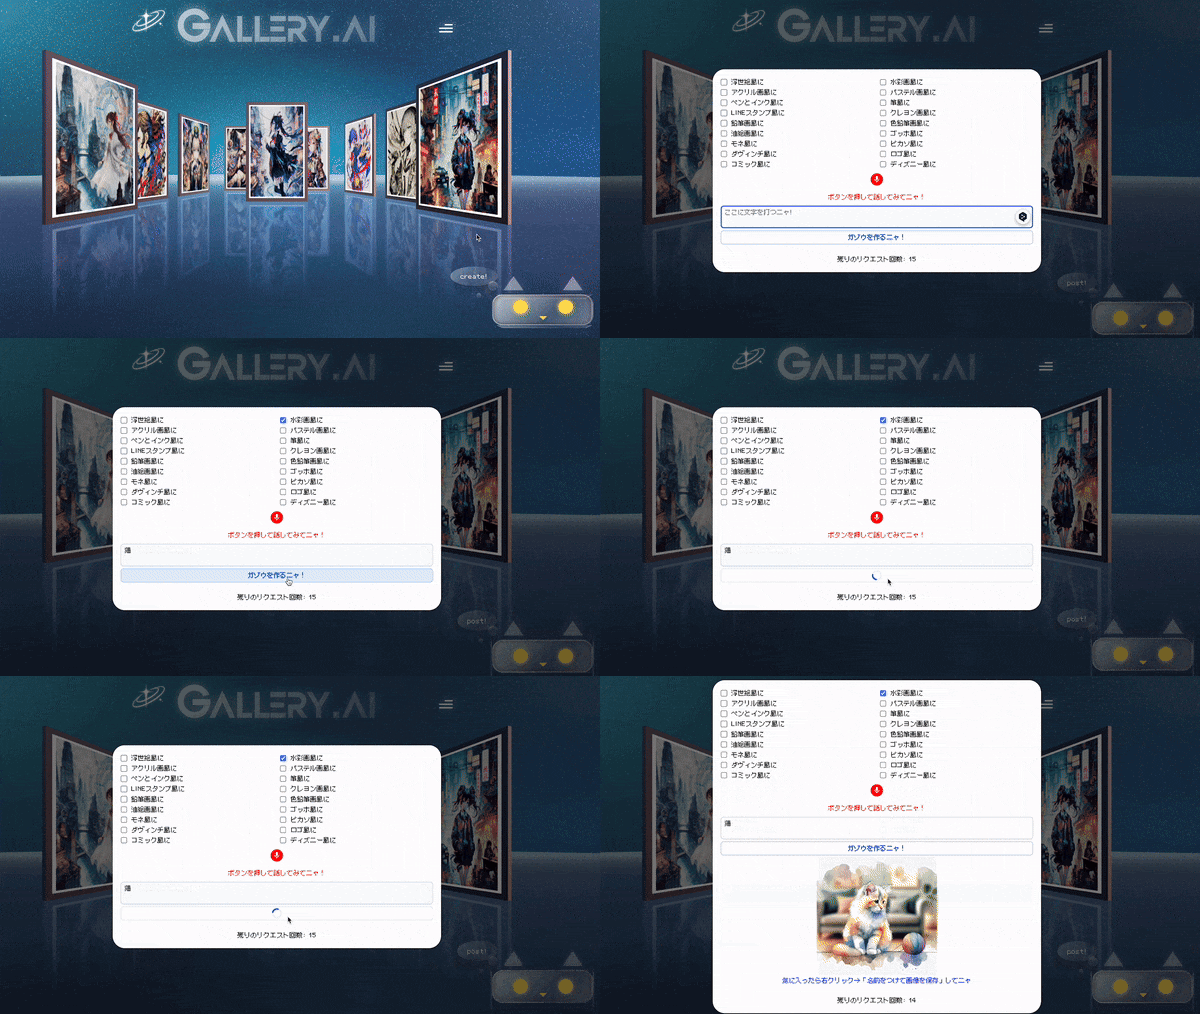
画風を指定して画像生成ができます。 |
| 画像生成機能 | 機能詳細 |
|---|---|
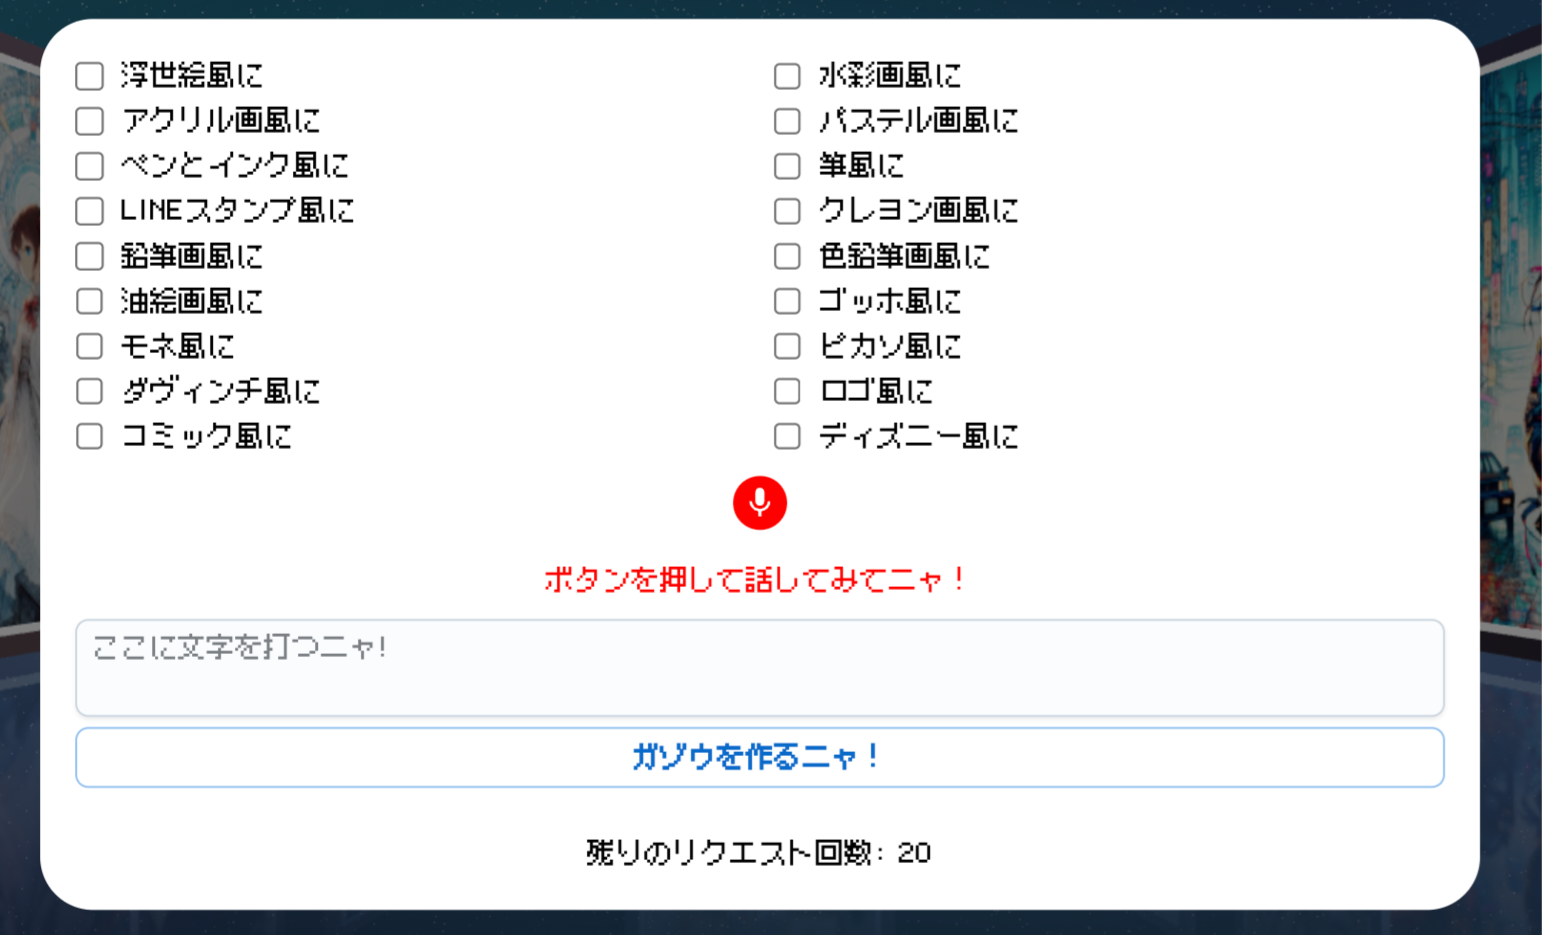
|
18種類の画風から選択して画像を生成できます。 |
| 音声入力で画像を生成できます。 |
| 画像投稿 |
|---|
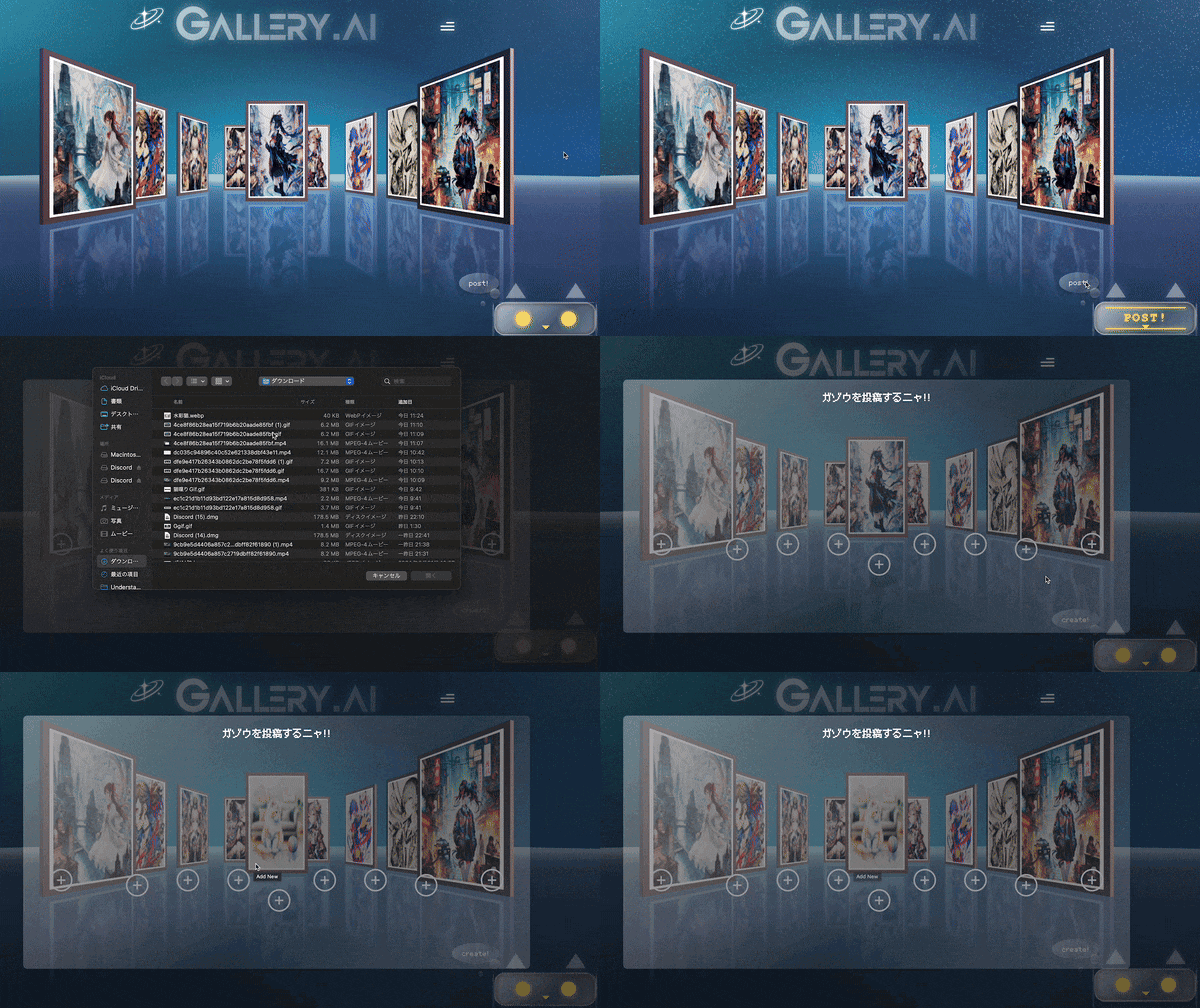
9枚の中から指定した位置に画像を投稿できます。 |
| ログイン/ログアウト機能 | リンクXシェア機能 |
|---|---|
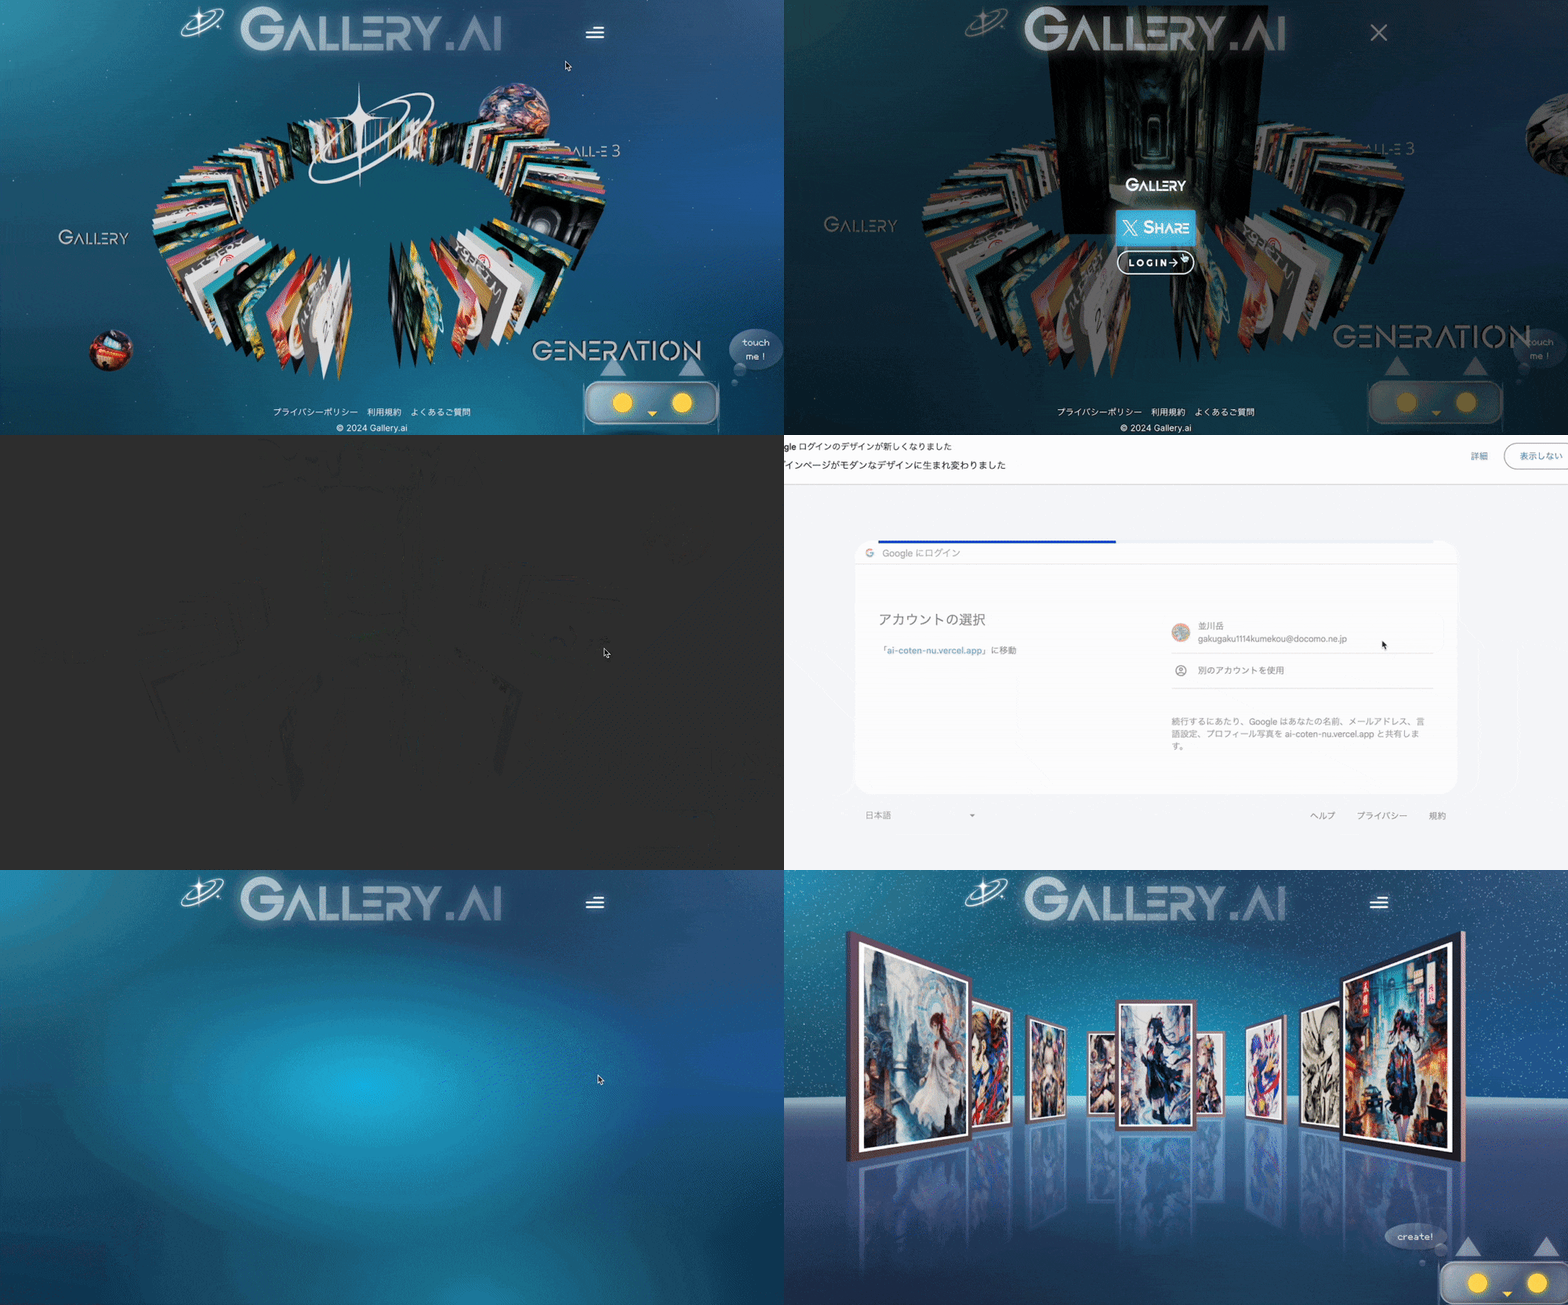
NextAuth.jsを使用したGoogleログインが可能です。 |
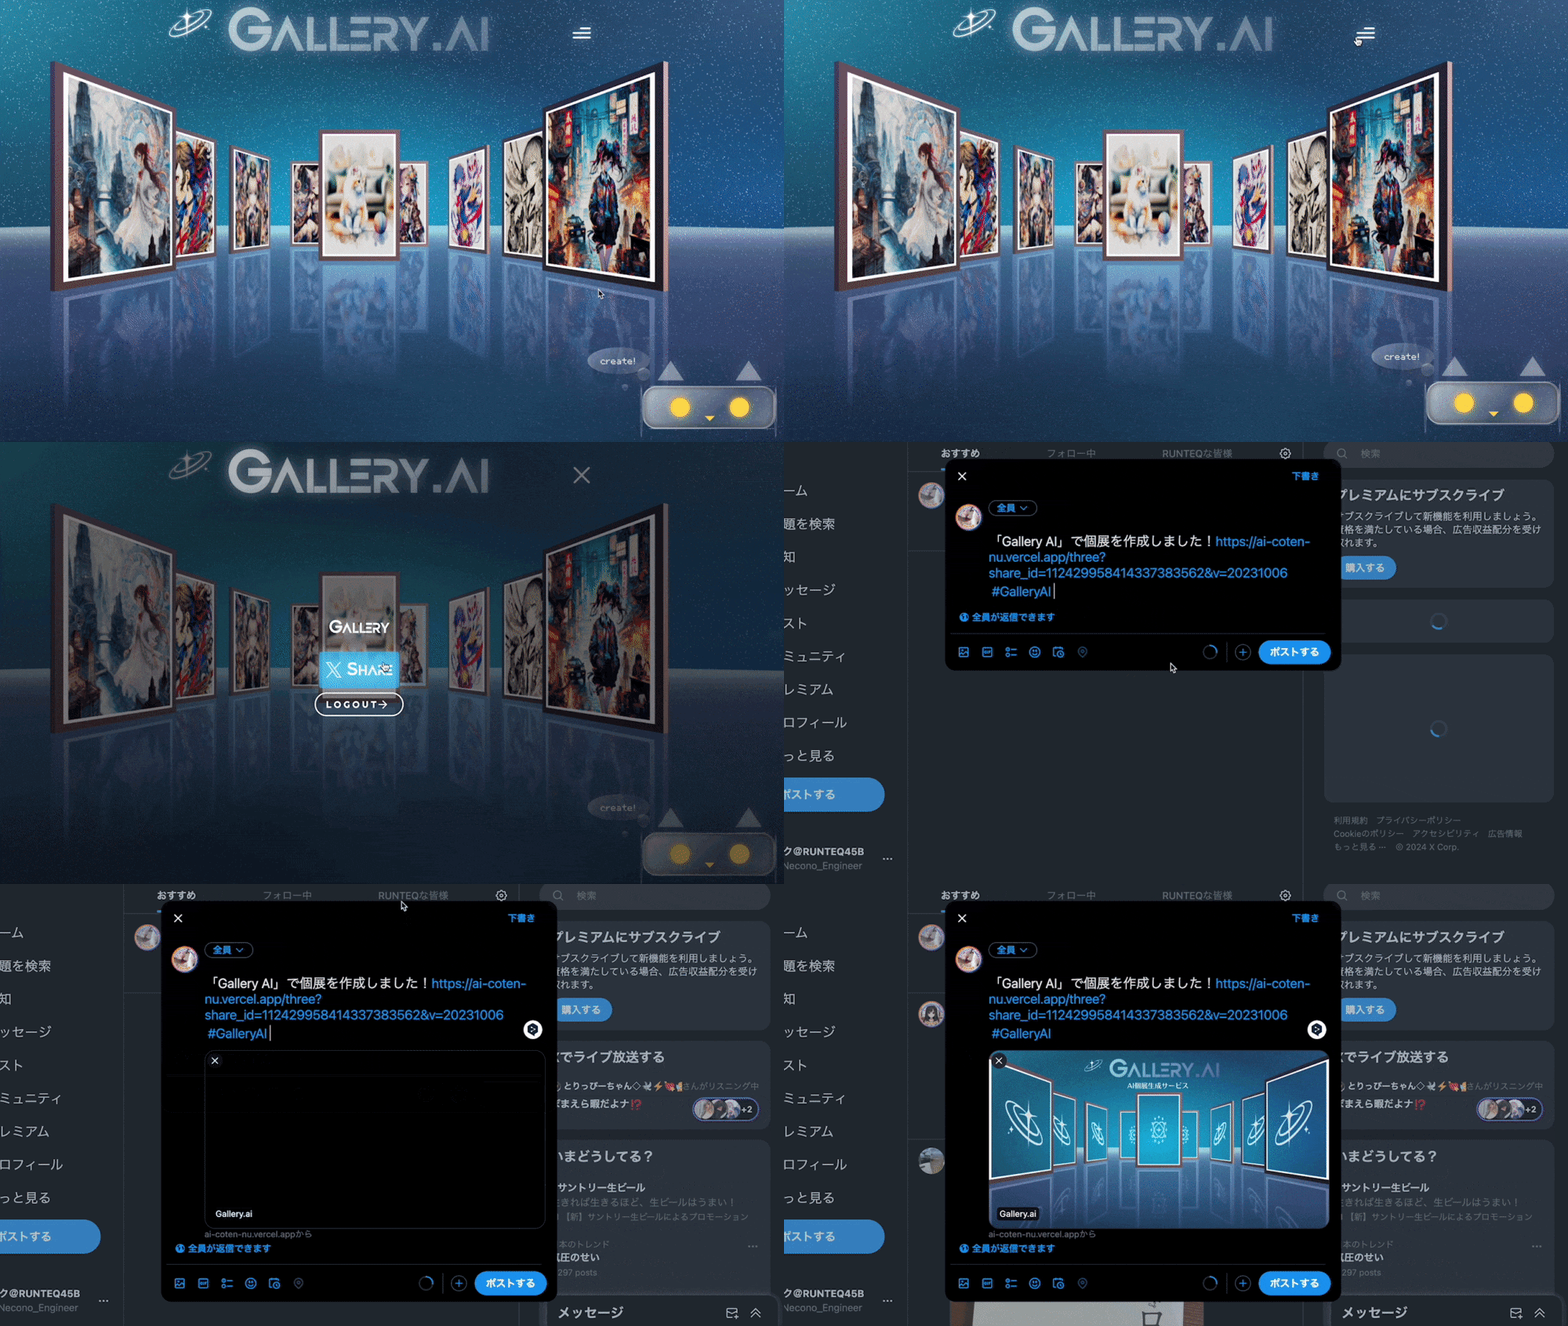
自分の個展へのリンクをXでシェアできます。 |
| 個展移動 |
|---|
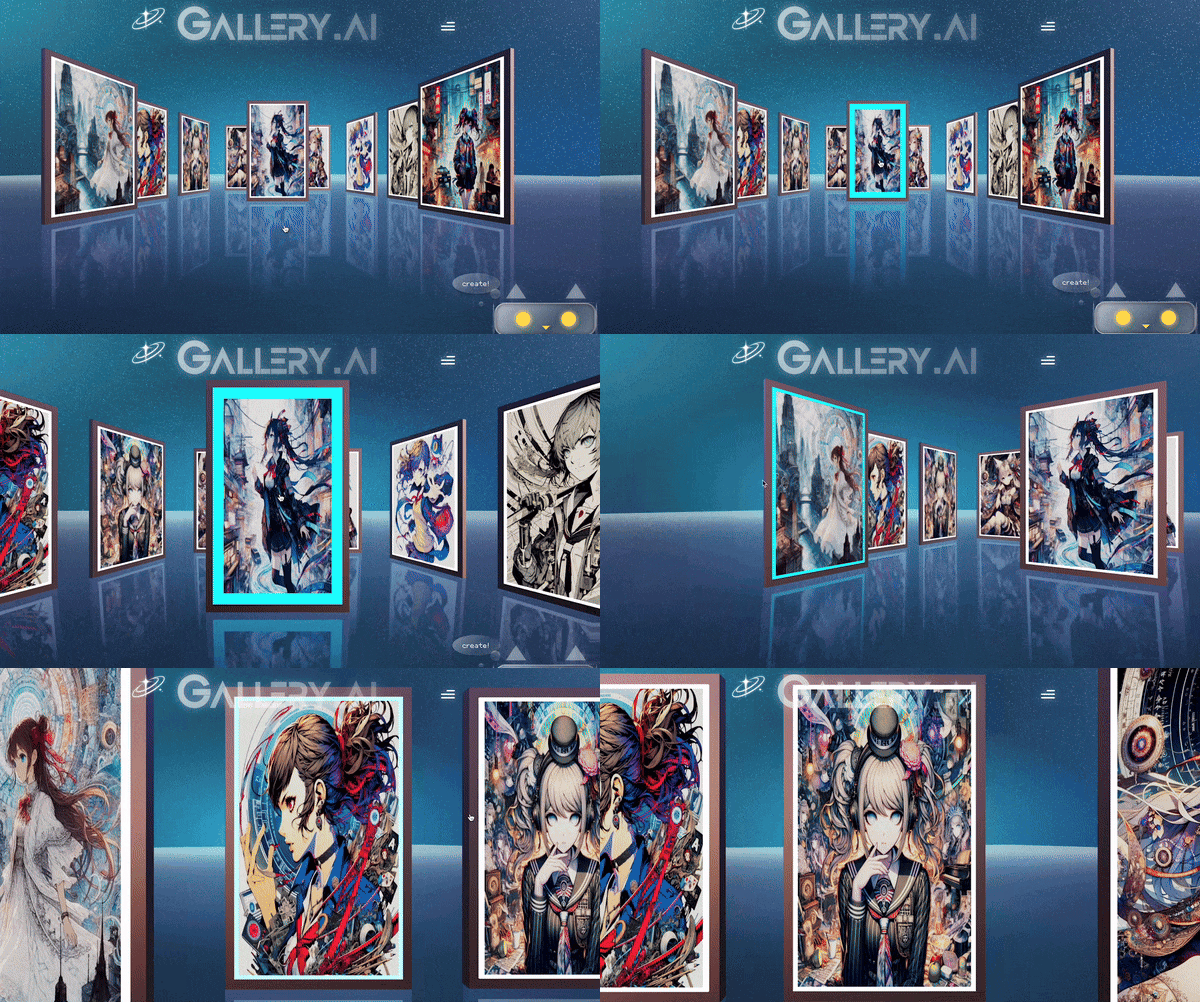
1クリックで個展内を移動できます。 |
| ネコロボット | クリックでサービス説明 |
|---|---|
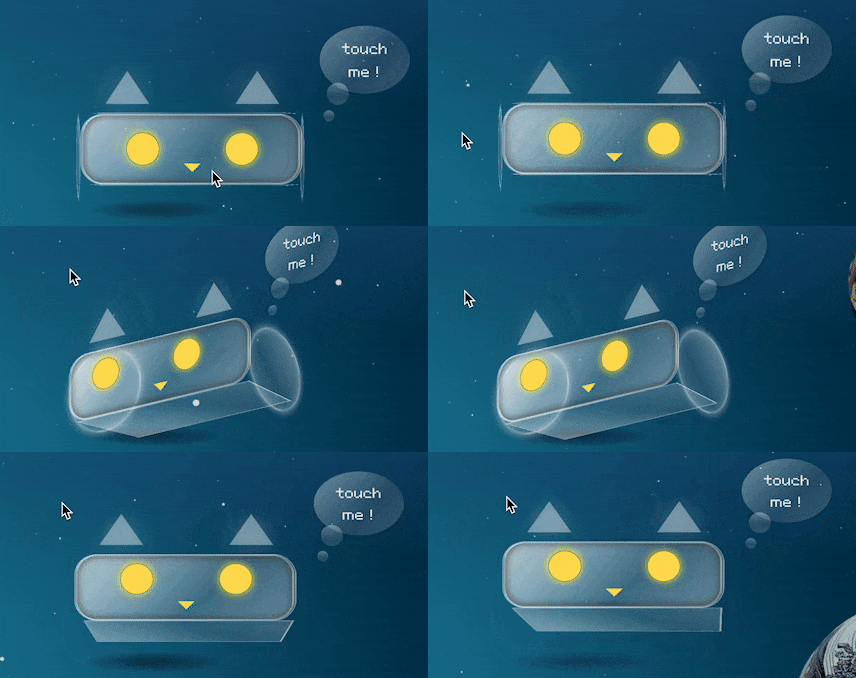 マウスの方向を向いてくれます。
|
 クリックするとサービスの説明をしてくれます。
|
| TOPページの一覧表示 |
|---|
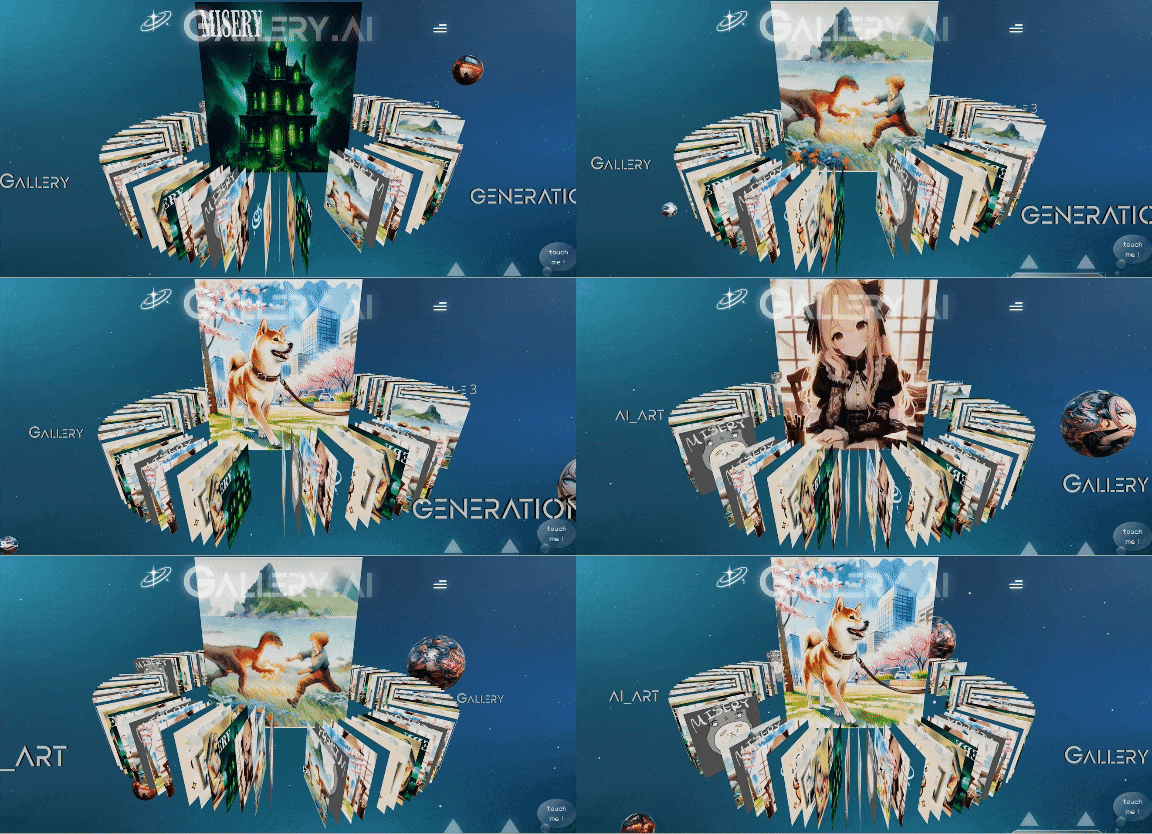
Cloud Storage for Firebaseを使用し、投稿を一覧表示しています。 |
使用技術一覧
| 項目 | 技術 | バージョン |
|---|---|---|
| フロントエンド | TypeScript / React / Next.js | 5.3.3 / 18.2.0 / 14.0.4 |
| バックエンド | Ruby / Ruby on Rails | 3.2.2 / 7.0.8 |
| インフラ | vercel / render | |
| データベース | PostgreSQL | |
| 認証 | NextAuth.js | 4.24.5 |
| 環境構築 | Docker | |
| ストレージ | Cloud Storage for Firebase / localForage | 10.8.0 / 1.10.0 |
| Web API | DALL-E3 API / Web Speech API | |
| UI構築 | Three.js | 0.160.0 |
| CSSフレームワーク | Tailwind CSS / Material-UI | 3.3.7 / 5.15.6 |
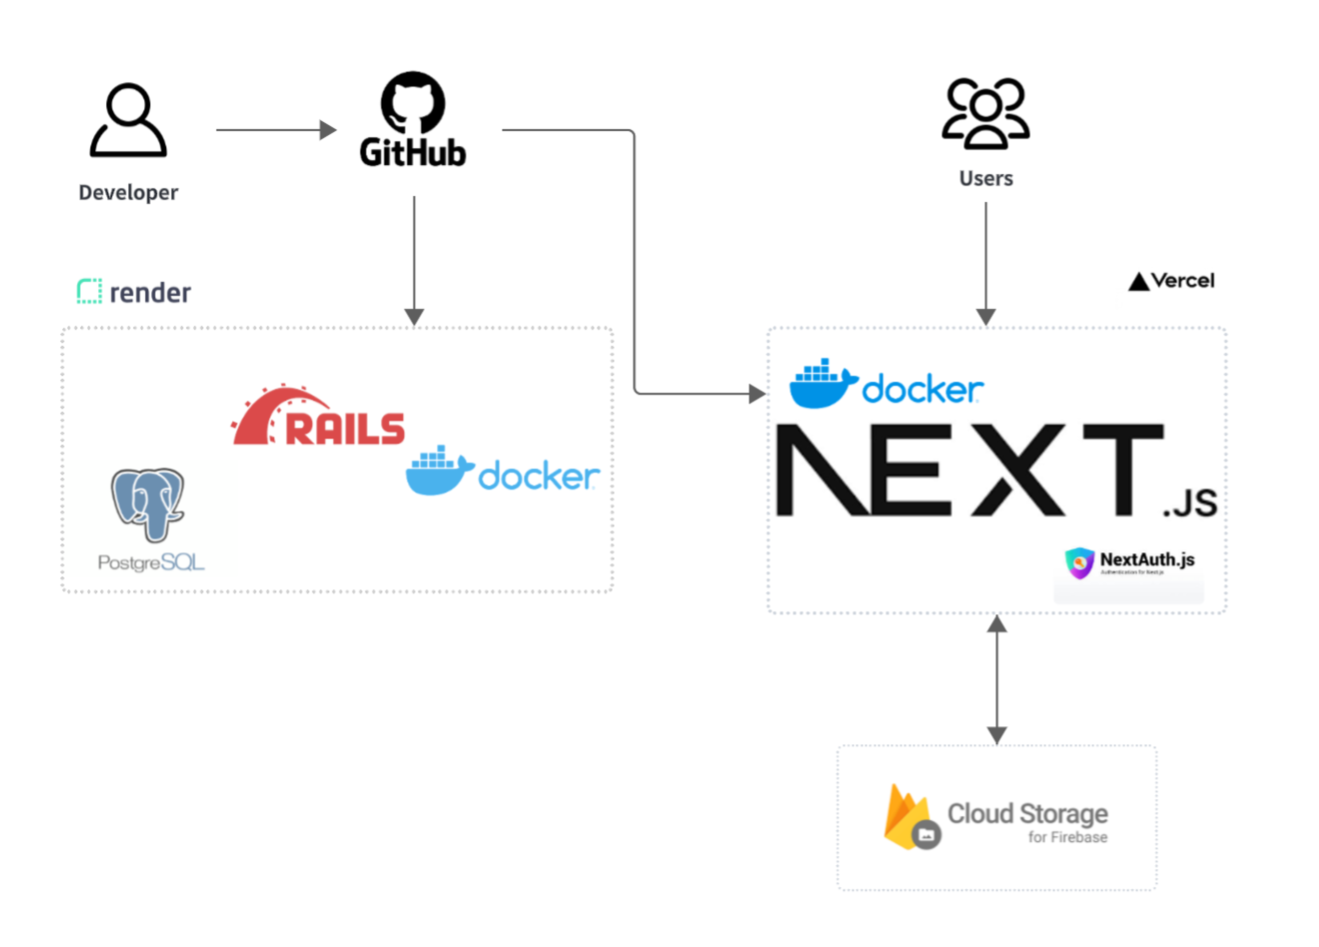
インフラ構成
使用技術の選定理由
開発環境
使用技術 : Docker
- スクールのカリキュラムでDockerでの環境構築に慣れていたこと、環境ごとの差異を最小限に抑えられることからDocker / docker-composeをベースの技術として選びました。
フロントエンド
使用技術: React / TypeScript / Next.js
UI/UXに
Three.jsという技術を用いて、3D表現を行っています。
豊富なUIライブラリも含めて使用できるReact
その中でも3D表現が可能なReact Three Fiberを採用しています。
- また、
TypeScriptの記事を書いたことがきっかけで型定義の手法を知り、実際に手を動かして学ぶ必要があると感じました。
▼ TypeScript学習のためにまとめた記事
- さらに、開発を始めた頃に
App routerが登場し、従来のPages routerとの違いを直接確かめてみたいと思いました。(今回はApp routerを採用しています) - チーム開発でNext.jsを使用した経験があり、開発に着手しやすかったため
- Next.jsの採用によりルーティング設定が容易になる点が魅力的だったため
など、複数の理由からNext.jsを選定しました。
バックエンド
使用技術: Ruby / Ruby on Rails
- プログラミングスクールで学んできた
Ruby on Railsを採用することで実装フェーズに迅速に移行できると考えました。
インフラ
使用技術 : vercel / render
-
Vercelに関してはデプロイ時、Next.jsとの相性がいいこと、renderに関しては学習教材やドキュメントの豊富さから採用しました。
認証
使用技術 : NextAuth.js
- 新規ユーザーが簡単に登録手続きを済ませ、サービスにアクセスできるようGoogleログインを容易に実装できる
NextAuth.jsを採用しました。
▼ 参考にした記事
画像用ストレージ
使用技術: Cloud Storage for Firebase
-
Cloud Storage for Firebaseはドキュメントを参照し、必要な設定をプロジェクトに組み込むことで即座に実装が可能だったことから採用しました。
工夫した点
認証機能
今回、NextAuth.jsでの認証機能を実装しました。
import NextAuth from 'next-auth';
import GoogleProvider from 'next-auth/providers/google';
import { Session } from "next-auth";
import { JWT } from "next-auth/jwt";
import axios from 'axios';

const apiUrl = process.env.NEXT_PUBLIC_API_URL;
const secret = process.env.NEXTAUTH_SECRET;
interface Account {
  access_token?: string;
  provider?: string;
}

interface User {
  id?: string;
  name?: string | null;
  email?: string | null;

}
interface MySession extends Session {
  accessToken?: string;
  user_id?: string;
}

interface MyToken extends JWT {
  accessToken?: string;
  user_id?: string;
}
// NextAuthの設定
const nextAuthOptions = {
  providers: [
    GoogleProvider({
      clientId: process.env.GOOGLE_CLIENT_ID || '',
      clientSecret: process.env.GOOGLE_CLIENT_SECRET || '',
      profile(profile) {
        return {
          id: profile.sub,
          name: profile.name,
          email: profile.email,
          image: profile.picture,
        };
      },
    }),
  ],
  session: {
    strategy: "jwt"as const,
    maxAge: 60 * 60 * 24, // 1日の秒数
    updateAge: 60 * 60, // 1時間ごとにセッションを更新
  },
  secret: process.env.NEXTAUTH_SECRET || '',
  callbacks: {
    async jwt({ token, account, user }: { token: MyToken; account: Account | null; user: User }) {
      if (account && user) {
        token.id = user.id;
        if (account.access_token) {
          token.accessToken = account.access_token;
        }
        if (user.id) {
          token.user_id = user.id;
        }
      }
      return token;
    },
    async session({ session, token }: { session: MySession, token: MyToken }) {
      if (token.accessToken) {
        session.accessToken = token.accessToken;
      }
      if (token.user_id) {
        session.user_id = token.user_id;
      }
      return session;
    },
    async signIn({ user, account }: { user: User, account: Account | null }) {
      if (!account) return false;
			const provider = account?.provider;
			const uid = user?.id;
			const name = user?.name;
			const email = user?.email;

			try {
				const response = await axios.post(
					`${apiUrl}/auth/${provider}/callback`,
					{
						provider,
						uid,
						name,
						email
					}
				);
				if (response.status === 200) {
					return true;
				} else {
					return false;
				}
			} catch (error) {
				return false;
			}
		},
  },

};

const handler = NextAuth(nextAuthOptions);
export { handler as GET, handler as POST };
NextAuth.jsの導入により、ログインプロセスが大幅に簡素化されました。
これにより、サービスにアクセスしやすくなり、より多くのユーザーがアプリに触れるようになり、サービスの普及に貢献したと考えています。
画像保存機能
Cloud Storage for Firebaseを使用しています。
const fetchImageUrlsFromStorage = async () => {
  const imagesRef = firebaseRef(storage, '/');
  try {
    const imageRefs = await listAll(imagesRef);
    const urlPromises = imageRefs.items.map((itemRef) => getDownloadURL(itemRef));
   let urls = await Promise.all(urlPromises);
    // ランダムに10枚選択するロジックを追加
    urls = urls.sort(() => 0.5 - Math.random()).slice(0, 10);
    console.log('effectUrl', urls);
    return urls;
  } catch (error) {
    console.error("Error fetching image URLs from Firebase Storage:", error);
    return [];
  }
};
ランダムに選んだ10枚の画像を取得し、TOPページでCardコンポーネントを使用してユーザーの投稿を一覧表示しています。
-
istAll(imagesRef)を使用して、ルートディレクトリ'/')にある全てのファイルの参照を取得後、
urls = await Promise.all(urlPromises);
urls = urls.sort(() => 0.5 - Math.random()).slice(0, 10);
配列をランダムに並び替え、上位10件を取得しています。
サービスの世界観
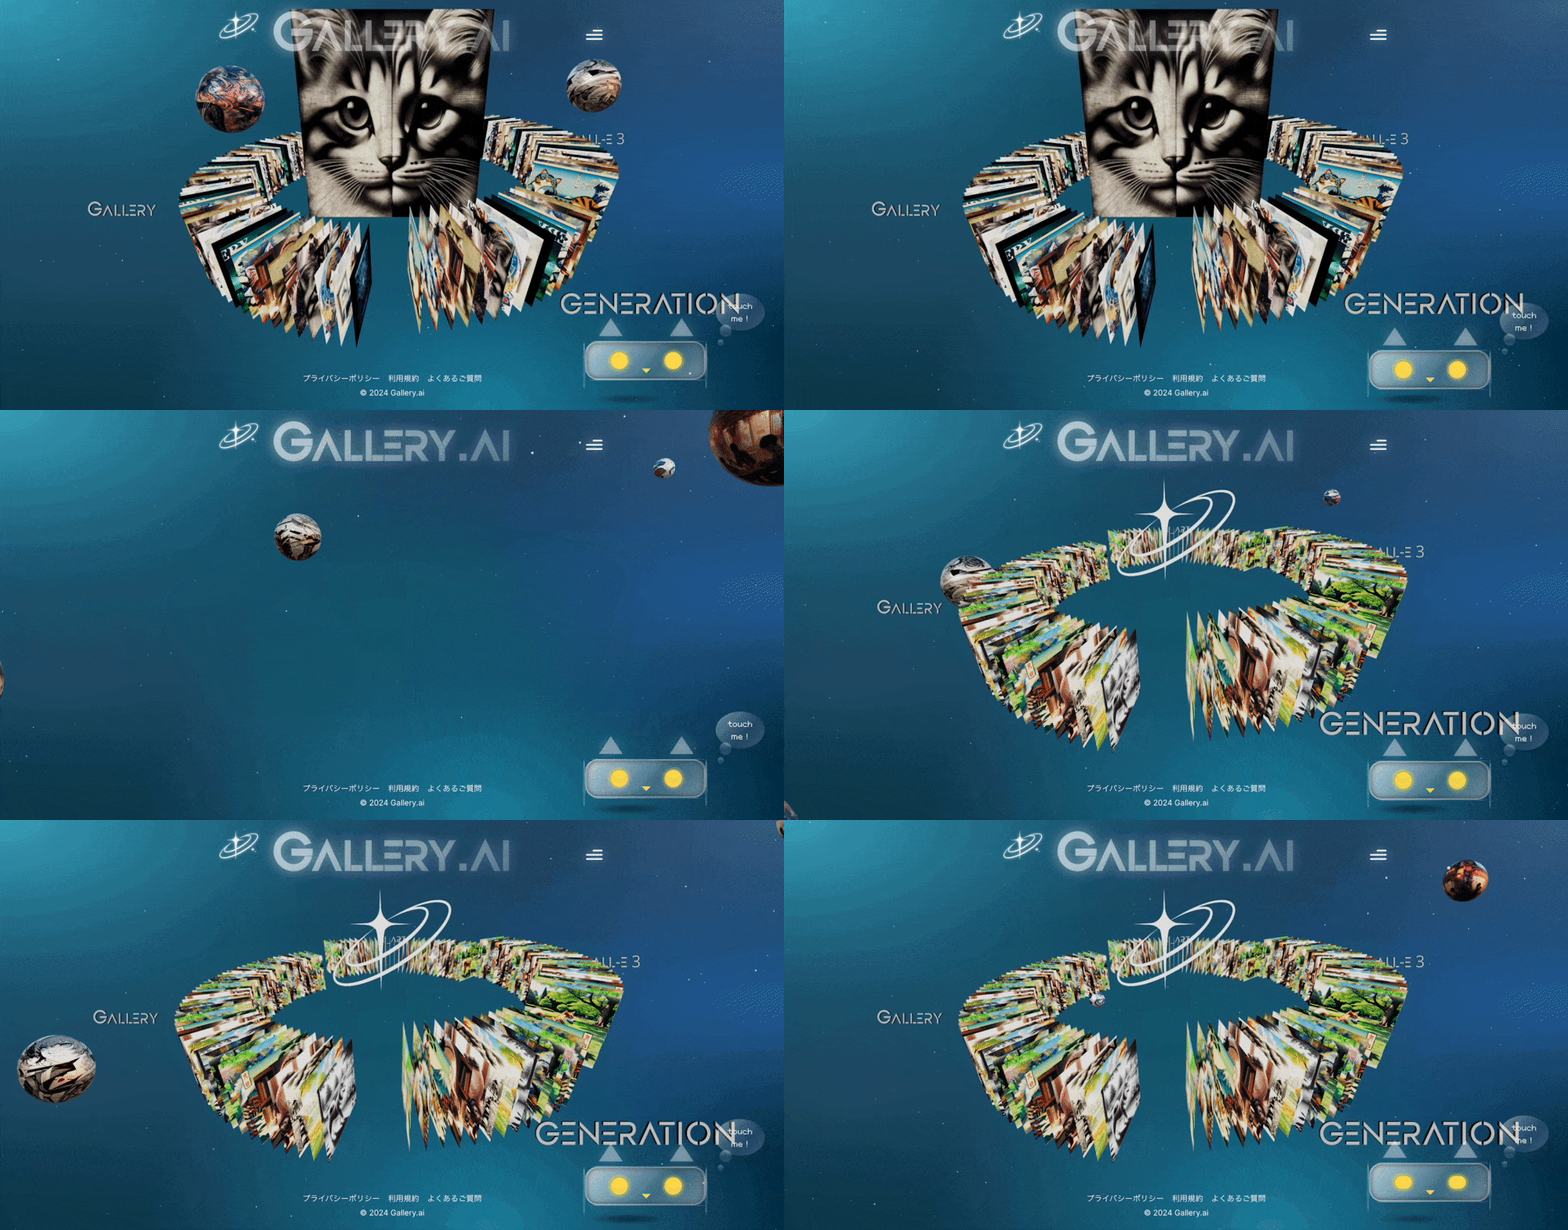
「宇宙」をテーマに動く惑星を背景に置いています。
export default function Ball() {
  // 球体の属性を定義する配列
  const spheres: { position: [number, number, number]; texture: string; scale: number | [number, number, number]; }[] = [
    { position: [-2.0, 1, 0.4], texture: '/ai5.jpg', scale: [0.2, 0.2, 0.2] },
    { position: [2, 0.3, 0.8], texture: '/ai6.jpg', scale: [0.1, 0.1, 0.1] },
    { position: [-2.8, -0.2, -0.1], texture: '/aix.jpg', scale: [0.3, 0.3, 0.3] },
    { position: [-2.8, -0.2, -0.1], texture: '/ai8.jpg', scale: [0.4, 0.4, 0.4] },
  ];

useFrame((state, delta) => { //位置と回転
    if (meshRef.current) { // meshRef.currentがnullでない場合
      const time = state.clock.getElapsedTime() * 0.3;
      const angle = time + index * (Math.PI * 2 / total);
      meshRef.current.position.x = Math.sin(angle) * 3.0;
      //オブジェクトのX軸とZ軸上の位置を計算、円軌道を描くように
      meshRef.current.position.z = Math.cos(angle) * 3.0;
      meshRef.current.position.y = Math.sin(time + index) * 1.5;

      meshRef.current.rotation.y += 0.02; // Y軸周りに回転

    }
  });
@react-three/fiberライブラリのHooksであるuseFrameを使用してオブジェクトを移動させることで惑星のようなビジュアルを実現しました。
また、TOPページ中央に配置した3D要素は、ユーザーがマウススクロールをすることで回転します。
シンプルな楽しさをコンセプトにユーザーが"触れるだけ"で楽しめるようなデザインにこだわりました。
生成画像の画風指定 & 音声入力機能
let promptPrefix = "";
    if (checkboxStates.precision) {
      promptPrefix += "歌川広重風に ";
    }
    if (checkboxStates.watercolor) {
      promptPrefix += "水彩画風に ";
    }
    if (checkboxStates.acrylic) {
      promptPrefix += "アクリル画風に ";
    }
    if (checkboxStates.pastelArt) {
      promptPrefix += "パステルアート風に ";
    }
    if (checkboxStates.penAndInk) {
      promptPrefix += "ペンとインク風に ";
    }
    if (checkboxStates.brushStroke) {
      promptPrefix += "筆風に ";
    }
    if (checkboxStates.crayon) {
      promptPrefix += "クレヨン風に ";
    }
    if (checkboxStates.lineStamp) {
      promptPrefix += "LINEスタンプ風に ";
    }
    if (checkboxStates.pencilDrawing) {
      promptPrefix += "鉛筆画風に ";
    }
    if (checkboxStates.coloredPencil) {
      promptPrefix += "色鉛筆画風に ";
    }
    if (checkboxStates.oilPainting) {
      promptPrefix += "油絵風に ";
    }
    if (checkboxStates.picasso) {
      promptPrefix += "ピカソ風に ";
    }
    if (checkboxStates.vanGogh) {
      promptPrefix += "ゴッホ風に ";
    }
    if (checkboxStates.Manet) {
      promptPrefix += "モネ風に ";
    }
    if (checkboxStates.Leonardo_da_Vinci) {
      promptPrefix += "ダヴィンチ風に ";
    }
    if (checkboxStates.logoStyle) {
      promptPrefix += "ロゴ風に ";
    }
    if (checkboxStates.disney) {
      promptPrefix += "ディズニー風に ";
    }
    if (checkboxStates.comic) {
      promptPrefix += "コミック風に ";
    }

const checkboxItems = [
    { name: 'precision', label: '浮世絵風に' },
    { name: 'watercolor', label: '水彩画風に' },
    { name: 'acrylic', label: 'アクリル画風に' },
    { name: 'pastelArt', label: 'パステル画風に' },
    { name: 'penAndInk', label: 'ペンとインク風に' },
    { name: 'brushStroke', label: '筆風に' },
    { name: 'lineStamp', label: 'LINEスタンプ風に' },
    { name: 'crayon', label: 'クレヨン画風に' },
    { name: 'pencilDrawing', label: '鉛筆画風に' },
    { name: 'coloredPencil', label: '色鉛筆画風に' },
    { name: 'oilPainting', label: '油絵画風に' },
    { name: 'vanGogh', label: 'ゴッホ風に' },
    { name: 'Manet', label: 'モネ風に' },
    { name: 'picasso', label: 'ピカソ風に' },
    { name: 'Leonardo_da_Vinci', label: 'ダヴィンチ風に' },
    { name: 'logoStyle', label: 'ロゴ風に' },
    { name: 'comic', label: 'コミック風に' },
    { name: 'disney', label: 'ディズニー風に' },
  ];
それぞれのタグをチェックボックスとして設定し、
const modifiedData = {
      textPrompt: `${promptPrefix}画像生成が可能な英文に修正 ${data.textPrompt}`,
    };
    try {
      const response = await fetch("/api/open-ai/dall-e-v3", {
        method: "POST",
        headers: {
          "Content-Type": "application/json",
        },
        body: JSON.stringify(modifiedData),
      });
      if (!response.ok) {
        throw new Error("リクエストに失敗したニャ...もう一度試してみてニャ");
      }
${promptPrefix}の部分でDAll-E-3 APIに指定したプロンプトを送信しています。
さらに、より直感的に画像生成を行えるように、Web Speech APIを活用した音声入力機能も実装しています。
const startSpeechToText = () => {
    if ('webkitSpeechRecognition' in window) {
      const recognition = new window.webkitSpeechRecognition();
      recognition.lang = 'ja-JP';
      recognition.start();

      setIsListening(true);

      recognition.onresult = (event: SpeechRecognitionEvent) => {
        const transcript = Array.from(event.results)
          .map((result) => result[0])
          .map((result) => result.transcript)
          .join('');
        setValue('textPrompt', transcript, { shouldValidate: true }); // データを設定し、バリデーションをトリガー
        setIsListening(false);
        recognition.stop(); // 音声認識を停止
      };

      recognition.onend = () => {
        // 音声認識が終了したらフォームを送信
        handleSubmit(onSubmit)(); // handleSubmitを呼び出してonSubmitをトリガー
      };

      recognition.onerror = (event: Event) => {
        console.error('Speech recognition error', (event as any).error);
        setIsListening(false);
      };
    } else {
      alert('このブラウザは音声認識をサポートしていません。');
    }
  };
今後の改善点
リファクタリング
機能の実装に重きを置いて実装を進めすぎたので、今後は他の人がより読みやすく、Reactのコンポーネント思想に準拠した設計をしていこうと考えています。
フルスタック化
これまではUIやフロントエンドの構築に多くの時間を割いてきましたが、今後はバックエンドの機能充実にも力を入れる予定です。
おわりに
このポートフォリオを作成する過程で、多くの人に助けられました。スクールの同期や講師の方々、リリース前にサービスを触ってくれた方々、忙しい中でも話を聞いてくれたり、アドバイスをくれた皆様に、感謝しています。
本当にありがとうございました!!!🙇♂️
まだまだ未熟なところばかりですので、これからも楽しみながら学習を続けていければと思います!
長くなりましたが、お読みいただいた皆様、ありがとうございました!!
Xもやっているので、よければフォローお願いします🐈
