GraphQL Mesh とは
The Guild から GraphQL Mesh が発表されました。
🚀 GraphQL Mesh - Query Anything, Run Anywhere 🚀https://t.co/PlZpAC9b54
— Urigo (@UriGoldshtein) March 23, 2020
🎉 I'm very proud to announce our new open source library - GraphQL Mesh!
Use #GraphQL to query:
🔹 openapi/Swagger
🔹 gRPC
🔹 SOAP
🔹 SQL
🔹 GraphQL
🔹 More!
Without changing the source!
Thread 1/5 pic.twitter.com/xo0G5smUwp
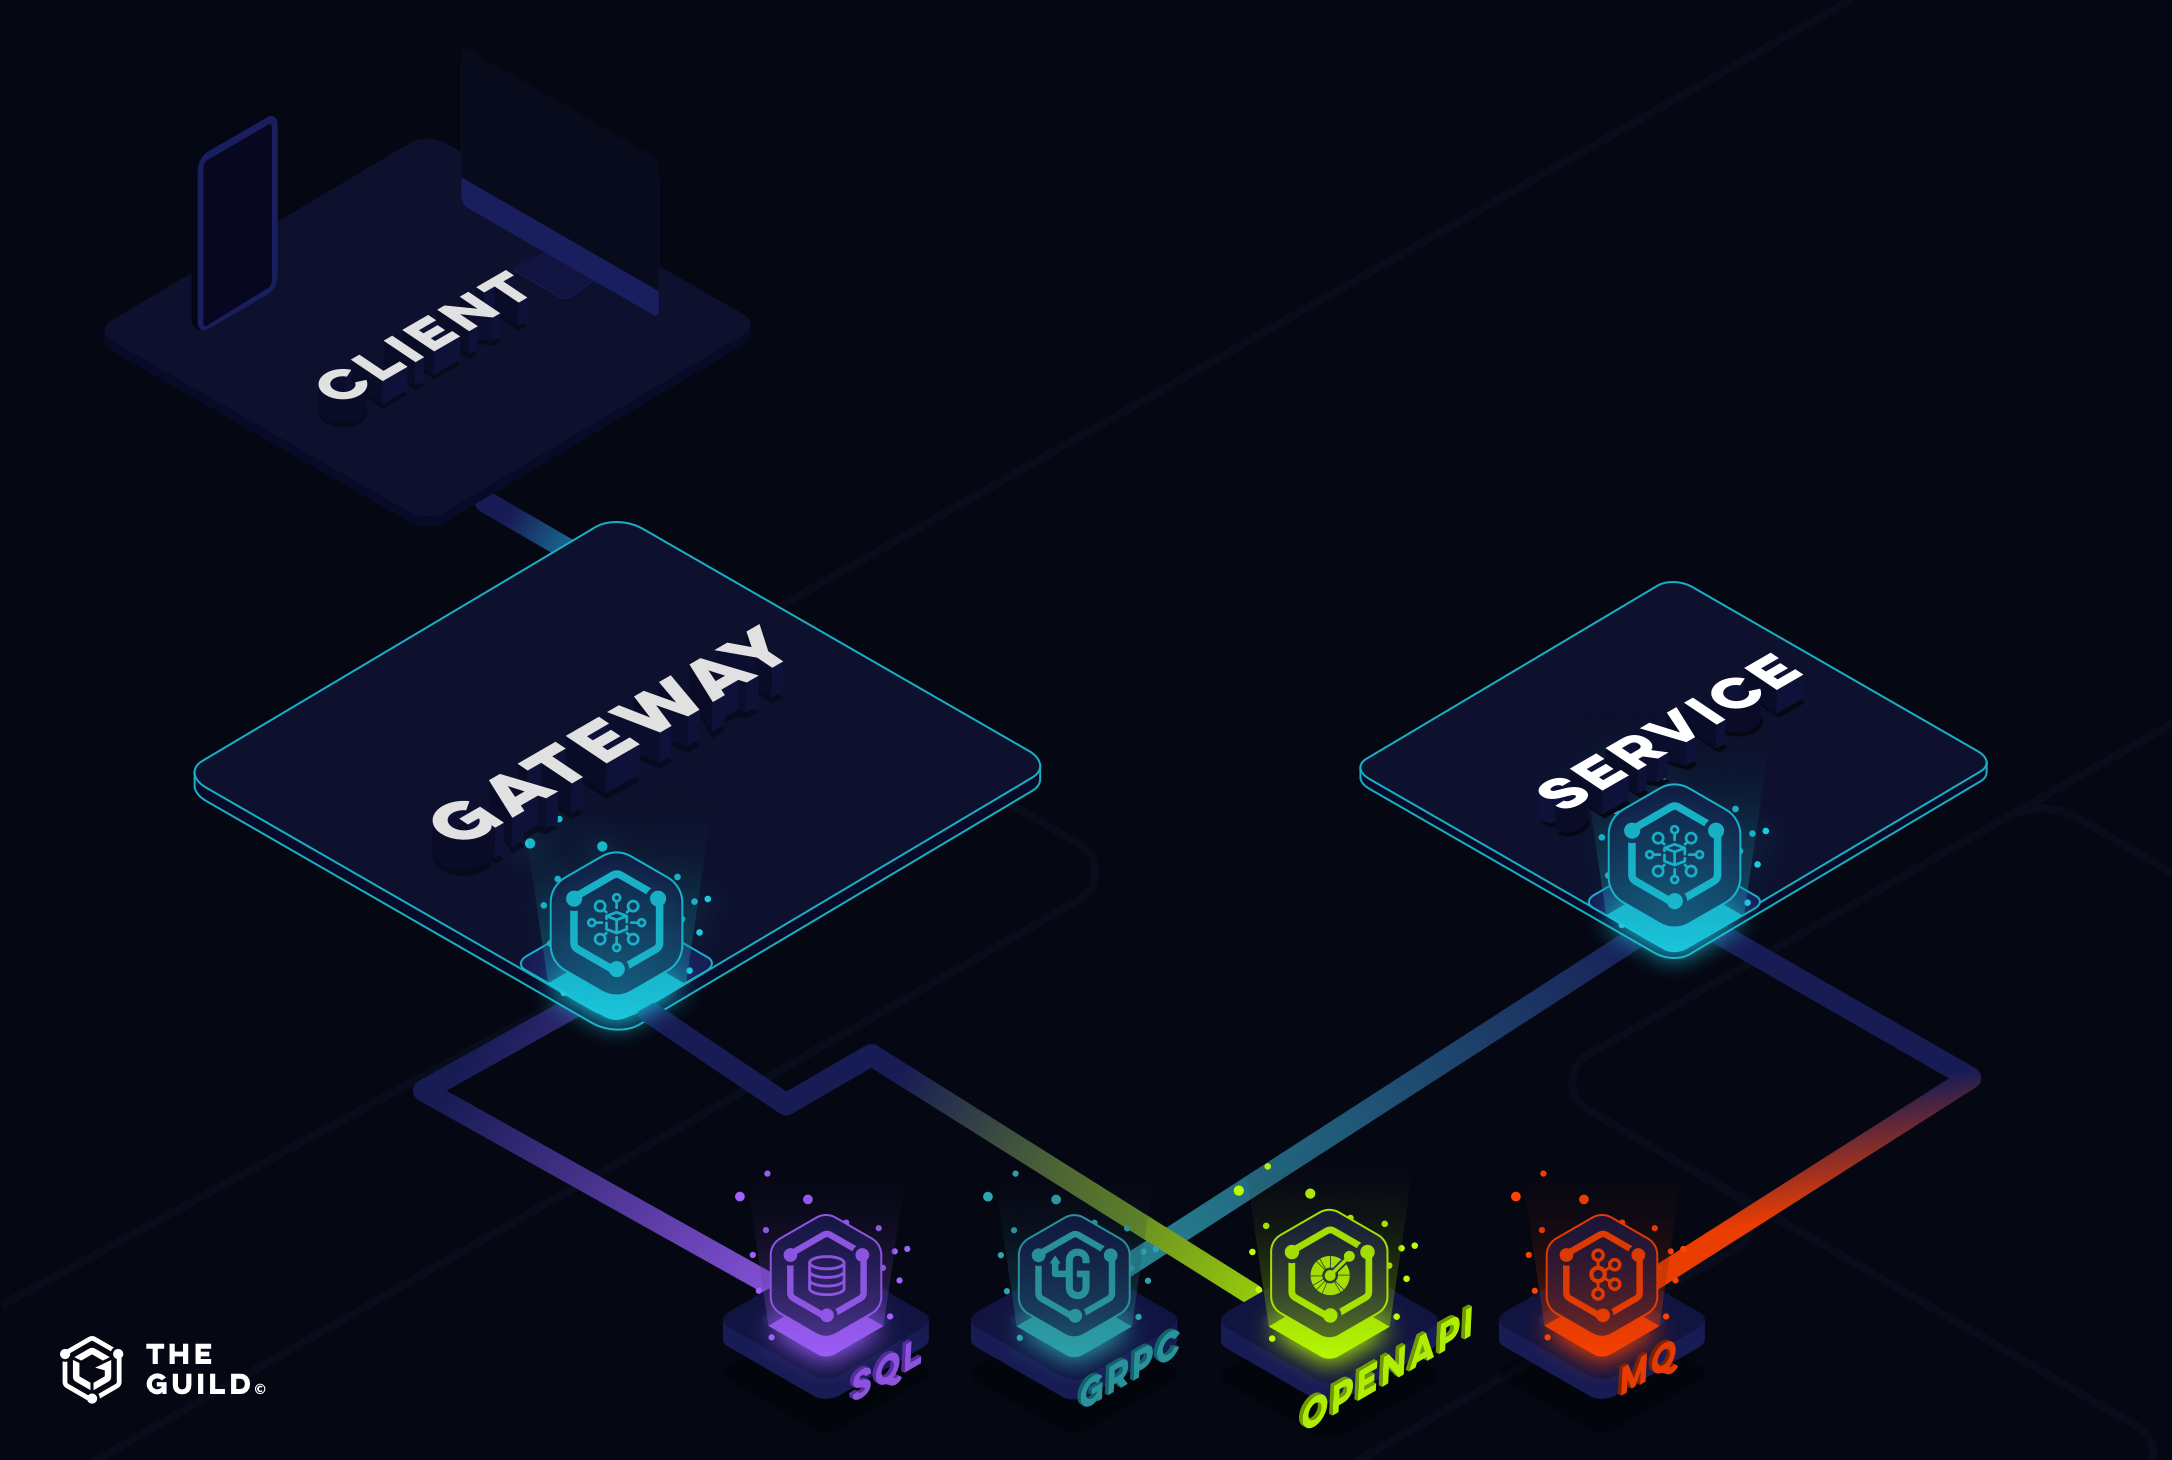
GraphQL Mesh は REST API や gRPC などの既存のバックエンド API サービスと接続するプロキシとして機能します。
GraphQL Mesh は、開発者が他の API 仕様(gRPC、OpenAPI、Swagger、oData、SOAP、GraphQL など)で記述されたサービスに対して、GraphQL のクエリを通じて簡単にアクセス可能にすることを目的として作られました。
従来、GraphQL プロキシを実装するためには、バックエンド API サービスに対して以下の作業を行う必要がありました。
- その API 仕様を読み解き、
- GraphQL サーバを構築し、
- スキーマ、リゾルバ、バックエンド API との通信処理を実装する
複数のバックエンド API をラップする GraphQL サーバを実装するためだけに多大な労力を割いていたのです。
もちろん、openapi-to-graphql のように、OpenAPI 定義を GraphQL のスキーマに読み換えるツールや、スキーマ定義からモックサーバを構築する graphql-tools などは登場していました。
今回登場した GraphQL Mesh は革新的です。バックエンド API の API 仕様さえあれば、そのバックエンド API に対して GraphQL クエリが即座に実行できる GraphQL プロキシが手に入ります。
本記事では GraphQL Mesh の簡単な使用方法とアーキテクチャの構成パターンについて解説します。
※ 本記事は こちら の記事を参照しています。
使用方法
バックエンドに OpenAPI で記述された REST API サービスがあることを想定して、GraphQL Mesh によるプロキシサーバを構築します。今回バックエンドの API は Qiita API を使用します。
1. インストール
GraphQL Mesh はいくつかのコアライブラリを組み合わせてインストールします。
$ yarn add graphql \
           @graphql-mesh/runtime \
           @graphql-mesh/cli \
           @graphql-mesh/openapi
使用可能な API(と実装予定の API)は 3/25 現在、以下の通りです。
| Package | Status | Supported Spec |
|---|---|---|
@graphql-mesh/graphql |
Available | GraphQL endpoint (schema-stitching, based on graphql-tools-fork) |
@graphql-mesh/federation |
WIP | Apollo Federation services |
@graphql-mesh/openapi |
Available | Swagger, OpenAPI 2/3 (based on openapi-to-graphql) |
@graphql-mesh/json-schema |
Available | JSON schema structure for request/response |
@graphql-mesh/postgraphile |
Available | Postgres database schema |
@graphql-mesh/grpc |
Available | gRPC and protobuf schemas |
@graphql-mesh/soap |
Available | SOAP specification |
@graphql-mesh/mongoose |
Available | Mongoose schema wrapper based on graphql-compose-mongoose
|
@graphql-mesh/odata |
WIP | OData specification |
2. 設定ファイルにバックエンド API の API 仕様を記述する
次に、.meshrc.yaml というファイルを作成し、バックエンド API の API 仕様を記述しましょう。今回は OpenAPI を使用します。他にも gRPC、oData、SOAP、GraphQL などをサポートしています。.meshrc.yaml はプロジェクトのルートディレクトリに配置します。
sources:
  - name: Qiita
    handler:
      openapi:
        source: ./qiita.openapi.yaml
QiitaAPI の OpenAPI 定義 .qiita.openapi.yaml は以下のように記述しています。
Qiita APIの仕様 (OpenAPI)
swagger: "2.0"

info:
  version: 0.0.1
  title: Qiita API

host: "qiita.com"

basePath: "/api/v2"

schemes:
  - https

consumes:
  - application/json

produces:
  - application/json

paths:
  "/tags/{tagId}/items":
    get:
      parameters:
        - in: path
          name: tagId
          type: string
          required: true
        - $ref: "#/parameters/pageParam"
        - $ref: "#/parameters/perPageParam"
      responses:
        "200":
          description: 指定されたタグが付けられた投稿一覧を、タグを付けた日時の降順で返します。
          schema:
            title: タグ記事一覧
            type: array
            items:
              $ref: "#/definitions/Item"
  "/users/{userId}":
    get:
      parameters:
        - in: path
          name: userId
          type: string
          required: true
      responses:
        "200":
          description: ユーザを取得します。
          schema:
            $ref: "#/definitions/User"
  "/users/{userId}/items":
    get:
      parameters:
        - in: path
          name: userId
          type: string
          required: true
        - $ref: "#/parameters/pageParam"
        - $ref: "#/parameters/perPageParam"
      responses:
        "200":
          description: ユーザの投稿の一覧を作成日時の降順で返します。
          schema:
            title: ユーザー記事一覧
            type: array
            items:
              $ref: "#/definitions/Item"
  "/items":
    get:
      parameters:
        - $ref: "#/parameters/pageParam"
        - $ref: "#/parameters/perPageParam"
        - name: query
          in: query
          description: 検索クエリ
          required: false
          type: string
      responses:
        "200":
          description: 投稿の一覧を作成日時の降順で返します。
          schema:
            title: 記事一覧
            type: array
            items:
              $ref: "#/definitions/Item"
parameters:
  pageParam:
    in: query
    name: page
    description: ページ番号 (1から100まで)
    type: number
  perPageParam:
    in: query
    name: per_page
    description: 1ページあたりに含まれる要素数 (1から100まで)
    type: number
definitions:
  ErrorMessage:
    description: エラーの内容を説明するmessageプロパティと、エラーの種類を表すtypeプロパティで構成されます
    type: object
    properties:
      message:
        type: string
      type:
        type: string
  Group:
    description: "Qiita:Teamのグループを表します。"
    type: object
    properties:
      created_at:
        type: string
      id:
        type: integer
      name:
        type: string
      private:
        type: boolean
      updated_at:
        type: string
      url_name:
        type: string
  Tag:
    description: タグ
    properties:
      name:
        type: string
        example: Ruby
      versions:
        type: array
        items:
          type: string
          example: 0.0.1
  User:
    properties:
      description:
        description: 自己紹介文
        type: string
      facebook_id:
        type: string
      followees_count:
        description: このユーザがフォローしているユーザの数
        type: integer
      followers_count:
        description: このユーザをフォローしているユーザの数
        type: integer
      github_login_name:
        type: string
      id:
        type: string
      items_count:
        description: "このユーザが qiita.com 上で公開している投稿の数 (Qiita:Teamでの投稿数は含まれません)"
        type: integer
      linkedin_id:
        type: string
      location:
        type: string
      name:
        type: string
      organization:
        type: string
      permanent_id:
        description: ユーザごとに割り当てられる整数のID
        type: integer
      profile_image_url:
        description: 設定しているプロフィール画像のURL
        type: string
      twitter_screen_name:
        type: string
      website_url:
        type: string
  Item:
    type: object
    properties:
      rendered_body:
        type: string
      body:
        type: string
      coediting:
        type: boolean
      comments_count:
        type: integer
      created_at:
        type: string
      id:
        type: string
      likes_count:
        type: string
      private:
        type: boolean
      reactions_count:
        type: integer
      title:
        type: string
      updated_at:
        type: string
      url:
        type: string
      page_views_count:
        type: integer
      tags:
        type: array
        items:
          $ref: "#/definitions/Tag"
      user:
        $ref: "#/definitions/User"
      group:
        $ref: "#/definitions/Group"
3. GraphQL Mesh サーバを起動する
GraphQL Mesh サーバを起動します。以下コマンドは npm scripts に設定しておくと良いでしょう。
$ yarn graphql-mesh serve
yarn run v1.22.4
info: 🕸️ => Serving GraphQL Mesh GraphiQL: http://localhost:4000/
http://localhost:4000/ で GrapiQL が起動します。ブラウザを開いて確認しましょう。
4. GraphQL クエリを実行する
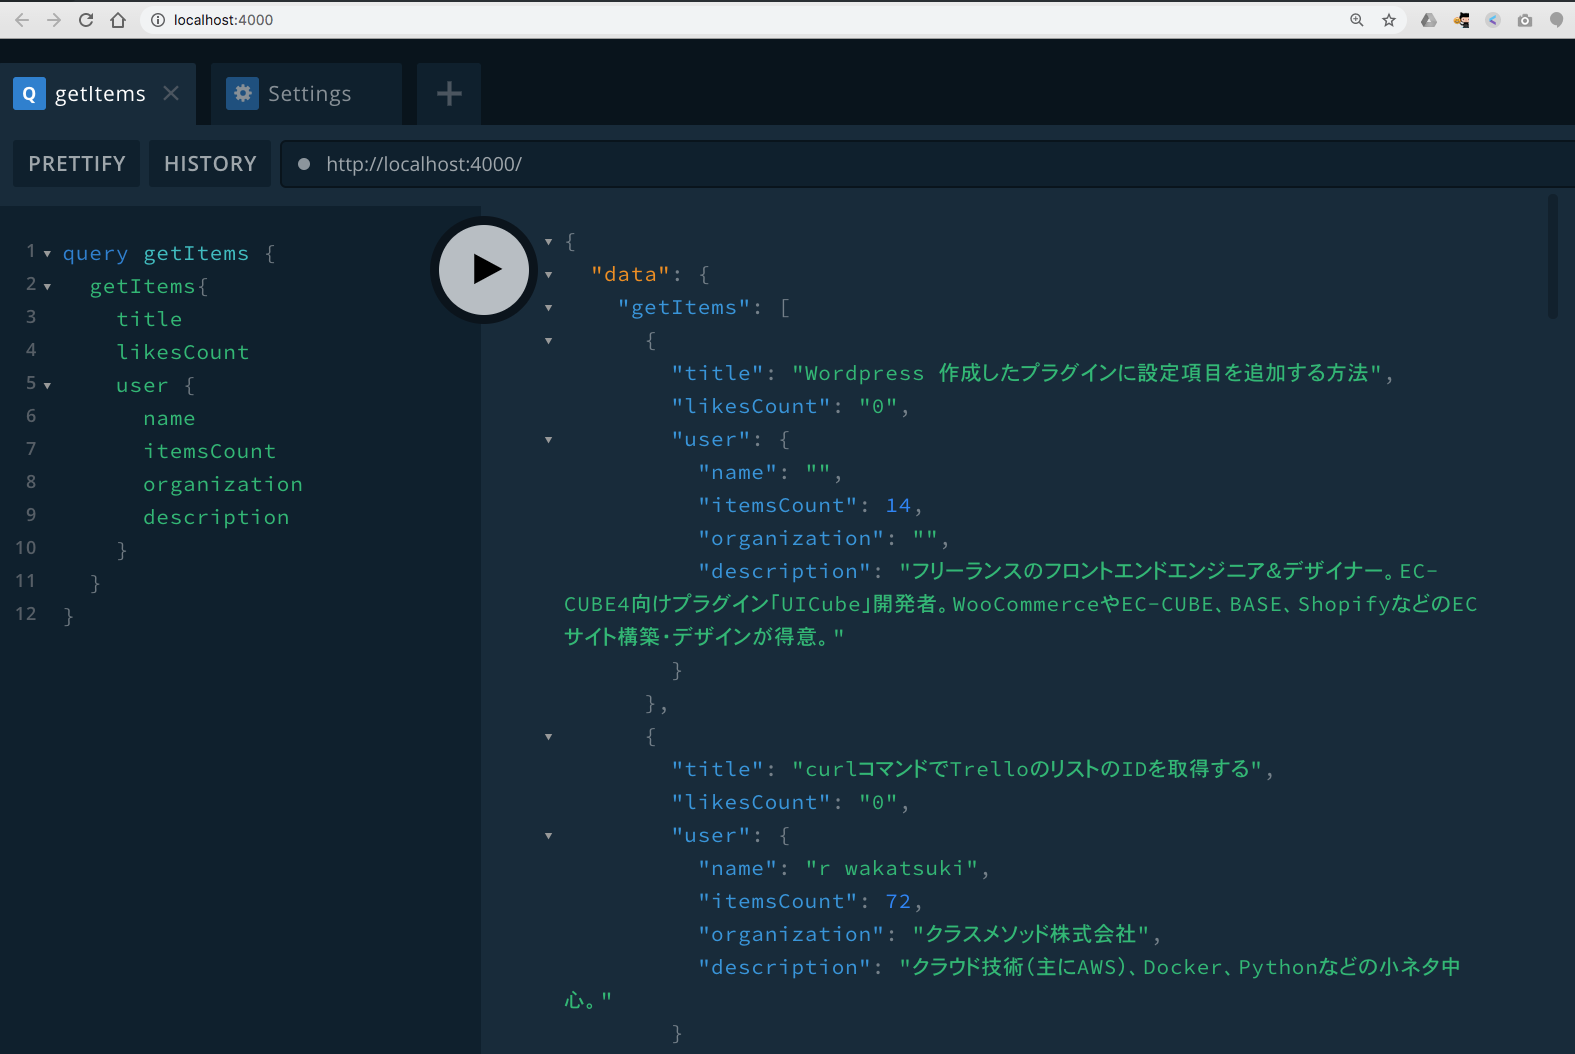
Qiita 記事の情報と、記事に紐づくユーザ情報も合わせて取得します。複数の REST API で取得できる情報をネストして記述し、1回のクエリで取得できることこそが GraphQL の真骨頂です。
query getItems {
  getItems{
    title
    likesCount
    user {
      name
      itemsCount
      organization
      description
    }
  }
}
きちんと取得できているようです。
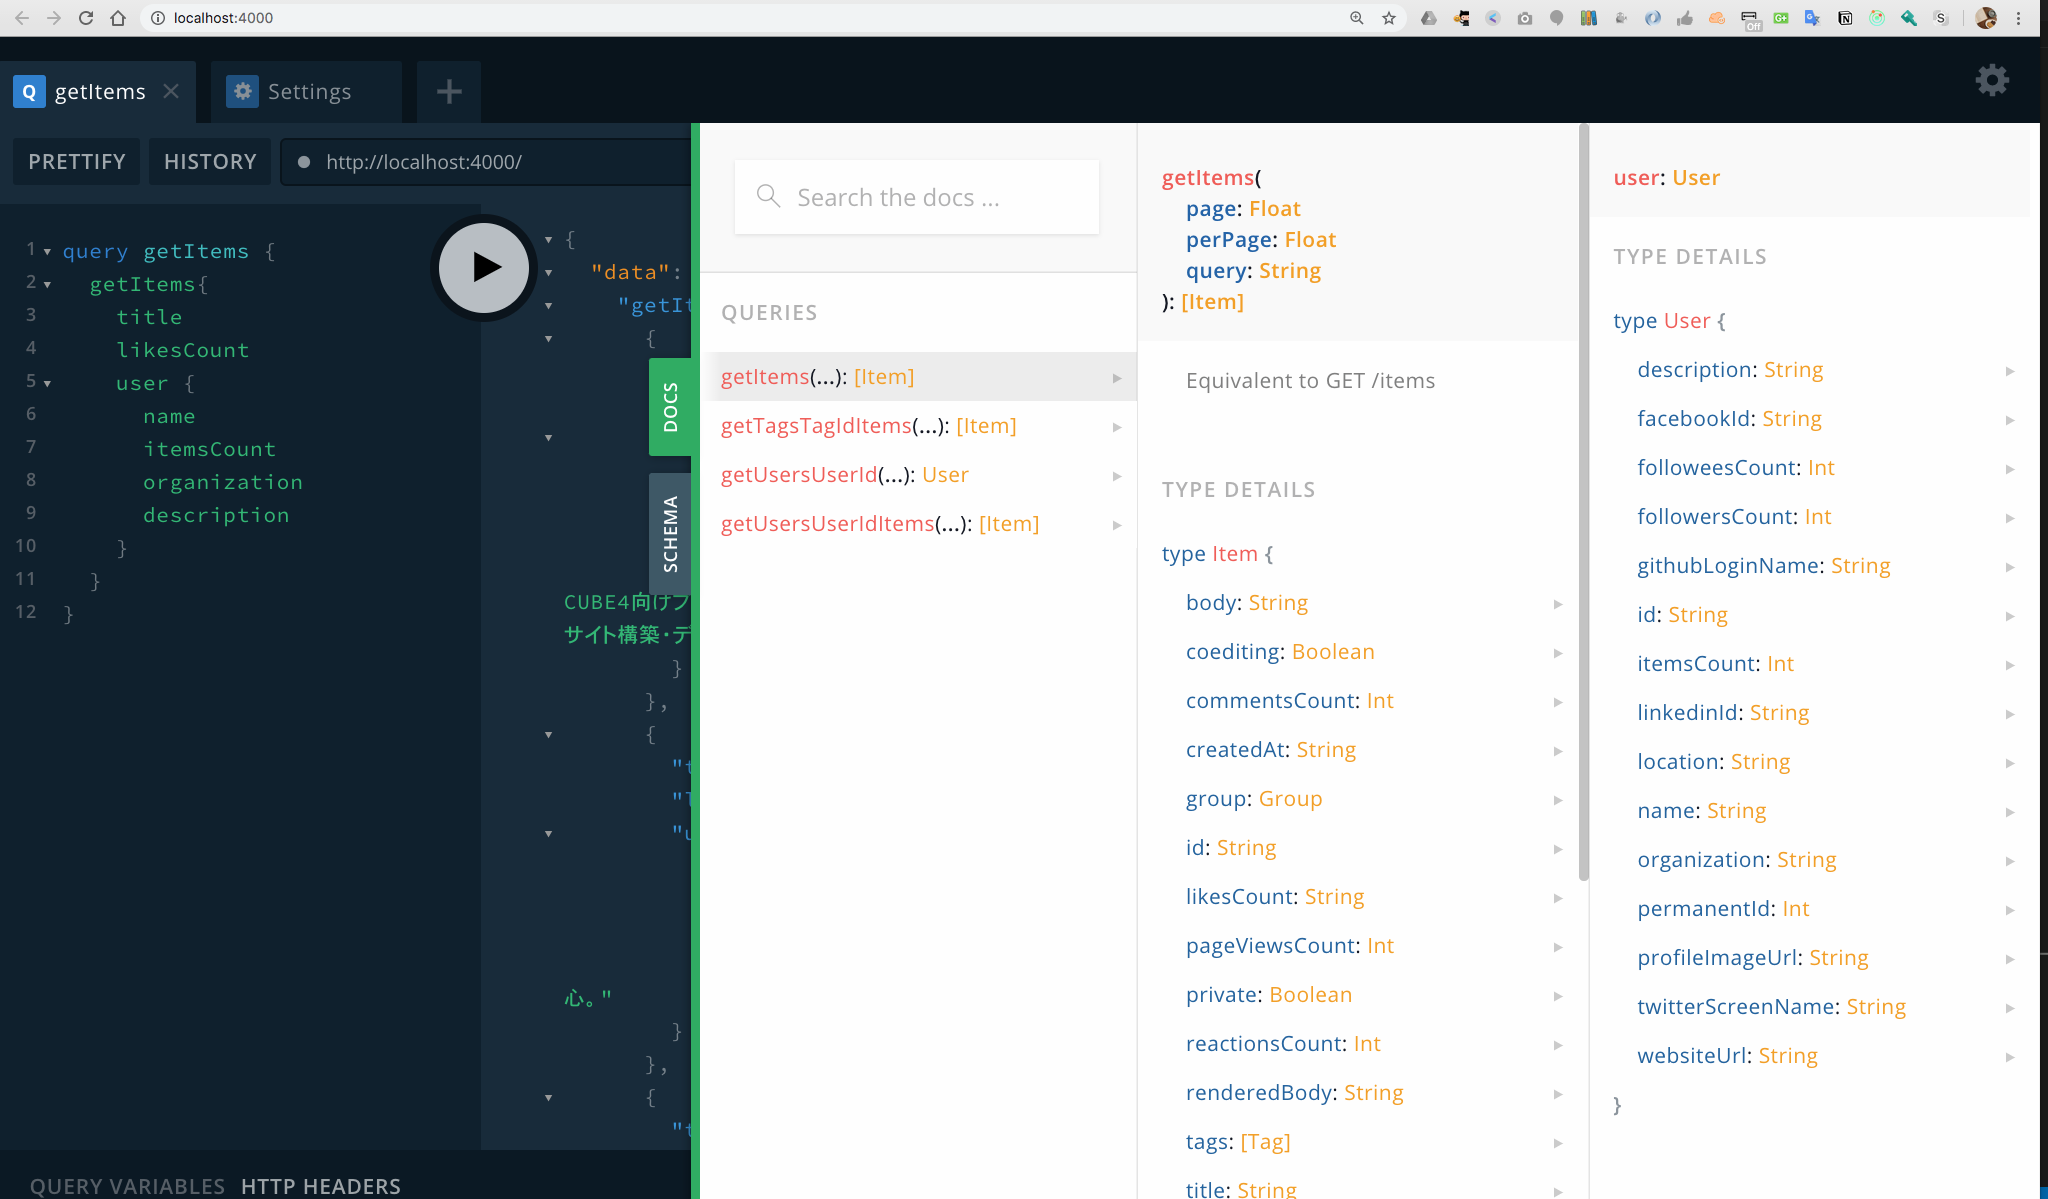
さらに OpenAPI のモデルの定義を正確に読み解き、GraphQL のスキーマ定義にもきちんと反映ができています。素晴らしい。
GraphQL Mesh の活用方法
GraphQL Mesh はバックエンド API のプロキシとして機能します。この性質から、クライアントに対する GATEWAY としてふるまい、複数のバックエンドを束ねた構成をとっても良いでしょう。
また、複数のマイクロサービスが内部で相互通信する際に、HUB とする構成を取ることもできます。
まだ開発初期段階らしく、GitHub の README には以下のように記されています。
Note: this project is early and there will be breaking changes along the way
今後大きく変更されることがあるかもしれません。ただ、このツールのコアコンセプトには非常に感銘を受けます。AWS の AppSync などの GraphQL マネージドサービス系がこの考え方を取り入れたら、Web API の業界に大きなインパクトがありそうだと感じました。


