Storybookは、ユーザーインタフェースやページの振る舞いを、コンポーネントごとに確かめ、試せるツールです。本稿は、ReactにTypeScriptを組み込んだプロジェクトで、Storybookの使い方について簡単にご説明します。
プロジェクトをつくる
React + TypeScriptのひな形プロジェクトは、Create React Appのつぎのコマンドでつくりましょう(プロジェクト名はreact-typescript-storybookとしました)。TypeScriptを環境に加えるオプションが--template typescriptです(「Create React AppでTypeScriptを使用する」)。
npx create-react-app react-typescript-storybook --template typescript
つぎに、Storybookをインストールします(「Install Storybook」)。つくられたプロジェクト(react-typescript-storybookディレクトリ)のルートで、つぎのコマンドを打ち込んでください。
npx storybook init
Storybookの初期画面は、npm run storybookで開きます(Reactプロジェクトを起動する必要はありません)。URLはhttp://localhost:6006/です。
サンプルのstoryモジュール(stories.tsx)やそれらの用いるコンポーネント(tsx)がつくられ、src/storiesに収められています。実際には、storyモジュールと分けるため、Reactコンポーネントはsrc下の別フォルダに加えることになるでしょう。
今回は、Reactコンポーネントとしてsrc/stories/Button.tsxを使います(コードはつぎのとおり)。src/stories/Button.cssがコンポーネントのスタイルを決めるCSSです。本稿では、story(stories.tsx)以外のモジュールについては、詳しく触れません。
import React from 'react';
import './button.css';

interface ButtonProps {
	primary?: boolean;
	backgroundColor?: string;
	size?: 'small' | 'medium' | 'large';
	label: string;
	onClick?: () => void;
}
export const Button = ({
	primary = false,
	size = 'medium',
	backgroundColor,
	label,
	...props
}: ButtonProps) => {
	const mode = primary ? 'storybook-button--primary' : 'storybook-button--secondary';
	return (
		<button
			type="button"
			className={['storybook-button', `storybook-button--${size}`, mode].join(' ')}
			style={{ backgroundColor }}
			{...props}
		>
			{label}
		</button>
	);
};
storyを書いてみる
早速、storyを新たなモジュールsrc/stories/HelloButton.stories.tsxとして書きましょう。
ディレクトリはstories内です。storyのコンポーネントはdefaultでexportしてください(「Default export」)。型はComponentMetaで定めます。プロパティのtitleはStorybookの画面左カラムに示されるstory名です。表示するReactコンポーネントをcomponentに与えます。
名前つきでexportする関数(HelloButton)が具体的なstoryの項目(オブジェクト)です(「Named story exports」)。戻り値のJSXがReactコンポーネントの表示を定めます(「Defining stories」参照)。
import { ComponentMeta } from '@storybook/react';
import { Button } from './Button';

export default {
	title: 'Button',
	component: Button,
} as ComponentMeta<typeof Button>;
export const HelloButton = () => <Button label="Hello!!" />;
Buttonコンポーネントが受け取ったプロパティlabelは、ボタンに示されるテキストです。
export const Button = ({

	label,

}: ButtonProps) => {

	return (
		<button

		>
			{label}
		</button>
	);
};
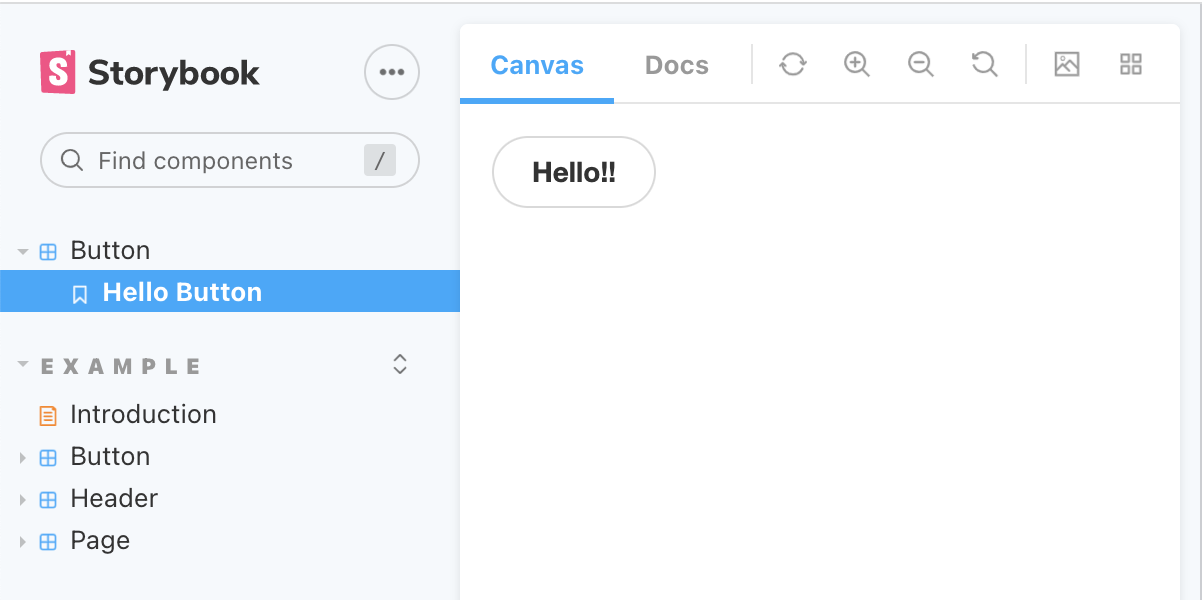
Storybookの画面左カラムにstoryのタイトル「Button」が加わりました。展開すると、名前つきexportしたstoryオブジェクト(項目)の識別子(HelloButton)がスペース区切りで示されます。なお、storyオブジェクト名には、アッパーキャメルケース(パスカルケース)を使いましょう(「キャメルケース【camel case】」参照)。
Use the named exports of a CSF file to define your component’s stories. We recommend you use UpperCamelCase for your story exports.
(「Defining stories」)
story項目「Hello Button」を選ぶと、Buttonコンポーネントはデフォルトのスタイルで表示され、labelのテキストがボタンに示されるでしょう。
ところで、あらかじめサンプルに加えられたstoryは「Example」という名前でグループ化されています。これは、titleをグループ名ではじめ、storyコンポーネント名はそのあとにスラッシュ(/)区切りで添えたからです(「Grouping」参照。)
export default {
	title: 'Example/Button',
	component: Button,

} as ComponentMeta<typeof Button>;
storyオブジェクト(項目)を追加する
名前つきexportするstoryオブジェクト(項目)は、ひとつのstoryコンポーネント(モジュール)にいくつでも加えられます。Buttonコンポーネントにはオプションのプロパティがありますので、それを新たなstoryオブジェクトPrimaryLargeButtonに定めましょう。プロパティprimaryはカラーテーマを使う論理値、sizeが3段階の大きさです。
import { ComponentMeta } from '@storybook/react';
import { Button } from './Button';

export default {
	title: 'Button',
	component: Button,
} as ComponentMeta<typeof Button>;
export const HelloButton = () => <Button label="Hello!!" />;
export const PrimaryLargeButton = () => <Button label="Primary Large" primary={true} size="large" />;
どちらのプロパティも、Buttonコンポーネントに与えるCSSのクラス(className)でスタイルを切り替えます。
export const Button = ({
	primary = false,
	size = 'medium',

}: ButtonProps) => {
	const mode = primary ? 'storybook-button--primary' : 'storybook-button--secondary';
	return (
		<button

			className={['storybook-button', `storybook-button--${size}`, mode].join(' ')}

		>

		</button>
	);
};
Storybookでストーリー項目の「Primary Large Button」を選べば、背景色は水色で白抜き文字の大きなボタンが表示されるでしょう。
テンプレートを使う
storyオブジェクトのプロパティはテンプレートのJSXに直に書き込むのでなく、値も含めて分けられれば管理しやすく便利です。その場合、テンプレートのargsにプロパティを定めます(「Using args」参照)。
まず、テンプレートのコールバックが返すJSXから、具体的なプロパティや値の記述は除いてください。つぎに、各storyオブジェクトにはテンプレートの関数をコピーします。このとき用いるのが、Function.prototype.bind()メソッドです。
💡
Template.bind({})is a standard JavaScript technique for making a copy of a function. We copy the Template so each exported story can set its own properties on it.
(「Using args」)
そのうえで、storyオブジェクトのargsに、プロパティと値をオブジェクトで与えてください。このオブジェクトがテンプレートのコールバックに引数(args)として渡されます。戻り値のJSXには、引数のプロパティと値を加えればよいのです。
// import { ComponentMeta } from '@storybook/react';
import { ComponentMeta, Story } from '@storybook/react';
import { Button } from './Button';

export default {
	title: 'Button',
	component: Button,
} as ComponentMeta<typeof Button>;
const Template: Story<typeof Button> = (args) => <Button label='' {...args} />;
// export const HelloButton = () => <Button label="Hello!!" />;
export const HelloButton = Template.bind({});
HelloButton.args = {
	label: 'Hello!!'
};
// export const PrimaryLargeButton = () => <Button label="Primary Large" size="large" primary={true} />;
export const PrimaryLargeButton = Template.bind({});
PrimaryLargeButton.args = {
	label: 'Primary Large',
	primary: true,
	size:'large',
}
controlを操作する
テンプレートにargsを定めると、Storybook下部の[Controls]パネルが使えるようになります。各プロパティについて、argsで与えた以外の値も試せるのです。値のリセットは、パネル右上の[Reset controls]ボタンをクリックしてください。
[Controls]パネルの操作オプションは、カスタマイズできます。そのとき用いるのが、argTypesです(「ArgTypes」参照)。
ButtonコンポーネントのプロパティbackgroundColorには初期値がありません。選択できるプロパティ値をラジオボタンで[Controls]パネルに加えてみましょう。
export const Button = ({

	backgroundColor,

}: ButtonProps) => {

	return (
		<button

			style={{ backgroundColor }}

		>

		</button>
  );
};
argTypesはstoryコンポーネントに加えます。backgroundColorに定めるオブジェクトのoptionsが値の配列で、controlは操作方法({ type: 'radio' })です。
import { ComponentMeta, Story } from '@storybook/react';
import { Button } from './Button';

export default {
	title: 'Button',
	component: Button,
	argTypes: {
		backgroundColor: {
			options: ['#1ea7fd', '#e57373', '#ffb74d', 'transparent'],
			control: { type: 'radio' },
		},
	},
} as ComponentMeta<typeof Button>;
const Template: Story<typeof Button> = (args) => <Button label='' {...args} />;
export const HelloButton = Template.bind({});
HelloButton.args = {
	label: 'Hello!!'
};
export const PrimaryLargeButton = Template.bind({});
PrimaryLargeButton.args = {
	label: 'Primary Large',
	size:'large',
	primary: true,
}
これで、ボタンの背景色(backgroundColor)は4つのラジオボタンから選べるようになりました。
なお、controlを{ type: 'select' }にすれば、オプションをプルダウンメニューから選択できます。
export default {

	argTypes: {
		backgroundColor: {

			// control: { type: 'radio' },
			control: { type: 'select' },
		},
	},
} as ComponentMeta<typeof Button>;
以上が、React + TypeScriptでStorybookをどのように使うかの基本的なご説明です。サンプルのプロジェクトにあらかじめ加えられたstoryについても、モジュールを開いておおむね理解いただけると思います。さらに詳しくは、Storybookの公式ドキュメントをお読みください。


