Reactは、マークアップ(テンプレート)をJSXの構文で、JavaScript(JS)ファイルに書くのが原則です(「JSXの導入」参照)。けれど、スタイルシートは、CSSファイルに定めます。これもJavaScriptコードに書いてしまえれば、マークアップもスタイルもコンポーネントごとにひとつのファイルにまとめられてすっきりするでしょう。
Reactでスタイルを割り当てるやり方はいくつかあります(「CSSとスタイルの使用
」)。その中で「CSS-in-JS」と呼ばれるのが、JavaScriptコードでCSSを定める手法です。styled-componentsは、そのためのライブラリとしてもっとも注目されています。本稿では、styled-componentsのインストールから基本的な使い方までをご紹介しましょう。
create-react-appでひな形のReactアプリケーションをつくる
styled-componentsはプロジェクトにインストールすることにします。そこで、今回使うのはcreate-react-appコマンドです(「新しいReactアプリを作る」参照)。コマンドラインツールからつぎのように入力して、アプリケーションのひな形をつくります。
$ npx create-react-app my-app
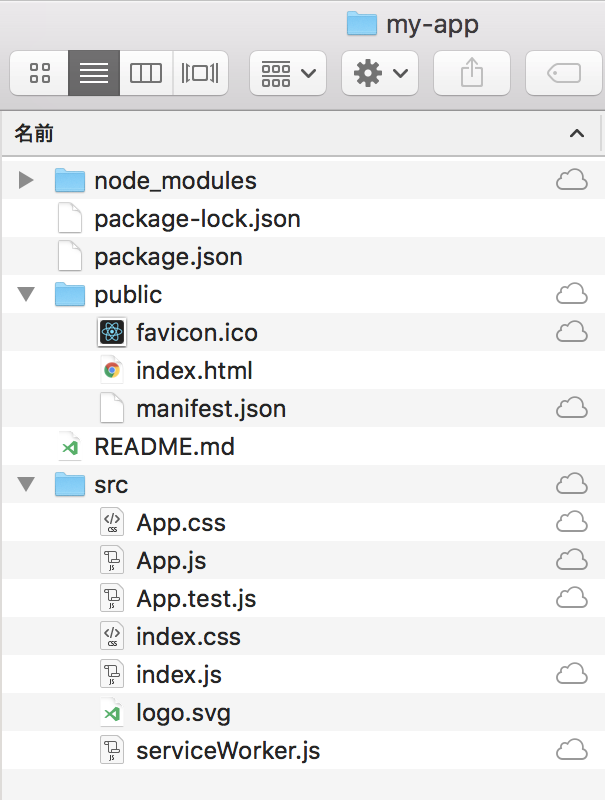
コマンドに与えたmy-appという名前のフォルダがつくられ、依存関係を含めた必要なファイルがつぎのように納められます(図001)。
図001■Reactアプリケーションのひな形としてつくられたファイル
これですぐにひな形のReactアプリケーションを、ローカルサーバーで開くことができます。つぎのようにアプリケーションのディレクトリ(my-app)に移って、コマンドnpm startを打ち込んでください。
$ cd my-app
$ npm start
ブラウザのURLhttp://localhost:3000でアプリケーションのページが開くでしょう(図002)。
図002■ブラウザで開いたReactアプリケーションのひな形
styled-componentsでCSSを定める
プロジェクトのディレクトリ(my-app)に、コマンドラインツールからつぎのようにstyled-componentsをインストールしてください。
$ npm install --save styled-components
ひな形にはCSSファイル(css:src/App.css)がつくられています。この中のスタイルを順にアプリケーションのJavaScriptコードに移してゆきましょう。まずは、つぎのクラス(App)の定めです。
.App {
  text-align: center;
}
JavaScriptファイルは、CSSファイル(App.css)に替えて、styled-componentsからstyledをimportします。スタイルを定めるのは、このヘルパーメソッドです。ドット(.)に続けて要素名を添え、文字列でCSSを記述します。テンプレート文字列``を用いれば、スタイルシートと同じ書き方ができて見やすいです。
styled.要素名`CSSの指定`
スタイルの定めは、前掲CSSファイルから{}の中身を、つぎのようにテンプレート文字列の中にコピーするだけです。そして、このスタイルが納められた変数名(ReactApp)で、マークアップの要素をタグづけしてください。
// import './App.css';
import styled from 'styled-components';

const ReactApp = styled.div`
	text-align: center;
`;

class App extends Component {
  render() {
    return (
		// <div className="App">
		<ReactApp>
			<header className="App-header">

			</header>
		</ReactApp>
		// </div>
    );
  }
}
CSSファイルのimportは外したので、すべてのスタイルは除かれたうえで、styled-componentsに移した設定だけが回復しているはずです。同じ要領で、他のスタイルもstyled-componentsで移行しましょう。ただし、アニメーションするロゴのスタイルはあとに回します。ここまでのJavaScriptコード(src/App.js)をまとめると、つぎのとおりです。
import React, { Component } from 'react';
import logo from './logo.svg';
import styled from 'styled-components';

const ReactApp = styled.div`
	text-align: center;
`;
const AppHeader = styled.header`
	background-color: #282c34;
	min-height: 100vh;
	display: flex;
	flex-direction: column;
	align-items: center;
	justify-content: center;
	font-size: calc(10px + 2vmin);
	color: white;
`
const AppLink = styled.a`
	color: #61dafb;
`;

class App extends Component {
	render() {
		return (
			<ReactApp>
				<AppHeader>
					<img src={logo} className="App-logo" alt="logo" />
					<p>
						Edit <code>src/App.js</code> and save to reload.
					</p>
					<AppLink
						href="https://reactjs.org"
						target="_blank"
						rel="noopener noreferrer"
					>
						Learn React
					</AppLink>
				</AppHeader>
			</ReactApp>
		);
	}
}

export default App;
animationプロパティのkeyframes規則を定める
回転するロゴ(<img>)のスタイルには、animationプロパティに@keyframes規則が与えられています。これを扱うヘルパーメソッドは、keyframesです。これをつぎのようにstyled-componentsからimportしておきます。テンプレート文字列への書き方は、スタイルシートと同じくCSSのままです。この規則を納めた変数(AppLogoSpin)は、animationの定めに、プレースホルダー${}で組み込んでください。これで、回転するロゴのスタイルも割り当てられました。
import styled, { keyframes } from 'styled-components';

const AppLogoSpin = keyframes`
	from {
		transform: rotate(0deg);
	}
	to {
		transform: rotate(360deg);
	}
`;
const AppLogo = styled.img`
	animation: ${AppLogoSpin} infinite 20s linear;
	height: 40vmin;
`;

class App extends Component {
	render() {
		return (
			<ReactApp>
				<AppHeader>
					<AppLogo src={logo} alt="logo" />

				</AppHeader>
			</ReactApp>
		);
	}
}
子要素や擬似クラスにスタイルを割り当てる
styled-componentsサイトの「Getting started」を見ただけではわからないのが、子要素や擬似クラスのスタイルです。これらについては、つぎのように現行セレクタを&で参照します(「Supported CSS」参照)。
const AppHeader = styled.header`

	& code {
		color: #aaeeff;
	}
`
const AppLink = styled.a`

	&:hover {
		color: #00ffff;
	}
`;
これで、子要素(<code>)や擬似クラス(:hover)にスタイルが定められます(図003)。書き上がったJavaScriptコード(src/App.js)は、以下のとおりです。
図003■子要素や擬似クラスにスタイルが与えられた
import React, { Component } from 'react';
import logo from './logo.svg';
import styled, { keyframes } from 'styled-components';

const ReactApp = styled.div`
	text-align: center;
`;
const AppHeader = styled.header`
	background-color: #282c34;
	min-height: 100vh;
	display: flex;
	flex-direction: column;
	align-items: center;
	justify-content: center;
	font-size: calc(10px + 2vmin);
	color: white;
	& code {
		color: #aaeeff;
	}
`
const AppLogoSpin = keyframes`
	from {
		transform: rotate(0deg);
	}
	to {
		transform: rotate(360deg);
	}
`;
const AppLogo = styled.img`
	animation: ${AppLogoSpin} infinite 20s linear;
	height: 40vmin;
`;
const AppLink = styled.a`
	color: #61dafb;
    &:hover {
        color: #00ffff;
    }
`;

class App extends Component {
	render() {
		return (
			<ReactApp>
				<AppHeader>
					<AppLogo src={logo} alt="logo" />
					<p>
						Edit <code>src/App.js</code> and save to reload.
					</p>
					<AppLink
						href="https://reactjs.org"
						target="_blank"
						rel="noopener noreferrer"
					>
						Learn React
					</AppLink>
				</AppHeader>
			</ReactApp>
		);
	}
}

export default App;


