Fateの熱が冷めず、Fate/SN UBWのブルーレイを借りて見続けているFortranです。懲りずに続きを書いていきます。
今回は、MySQLに格納したデータから、nwdiagが解釈できるようにconfigファイルを作り、ネットワーク構成図をexportするまでの過程を作りこんでいきます。
実験
実験用データ
- MySQLに予め下記のデータをinsertしておきます。
- この2つのVLANについてnwdiagのconfigが作れるか実験をします。
mysql> select * from config_data where vlan='VLAN100';
+------------+------+---------------+---------+------------+
| IP_ADDRESS | HOST | NETMASK       | VLAN    | NW_ADDRESS |
+------------+------+---------------+---------+------------+
| 1.1.1.1    | web1 | 255.255.255.0 | VLAN100 | 1.1.1.0/24 |
| 1.1.1.2    | web2 | 255.255.255.0 | VLAN100 | 1.1.1.0/24 |
| 1.1.1.3    | web3 | 255.255.255.0 | VLAN100 | 1.1.1.0/24 |
+------------+------+---------------+---------+------------+
3 rows in set (0.00 sec)

mysql> select * from config_data where vlan='VLAN10';
+------------+------+---------------+--------+---------------+
| IP_ADDRESS | HOST | NETMASK       | VLAN   | NW_ADDRESS    |
+------------+------+---------------+--------+---------------+
| 172.23.0.1 | web1 | 255.255.255.0 | VLAN10 | 172.23.0.0/24 |
| 172.23.0.2 | web2 | 255.255.255.0 | VLAN10 | 172.23.0.0/24 |
| 172.23.0.3 | web3 | 255.255.255.0 | VLAN10 | 172.23.0.0/24 |
+------------+------+---------------+--------+---------------+
3 rows in set (0.00 sec)
nwdiagのconfigデータ
- nwdiag公式doc : http://blockdiag.com/ja/nwdiag/
- 公式ページの事例を引用すると、下記のconfigから次のような図が生成されるようになります。
example.diag
nwdiag {
  network dmz {
      address = "210.x.x.x/24"

      web01 [address = "210.x.x.1"];
      web02 [address = "210.x.x.2"];
  }
  network internal {
      address = "172.x.x.x/24";

      web01 [address = "172.x.x.1"];
      web02 [address = "172.x.x.2"];
      db01;
      db02;
  }
}

ソースコード
次のようなPerlのスクリプトとシェルスクリプトを組み合わせて、実験を行いました。
うーん、力押しとしか言えないソースですなぁ…
nwdiag.sh
# !/bin/bash

echo "nwdiag {"

./nwdiag.pl VLAN10
./nwdiag.pl VLAN100

echo "}"
nwdiag.pl
# !/usr/bin/perl

use strict;
use warnings;

use DBI;

my $vlan = $ARGV[0];

my $db = 'DBI:mysql:nw_config';
my $user = '******';
my $pass = '*******';

# データベースに接続
my $dbh = DBI->connect($db, $user, $pass);

# データの選択
my $sql = "select host, ip_address from config_data where vlan='$vlan'";
my $sth = $dbh->prepare($sql);
$sth->execute;
# データの個数をチェック
my $rv = $sth->rows;

my $data = $sth->fetchall_arrayref();

if($rv >= 1) {
  &nwdiag_start($vlan);
  foreach my $value (@$data){
    &nwdiag_data($value->[0], $value->[1])
  }
  &nwdiag_end;
} else {
  print "[ERROR] NO VLAN-ID\n";
}
$sth->finish;
$dbh->disconnect;

sub nwdiag_start{
        my $V=$_[0];
        print "  network $V {\n";
}

sub nwdiag_data{
        print "    $_[0] [address = ".$_[1]."] \n";
}

sub nwdiag_end{
        print "  }\n";
}
実験結果
- 出力先を指定してシェルスクリプトを実行すると、下記のようなファイルが作られます。
# ./nwdiag.sh > test.diag
# cat test.diag

nwdiag {
  network VLAN10 {
    web1 [address = 172.23.0.1]
    web2 [address = 172.23.0.2]
    web3 [address = 172.23.0.3]
  }
  network VLAN100 {
    web1 [address = 1.1.1.1]
    web2 [address = 1.1.1.2]
    web3 [address = 1.1.1.3]
  }
}
このコマンドでtest2.pngをFFFTP等のFTPツールを使って、画像をローカルで開くと下記のような図が出来ていることが分かります。
# nwdiag test2.diag -o test2.png
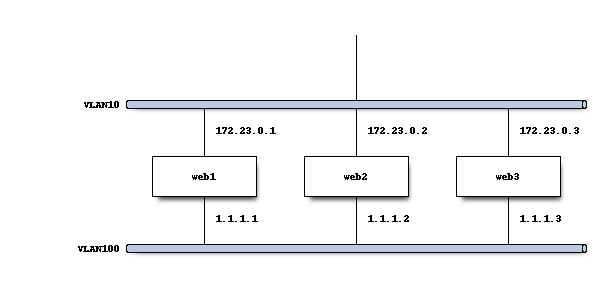
これでネットワーク構成図が作られる流れはできました。
これでオシマイ?
まだ作り込みが足りない点が数多くあるので、課題点を一つずつ潰していこうと思います。改良点を随時、記事として作っていこうと思いますので、今後ともよろしくお願いいたします。