目的
Godot4.0のArrayMeshを作って、落とし穴を作ります。
前々回の下記記事でArrayMeshからCollisionShape3Dを設定する方法を書きましたが、本当に動的に作成したCollisionShape3Dが使えるのか確認したいと思います。
やりたいこと
地面にカーソルで操作できる穴を作ります。
地面の上にはRigidBody3Dの球や長方形を置いておいて、穴が下を通ると落ちることを確認します。

新規プロジェクト作成してノードを追加する
Godotで新規プロジェクトを作成して、下記のようにノードを構成します。
またHoleOnGroundを右クリックして「スクリプトをアタッチ」してください。

obj1~obj4は球を配置、obj5のみ長方形を配置しています。
| ノード名:ノードクラス名 | インスペクタ変更値 |
|---|---|
| World : Node3D | |
| ┝━Camera3D | Position : (0m, 4m, 7m) Rotation : (-45°, 0°, 0°) |
| ┝━DirectionalLight3D | Position : (-10m, 0m, 0m) Rotation : (-10°, 45°, 0°) shadow:オン |
| ┝━HoleOnGround : StaticBody3D | |
| ┃ ┝━MeshInstance3D | 設定不要(GDScriptから設定する) |
| ┃ ┗━CollisionShape3D | 設定不要(GDScriptから設定する) |
| ┗━Objects : Node3D | |
| ┝━obj1 : RigidBody3D | Position : (-2m, 4m, 0m) |
| ┃ ┝━MeshInstance3D | 新規SphereMesh3D Radius=0.2m, Height:0.4m |
| ┃ ┗━CollisionShape3D | 新規SphereShape3D Radius=0.2m |
| ┝━obj2 : RigidBody3D | Position : (0m, 4m, 3m) |
| ┃ ┝━MeshInstance3D | 同上 |
| ┃ ┗━CollisionShape3D | 同上 |
| ┝━obj3 : RigidBody3D | Position : (0m, 4m, -2m) |
| ┃ ┝━MeshInstance3D | 同上 |
| ┃ ┗━CollisionShape3D | 同上 |
| ┝━obj4 : RigidBody3D | Position : (2m, 4m, 0m) |
| ┃ ┝━MeshInstance3D | 同上 |
| ┃ ┗━CollisionShape3D | 同上 |
| ┗━obj5 : RigidBody3D | Position : (-2m, 4m, -2m) |
| ┝━MeshInstance3D | 新規BoxMesh3D x:0.5m, y:1m, z:0.5m |
| ┗━CollisionShape3D | 新規BoxShape3D x:0.5m, y:1m, z:0.5m |

GDScriptを作成する
下記のように実装しました。
extends StaticBody3D

#
# カーソルキー操作でhole(落とし穴)を動かす
#
const SPEED = 3.0

# 地面の大きさ
var m_d_ground_w_m : float = 20.0
var m_d_ground_d_m : float = 20.0

# 落とし穴
var m_v3_hole_pos = Vector3(0, 0, 0)
var m_d_hole_x_m : float = 1.0
var m_d_hole_z_m : float = 1.0

func _physics_process(delta):
	var velocity = Vector3.ZERO
	var input_dir = Input.get_vector("ui_left", "ui_right", "ui_up", "ui_down")
	var direction = (transform.basis * Vector3(input_dir.x, 0, input_dir.y)).normalized()
	if direction:
		velocity.x = direction.x
		velocity.z = direction.z

	# holeの位置を移動
	m_v3_hole_pos += velocity.normalized() * SPEED * delta
	set_hole_and_ground_array_mesh()

# 三角形2つで四角形を作る
# l:Left, t:Top, r:Right, b:bottom
func add_square(vertices, normals, x_l, z_t, x_r, z_b):
	vertices.push_back(Vector3(x_l, 0, z_t))
	vertices.push_back(Vector3(x_r, 0, z_t))
	vertices.push_back(Vector3(x_r, 0, z_b))
	normals.push_back(Vector3.UP)
	normals.push_back(Vector3.UP)
	normals.push_back(Vector3.UP)

	vertices.push_back(Vector3(x_r, 0, z_b))
	vertices.push_back(Vector3(x_l, 0, z_b))
	vertices.push_back(Vector3(x_l, 0, z_t))
	normals.push_back(Vector3.UP)
	normals.push_back(Vector3.UP)
	normals.push_back(Vector3.UP)


# 落とし穴ArrayMeshを作成する
func set_hole_and_ground_array_mesh():

	var vertices = PackedVector3Array()
	var normals  = PackedVector3Array()
	# 地面のXZ平面上の左上、右下の位置を設定
	var ground_LT = Vector3(-m_d_ground_w_m/2.0 , 0, -m_d_ground_d_m/2.0)
	var ground_RB = Vector3( m_d_ground_w_m/2.0 , 0,  m_d_ground_d_m/2.0)
	# holeのXZ平面上の左上、右下の位置を設定
	var hole_size = Vector3( m_d_hole_x_m , 0,  m_d_hole_z_m)
	var hole_LT = m_v3_hole_pos - hole_size/2.0
	var hole_RB = m_v3_hole_pos + hole_size/2.0

	# 3×3グリッドの上3ブロック
	add_square(vertices, normals, ground_LT.x, ground_LT.z ,ground_RB.x, hole_LT.z)
	# 3×3グリッド、左(holeの左)
	add_square(vertices, normals, ground_LT.x, hole_LT.z ,hole_LT.x, hole_RB.z)
	# 3×3グリッド、右(holeの右)
	add_square(vertices, normals, hole_RB.x, hole_LT.z ,ground_RB.x, hole_RB.z)
	# 3×3グリッドの下3ブロック
	add_square(vertices, normals, ground_LT.x, hole_RB.z ,ground_RB.x, ground_RB.z)

	var arrays = Array()
	arrays.resize(ArrayMesh.ARRAY_MAX)
	arrays[ArrayMesh.ARRAY_VERTEX] = vertices
	arrays[ArrayMesh.ARRAY_NORMAL] = normals

	var tmpMesh = ArrayMesh.new()
	tmpMesh.add_surface_from_arrays(Mesh.PRIMITIVE_TRIANGLES, arrays)
	$MeshInstance3D.mesh = tmpMesh

	# MeshからCollision形状(ConcavePolygonShape3D)生成
	$CollisionShape3D.shape = tmpMesh.create_trimesh_shape()
実行します。
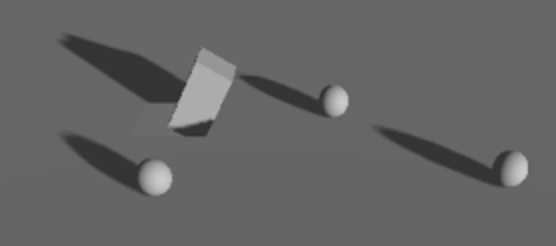
4つの球の真ん中にあるのが、落とし穴です。カーソルキーで動かすことができます。

地面と落とし穴の色が似ていて見にくいですが、穴が下に来ると球や長方形が落ちます。
RigitBody3Dが物理エンジンで制御されるので、リアルに落ちていきます。
スクリプト説明
スクリプトを説明します。
extends StaticBody3D

#
# カーソルキー操作でhole(落とし穴)を動かす
#
const SPEED = 3.0
SPEEDはカーソルキーによる落とし穴の移動速度を定義しています。
# 地面の大きさ
var m_d_ground_w_m : float = 20.0
var m_d_ground_d_m : float = 20.0
地面は原点を中心に配置するので、縦横±10mの正方形になります。
# 落とし穴
var m_v3_hole_pos = Vector3(0, 0, 0)
var m_d_hole_x_m : float = 1.0
var m_d_hole_z_m : float = 1.0
落とし穴をし初期位置と大きさを定義します。m_v3_hole_posは落とし穴の正方形の中心です。
func _physics_process(delta):
	var velocity = Vector3.ZERO
	var input_dir = Input.get_vector("ui_left", "ui_right", "ui_up", "ui_down")
	var direction = (transform.basis * Vector3(input_dir.x, 0, input_dir.y)).normalized()
	if direction:
		velocity.x = direction.x
		velocity.z = direction.z

	# holeの位置を移動
	m_v3_hole_pos += velocity.normalized() * SPEED * delta
	set_hole_and_ground_array_mesh()
CharacterBody3DのGDScriptテンプレートからカーソルキー上下左右の処理を流用しました。
最後にm_v3_hole_posにx軸とz軸の移動量を足して、set_hole_and_ground_array_mesh()を呼び出して落とし穴メッシュを作り直しています。
# 三角形2つで四角形を作る
# l:Left, t:Top, r:Right, b:bottom
func add_square(vertices, normals, x_l, z_t, x_r, z_b):
	vertices.push_back(Vector3(x_l, 0, z_t))
	vertices.push_back(Vector3(x_r, 0, z_t))
	vertices.push_back(Vector3(x_r, 0, z_b))
	normals.push_back(Vector3.UP)
	normals.push_back(Vector3.UP)
	normals.push_back(Vector3.UP)

	vertices.push_back(Vector3(x_r, 0, z_b))
	vertices.push_back(Vector3(x_l, 0, z_b))
	vertices.push_back(Vector3(x_l, 0, z_t))
	normals.push_back(Vector3.UP)
	normals.push_back(Vector3.UP)
	normals.push_back(Vector3.UP)
4角形を作るメソッドです。
引数に四角形の左上(x,z)=(x_l,z_y)と右下(x,z)=(x_r, z_b)を指定すると、三角形2つ作って、長方形を作成します。
時計回りに頂点をpush_backします。
また今回生成する平面の向きは上(Y軸プラス方向)なので法線はVector3.UPを指定します。
# 落とし穴ArrayMeshを作成する
func set_hole_and_ground_array_mesh():
ArrayMeshとCollisionShape3Dを作成するメソッドです。
	var vertices = PackedVector3Array()
	var normals  = PackedVector3Array()
PackedVector3Arrayを作ります。
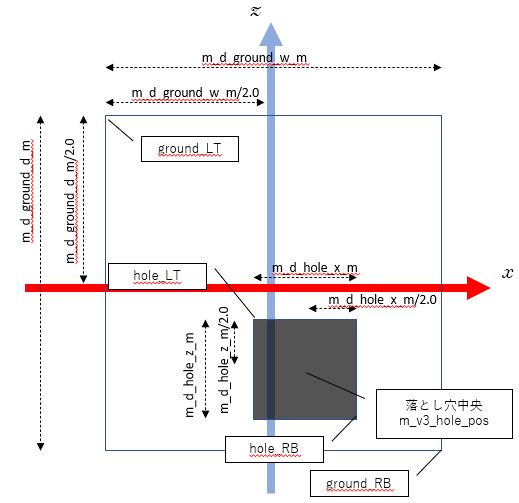
	# 地面のXZ平面上の左上、右下の位置を設定
	var ground_LT = Vector3(-m_d_ground_w_m/2.0 , 0, -m_d_ground_d_m/2.0)
	var ground_RB = Vector3( m_d_ground_w_m/2.0 , 0,  m_d_ground_d_m/2.0)

	# holeのXZ平面上の左上、右下の位置を設定
	var hole_size = Vector3( m_d_hole_x_m , 0,  m_d_hole_z_m)
	var hole_LT = m_v3_hole_pos - hole_size/2.0
	var hole_RB = m_v3_hole_pos + hole_size/2.0
地面と落とし穴の左上、右下の座標を求めています。下図が参考になると思います。
(本当はZ軸は手前を向いているので矢印が逆ですが、今回のケースでは大丈夫だと思います)
	# 3×3グリッドの上3ブロック
	add_square(vertices, normals, ground_LT.x, ground_LT.z ,ground_RB.x, hole_LT.z)
	# 3×3グリッド、左(holeの左)
	add_square(vertices, normals, ground_LT.x, hole_LT.z ,hole_LT.x, hole_RB.z)
	# 3×3グリッド、右(holeの右)
	add_square(vertices, normals, hole_RB.x, hole_LT.z ,ground_RB.x, hole_RB.z)
	# 3×3グリッドの下3ブロック
	add_square(vertices, normals, ground_LT.x, hole_RB.z ,ground_RB.x, ground_RB.z)
下図のように3×3ブロックに分けて、左の図のように、一番上の3ブロック、下の3ブロックと右の図のように中央(落とし穴)の左、中央の右と、全部で4つの長方形に分けて、四角形のメッシュを作成します。

	var arrays = Array()
	arrays.resize(ArrayMesh.ARRAY_MAX)
	arrays[ArrayMesh.ARRAY_VERTEX] = vertices
	arrays[ArrayMesh.ARRAY_NORMAL] = normals

	var tmpMesh = ArrayMesh.new()
	tmpMesh.add_surface_from_arrays(Mesh.PRIMITIVE_TRIANGLES, arrays)
	$MeshInstance3D.mesh = tmpMesh
ArrayMeshを生成して、MeshInstance3Dに設定します。
	# MeshからCollision形状(ConcavePolygonShape3D)生成
	$CollisionShape3D.shape = tmpMesh.create_trimesh_shape()
ArrayMeshからCollision形状(ConcavePolygonShape3D)を生成してCollisionShape3Dに設定しています。
以上