ゲームエンジンGodot4.0で3Dスマホゲームを作りたいと思いますが、その前にお勉強しています。
Godot_v4.0-rc1_win64.exe.zipを使用しています。
目的
タッチした座標は画面上の2次元の座標ですが、ノードは3D空間に存在するため変換が必要です。
GodotのPhysicsDirectSpaceState3Dクラスの3D物理空間の衝突情報を利用します。
やりたいこと
画面をタッチした場合、画像上のピクセル位置(x[px]、y[px])が通知されます。下図左側がタッチするスマホ画面です。画面は2次元なので★マークをタッチしたときにわかるのが画面上のピクセル位置になります。
しかし、ノードを動かしたい場合に知りたいのは、3D空間上の点です。global座標系の(x[m]、y[m]、z[m])で表す位置がほしいのです。
そのためGODOT DOCSのPhysics/Ray-castingを参考に変換をします。
https://docs.godotengine.org/en/latest/tutorials/physics/ray-casting.html
対象のオブジェクトを検出するために、物理エンジンの衝突情報を利用しています。
タッチすることができるのは、CollisionObject3Dの派生ノード(Area3D、StaricBody3D、CharacterBody3Dなど)でかつCollisionShape3Dなどで設定した衝突形状です。
また今回は手動で検出しますが、input_eventシグナルで通知を受ける方法もあります。

マウスでタッチ操作をエミュレートする
PCで開発をする場合、タッチ操作のデバッグをするための設定が必要です。
Godotのプロジェクトメニューからプロジェクト設定を開き、入力デバイス/ポインティングで「マウスでタッチ操作をエミュレート」にチェックを入れます。

タッチイベントの内容を確認する
タッチのイベント通知を受けます。
プロジェクトを新規作成して、下記のようにノードを追加します。
アイコンで分かるようになってきたと思いますが、ルートノード「global」はNode3D、「Player」ノードはCharacterBody3Dです。

各ノードのインスペクタで下記のように変更します。
-
Camera3Dは上から見下ろすように設定します
- MeshInstance3Dに球型を設定します。
インスペクタ内のMeshInstance3D/Meshを新規SphereMeshに設定します。
- MeshInstance3Dに球型を設定します。
-
CollisionShape3Dに衝突形状を設定
MeshInstance3Dと同じ形にします。
インスペクタ内のCollisionShape3D/Shapeに新規SphereShape3Dを設定 -
DirectionalLight3Dをほかのノードと重ならないように移動
x=-10に変更しました。
playerを右クリックして、スクリプトをアタッチしましょう。
下記のように修正します。
extends CharacterBody3D

func _input(event):
	print(event)
- func _input(event):
各種入力イベントが発生すると呼ばれるメソッドです。
実行しましょう。
ウインドウ上でマウスを動かしたり、クリック、ドラッグするとprint文が出力されます。
マウスを止めるとprint文の出力も止まるので、動きがあったときだけ_inputメソッドが呼ばれるのがわかります。
またマウスを左から右に動かすと、position=((x,y))のxが増えていくのがわかると思います。
ディフォルトで生成されるウインドウのサイズが1152×648です。下記のログではXの値は7,20,33,....,1140までとびとびの値で通知されています。連続した値ではありません。
InputEventMouseMotion: button_mask=0, position=((7, 619)), relative=((0, 0)), velocity=((0, 0)), pressure=0.00, tilt=((0, 0)), pen_inverted=(false)
InputEventMouseMotion: button_mask=0, position=((20, 617)), relative=((13, -2)), velocity=((0, 0)), pressure=0.00, tilt=((0, 0)), pen_inverted=(false)
InputEventMouseMotion: button_mask=0, position=((33, 615)), relative=((13, -2)), velocity=((0, 0)), pressure=0.00, tilt=((0, 0)), pen_inverted=(false)
InputEventMouseMotion: button_mask=0, position=((56, 611)), relative=((23, -4)), velocity=((0, 0)), pressure=0.00, tilt=((0, 0)), pen_inverted=(false)
InputEventMouseMotion: button_mask=0, position=((94, 607)), relative=((38, -4)), velocity=((0, 0)), pressure=0.00, tilt=((0, 0)), pen_inverted=(false)
     :
InputEventMouseMotion: button_mask=0, position=((1043, 589)), relative=((34, -2)), velocity=((1135.095, -19.07723)), pressure=0.00, tilt=((0, 0)), pen_inverted=(false)
InputEventMouseMotion: button_mask=0, position=((1063, 589)), relative=((20, 0)), velocity=((1135.095, -19.07723)), pressure=0.00, tilt=((0, 0)), pen_inverted=(false)
InputEventMouseMotion: button_mask=0, position=((1094, 589)), relative=((31, 0)), velocity=((1135.095, -19.07723)), pressure=0.00, tilt=((0, 0)), pen_inverted=(false)
InputEventMouseMotion: button_mask=0, position=((1119, 589)), relative=((25, 0)), velocity=((757.1518, -32.91964)), pressure=0.00, tilt=((0, 0)), pen_inverted=(false)
InputEventMouseMotion: button_mask=0, position=((1140, 589)), relative=((21, 0)), velocity=((757.1518, -32.91964)), pressure=0.00, tilt=((0, 0)), pen_inverted=(false)
同様にマウスを上から下に移動するとposition=((x,y))のyが増えるのがわかると思います。
ディフォルトで生成されるウインドウのサイズが1152×648です。39,60,81,...,647まで移動しています。
実行画面のウインドウは2次元で、右に行くとXがプラス、下に行くとyがプラスになる座標系ということがわかります。
InputEventMouseMotion: button_mask=0, position=((91, 39)), relative=((0, 0)), velocity=((0, 0)), pressure=0.00, tilt=((0, 0)), pen_inverted=(false)
InputEventMouseMotion: button_mask=0, position=((91, 60)), relative=((0, 21)), velocity=((0, 0)), pressure=0.00, tilt=((0, 0)), pen_inverted=(false)
InputEventMouseMotion: button_mask=0, position=((89, 81)), relative=((-2, 21)), velocity=((0, 0)), pressure=0.00, tilt=((0, 0)), pen_inverted=(false)
InputEventMouseMotion: button_mask=0, position=((85, 90)), relative=((-4, 9)), velocity=((0, 0)), pressure=0.00, tilt=((0, 0)), pen_inverted=(false)
    :
InputEventMouseMotion: button_mask=0, position=((93, 623)), relative=((1, 19)), velocity=((57.84471, 703.7773)), pressure=0.00, tilt=((0, 0)), pen_inverted=(false)
InputEventMouseMotion: button_mask=0, position=((93, 635)), relative=((0, 12)), velocity=((57.84471, 703.7773)), pressure=0.00, tilt=((0, 0)), pen_inverted=(false)
InputEventMouseMotion: button_mask=0, position=((93, 647)), relative=((0, 12)), velocity=((57.84471, 703.7773)), pressure=0.00, tilt=((0, 0)), pen_inverted=(false)
あとはタッチしているとき(マウス操作でいうとマウスクリックとドラッグ)のX座標がほしいので関係しそうな、タッチ操作をエミュレートしたマウスの動きをしたときのevent内容を確認します。
- マウス右ボタンクリック押し込み
マウスでタッチ操作をエミュレートしているため、InputEventScreenTouchとInputEventMouseButtonが両方表示されます。
InputEventScreenTouch: index=0, pressed=true, position=((12, 604)), double_tap=false
InputEventMouseButton: button_index=1, mods=none, pressed=true, position=((12, 604)), button_mask=1, double_click=false
- マウス右ボタン離す
離した時もInputEventScreenTouchとInputEventMouseButtonが通知されます。
さらにInputEventMouseMotionも通知されています。
InputEventScreenTouch: index=0, pressed=false, position=((12, 604)), double_tap=false
InputEventMouseButton: button_index=1, mods=none, pressed=false, position=((12, 604)), button_mask=0, double_click=false
InputEventMouseMotion: button_mask=0, position=((12, 604)), relative=((0, 0)), velocity=((0, 0)), pressure=0.00, tilt=((0, 0)), pen_inverted=(false)
- ドラッグ
ドラッグ中のみInputEventScreenDragが通知されます。マウスオーバーの時にはタッチイベントは通知されません。
マウスオーバー中
InputEventMouseMotion: button_mask=0, position=((100, 646)), relative=((0, 0)), velocity=((0, 0)), pressure=0.00, tilt=((0, 0)), pen_inverted=(false)
InputEventMouseMotion: button_mask=0, position=((101, 645)), relative=((1, -1)), velocity=((0, 0)), pressure=0.00, tilt=((0, 0)), pen_inverted=(false)
InputEventMouseMotion: button_mask=0, position=((101, 643)), relative=((0, -2)), velocity=((7.037199, -7.037199)), pressure=0.00, tilt=((0, 0)), pen_inverted=(false)

★マウスクリック~ドラッグ
InputEventScreenTouch: index=0, pressed=true, position=((101, 643)), double_tap=false
InputEventMouseButton: button_index=1, mods=none, pressed=true, position=((101, 643)), button_mask=1, double_click=false
InputEventScreenDrag: index=0, position=((101, 643)), relative=((0, 0)), velocity=((0, -3.49791)), pressure=1.00, tilt=((0, 0)), pen_inverted=(false)
InputEventMouseMotion: button_mask=1 (Left Mouse Button), position=((101, 643)), relative=((0, 0)), velocity=((0, -3.49791)), pressure=1.00, tilt=((0, 0)), pen_inverted=(false)
InputEventScreenDrag: index=0, position=((108, 645)), relative=((7, 2)), velocity=((0, 0)), pressure=1.00, tilt=((0, 0)), pen_inverted=(false)
InputEventMouseMotion: button_mask=1 (Left Mouse Button), position=((108, 645)), relative=((7, 2)), velocity=((0, 0)), pressure=1.00, tilt=((0, 0)), pen_inverted=(false)
  :
InputEventScreenDrag: index=0, position=((222, 639)), relative=((1, 0)), velocity=((89.11685, 0)), pressure=1.00, tilt=((0, 0)), pen_inverted=(false)
InputEventMouseMotion: button_mask=1 (Left Mouse Button), position=((222, 639)), relative=((1, 0)), velocity=((89.11685, 0)), pressure=1.00, tilt=((0, 0)), pen_inverted=(false)

★マウスボタンを離す
InputEventScreenTouch: index=0, pressed=false, position=((222, 639)), double_tap=false
InputEventMouseButton: button_index=1, mods=none, pressed=false, position=((222, 639)), button_mask=0, double_click=false
InputEventMouseMotion: button_mask=0, position=((222, 639)), relative=((0, 0)), velocity=((2.859488, 0)), pressure=0.00, tilt=((0, 0)), pen_inverted=(false)
InputEventMouseMotion: button_mask=0, position=((222, 640)), relative=((0, 1)), velocity=((0, 0)), pressure=0.00, tilt=((0, 0)), pen_inverted=(false)
タッチ位置を保持する
タッチしたときとドラッグしたときに画面上の座標がほしいので下記のように実装しました。
extends CharacterBody3D

var m_touch_pos = Vector2.ZERO

func _input(event):
	if ( event is InputEventScreenDrag ) or ( event is InputEventScreenTouch ):
		m_touch_pos = event.position
		print("m_touch_pos:", m_touch_pos)
- var m_touch_pos = Vector2.ZERO
タッチ位置を保存するメンバ追加 - if ( event is InputEventScreenDrag ) or ( event is InputEventScreenTouch ):
タッチスクリーンデバイスを使用している場合、タッチはInputEventScreenTouch、タッチドラッグ?はInputEventScreenDrag で通知されるようです。 - m_touch_pos = event.position
タッチした位置を保持します
画面上の位置を3D空間の位置に変換する
タッチしたノードを検出するための3D物理空間の衝突情報は_physics_processメソッド内で実装する必要があります。
extends CharacterBody3D

@export var m_ray_length_m = 1000		# [m]十分な長さにする
var m_touch_pos = Vector2.ZERO

func _input(event):
	if ( event is InputEventScreenDrag ) or ( event is InputEventScreenTouch ):
		m_touch_pos = event.position

func _physics_process(delta):
	var camera = get_viewport().get_camera_3d()

	# カメラを利用して3D空間のカメラ位置とタッチしたピクセルに対応する方向の1000m先の位置を計算する
	var from3d = camera.project_ray_origin(m_touch_pos)
	var to3d = from3d + camera.project_ray_normal(m_touch_pos) * m_ray_length_m

	# 3D ray physics queryの作成
	var query = PhysicsRayQueryParameters3D.create(from3d, to3d)
	query.collide_with_areas = true		# Area3Dを検知できるようにする

	# Godotの3Dの物理とコリジョンを保存しているspaceという情報を使用してオブジェクト検出
	var space_state = get_world_3d().direct_space_state
	var result = space_state.intersect_ray(query)
	if result:
		print(result)
メンバ変数追加
-
@export var m_ray_length_m = 1000 # [m]十分な長さにする
検出する最大距離をパラメータとして保持
m_ray_length_mはパラメータです。とりあえず1000mとしていますが、検出したいものがもっと遠くにある場合は値を変更します。
_physics_process追加
- func _physics_process(delta):
3D物理空間情報は_physics_processメソッドの中で使用します。 - var camera = get_viewport().get_camera_3d()
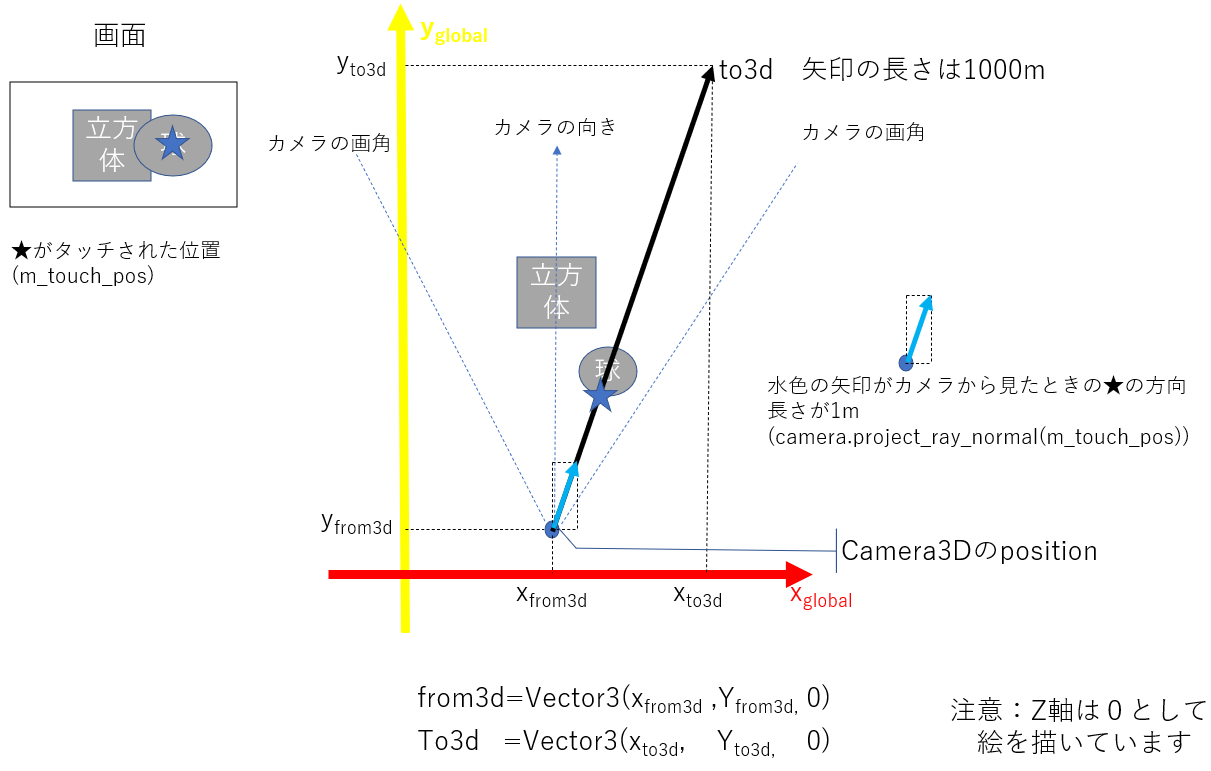
今表示しているカメラを取得します。 - var from3d = camera.project_ray_origin(m_touch_pos)
タッチした位置からカメラの位置を取得しています。
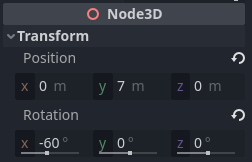
Camera3D/ProjectionがPerspectiveの場合、printするとクリックしたピクセルによらず(0.0m,7.0m,0.0m)と表示されるので、Camera3DノードのNode3D/Transform/positionを取得しているようです。 - camera.project_ray_normal(m_touch_pos)
カメラはfrom3dの1点から画角の範囲を放射状に見ていて、m_touch_posでクリックしたピクセルを見ている方向をcamera.project_ray_normalで取得します。長さ1mの距離です。 - var to3d = from3d + camera.project_ray_normal(m_touch_pos) * m_ray_length_m
カメラの位置(from3d)からカメラが見ている方向へ1000m(m_ray_length_m(パラメータ)先の点を取得します。
絵を描いてみました。
- var query = PhysicsRayQueryParameters3D.create(from3d, to3d)
queryのひな型を作成 - query.collide_with_areas = true # Area3Dを検知できるようにする
ディフォルトでArea3Dは検出しませんが、collide_with_areas = trueにすると検出できるようになります。 - var space_state = get_world_3d().direct_space_state
3D物理空間情報(PhysicsDirectSpaceState3Dクラス)を取得します。_physics_processメソッドの中で使用が推奨されています。 - var result = space_state.intersect_ray(query)
from3dからto3dを見たときに一番最初に衝突(検出)した情報が返却されます。 - if result:
衝突したノードがある場合。
実行しましょう。
球をクリックすると下記のようなログが出力されると思います。
{ "position": (0, 0.493097, 0.082794), "normal": (0, 0.986195, 0.165589), "collider_id": 26306675111, "collider": Player:<CharacterBody3D#26306675111>, "shape": 0, "rid": RID(3921305141248) }
x:0
{ "position": (-0.44261, 0.227037, 0.050508), "normal": (-0.885219, 0.454074, 0.101017), "collider_id": 26306675111, "collider": Player:<CharacterBody3D#26306675111>, "shape": 0, "rid": RID(3921305141248) }
x:-0.44260975718498
- print(result)
resultは辞書型のデータでprintすると下記のような情報が設定されています。
{
    "position": (-0.119681, 0.481735, 0.060076),
    "normal": (-0.239361, 0.963468, 0.120151),
    "collider_id": 26306675111,
    "collider": Player:<CharacterBody3D#26306675111>,
    "shape": 0,
    "rid": RID(3921305141248)
}
positionはfrom2dからto3dを見たときに一番最初に衝突した点のglobal座標が設定されます。
表示されている球は中心が原点で半径0.5mの球なので、中央をクリックすると、
{ "position": (0, 0.499575, -0.020629), "normal": (0, 0.999148, -0.041259), "collider_id": 26306675111, "collider": Player:<CharacterBody3D#26306675111>, "shape": 0, "rid": RID(3921305141248) }
x:0
と表示されました。理想的にはposition(x,y,z)=(0.0m,0.5m,0.0m)ですが"position": (0, 0.499575, -0.020629)なので近い値になっていると思います。
次に、球の左端をクリックすると、
{ "position": (-0.477748, 0.147479, 0.002636), "normal": (-0.955496, 0.294957, 0.005271), "collider_id": 26306675111, "collider": Player:<CharacterBody3D#26306675111>, "shape": 0, "rid": RID(3921305141248) }
x:-0.47774815559387
と表示されました。理想的にはposition(x,y,z)=(-0.5m,0.0m,0.0m)のところ、"position": (-0.477748, 0.147479, 0.002636)です。ぎりぎり端をクリックするのが難しいです。
床を追加する
タッチした点のX座標に移動したいので、StaticBody3Dで床追加します。
globalの子ノードにStaticBody3Dを追加して、Groundという名前に変更します。
また下記のようにMeshInstance3DとCollisionShape3Dを追加します。

床を追加します。y=0を床にしたいので、PlayerのY位置も移動します。
1. Groundを移動します
インスペクタ内のNode3D/Transform/position/yに-0.5m、zに-7mを設定します。

-
MeshInstance3Dに立方体を設定して床にします
インスペクタ内のMeshInstance3D/Meshに新規BoxMeshを設定します。
インスペクタ内のMeshInstance3D/Meshのアイコンをクリックすると、サイズを設定できます。Sizeのxを5m、zを15mにします。

-
CollisionShape3Dに衝突形状としてMeshInstance3Dと同じサイズの立方体を設定します。
インスタンス内のCollisionShape3D/Shapeに新規BoxShape3Dを設定します。
インスタンス内のCollisionShape3D/ShapeのBoxShape3DをクリックするとSizeを設定できます。
Sizeのxを5m、zを15mにします。

-
Playerを移動します。
Y=0を床面に設定したいので、Playerのインスペクタ内のNode3D/Transform/position/yに0.5mを設定します。

-
DirectionalLight3Dの向きを調整します。
床が明るくなるように、インスペクタ内のNode3D/Transform/rotation/xに-135°を設定します。
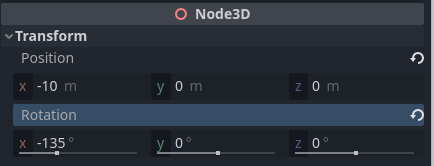
このようになると思います。
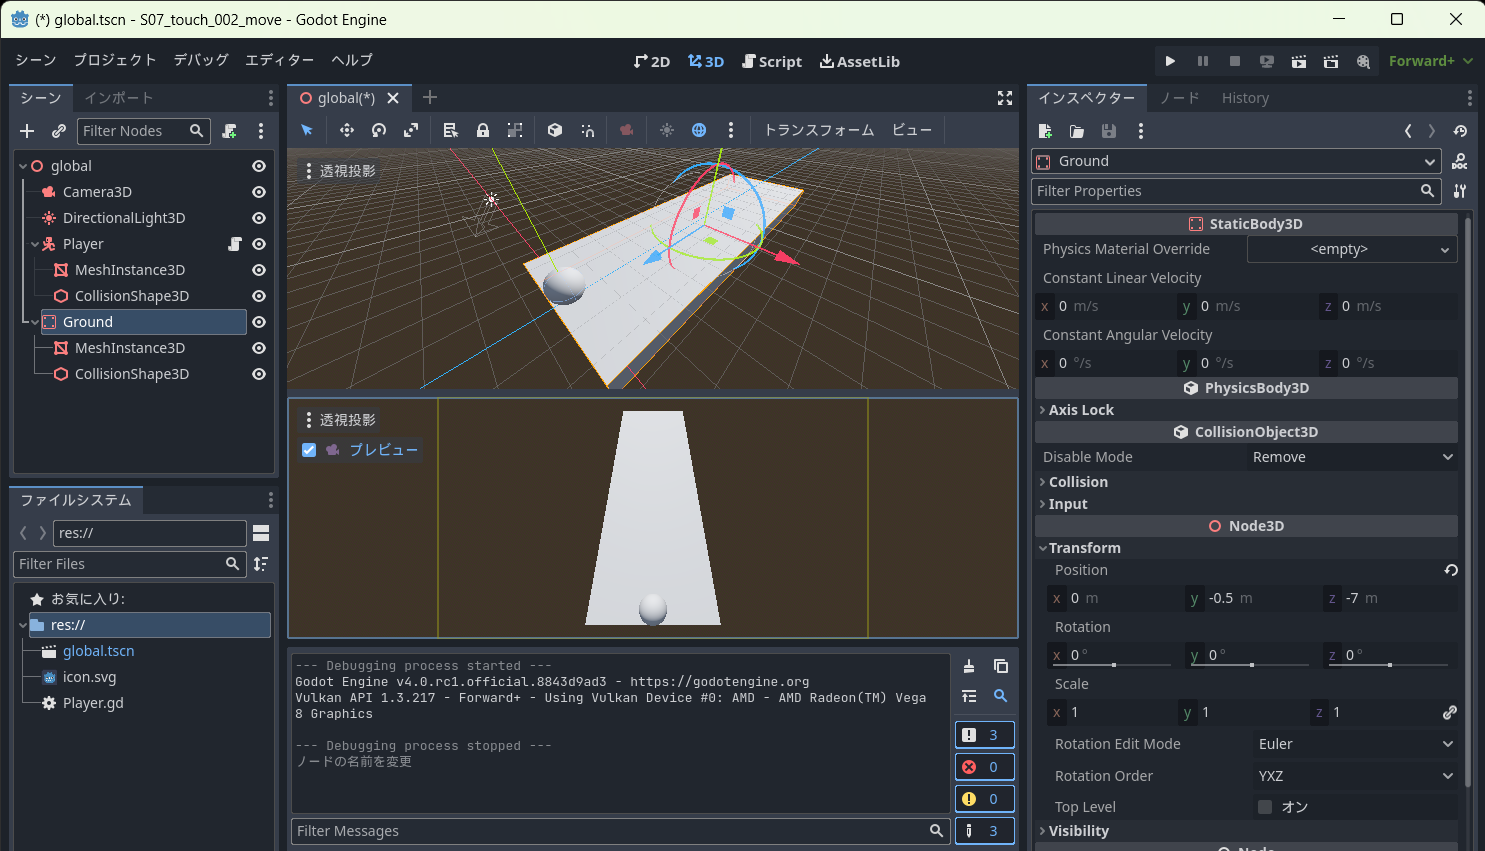
実行しましょう。
床をクリックすると"collider": Groundと表示されます。
{ "position": (2.374918, 0, 0.186289), "normal": (0, 1, 0), "collider_id": 26390561188, "collider": Ground:<StaticBody3D#26390561188>, "shape": 0, "rid": RID(3955664879617) }
球をクリックすると"collider": Playerと表示されます。
{ "position": (0.946409, 0.999832, 0.01295), "normal": (0, 0.999665, 0.0259), "collider_id": 26340230164, "collider": Player:<CharacterBody3D#26340230164>, "shape": 0, "rid": RID(3929895075840) }
どちらをクリックしてもglobal座標系のX座標が取得できれば良いです。
タッチしたところに球を移動する
Playerのスクリプトを開いて下記のように修正します。
extends CharacterBody3D

@export var m_speed_mps = 5.0
@export var m_ray_length_m = 1000		# [m]十分な長さにする
var m_touch_pos = Vector2.ZERO
var m_d_move_to_pos_x_m = 0

func _input(event):
	if ( event is InputEventScreenDrag ) or ( event is InputEventScreenTouch ):
		m_touch_pos = event.position

func _physics_process(delta):
	var camera = get_viewport().get_camera_3d()

	# カメラを利用して3D空間のカメラ位置とタッチしたピクセルに対応する方向の1000m先の位置を計算する
	var from3d = camera.project_ray_origin(m_touch_pos)
	var to3d = from3d + camera.project_ray_normal(m_touch_pos) * m_ray_length_m

	# 3D ray physics queryの作成
	var query = PhysicsRayQueryParameters3D.create(from3d, to3d)
	query.collide_with_areas = true		# Area3Dを検知できるようにする

	# Godotの3Dの物理とコリジョンを保存しているspaceという情報を使用してオブジェクト検出
	var space_state = get_world_3d().direct_space_state
	var result = space_state.intersect_ray(query)
	if result:
		m_d_move_to_pos_x_m = result.position.x

	# 移動制御は毎周期実行する
	var d_diff_x_m = (m_d_move_to_pos_x_m - transform.origin.x);
	var d_speed_mps = m_speed_mps if d_diff_x_m>0 else -m_speed_mps
	var d_move_diff_x_m = d_speed_mps * delta
	if absf(d_move_diff_x_m) > absf(d_diff_x_m):
		# 移動すると目標位置を超えるため、目標位置を設定する
		transform.origin.x = m_d_move_to_pos_x_m
	else:
		move_and_collide(Vector3(d_move_diff_x_m, 0, 0))
メンバ変数の追加
-
@export var m_speed_mps = 5.0
左右に移動する速度を設定します。インスペクタから変更できるように「@export」しています。

-
var m_d_move_to_pos_x_m = 0
目標移動位置 x座標を保存するメンバ変数です。
_inputメソッドの修正
- m_d_move_to_pos_x_m = result.position.x
resultが設定されている(タッチ検出した)場合、検出位置のx座標を保存します。
_physics_processの修正
- var d_diff_x_m = (m_d_move_to_pos_x_m - transform.origin.x);
目標位置と現在のX座標の差分を計算します。 - var d_speed_mps = m_speed_mps if d_diff_x_m>0 else -m_speed_mps
d_diff_x_mがプラスの場合は目標位置がX座標プラス側(画面右側)にあるため、プラスの速度で保存します。
そうではない(0以上の場合)は目標位置と同一もしくはX座標マイナス側(画面左側)にあるため、マイナスの速度で保存します。 - var d_move_diff_x_m = d_speed_mps * delta
速度にdeltaをかけて、前回から今回の時間分の移動距離を計算します。 - if absf(d_move_diff_x_m) > absf(d_diff_x_m):
absで絶対値をとり、移動距離(d_move_diff_x_m)分移動すると目標位置を跳び越すか判定します。 - transform.origin.x = m_d_move_to_pos_x_m
目標位置を跳び越すと判定した場合、目標位置に到達したということですので、目標位置を代入します。
目標位置を跳び越すと、次の周期は反対方向に目標位置を跳び越してを繰り返すようになり、見た目はぶるぶる震えるようになります。
- else:
- move_and_collide(Vector3(d_move_diff_x_m, 0, 0))
目標位置まで十分な距離がある場合、移動指示をします。
move_and_slideを使用する場合は下記のようにします。
		velocity = Vector3( Vector3(speed_mps, 0, 0) )
		move_and_slide()
おまけ
このqueryは単に3D空間の2点を設定しているだけなので、2点の間に障害物がないかどうかの判定にも使えそうですね。
var query = PhysicsRayQueryParameters3D.create(from3d, to3d)
以上