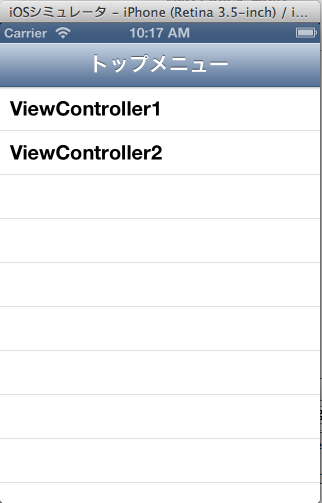
アプリケーションを起動したところ。
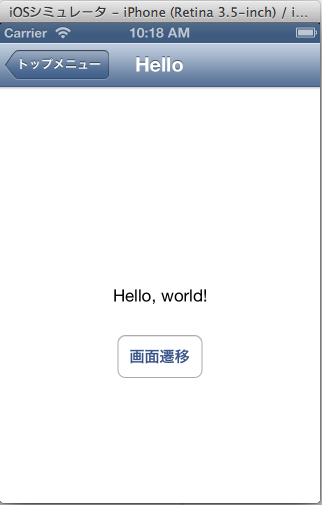
ViewController1をタッチして画面が遷移したところ。
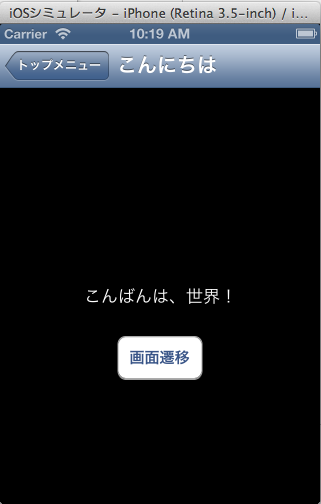
前の画面に戻り、ViewController2をタッチして画面が遷移したところ。
このようなアプリケーションを作ることにする。
まず以下記事を参照に2画面の遷移を実装する。
XIBやストーリーボードを使わずにEmpty Projectに画面を2つ追加し、お互いに画面遷移させるには #Objective-C #iOS - Qiita [キータ] http://qiita.com/items/9eaf6c7d9a04081e3ffc
上記記事をベースに変更を行い、ボタンで遷移していたのを、NavigationControllerを使って遷移するようにする。
ファイルの構成としては、以下のようになる:
- AppDelegate.h/m(アプリケーション本体)
- TopMenuController.h/m(最初に表示されるテーブルビュー)
- ViewController1.h/m(遷移先のビューの1つ目)
- ViewController2.h/m(遷移先のビューの2つ目)
- アプリケーション本体を書く
AppDelegate.m
〜中略〜

- (BOOL)application:(UIApplication *)application didFinishLaunchingWithOptions:(NSDictionary *)launchOptions
{
    self.window = [[[UIWindow alloc] initWithFrame:[[UIScreen mainScreen] bounds]] autorelease];
    // Override point for customization after application launch.

    // 次の2行を追加
    TopMenuController* topMenu = [[[TopMenuController alloc] init] autorelease];
    self.window.rootViewController = [[UINavigationController alloc] initWithRootViewController:topMenu];

//    self.window.backgroundColor = [UIColor whiteColor];
    [self.window makeKeyAndVisible];
    return YES;
}

〜中略〜
- 最初に表示されるテーブルビューを作る
[New File]->
[Objective-C Class]->
[Class名]TopMenuController
[SubClass of]TableViewController
TopMenuController.h
# import <UIKit/UIKit.h>

@interface TopMenuController : UITableViewController
@property (strong) NSMutableArray* items;

@end
TopMenuController.m
〜中略〜

- (id)initWithStyle:(UITableViewStyle)style
{
    self = [super initWithStyle:style];
    if (self) {
        // Custom initialization
        self.title = @"トップメニュー";
        _items = [[NSMutableArray alloc] initWithObjects:
                  @"ViewController1", @"ViewController2", nil];
        NSLog(@"%@", _items);
    }
    return self;
}

〜中略〜

- (NSInteger)numberOfSectionsInTableView:(UITableView *)tableView
{
# warning Potentially incomplete method implementation.
    // Return the number of sections.
    return 1;
}

- (NSInteger)tableView:(UITableView *)tableView numberOfRowsInSection:(NSInteger)section
{
    // Return the number of rows in the section.
    NSLog(@"%d", _items.count);
    return _items.count;
}

- (UITableViewCell *)tableView:(UITableView *)tableView cellForRowAtIndexPath:(NSIndexPath *)indexPath
{
    static NSString *CellIdentifier = @"Cell";
    UITableViewCell *cell = [tableView dequeueReusableCellWithIdentifier:CellIdentifier];

    // Configure the cell...
    if (!cell) {
        cell = [[[UITableViewCell alloc] initWithStyle:UITableViewCellStyleDefault
                                       reuseIdentifier:@"Cell"] autorelease];
    }
    cell.textLabel.text = [_items objectAtIndex:indexPath.row];
    NSLog(@"%d", indexPath.row);

    return cell;
}

〜中略〜

- (void)tableView:(UITableView *)tableView didSelectRowAtIndexPath:(NSIndexPath *)indexPath
{
    // Navigation logic may go here. Create and push another view controller.
    /*
     <#DetailViewController#> *detailViewController = [[<#DetailViewController#> alloc] initWithNibName:@"<#Nib name#>" bundle:nil];
     // ...
     // Pass the selected object to the new view controller.
     [self.navigationController pushViewController:detailViewController animated:YES];
     [detailViewController release];
     */

    Class class = NSClassFromString([_items objectAtIndex:indexPath.row]);
//    id viewController = [[[class alloc] initWithNibName:nil bundle:nil] autorelease];
    id viewController = [[[class alloc] init] autorelease];
    if (viewController) {
        [self.navigationController pushViewController:viewController animated:YES];
    }
}

〜中略〜
ブログやってます:PAPA-tronix !