前提条件
- Laravelをローカルでデプロイヤーとしてdeployerを利用している(公開鍵を利用)
やりたいの
- ローカルでのdeployerを利用するデプロイはそのまま使用可能
- Actionsを利用したデプロイもdeployerを利用
- Staging環境のデプロイはbranchのpushで自動デプロイ
- 本番環境のデプロイは手動デプロイ
環境周りの設定
Githubへ公開鍵の設定
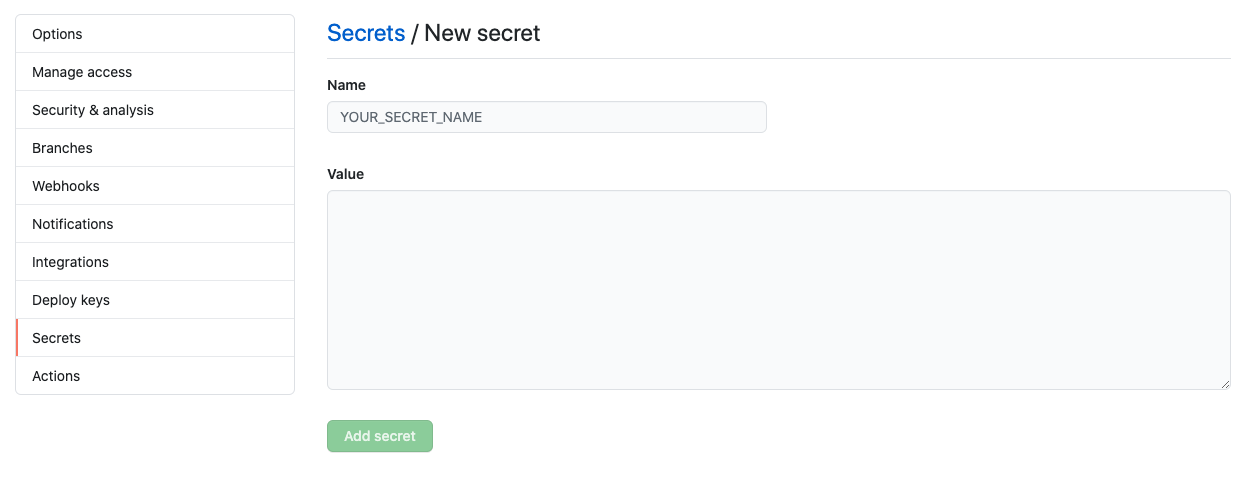
利用するレポジトリの「Settings > Secrets」に入って、「New secret」クリックし公開鍵を登録します。

- Name:SSH_DEPLOY_KEY
- Value:ローカルのDeployerで使用している鍵(.pubでない方)の中身をコピーして入れる
サーバーでの設定
CIで実装されるので、「やりたいの」で書いた公開鍵を利用したsshの接続することと同様にDeployerの実行の中でGithubからのソースのcloneする際にもパスワードが入力しなくても可能にする必要が有ります。
サーバーで以下の作業が必要です。
公開鍵の作成
鍵を入れるフォルダに移動しましょう。
$cd ~/.ssh
はじめて鍵を生成するときは何もないはずです。次のコマンドで鍵を生成します。
$ssh-keygen -t rsa
他のオプションを利用しても良いですが、ここでは一番簡単な感じでやります。
$ ssh-keygen -t rsa
Generating public/private rsa key pair.
Enter file in which to save the key (/Users/(username)/.ssh/id_rsa):
Enter passphrase (empty for no passphrase):
Enter same passphrase again:
鍵のファイル名やパスワードを聞かれますが、3回エンターを押して飛ばします。
id_rsaとid_rsa.pubの2つの鍵が生成されます。既にid_rsaが存在する人は上書きされてしまうので注意です。
Githubで鍵の登録
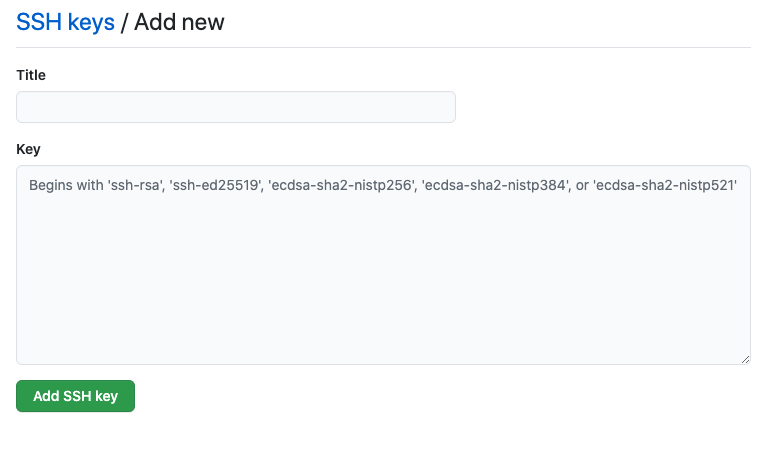
Githubに入って上記で作成した鍵を登録します。https://github.com/settings/sshで公開鍵の設定が出来ます。
ローカルのデプロイでも使用していれば既に登録されている物があると思います。画面右上の「Add SSH key」のボタンを押します。

- Title:公開鍵名(任意)
- Key:公開鍵の中身
なお、鍵の中身のクリップボードへのコピーは以下の感じです。鍵の名前は自分の作成したもの。
$ pbcopy < ~/.ssh/id_rsa.pub (Mac)
$ clip < ~/.ssh/id_rsa.pub (Windows)
接続のテスト
サーバーで以下を実行してみます。
$ ssh -T git@github.com
Hi (account名)! You've successfully authenticated, but GitHub does not provide shell access.
で返ってきたら接続が可能とことです。
しかし、鍵を作るときに名前を指定していれば、うまくいかないかもしれません。それは、ssh接続の際「~/.ssh/id_rsa」、「~/.ssh/id_dsa」、「~/.ssh/identity」しかデフォルトでは見にいかないからです。
それに対応するためには~/.ssh/configを作成し、以下の内容を追記します。
Host github github.com
  HostName github.com
  IdentityFile ~/.ssh/id_rsa #ここに自分の鍵のファイル名
  User git
テスト!!
$ ssh -T github
Actionsのworkflowを作成
対象リポジトリの「Actions」に入って新しくTempleteを利用して作成しても良いです。
トリガーの部分
Staging
Stagingは要求内容にも書いてますが、特にエンジニアーが管理する必要がないかと思いましてgitにPushするタイミングでデプロイが動くと良いかと思いました。
name: deploy dev

on:
  push:
    branches:
      - deploy/dev
production
本番の場合はGitのPushミス等の可能性でエンジニアーが手動でする必要があるかと思いましたので、以下のトリガーにしました。
name: deploy pro

on:
  workflow_dispatch:
    branches:
      - deploy/pro
テストの部分
他の記事や資料、Githubのテンプレートではphpunitを利用する例が多です。
jobs:
  laravel-tests:

    runs-on: ubuntu-latest

    steps:
    - uses: actions/checkout@v2
    - name: Copy .env
      run: php -r "file_exists('.env') || copy('.env.example', '.env');"
    - name: Install Dependencies
      run: composer install -q --no-ansi --no-interaction --no-scripts --no-progress --prefer-dist
    - name: Generate key
      run: php artisan key:generate
    - name: Directory Permissions
      run: chmod -R 777 storage bootstrap/cache
    - name: Create Database
      run: |
        mkdir -p database
        touch database/database.sqlite
    - name: Execute tests (Unit and Feature tests) via PHPUnit
      env:
        DB_CONNECTION: sqlite
        DB_DATABASE: database/database.sqlite
      run: vendor/bin/phpunit
でも今回はウェブの状態を確認するように構成してみました。以下のように書きました。
jobs:
  test:
    name: serve test
    runs-on: ubuntu-latest

    services:
      mysql:
        image: mariadb:10.4.11
        ports:
          - 3306:3306
        options: --health-cmd "mysqladmin ping -h localhost" --health-interval 20s --health-timeout 10s --health-retries 10
        env:
          MYSQL_ROOT_PASSWORD: pass
          MYSQL_DATABASE: db_sample

    env:
      DB_CONNECTION: mysql
      DB_HOST: 127.0.0.1
      DB_PORT: 3306
      DB_DATABASE: db_sample
      DB_USERNAME: root
      DB_PASSWORD: pass

    steps:
      - uses: actions/checkout@v2
      - name: cache vendor
        id: cache
        uses: actions/cache@v1
        with:
          path: ./vendor
          key: ${{ runner.os }}-composer-${{ hashFiles('**/composer.lock') }}
          restore-keys: |
            ${{ runner.os }}-composer-
      - name: composer install
        if: steps.cache.outputs.cache-hit != 'true'
        run: composer install -n --prefer-dist
      - name: copy .env
        run: cp .env.ci .env
      - name: generate key
        run: php artisan key:generate
      - name: Directory Permissions
        run: chmod -R 777 storage bootstrap/cache
      - name: migrate
        run: php artisan migrate
      - name: run serve
        run: |
          php artisan serve &
          sleep 5
      - name: test
        run: curl -vk http://localhost:8000
.env.ciファイルは既存のローカル環境で使用している物を再利用しました。
デプロイの部分
jobかstepに以下のような条件で分けることで共通化も可能でしたが、今回トリガーで分けるのでファイル次第が別にするしかなかったです。
if: github.ref == 'refs/heads/deploy/staging' <- ブランチが「deploy/staging」の場合
以下になりました。
  deploy:
    name: deploy
    runs-on: ubuntu-latest
    needs: test

    steps:
      - uses: actions/checkout@v2
      - name: cache vendor
        id: cache
        uses: actions/cache@v1
        with:
          path: ./vendor
          key: ${{ runner.os }}-composer-${{ hashFiles('**/composer.lock') }}
          restore-keys: |
            ${{ runner.os }}-composer-
      - name: composer install
        if: steps.cache.outputs.cache-hit != 'true'
        run: composer install -n --prefer-dist
      - name: ssh_key copy
        run: |
          mkdir -p /home/runner/.ssh
          touch /home/runner/.ssh/deployerで設定されているファイル名
          echo "${{ secrets.SSH_DEPLOY_KEY }}" > /home/runner/.ssh/deployerで設定されているファイル名
          chmod 600 /home/runner/.ssh/deployerで設定されているファイル名
      - name: add known hosts
        run: ssh-keyscan サーバーIP >> ~/.ssh/known_hosts
      - name: install deploy
        run: |
          curl -LO https://deployer.org/deployer.phar
          mv deployer.phar ./deployer/dep
          chmod +x ./deployer/dep
      - name: deploy dev
        run: cd ./deployer && ./dep deploy dev -vvv
- .deployer:deployerの設定が入っているフォルダーで、laravelプロジェクト/deployerの感じで設定されている状況です。
- dep deploy dev:deployerで設定されているstage名「->stage('dev')」です。
欲しい機能
本番のデプロイをトリガーで手動でしているのでファイルが別々になって共通的な部分が再利用されない状況です。CircleCIかBitbucketのPipelineのように手動でデプロイする他の方があるかとjob等を他のymlファイルをインクルード等出来れば良いかと思いました。
