はじめに
Dynamixel(ROBOTIS社製)は手軽に制御できる人気のサーボモータであり,ROSにも対応しています.
しかしながら,公式で配布されているROSコントローラパッケージは(個人的な意見ではありますが)少々使いづらく,もっと手軽に使用できるようにしたいと考えていました.
この記事では,動かすための環境構築とより手軽に扱えるようにするためのコントローラの作成方法をまとめておきます.
(なお,今回の記事では環境構築のみを行います.)
実行環境
OS: Ubuntu18.04
ボード:OpenCR
モータ:XM540-W270-R×2,XM430-W210-R×1の計3つ
必要パッケージをクローン&ビルド
新しくフォルダを作成し,必要なパッケージをcloneしてビルドします.
$ cd catkin_ws/src
$ mkdir my_dynamixel_pkgs
$ cd my_dynamixel_pkgs

$ git clone https://github.com/ROBOTIS-GIT/dynamixel-workbench.git
$ git clone https://github.com/ROBOTIS-GIT/dynamixel-workbench-msgs.git
$ git clone https://github.com/ROBOTIS-GIT/DynamixelSDK.git

$ catkin build
ビルド環境の構築
$ sudo apt install build-essential
$ sudo apt install gcc-multilib g++-multilib
USB portの設定
OpenCRにファームウェアを書き込む際に必要な設定を行う.
$ wget https://raw.githubusercontent.com/ROBOTIS-GIT/OpenCR/master/99-opencr-cdc.rules
$ sudo cp ./99-opencr-cdc.rules /etc/udev/rules.d/
$ sudo udevadm control --reload-rules
$ sudo udevadm trigger
コンパイラの設定
OpenCR用のライブラリをは32bit用に記述されているので,64bitPCでは以下を実行する
sudo apt install libncurses5-dev:i386
ArduinoIDEの導入
ArduinoIDEのインストールファイルをダウンロードする.
ダウンロード先は以下のサイトから.
今回は「Linux 64bit」を選択.
https://www.arduino.cc/en/software
インストールフォルダ(arduino-1.8.13-linux64.tar.xz)を移動し,解凍,インストールを行う.
$ tar Jxfv arduino-1.8.13-linux64.tar.xz
$ cd arduino-1.8.13
$ sudo ./install.sh
ArduinoIDEでファームウェアをアップデートする際に不都合なことが起こるのを防ぐために以下を実行
$ sudo apt purge modemmanager
以下のコマンドを実行してarduinoが無事起動すればOK.
$ arduino
ArduinoIDEの設定
OpenCR用ライブラリのインポート
ArduinoIDEを実行し,
「ファイル」→「環境設定」→「追加のボードマネージャのURL」に以下を記入.
これでOpenCRのライブラリがインポートされる.
https://raw.githubusercontent.com/ROBOTIS-GIT/OpenCR/master/arduino/opencr_release/package_opencr_index.json
完了したらArduinoIDEを再起動し設定を反映させる.
もう一度開き,
「ツール」→「ボード:Arduino Uno」→「ボードマネージャ」
を選択し,検索欄に
「OpenCR」と入力して出てくるライブラリをインストール.
ファームウェアの書き込み
OpenCR経由でDynamixelをROSノードで動かす場合,OpenCRのファームウェアを書き換える必要があるため,ここではその手順を説明します.
まず,OpenCRをPCに接続し,ArduinoIDEで以下2点を行う.
・「ツール」→「シリアルポート」から「/dev/ttyACM0」を選択
・「ツール」→「ボード」から「OpenCR Board」を選択
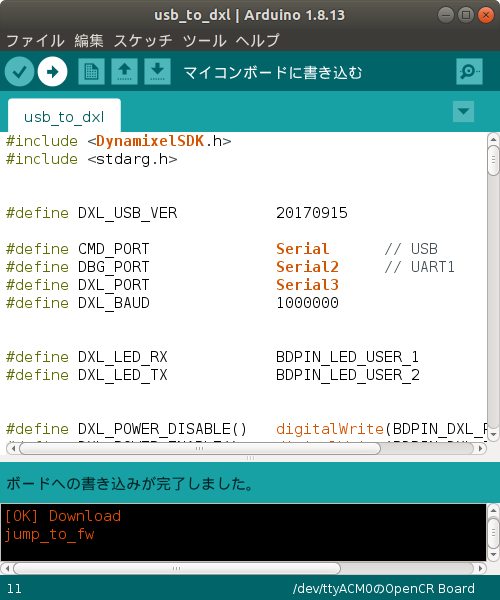
上記が完了したらファームウェアのプログラムを開く.
「ファイル」→「スケッチ例」→「OpenCR」→「10.Etc」→「usb_to_dxl」
開けたら左上の矢印の部分をクリックしてファームウェアを書き込みます.

以上でDynamixelをROSに接続するための準備は完了です.
OpenCRにDynamixelを接続し,以下のノードを実行します.
ポート名が異なる場合は適宜読み替えて下さい.
$ rosrun dynamixel_workbench_controllers find_dynamixel /dev/ttyACM0
DynamixelのID・baudrateを変更したい場合は,ArduinoIDEのスケッチ例にあるプログラムを使用する.
・IDを変更したい場合は
「ファイル」→「スケッチ例」→「OpenCR」→「08.DynamixelWorkbench」→「c_ID_Change」
・Baudrateを変更したい場合は
「ファイル」→「スケッチ例」→「OpenCR」→「08.DynamixelWorkbench」→「d_BPS_Change」
まとめ
とりあえずDynamixelをROSノードで動かす準備は大体整ったので,次回の記事で実際に動かしてみる.


