概要
choreonoid_ros_controlをTankモデルに適用したサンプルがchoreonoidのドキュメントに記載されていますが,「自分のロボットに適用するにはどうしたらいいか」が分からなかったため,色々調べた結果を記事として発表します.
今回の記事では新しくロボットモデルを作成しますが,使用するモデルをすでに作成済みの方は
・ ros_controlの設定
をご覧ください.
また,今回作成するパッケージのリンクを貼っておきます.
作成するのが面倒な方はこちらからどうぞ.
準備
事前準備として,choreonoidのドキュメントに沿って導入を済ませてください.
・ [Choreonoidドキュメント開発版 - ROS版Choreonoidの導入]
(https://choreonoid.org/ja/manuals/latest/ros/build-choreonoid.html)
・ Choreonoidドキュメント開発版 - choreonoid_ros_controlの導入
今回使用するパッケージは
・ choreonoid(リンク)
・ choreonoid_ros(リンク)
・ choreonoid_ros_control(リンク)
の3つです.
テスト用パッケージの作成
choreonoid_ros_controlを試すためのパッケージを作成します.
以下,ROSのワークスペースを「choreonoid_ws」,パッケージ名を「choreonoid_ros_control_sample」とします.
名前が異なる場合は適宜読み替えてください.
$ cd ~/choreonoid_ws/src
$ catkin_create_pkg choreonoid_ros_control_sample roscpp std_msgs
package.xmlの編集
作成したパッケージの中にあるpackage.xmlを以下のように編集します.
<?xml version="1.0"?>
<package format="2">
// 省略 --------------------
  <buildtool_depend>catkin</buildtool_depend>
  <build_depend>roscpp</build_depend>
  <build_depend>std_msgs</build_depend>
  <build_export_depend>roscpp</build_export_depend>
  <build_export_depend>std_msgs</build_export_depend>
  <exec_depend>roscpp</exec_depend>
  <exec_depend>std_msgs</exec_depend>
  <exec_depend>choreonoid</exec_depend>
  <exec_depend>choreonoid_ros</exec_depend>
  <exec_depend>controller_interface</exec_depend>
  <exec_depend>controller_manager</exec_depend>
  <exec_depend>joint_state_controller</exec_depend>
  <exec_depend>robot_state_publisher</exec_depend>
  <exec_depend>ros_control</exec_depend>
  <exec_depend>ros_controllers</exec_depend>

  <export>
  </export>
</package>
編集が完了したら,一度パッケージをビルドしておきましょう.
$ catkin build
ロボットモデルの作成
パッケージの作成が完了したら,次はロボットのモデルを作成しましょう.
choreonoid_ros_controlでロボットモデルを動かす場合,Choreonoid用のモデル(bodyファイル)の他に
urdfもしくはxacroで書かれたロボットモデルを用意する必要があります.
今回は単純な2自由度の脚モデル「simple_leg」を作成します.
Choreonoid用のモデル作成
パッケージの中にmodelフォルダを作成し,その中にbodyファイルを生成します.
$ cd ~/choreonoid_ws/src/choreonoid_ros_control_sample
$ mkdir model
$ cd model
$ touch simple_leg.body
作成したbodyファイルに以下を記述します.
format: ChoreonoidBody
formatVersion: 1.0
angleUnit: degree
name: simple_leg
rootLink: BaseLink

# Constants
key: &Baselink_x  0.1
key: &Baselink_y  0.1
key: &Baselink_z  0.1
key: &l_2         0.075
key: &l_2m       -0.075
key: &Tip_radius  0.025

# Description of robot
links:
  - # BaseLink
    name: BaseLink
    jointType: fixed
    translation: [0, 0, 0.30]
    centerOfMass: [0, 0, 0]
    mass: 5.0
    inertia: [
      5.0, 0,   0,
      0,   5.0, 0,
      0,   0,   5.0
    ]
    elements:
      -
        type: Shape
        geometry:
          type: Box
          size: [*Baselink_x, *Baselink_y, *Baselink_z]
        appearance:
          material:
            diffuseColor: [0, 0.2, 0.5]

  - # Hip
    name: Hip
    parent: BaseLink
    translation: [0, 0, 0]
    rotation: [0, 1, 0, -90]
    jointType: revolute
    jointAxis: Y
    jointRange: [-90, 90]
    maxJointVelocity: 30
    jointId: 0
    centerOfMass: [0, 0, 0]
    mass: 0.1
    inertia: [
      0.1,  0,    0,
      0,    0.1,  0,
      0,    0,    0.1
    ]
    elements:
      -
        type: Shape
        geometry: &JointGeometry
          type: Cylinder
          height: 0.05
          radius: 0.025
        appearance: &JointAppearance
          material:
            diffuseColor: [0.9, 0, 0]
      -
        type: ForceSensor
        name: HipForceSensor
        id: 0

  - # Upper Thigh
    name: UpperThigh
    parent: Hip
    rotation: [0, 0, 1, -90]
    translation: [*l_2m, 0, 0]
    centerOfMass: [0, 0, 0]
    mass: 1.0
    inertia: [
      1.0, 0,   0,
      0,   1.0, 0,
      0,   0,   1.0
    ]
    elements:
      Shape:
        geometry: &LinkGeometry
          type: Box
          size: [0.05, 0.1, 0.05]
        appearance: &LinkAppearance
          material:
            diffuseColor: [0.9, 0.9, 0.9]

  - # Knee
    name: Knee
    parent: UpperThigh
    translation: [0, *l_2m, 0]
    rotation: [0, 0, 1, -90]
    jointType: revolute
    jointAxis: -Y
    jointRange: 150
    jointId: 1
    centerOfMass: [0, 0, 0]
    mass: 0.1
    inertia: [
      0.1, 0,   0,
      0,   0.1, 0,
      0,   0,   0.1
    ]
    elements:
      -
        type: Shape
        geometry: *JointGeometry
        appearance: *JointAppearance
      -
        type: ForceSensor
        name: KneeForceSensor
        id: 1


  - # Lower Thigh
    name: LowerThigh
    parent: Knee
    rotation: [0, 0, 1, 90]
    translation: [*l_2, 0, 0]
    centerOfMass: [0, 0, 0]
    mass: 1.0
    inertia: [
      1.0, 0,   0,
      0,   1.0, 0,
      0,   0,   1.0
    ]
    elements:
      Shape:
        geometry: *LinkGeometry
        appearance: *LinkAppearance

  - # Tip
    name: Tip
    parent: LowerThigh
    translation: [0, *l_2m, 0]
    rotation: [0, 0, 1, 90]
    centerOfMass: [0, 0, 0]
    mass: 0.01
    inertia: [
      0.01, 0,    0,
      0,    0.01, 0,
      0,    0,    0.01
    ]
    elements:
      -
        type: Shape
        geometry: &TipGeometry
          type: Sphere
          radius: *Tip_radius
        appearance: &TipAppearance
          material:
            diffuseColor: [0, 0.8, 0.8]
bodyファイルを編集できたら,モデルを確認してみましょう.
ROSマスターを起動した状態で以下を実行し,choreonoidを起動させます.
$ rosrun choreonoid_ros choreonoid
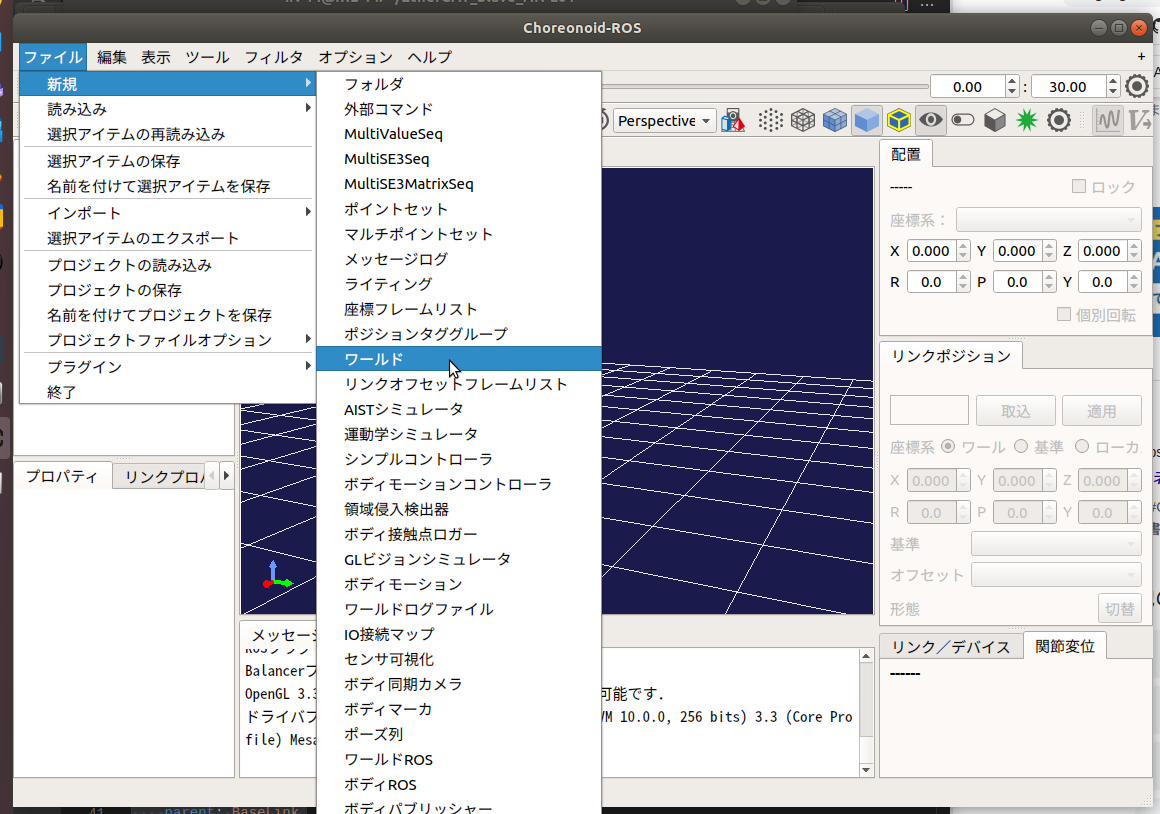
左上のタブから
「ファイル」→「新規」→「ワールド」を選択し,ワールドを生成します.
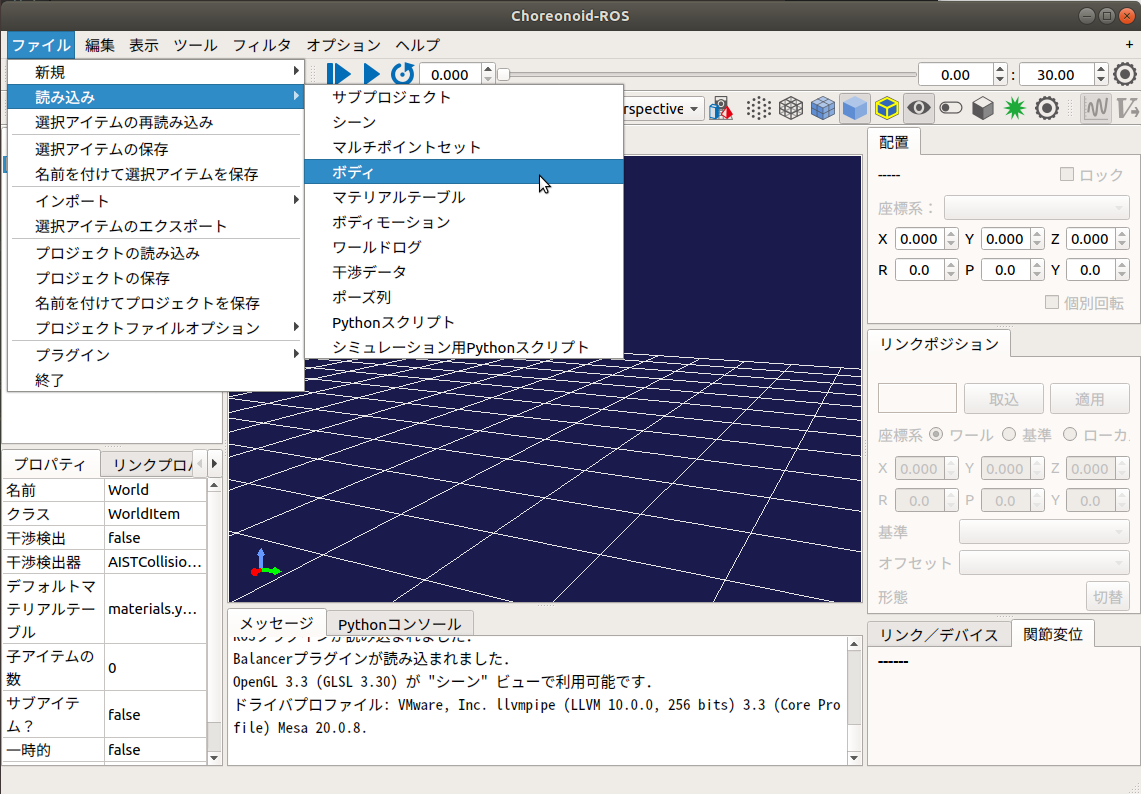
次に,先程生成したワールドの配下に作成したモデルを配置します.
「World」を選択した状態で,左上のタブから
「ファイル」→「読み込み」→「ボディ」を選択し,作成した「simple_leg.body」を指定します.
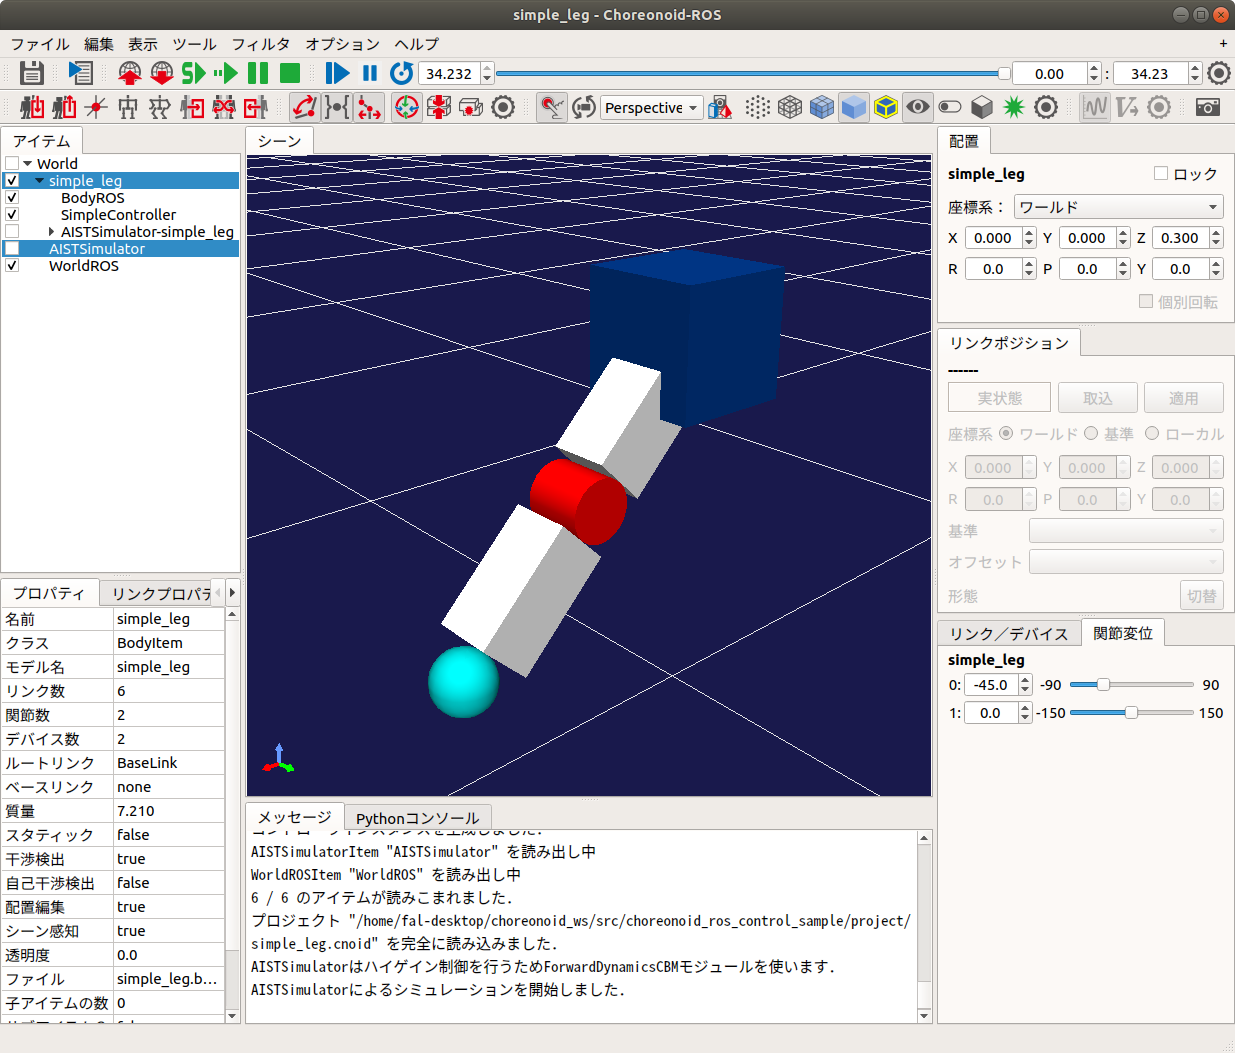
今回の例だとこんな感じの画面になります.

以上でchoreonoidモデルの作成は完了ですが,せっかくなのでChoreonoidのプロジェクトファイルを保存しておきましょう.
保存先は,「choreonoid_ros_control_sample/project/simple_leg.cnoid」で.
(projectフォルダを生成するのを忘れずに!)
xacroファイルの作成
Choreonoid用のモデルを作成し終わったら,次はxacroでロボットモデルを作成します.
以下を実行しモデルファイルを生成します.
$ cd ~/choreonoid_ws/src/choreonoid_ros_control_sample
$ mkdir xacro
$ touch simple_leg.xacro
simple_leg.xacroの中身を以下のように編集します.
<?xml version="1.0"?>
<robot name="simple_leg" xmlns:xacro="http://www.ros.org/wiki/xacro">
	<!-- Constants -->
	<xacro:property name="Baselink_x" value="0.1"/>
    <xacro:property name="Baselink_y" value="0.1"/>
    <xacro:property name="Baselink_z" value="0.1"/>
	<xacro:property name="l1" value="0.15"/>
    <xacro:property name="l2" value="0.15"/>

	<!-- Color settings -->
    <material name="red">
        <color rgba="1.0 0.0 0.0 2.0"/>
    </material>
    <material name="blue">
        <color rgba="0.0 0.0 1.0 2.0"/>
    </material>
    <material name="white">
        <color rgba="1.0 1.0 1.0 2.0"/>
    </material>

	<!-- Description of robot -->
	<link name="world"/>

	<!-- Baselink -->
	<joint name="Base_joint" type="fixed">
		<parent link="world"/>
		<child link="Base_link"/>
		<origin rpy="0 0 0" xyz="0 0 0.3"/>
	</joint>
	<link name="Base_link">
		<visual>
			<origin rpy="0 0 0" xyz="0 0 0"/>
			<geometry>
				<box size="${Baselink_x} ${Baselink_y} ${Baselink_z}"/>
			</geometry>
			<material name="blue"/>
		</visual>
		<collision>
			<origin rpy="0 0 0" xyz="0 0 0"/>
			<geometry>
				<box size="${Baselink_x} ${Baselink_y} ${Baselink_z}"/>
			</geometry>
		</collision>
		<inertial>
			<mass value="5.0"/>
			<inertia ixx="5.0" ixy="0" ixz="0" iyy="5.0" iyz="0" izz="5.0"/>
		</inertial>
	</link>

	<!-- Hip_joint & UpperThigh_link -->
	<joint name="Hip" type="revolute">
		<parent link="Base_link"/>
		<child link="UpperThigh"/>
		<axis xyz="0 1 0"/>
		<origin rpy="0 0 0" xyz="0 0 0"/>
		<limit effort="1000" lower="${radians(-90)}" upper="${radians(90)}" velocity="100.0"/>
	</joint>
	<link name="UpperThigh">
		<visual>
			<origin rpy="0 0 0" xyz="0 0 -${l1/2}"/>
			<geometry>
				<box size="0.05 0.05 ${l1}"/>
			</geometry>
			<material name="white"/>
		</visual>
		<collision>
			<origin rpy="0 0 0" xyz="0 0 -${l1/2}"/>
			<geometry>
				<box size="0.05 0.05 ${l1}"/>
			</geometry>
		</collision>
		<inertial>
			<mass value="1.0"/>
			<inertia ixx="1.0" ixy="0" ixz="0" iyy="1.0" iyz="0" izz="1.0"/>
		</inertial>
	</link>


	<!-- Knee_joint & LowerThigh_link -->
	<joint name="Knee" type="revolute">
		<parent link="UpperThigh"/>
		<child link="LowerThigh"/>
		<axis xyz="0 1 0"/>
		<origin rpy="0 0 0" xyz="0 0 -${l1}"/>
		<limit effort="1000" lower="${radians(-90)}" upper="${radians(90)}" velocity="100.0"/>
	</joint>
	<link name="LowerThigh">
		<visual>
			<origin rpy="0 0 0" xyz="0 0 -${l2/2}"/>
			<geometry>
				<box size="0.05 0.05 ${l2}"/>
			</geometry>
			<material name="white"/>
		</visual>
		<collision>
			<origin rpy="0 0 0" xyz="0 0 -${l2/2}"/>
			<geometry>
				<box size="0.05 0.05 ${l2}"/>
			</geometry>
		</collision>
		<inertial>
			<mass value="1.0"/>
			<inertia ixx="1.0" ixy="0" ixz="0" iyy="1.0" iyz="0" izz="1.0"/>
		</inertial>
	</link>

	<!-- Actuator Settings -->
	<transmission name="Hip_trans"  type="SimpleTransmission">
		<type>transmission_interface/SimpleTransmission</type>
		<joint name="Hip">
			<hardwareInterface>hardware_interface/PositionJointInterface</hardwareInterface>
		</joint>
		<actuator name="Hip_motor">
			<hardwareInterface>hardware_interface/PositionJointInterface</hardwareInterface>
			<mechanicalReduction>1</mechanicalReduction>
		</actuator>
	</transmission>

	<transmission name="Knee_trans"  type="SimpleTransmission">
		<type>transmission_interface/SimpleTransmission</type>
		<joint name="Knee">
			<hardwareInterface>hardware_interface/PositionJointInterface</hardwareInterface>
		</joint>
		<actuator name="Knee_motor">
			<hardwareInterface>hardware_interface/PositionJointInterface</hardwareInterface>
			<mechanicalReduction>1</mechanicalReduction>
		</actuator>
	</transmission>

	<gazebo><!-- Do I have to write it down? -->
		<plugin name="gazebo_ros_control" filename="libgazebo_ros_control.so">
			<robotNamespace>/simple_leg</robotNamespace>
			<robotSimType>gazebo_ros_control/DefaultRobotHWSim</robotSimType>
		</plugin>
	</gazebo>
	<!-- Gazebo color setting -->
	<gazebo reference="Baselink">
		<material>Gazebo/Blue</material>
	</gazebo>

	<gazebo reference="UpperThigh">
		<material>Gazebo/White</material>
	</gazebo>

	<gazebo reference="LowerThigh">
		<material>Gazebo/White</material>
	</gazebo>
</robot>
書き方はbodyファイルと少々異なりますが,基本的なパラメータはsimple_leg.bodyと同じにしています.
ここで,choreonoid_ros_controlを使用する場合は
「xacroファイルとbodyファイルで対応するjointの名前を統一しておく」
必要があるので注意してください.名前が異なるとエラーが発生します.
xacroファイルを編集し終えたら以下を実行し,モデルに異常がないかを確認してみましょう.
$ cd ~/choreonoid_ws/src/choreonoid_ros_control_sample
$ cd xacro
$ roslaunch urdf_tutorial display.launch model:=simple_leg.xacro
今回の場合だと以下のような画面が出てきます.
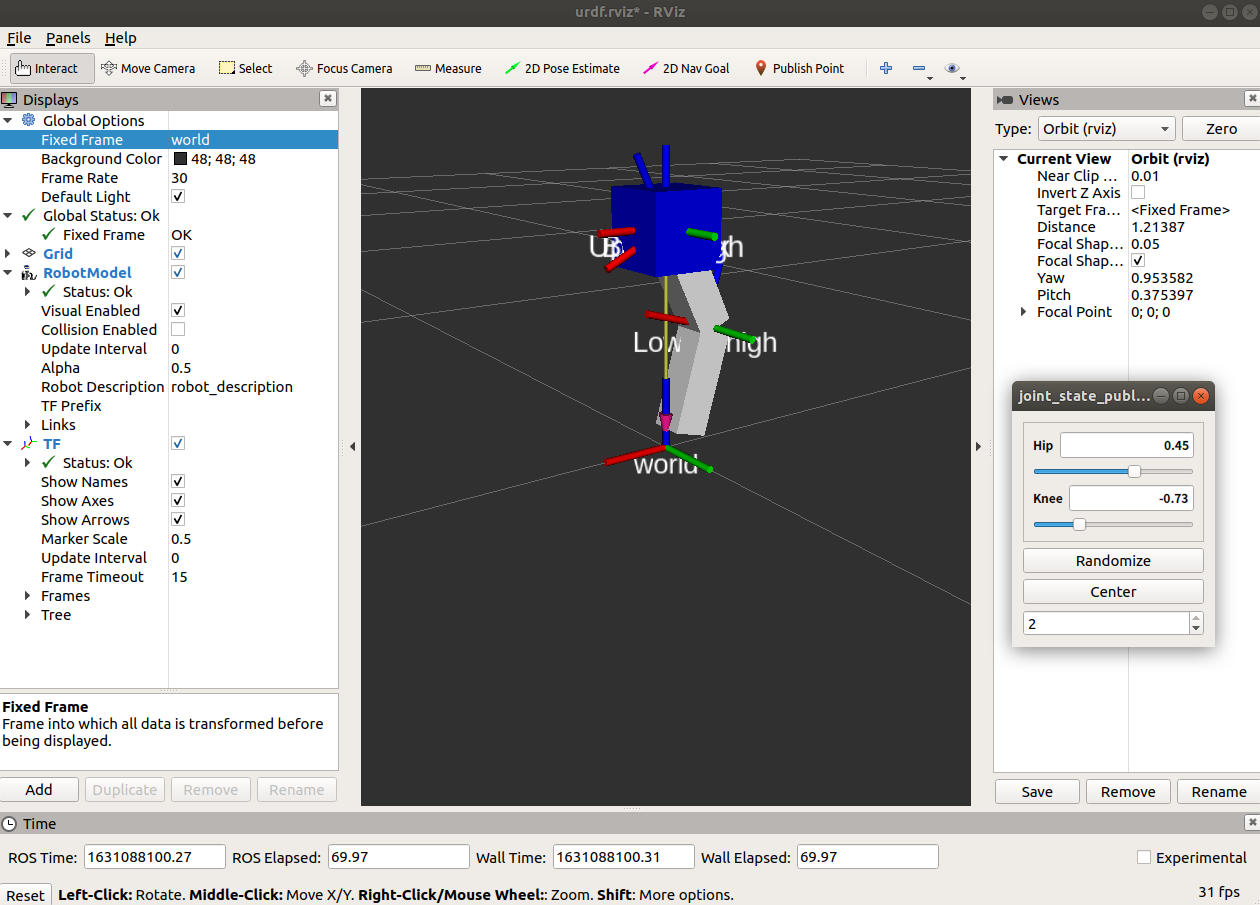
joint_state_publisherのGUIでスライダを動かすとRViz上のロボットが動くのを確認できると思います.
※ エラーが発生している方は,「Global Options」の「Fixed Frame」を「base_link」から「world」に変更してみてください.
ros_controlの設定
ros_controlを使用するための設定を行います.
yamlファイルの作成
パッケージに「config」フォルダを作成し,その中にrosparamを定義するファイルを作成します.
$ cd ~/choreonoid_ws/src/choreonoid_ros_control_sample
$ mkdir config
$ touch simple_leg_control.yaml
simple_leg_control.yamlファイルを以下のように編集します.
今回は2つの関節を位置指令で動かすのでJointPositionControllerを選択しました.
また,"joint"の欄にはxacroファイル,bodyファイルで記述した関節名を記入します.
joint_state_controller:
  type: joint_state_controller/JointStateController
  publish_rate: 100

Hip_position_controller:
  type: position_controllers/JointPositionController
  joint: Hip

Knee_position_controller:
  type: position_controllers/JointPositionController
  joint: Knee
launchファイルの作成
ros_controlを使用するためのlaunchファイルを作成します.
$ cd ~/choreonoid_ws/src/choreonoid_ros_control_sample
$ mkdir launch
$ touch simple_leg_control.launch
作成したlaunchファイルを以下のように編集します.
ros_controlに関係する部分に「simple_leg」というnamespaceを設けています.
<launch>
    <param name="use_sim_time" value="true"/>

    <!-- set namespace -->
    <group ns="simple_leg">
        <arg name="model" default="simple_leg.xacro"/>
        <param name="robot_description" command="$(find xacro)/xacro --inorder '$(find choreonoid_ros_control_sample)/xacro/$(arg model)'"/>

        <!-- robot_state_publisher -->
        <node name="robot_state_publisher" pkg="robot_state_publisher" type="robot_state_publisher" respawn="true"/>

        <!-- load controller from rosparam -->
        <rosparam file="$(find choreonoid_ros_control_sample)/config/simple_leg_control.yaml" command="load"/>
        <node name="controller_spawner" pkg="controller_manager"
            type="spawner" output="screen" respawn="true"
            args="joint_state_controller
                Hip_position_controller
                Knee_position_controller"/>
    </group>
</launch>
Choreonoid起動用のlaunchファイルを作成
続けて,もう一つlaunchファイルを作成しましょう.
$ touch bringup.launch
作成したlaunchファイルを以下のように編集します.
<launch>
	<node name="choreonoid_ros" pkg="choreonoid_ros" type="choreonoid" args="$(find choreonoid_ros_control_sample)/project/simple_leg.cnoid"/>
	<include file="$(find choreonoid_ros_control_sample)/launch/simple_leg_control.launch"/>
</launch>
これを実行すると,ros_controlの設定とChoreonoidのプロジェクトが一度に設定されるようになります.
Choreonoidのプロジェクトの設定(重要)
最後に,Choreonoidのプロジェクトでもros_controlを使用するための準備を行います.
先程作成したlaunchファイルを実行してChoreonoidのsimple_legプロジェクトを立ち上げます.
roslaunch choreonoid_ros_control_sample bringup.launch
開けたら,左上の「アイテム」欄に色々追加していきます.
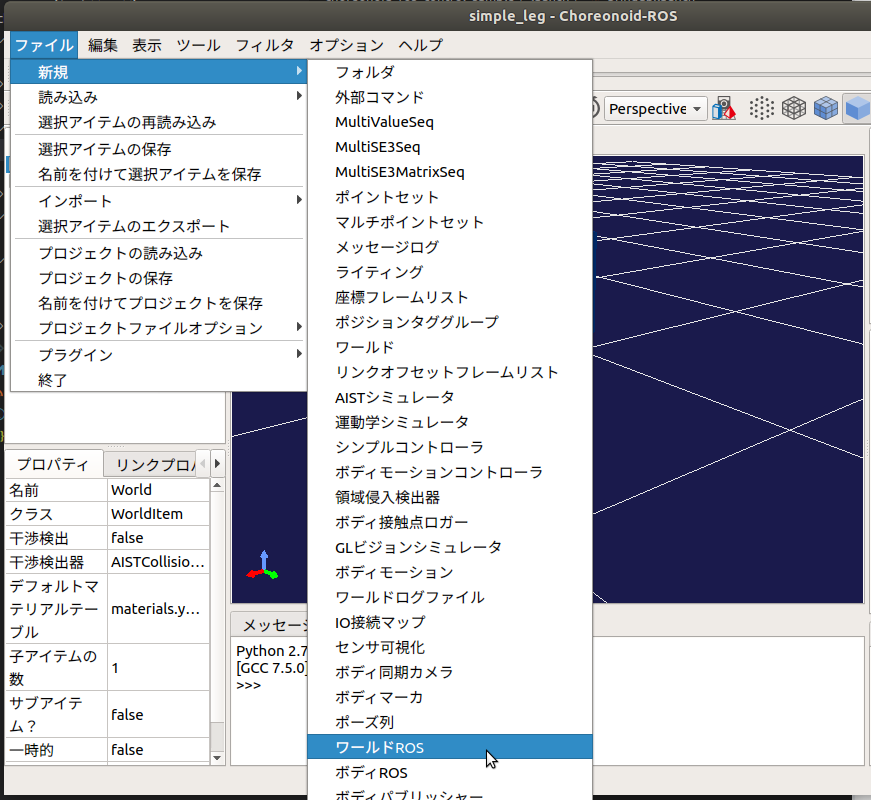
WorldROSの追加
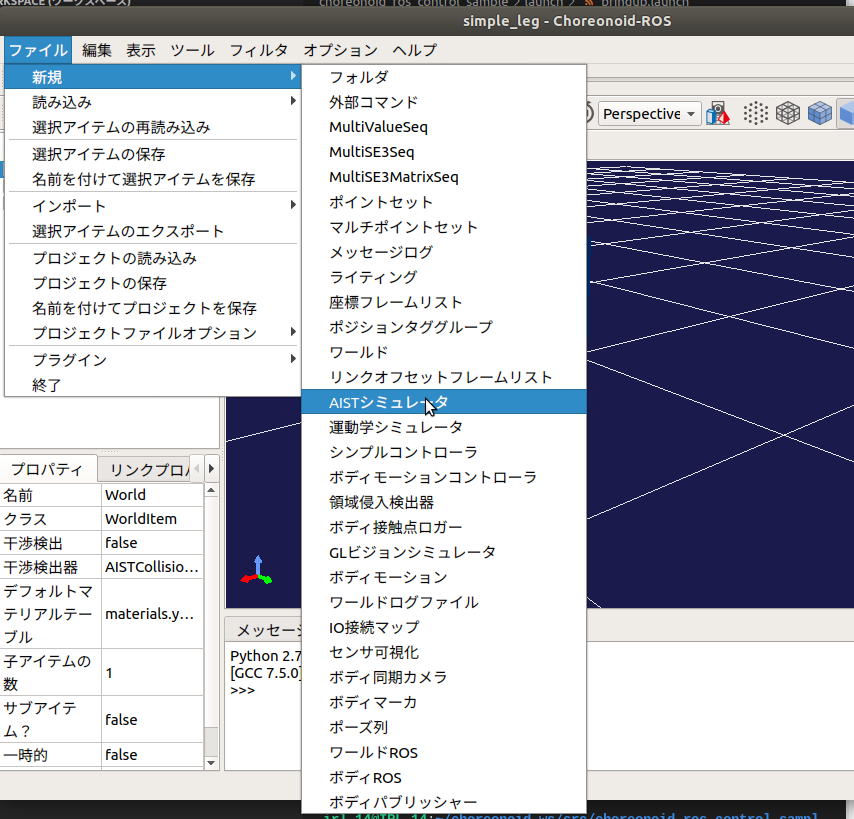
「World」を選択したまま,「ファイル」→「新規」→「ワールドROS」を追加.
AISTシミュレータの追加
「World」を選択したまま,「ファイル」→「新規」→「AISTシミュレータ」を追加.
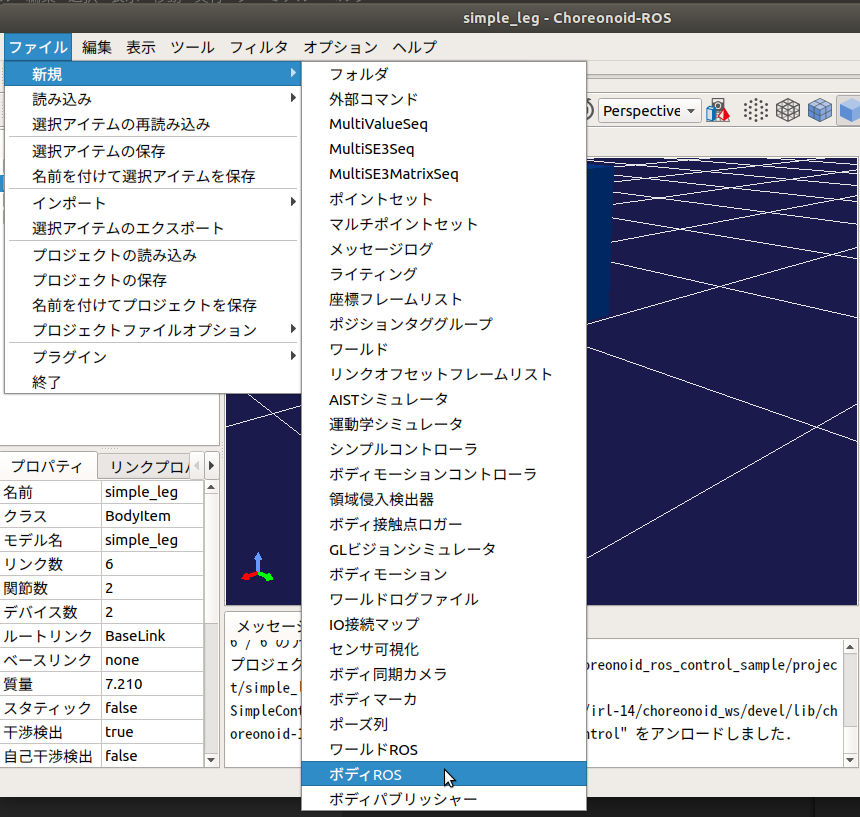
BodyROSの追加
「simple_leg」(モデルファイル)を選択したまま,「ファイル」→「新規」→「ボディROS」を追加.
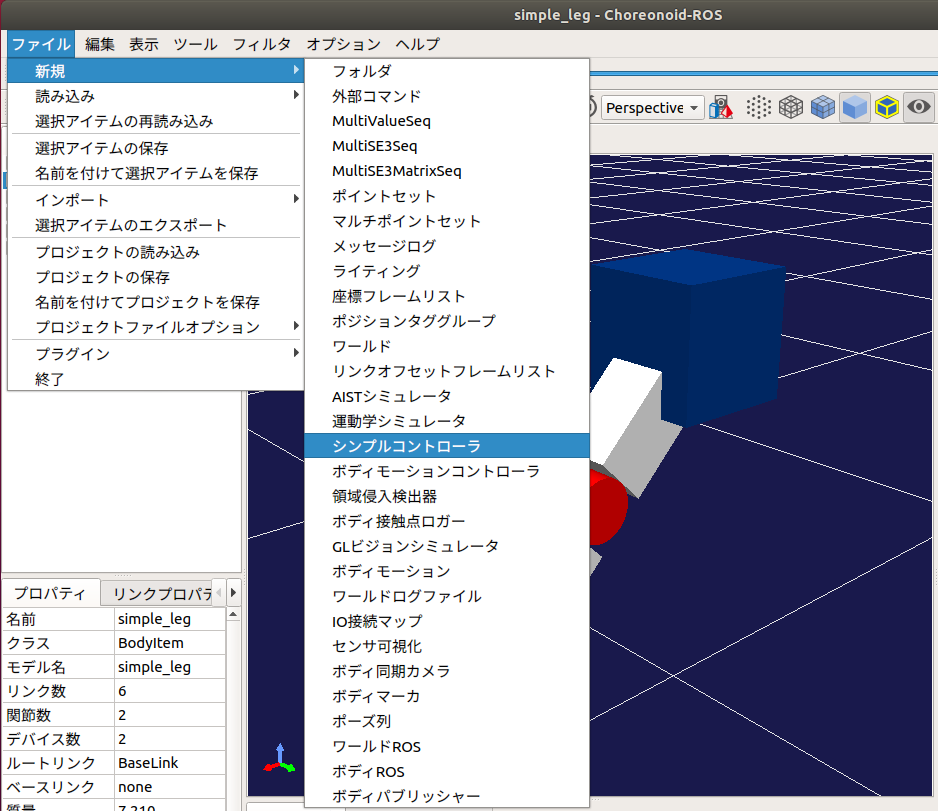
SimpleControllerの追加
「simple_leg」(モデルファイル)を選択したまま,「ファイル」→「新規」→「シンプルコントローラ」を追加.
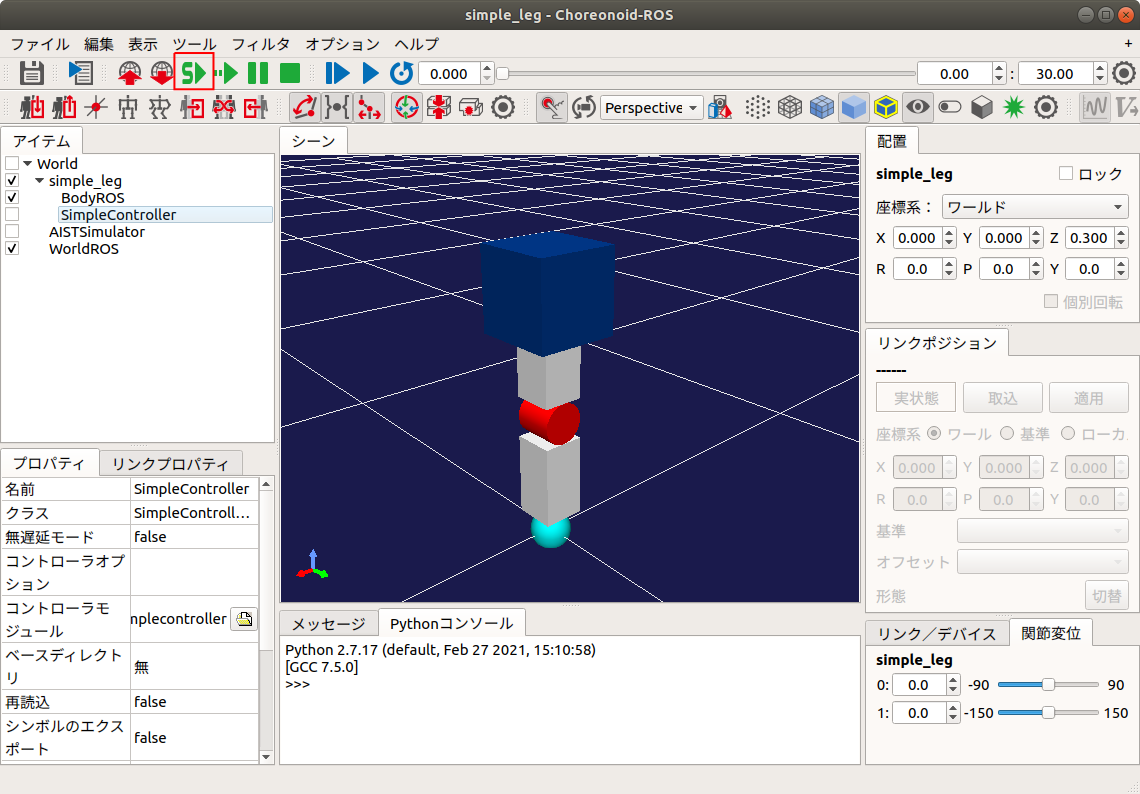
作成した「SimpleController」を選択し,左下の「プロパティ」→「コントローラモジュール」をダブルクリック.
出てきたフォルダのアイコンをクリックし,出てきたウィンドウで「choreonoid_ros_control.so」を選択.

※ 「choreonoid_ros_control.so」は通常「~/choreonoid_ws/devel/lib/choreonoid-1.8/simplecontroller」フォルダ内にあります.
※ 見当たらない場合はchoreonoid_ros_controlの導入をやり直してください.ビルドし忘れてませんか?
以上でchoreonoid_ros_controlの設定は完了です.
忘れずにプロジェクトを保存しておきましょう.(左上のフロッピーのアイコン)
ロボットを動かしてみる
では,実際にロボットを動かしてみます.
はじめにChoreonoid等を起動するlaunchを実行します.
$ roslaunch choreonoid_ros_control_sample bringup.launch
Choreonoidのウィンドウが立ち上がるので,「初期位置からのシミュレーションを開始」ボタンをクリックしましょう.
するとシミュレーションが開始され,経過時間が表示されます.
このとき,launchファイルが実行された端末で下図のような表記があれば正常に動作しています.

端末からロボットを動かす
最後に,ロボットに指令を送ってみましょう.
今回はHipの角度を-45に動かしてみます.
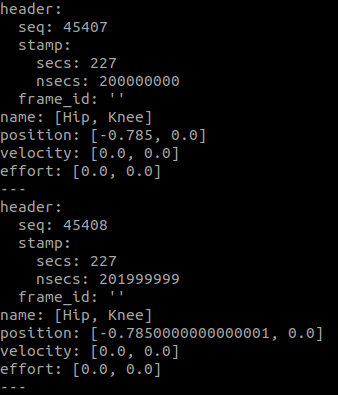
$ rostopic pub -1 /simple_leg/Hip_position_controller/command std_msgs/Float64 -- -0.785
joint_stateもちゃんと返ってきてますね.
$ rostopic echo -n 2 /simple_leg/joint_states
ノードからロボットを動かしてみる
ノードからもロボットを動かしてみましょう.
choreonoid_ros_control_sampleのsrcフォルダ内にsinewave_command.cppを作成し,以下のように編集します.
内容は各関節の角度を正弦波状に動かすだけです.
$ cd ~/choreonoid_ros_control_sample/src
$ touch sinewave_command.cpp
#include <ros/ros.h>
#include <std_msgs/Float64.h>

std_msgs::Float64 Hip_cmd, Knee_cmd;
ros::Publisher Hip_command_pub, Knee_command_pub;

const double Hip_amplitude = 1.0;
const double Knee_amplitude = 1.5;
const double Hip_freq = 0.5;
const double Knee_freq = 1.0;

int main(int argc, char** argv){
    ros::init(argc, argv, "simple_leg_controller");
    ros::NodeHandle nh("simple_leg");   // set namespace
    ros::Rate loop_rate(50);

    Hip_command_pub = nh.advertise<std_msgs::Float64>("Hip_position_controller/command", 1);
    Knee_command_pub = nh.advertise<std_msgs::Float64>("Knee_position_controller/command", 1);

    ros::Time t_start = ros::Time::now();

    while(ros::ok()){
        double current_time = (ros::Time::now() - t_start).toSec();

        Hip_cmd.data  = Hip_amplitude * sin(2 * M_PI * Hip_freq * current_time);
        Knee_cmd.data = Knee_amplitude * sin(2 * M_PI * Knee_freq * current_time);

        Hip_command_pub.publish(Hip_cmd);
        Knee_command_pub.publish(Knee_cmd);

        loop_rate.sleep();
    }
    return 0;
}
CMakeLists.txtに以下の記述を追加し,コンパイルを行いましょう.
add_executable(sinewave_command src/sinewave_command.cpp)
add_dependencies(sinewave_command ${${PROJECT_NAME}_EXPORTED_TARGETS} ${catkin_EXPORTED_TARGETS})
target_link_libraries(sinewave_command ${catkin_LIBRARIES})
$ catkin build choreonoid_ros_control_sample
実行結果は以下のようになるはずです.
脚も可愛く動かすことが出来た pic.twitter.com/hTafFXBSRu
— F@L (@hayabusa_f) September 8, 2021
まとめ
新しくロボットモデルを作成し,choreonoid_ros_controlを使用して動かす方法を解説しました.
実機の制御とChoreonoidモデルの制御を同じコントローラで動かせるのはやはり有り難いですね!
この記事がchorenoid_ros_controlを使いたいと考えている方のお役に立てば幸いです.
2021/09/09追記
- choreonoidのURDF対応版が開発中とのこと.
確かにurdfとbodyファイルの2つを1つにできるのは大きいですね!
(実はchoreonoidは開発中のURDF対応版がありまして、人柱を募集しています) https://t.co/uZW4xLo0jy https://t.co/ev0x75mCVy
— ゆき (@blessingyuki) August 25, 2021
- SimpleControllerではなくControlItemを使用したバージョンも今後公開されるかも?
おおお
— 田中良道 (@RyodoTanaka) September 8, 2021
公式wikiで取りこぼしていること全てを書いてくださってる…!
ありがたいです!
実はSimpleControllerではなく、ControlItemを使ったものを整理中なので、それが完了すれば公式wikiも更新されると思います!
ちなみにこちらがそのPRhttps://t.co/tOzhUvPbDr#ros #rosjp #choreonoid https://t.co/YPYz8gBvMB
2021/09/22追記
注意点を2点ほど発見.
その1
rosparamの「robot_description」にはロボット名の名前空間を設けないとChoreonoidがフリーズする現象が発生.
今回の例のように,
「<ロボット名>/robot_description」とすることで正常に動作.
<ロボット名>にはbodyファイルのモデル名が入る.
その2
controller_managerを立ち上げる前にchoreonoidを起動しておくこと.
順番を逆にするとChoreonoid内のモデルが微動だにしなかった.