お疲れ様です。
朝6時です。
5時間後の、社内勉強会の発表担当なのですが、テーマを全く決めておらず、ギリギリまで迷っているとこんな時間になってしまいました。
クリスマスの日に以下のような、画像文字入れ編集アプリを軽くv0くんと作ってみたのですが、今回は画像文字入れ編集の機構をRooCodeくんと一緒にライブラリ化してみようと思います。
出来たもの
こちらになります。
ギリギリまでRooくんとワイワイやってた & 眠気に抗いながらではVercelの設定やnpmへのpublishは間に合わず、すでにライブラリ化失敗説が囁かれます。
AI達が大活躍する2025年において、ボトルネックは俺たちの体力なのかもしれません。
折角なので切実に、触って楽しんでもらいたかったのですが、皆様が触ってくれているリアクションを受け取る楽しみは数日後に取っておこうと思います。
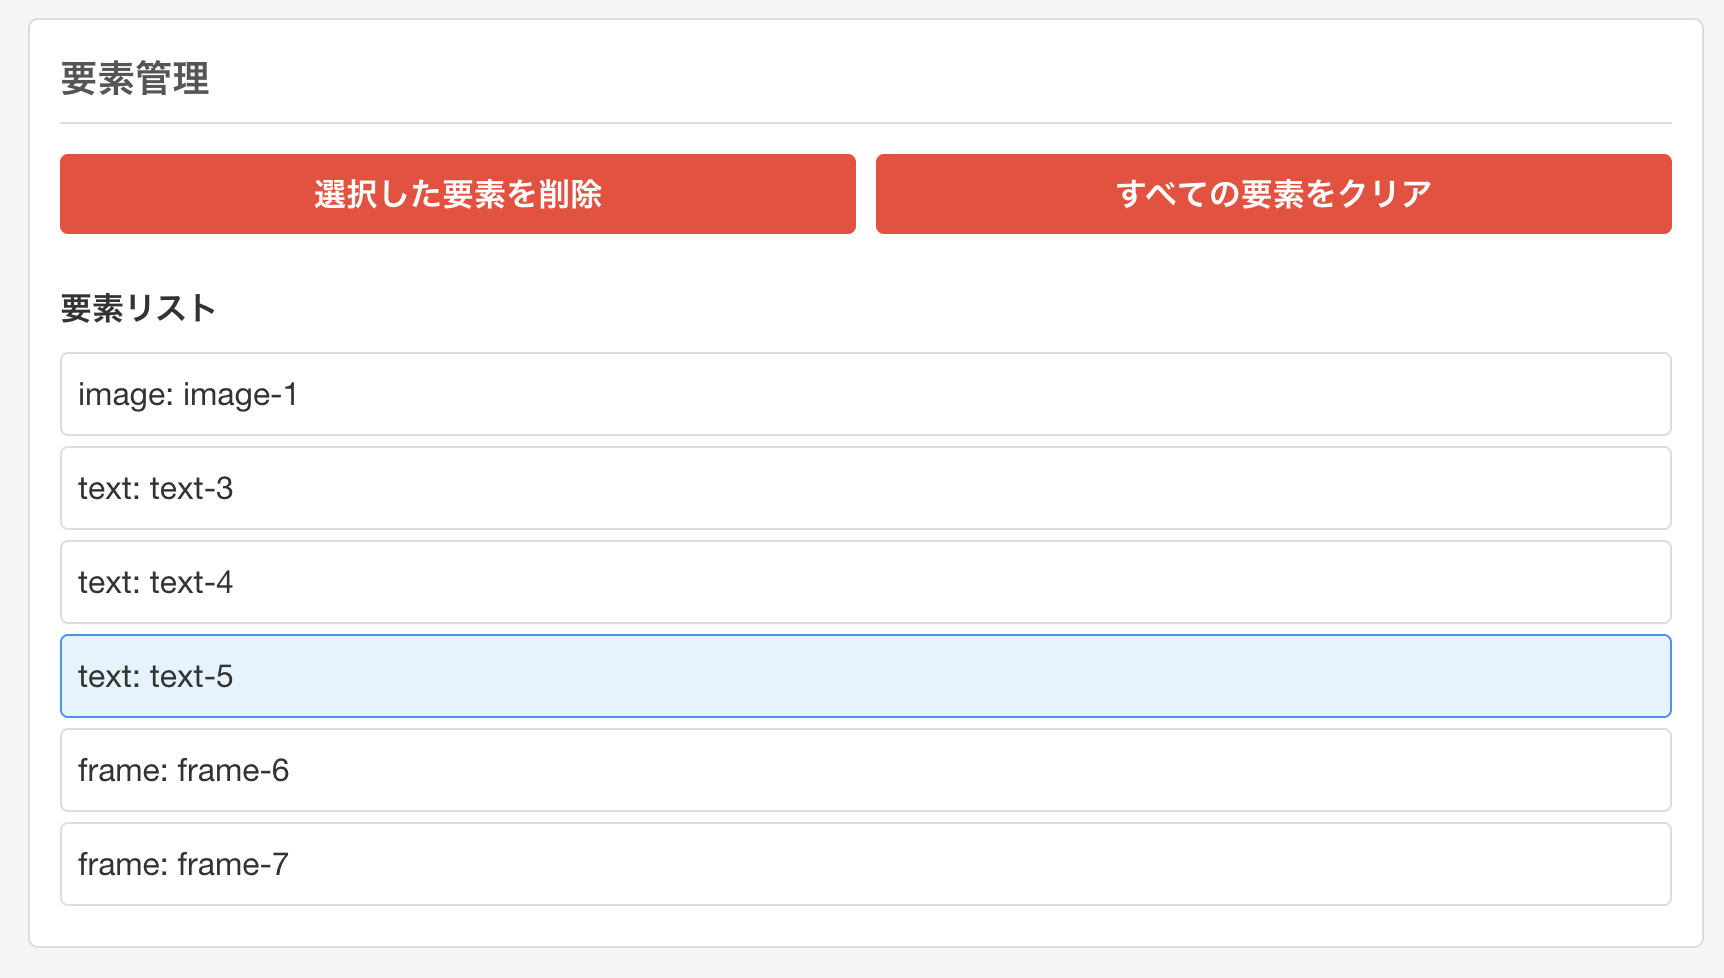
具体的な機能を画像ベースで見せることが出来るところまではRooくんがやってくれたため、一旦先にいくつか機能を発表したいと思います。
出力している機能の一覧をサンプルアプリのスクショにて
リポジトリの趣旨として、ビルドしてコンポーネントのみを吐き出すようにしているのですが、さすがにサンプルアプリとドキュメントくらいは無いと話にならないと思うので、軽く動く程度には整えています。
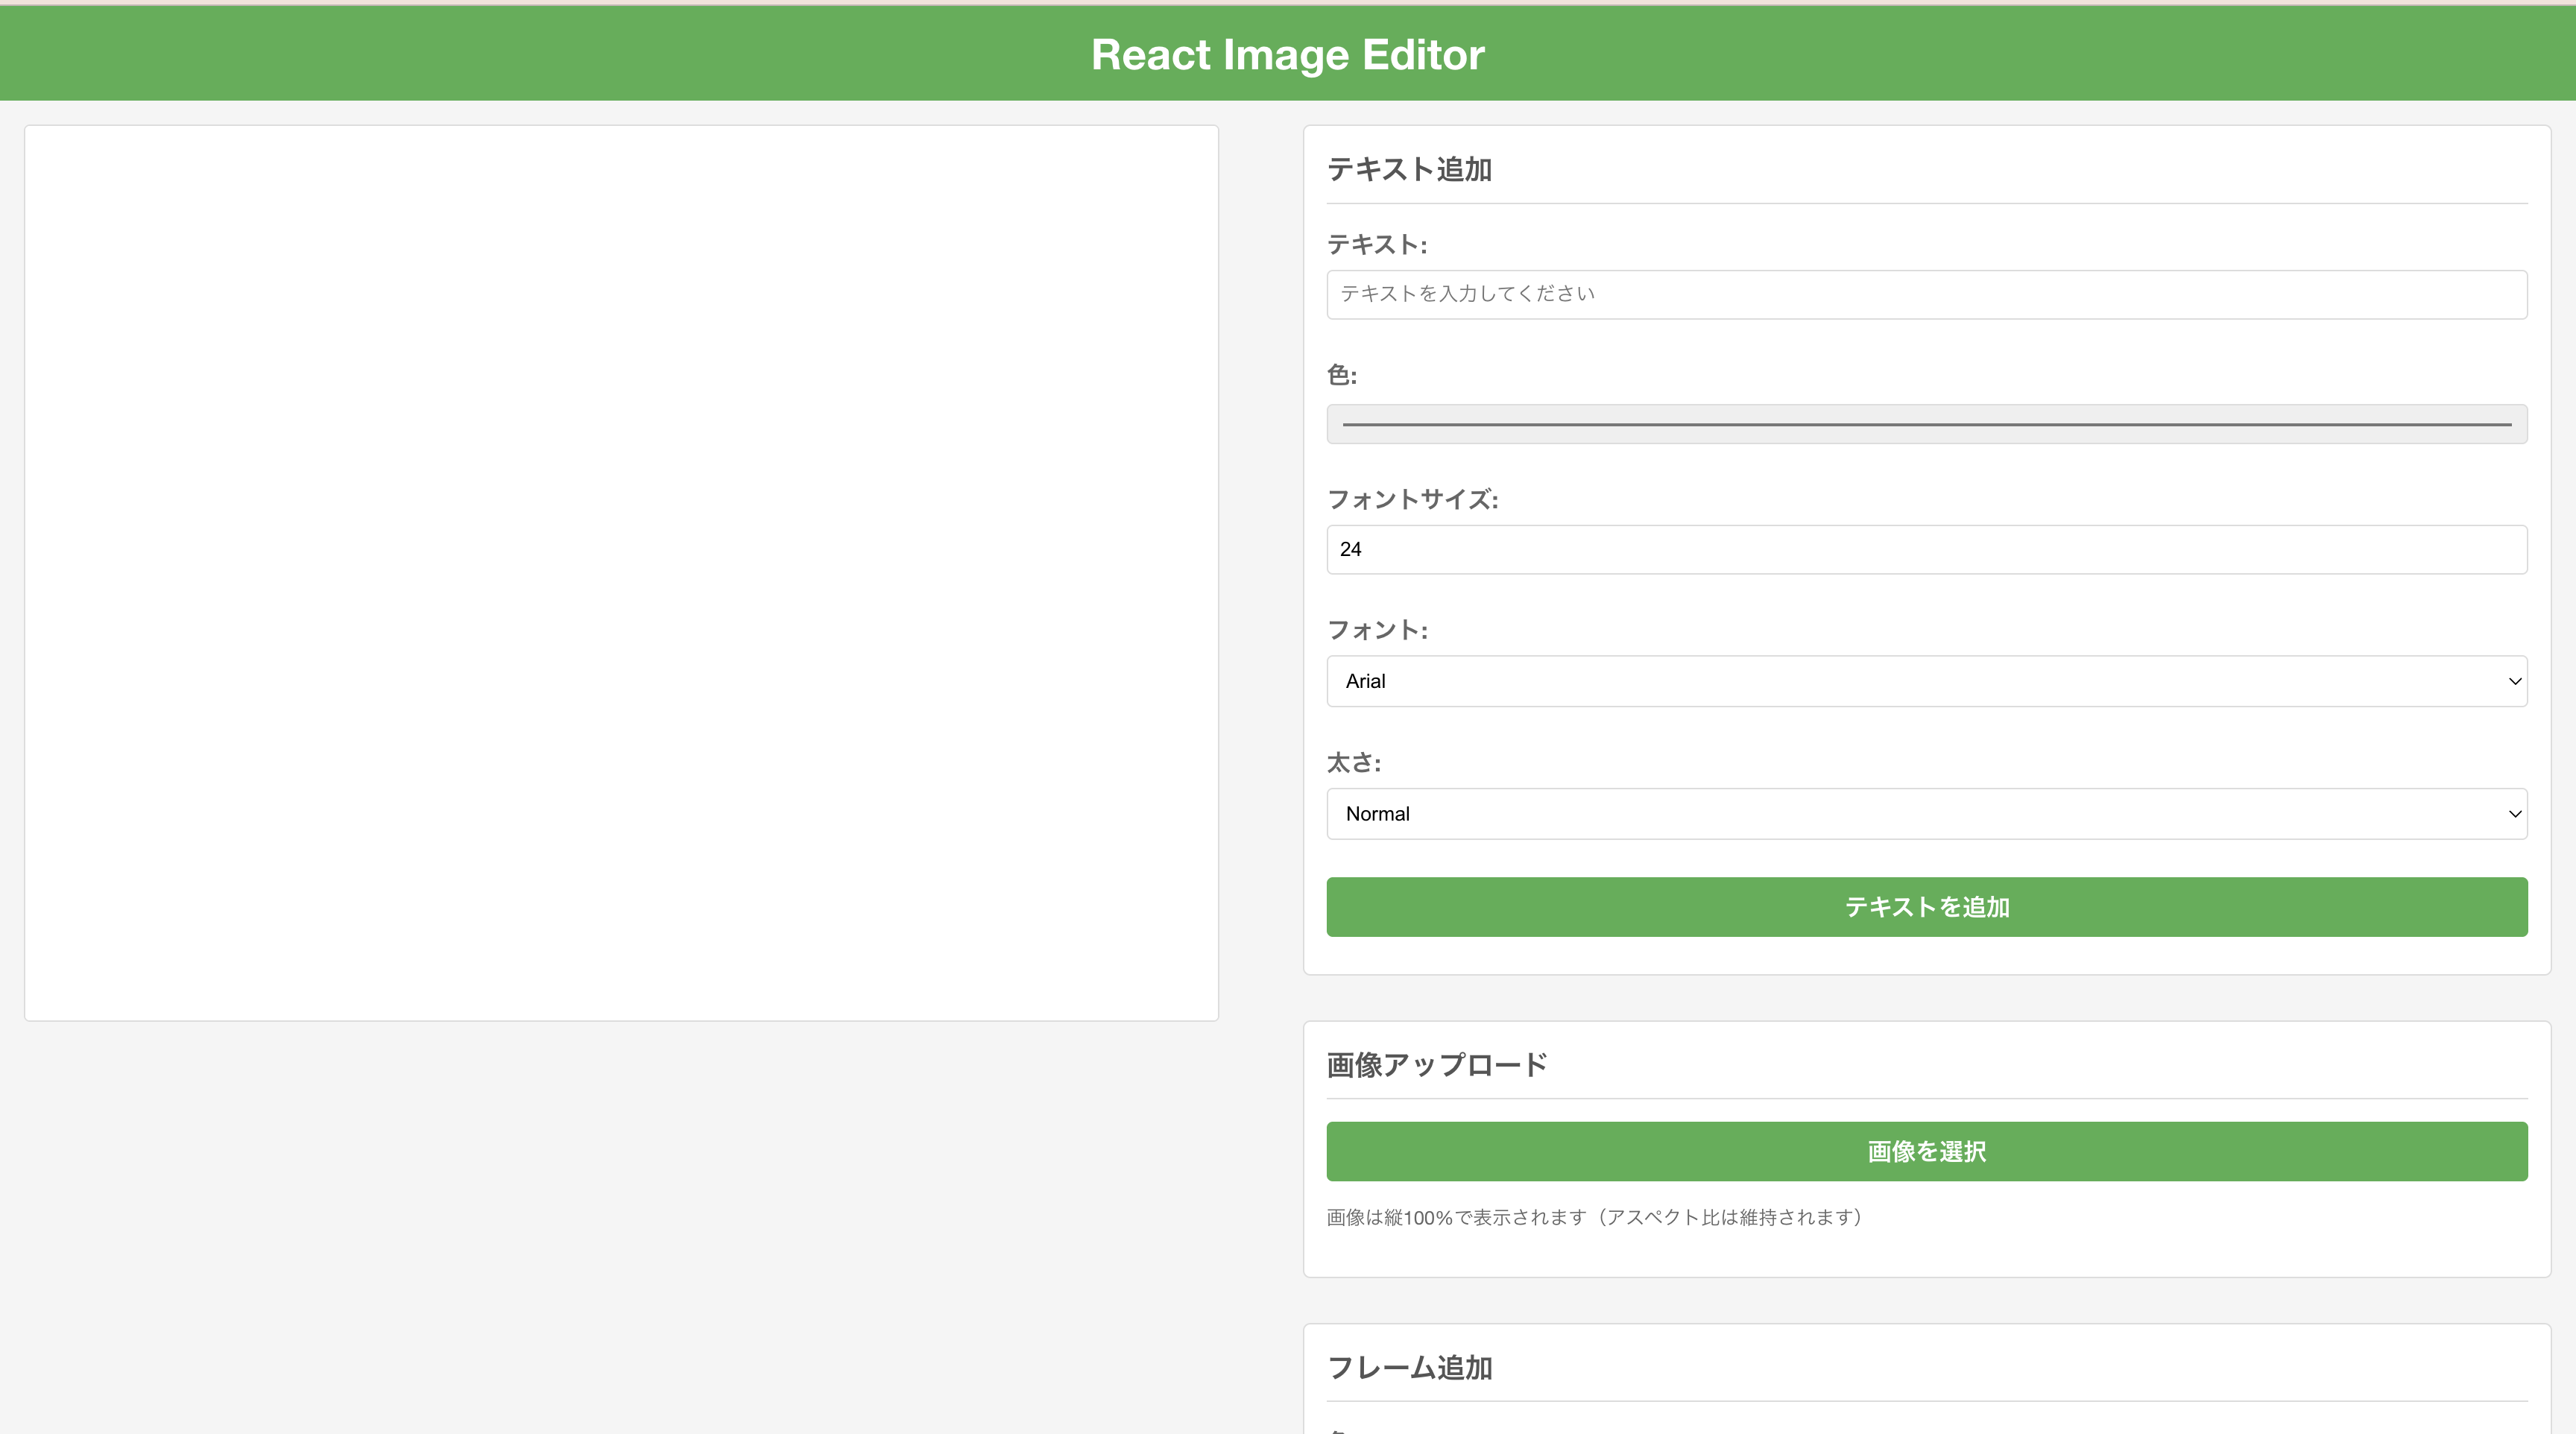
画像のアップロード
画像を選択してアップロードすることが出来ます。
オプションによって、Opacityの調整も可能となります。

文字入れ
画像に対して、文字を入れることが出来ます。


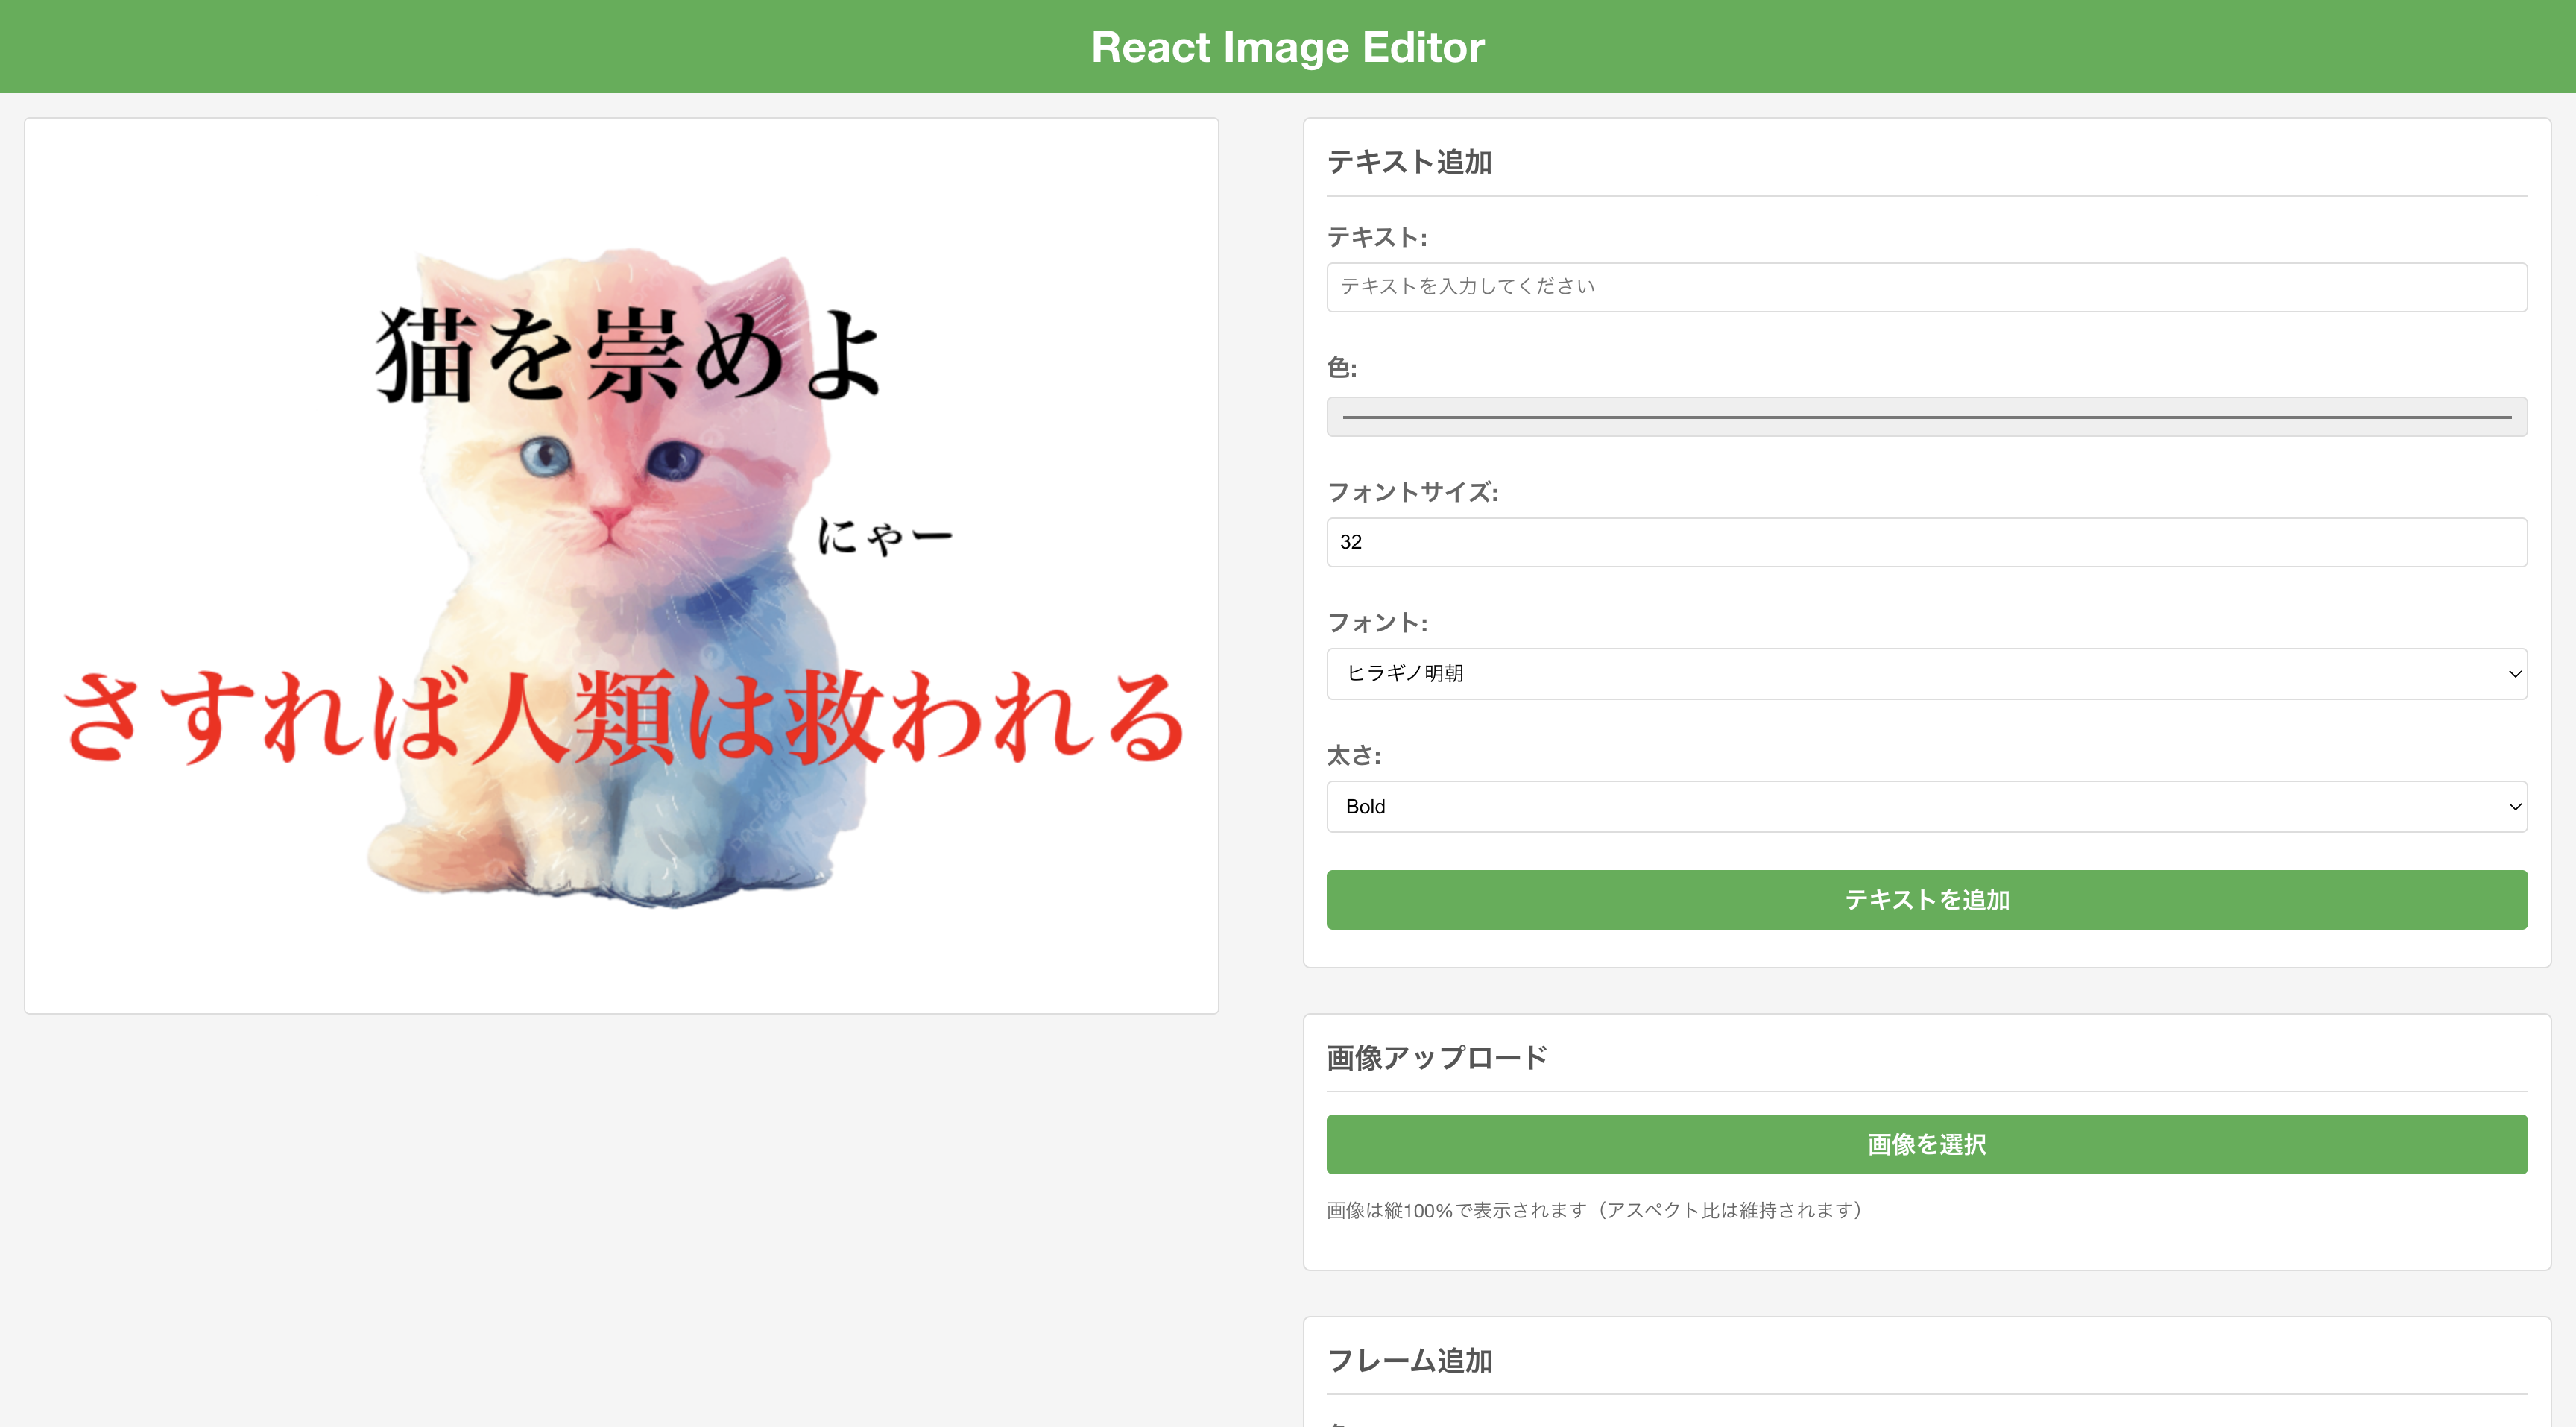
文字サイズの変更、太さ調整など。
フォントは日本語フォントを含めた18種別から選択可能にしています。
フレーム
フレームを複数設定出来ます。
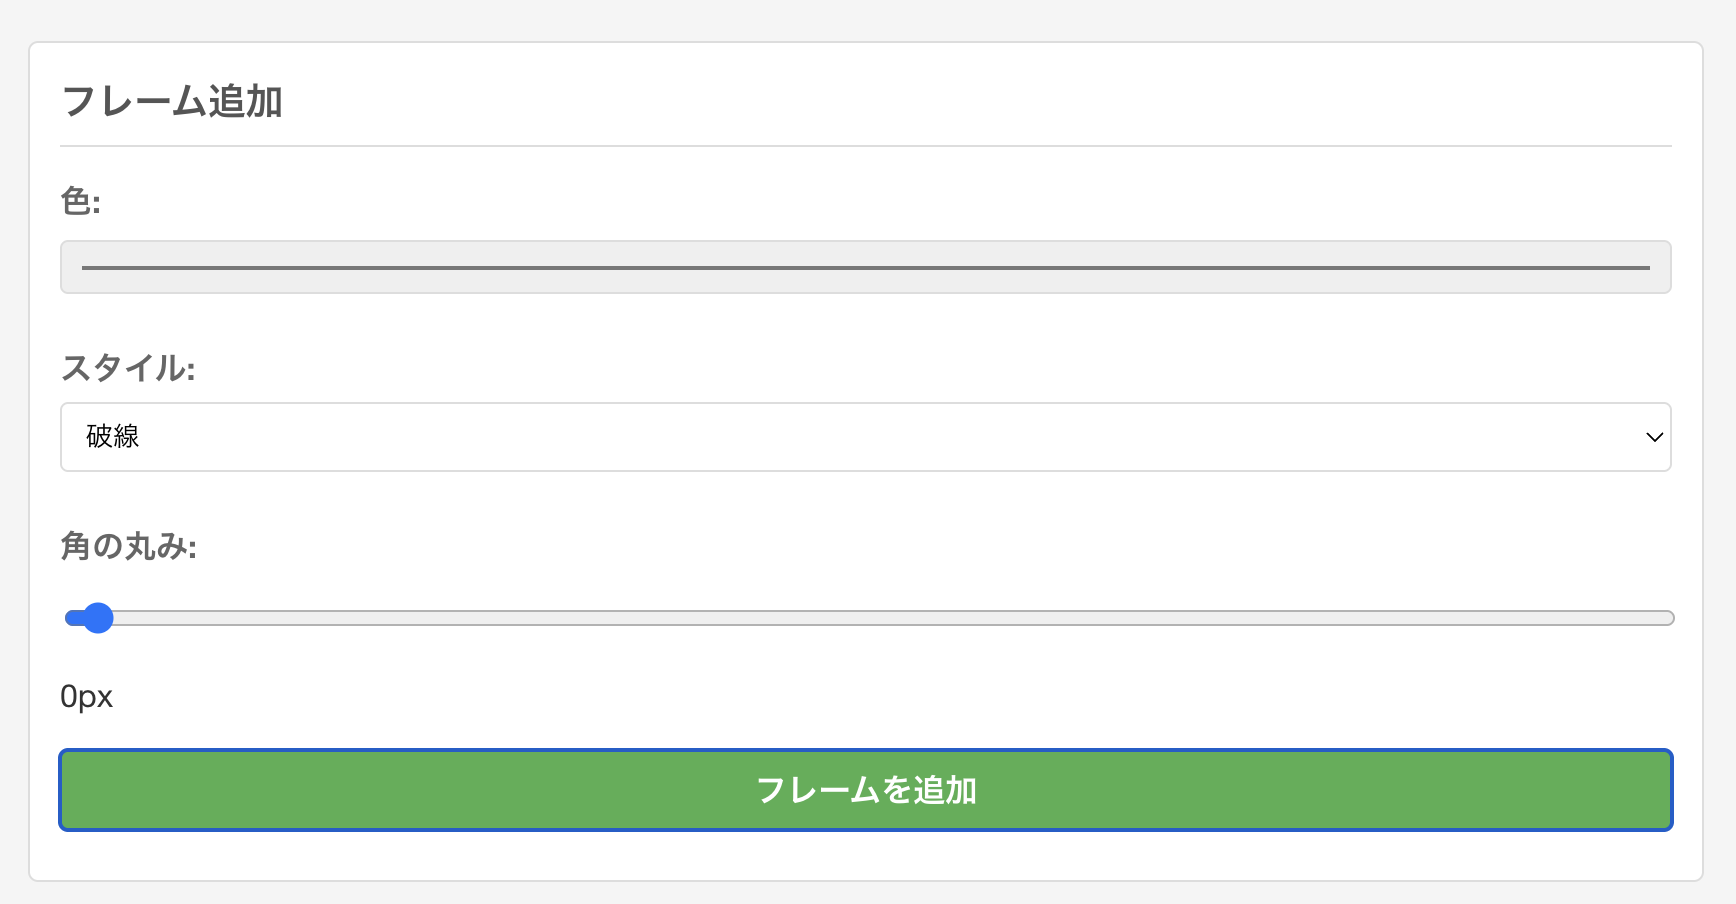
この機能は要らないかもしれない。
要素の削除
画像の出力
画像の保存が可能となっています。
スマホで表示時、特定のブラウザでは直接の画像保存が出来ない場合があるためプレビューを表示します。

Rooくんと書いた実装を読んでいくターン
上記の機能がどう実装されているか、の具体を読んでいこうと思います。
実際のソースコードを引用(自分のリポジトリではあるのですが)しつつとなります。
画像のアップロード
サンプルアプリ側
サンプルアプリ側でどのように画像を受け取っているか?の解説になります。
import {
  ImageEditorRef,
  EditorElement,
  ImageUpload,
} from 'react-imageedit';

function App() {
  const editorRef = useRef<ImageEditorRef>(null);

  const handleAddImage = async (fileUrl: string) => {
    if (!editorRef.current) return;

    // 現在の不透明度を適用(0-100から0-1に変換)
    const opacity = imageOpacity / 100;

    const id = await editorRef.current?.addImage(fileUrl, {
      opacity: opacity
    });

    if (id && editorRef.current) {
      const newElements = editorRef.current.getElements();
      const newElement = newElements.find(el => el.id === id);
      if (newElement) {
        setSelectedElement(newElement);
      }
    }
  };
            <ImageUpload
              onImageUpload={handleAddImage}
              onOpacityChange={handleOpacityChange}
              opacity={imageOpacity}
            />
のように実装することが可能です。
ImageUploadはライブラリから吐き出しているコンポーネントで、以下の統一感のあるスタイルを提供します。

また以下のpropsを受け取ることが可能です。
| プロパティ | 型 | デフォルト値 | 説明 |
|---|---|---|---|
| onImageUpload | (imageDataUrl: string) => void | 必須 | 画像がアップロードされたときのコールバック |
| onOpacityChange | (opacity: number) => void | 必須 | 不透明度が変更されたときのコールバック |
| opacity | number | 必須 | 現在の不透明度(0〜100) |
| maxFileSize | number | 5 * 1024 * 1024 (5MB) | 最大ファイルサイズ(バイト単位) |
| className | string | '' | コンポーネントに適用する追加のCSSクラス |
onImageUpload自体は画像がアップロードされたときにDataUrlにコンバートするだけのコールバックなので、画像アップロード・透明度の調整UIは使用者が自由に組むことが可能な、汎用的な実装になっています。
任意の画像Urlを以下のように、ライブラリから吐き出されているImageEditorRefにセットすることで、画像の編集が可能となります。
  const editorRef = useRef<ImageEditorRef>(null);
  await editorRef.current?.addImage(fileUrl);
内部実装側
ImageUploadは素直にスタイルだけ吐き出しているコンポーネントなので解説しません。
ImageEditorRef自体が何者なのか?の記述をしたいと思います。
この子は画像編集の根幹にあたるクラスで、
ImageEditorクラスの実装
import { TextElement, ImageElement, FrameElement, EditorElement } from './types';
import { loadImage, drawText, generateFrameSvg } from './utils/imageUtils';

/**
 * 画像エディタクラス
 */
export class ImageEditor {
  private canvas: HTMLCanvasElement;
  private ctx: CanvasRenderingContext2D;
  private elements: EditorElement[] = [];
  private nextId = 1;
  private imageCache: Map<string, HTMLImageElement> = new Map();

  /**
   * コンストラクタ
   * @param canvas キャンバス要素
   */
  constructor(canvas: HTMLCanvasElement) {
    this.canvas = canvas;
    const ctx = canvas.getContext('2d');
    if (!ctx) {
      throw new Error('Failed to get canvas context');
    }
    this.ctx = ctx;
    this.redraw();
  }

  /**
   * テキストを追加する
   * @param textElement テキスト要素
   * @returns 要素ID
   */
  addText(textElement: Omit<TextElement, 'id'>): string {
    const id = `text-${this.nextId++}`;
    this.elements.push({
      id,
      type: 'text',
      data: textElement as TextElement
    });
    this.redraw();
    return id;
  }

  /**
   * 画像を追加する
   * @param src 画像のURL
   * @param options オプション
   * @returns 要素ID
   */
  async addImage(src: string, options: Omit<ImageElement, 'src'>): Promise<string> {
    const id = `image-${this.nextId++}`;

    // 画像をロードして、アスペクト比を計算
    let img: HTMLImageElement;
    if (this.imageCache.has(src)) {
      img = this.imageCache.get(src)!;
    } else {
      img = await loadImage(src);
      this.imageCache.set(src, img);
    }

    // デフォルトでは、画像の縦サイズをキャンバスの高さに合わせる
    const aspectRatio = img.width / img.height;
    const height = this.canvas.height;
    const width = height * aspectRatio;

    // 位置とサイズを設定
    const position = options.position || { x: this.canvas.width / 2, y: this.canvas.height / 2 };
    const size = options.size || { width, height };

    this.elements.push({
      id,
      type: 'image',
      data: {
        src,
        opacity: options.opacity || 1,
        position,
        size
      } as ImageElement
    });

    this.redraw();
    return id;
  }

  /**
   * フレームを追加する
   * @param frameElement フレーム要素
   * @returns 要素ID
   */
  addFrame(frameElement: FrameElement): string {
    const id = `frame-${this.nextId++}`;
    this.elements.push({
      id,
      type: 'frame',
      data: frameElement
    });
    this.redraw();
    return id;
  }

  /**
   * 要素を削除する
   * @param id 要素ID
   * @returns 成功したかどうか
   */
  removeElement(id: string): boolean {
    const index = this.elements.findIndex(element => element.id === id);
    if (index === -1) {
      return false;
    }
    this.elements.splice(index, 1);
    this.redraw();
    return true;
  }

  /**
   * すべての要素を削除する
   */
  removeAllElements(): void {
    this.elements = [];
    this.redraw();
  }

  /**
   * 要素を更新する
   * @param id 要素ID
   * @param data 新しいデータ
   * @returns 成功したかどうか
   */
  updateElement(id: string, data: Partial<TextElement | ImageElement | FrameElement>): boolean {
    const element = this.elements.find(element => element.id === id);
    if (!element) {
      return false;
    }

    // フレーム要素の場合、キャッシュをクリア
    if (element.type === 'frame') {
      const frameElement = element.data as FrameElement;
      const oldCacheKey = `frame-${frameElement.color}-${frameElement.style}-${frameElement.borderRadius}-${this.canvas.width}-${this.canvas.height}`;
      this.imageCache.delete(oldCacheKey);
    }

    element.data = { ...element.data, ...data };
    this.redraw();
    return true;
  }

  /**
   * 要素の位置を更新する
   * @param id 要素ID
   * @param position 新しい位置
   * @returns 成功したかどうか
   */
  updateElementPosition(id: string, position: { x: number; y: number }): boolean {
    const element = this.elements.find(element => element.id === id);
    if (!element) {
      return false;
    }
    (element.data as any).position = position;
    this.redraw();
    return true;
  }

  /**
   * キャンバスを再描画する
   */
  async redraw(): Promise<void> {
    // 背景をクリア
    this.ctx.fillStyle = '#ffffff';
    this.ctx.fillRect(0, 0, this.canvas.width, this.canvas.height);

    // 要素を描画(画像、フレーム、テキストの順に描画)
    // 1. まず、画像要素を描画
    await this.drawElementsByType('image');

    // 2. 次に、フレーム要素を描画
    await this.drawElementsByType('frame');

    // 3. 最後に、テキスト要素を描画
    await this.drawElementsByType('text');
  }

  /**
   * 指定されたタイプの要素を描画する
   * @param type 要素のタイプ
   */
  private async drawElementsByType(type: 'text' | 'image' | 'frame'): Promise<void> {
    const elements = this.elements.filter(element => element.type === type);

    for (const element of elements) {
      try {
        if (element.type === 'image') {
          const imageElement = element.data as ImageElement;
          let img: HTMLImageElement;

          // 画像キャッシュを使用
          if (this.imageCache.has(imageElement.src)) {
            img = this.imageCache.get(imageElement.src)!;
          } else {
            img = await loadImage(imageElement.src);
            this.imageCache.set(imageElement.src, img);
          }

          this.ctx.save();
          this.ctx.globalAlpha = imageElement.opacity;

          const position = imageElement.position || { x: this.canvas.width / 2, y: this.canvas.height / 2 };
          const size = imageElement.size || { width: this.canvas.width, height: this.canvas.height };

          this.ctx.drawImage(
            img,
            position.x - size.width / 2,
            position.y - size.height / 2,
            size.width,
            size.height
          );

          this.ctx.restore();
        } else if (element.type === 'text') {
          const textElement = element.data as TextElement;
          drawText(this.ctx, textElement);
        } else if (element.type === 'frame') {
          const frameElement = element.data as FrameElement;
          const svgString = generateFrameSvg(
            frameElement,
            this.canvas.width,
            this.canvas.height
          );

          const cacheKey = `frame-${frameElement.color}-${frameElement.style}-${frameElement.borderRadius}-${this.canvas.width}-${this.canvas.height}`;

          let frameImg: HTMLImageElement;
          if (this.imageCache.has(cacheKey)) {
            frameImg = this.imageCache.get(cacheKey)!;
          } else {
            frameImg = await loadImage(`data:image/svg+xml,${encodeURIComponent(svgString)}`);
            this.imageCache.set(cacheKey, frameImg);
          }

          this.ctx.drawImage(frameImg, 0, 0, this.canvas.width, this.canvas.height);
        }
      } catch (error) {
        console.error(`Error drawing element ${element.id}:`, error);
      }
    }
  }

  /**
   * キャンバスをデータURLとしてエクスポートする
   * @param type 画像タイプ
   * @param quality 画質
   * @returns データURL
   */
  exportToDataURL(type: string = 'image/png', quality: number = 0.95): string {
    return this.canvas.toDataURL(type, quality);
  }

  /**
   * 要素の配列を取得する
   * @returns 要素の配列
   */
  getElements(): EditorElement[] {
    return [...this.elements];
  }

  /**
   * キャンバス要素を取得する
   * @returns キャンバス要素
   */
  getCanvas(): HTMLCanvasElement {
    return this.canvas;
  }
}
canvasの描画・編集自体の操作の役割を担っています。
この章ではアップロードされた時のコードを追います。
先の章で editorRef.current?.addImage(fileUrl)したため、以下のメンバが呼び出されます。
  /**
   * 画像を追加する
   * @param src 画像のURL
   * @param options オプション
   * @returns 要素ID
   */
  async addImage(src: string, options?: Omit<ImageElement, 'src'>): Promise<string> {
    const id = `image-${this.nextId++}`;

    // 画像をロードして、アスペクト比を計算
    let img: HTMLImageElement;
    if (this.imageCache.has(src)) {
      img = this.imageCache.get(src)!;
    } else {
      img = await loadImage(src);
      this.imageCache.set(src, img);
    }

    // デフォルトでは、画像の縦サイズをキャンバスの高さに合わせる
    const aspectRatio = img.width / img.height;
    const height = this.canvas.height;
    const width = height * aspectRatio;

    // 位置とサイズを設定
    const position = options.position || { x: this.canvas.width / 2, y: this.canvas.height / 2 };
    const size = options.size || { width, height };

    this.elements.push({
      id,
      type: 'image',
      data: {
        src,
        opacity: options.opacity || 1,
        position,
        size
      } as ImageElement
    });

    this.redraw();
    return id;
  }
    // 画像をロードして、アスペクト比を計算
    let img: HTMLImageElement;
    if (this.imageCache.has(src)) {
      img = this.imageCache.get(src)!;
    } else {
      img = await loadImage(src);
      this.imageCache.set(src, img);
    }
まず、ここの実装ですが、imageCacheというメンバはキャッシュにその画像が存在するかどうかをチェックするためのものになります。
画像やSVGのロードはコストの高い操作であるため、同等の画像がアップされた場合にloadし直す必要を無くしています。
loadImageはutilsに定義している便利関数で以下です。
画像を同期で処理し、UrlをHTMLImageElementで返します。
/**
 * 画像をロードする
 * @param src 画像のURL
 * @returns 画像要素のPromise
 */
export const loadImage = (src: string): Promise<HTMLImageElement> => {
  return new Promise((resolve, reject) => {
    const img = new Image();
    img.onload = () => resolve(img);
    img.onerror = (e) => reject(new Error(`Failed to load image: ${src}`));
    img.src = src;
  });
};
その後、HTMLImageElementから元画像のデータを取得します。
具体的な実装が以下
    // デフォルトでは、画像の縦サイズをキャンバスの高さに合わせる
    const aspectRatio = img.width / img.height;
    const height = this.canvas.height;
    const width = height * aspectRatio;

    // 位置とサイズを設定
    const position = options?.position || { x: this.canvas.width / 2, y: this.canvas.height / 2 };
    const size = options?.size || { width, height };
その後以下の処理が行われます。
    this.elements.push({
      id,
      type: 'image',
      data: {
        src,
        opacity: options?.opacity || 1,
        position,
        size
      } as ImageElement
    });

    this.redraw();
    return id;
elementsはエディタ上のすべての要素(テキスト、画像、フレームなど)を保持する配列です。
具体的には、以下のような情報を持ちます。
特段しっかり読む必要はないですが、共通して「色や大きさ、canvas内で位置情報」を保持します。
export interface TextElement {
  text: string;
  color: string;
  fontSize: number;
  fontFamily: string;
  position: { x: number; y: number };
  weight: string;
}

export interface ImageElement {
  src: string;
  opacity: number;
  position?: { x: number; y: number };
  size?: { width: number; height: number };
}

export interface FrameElement {
  color: string;
  style: 'solid' | 'dashed' | 'double';
  borderRadius?: number;
  position?: { x: number; y: number };
  size?: { width: number; height: number };
}

export interface EditorElement {
  id: string;
  type: 'text' | 'image' | 'frame';
  data: TextElement | ImageElement | FrameElement;
}
画像がアップロードされた場合の処理なので、ImageElementに沿ってデータが形作られ、elemtentsに渡されています。
this.redraw();は名前から分かる通り、再描画関数になります
  /**
   * キャンバスを再描画する
   */
  async redraw(): Promise<void> {
    // 背景をクリア
    this.ctx.fillStyle = '#ffffff';
    this.ctx.fillRect(0, 0, this.canvas.width, this.canvas.height);

    // 要素を描画(画像、フレーム、テキストの順に描画)
    // 1. まず、画像要素を描画
    await this.drawElementsByType('image');

    // 2. 次に、フレーム要素を描画
    await this.drawElementsByType('frame');

    // 3. 最後に、テキスト要素を描画
    await this.drawElementsByType('text');
  }
まずい、日光が差し込み始めました。
タイムリミットは近い。
再描画関数ではそれぞれのタイプごとに描画関数っぽいものを走らせていることがわかります。
描画関数を覗き見みます。
  private async drawElementsByType(type: 'text' | 'image' | 'frame'): Promise<void> {
    const elements = this.elements.filter(element => element.type === type);

    for (const element of elements) {
      try {
        if (element.type === 'image') {
          const imageElement = element.data as ImageElement;
          let img: HTMLImageElement;

          // 画像キャッシュを使用
          if (this.imageCache.has(imageElement.src)) {
            img = this.imageCache.get(imageElement.src)!;
          } else {
            img = await loadImage(imageElement.src);
            this.imageCache.set(imageElement.src, img);
          }

          this.ctx.save();
          this.ctx.globalAlpha = imageElement.opacity;

          const position = imageElement.position || { x: this.canvas.width / 2, y: this.canvas.height / 2 };
          const size = imageElement.size || { width: this.canvas.width, height: this.canvas.height };

          this.ctx.drawImage(
            img,
            position.x - size.width / 2,
            position.y - size.height / 2,
            size.width,
            size.height
          );

          this.ctx.restore();
        } else if (element.type === 'text') {
          const textElement = element.data as TextElement;
          drawText(this.ctx, textElement);
        } else if (element.type === 'frame') {
          const frameElement = element.data as FrameElement;
          const svgString = generateFrameSvg(
            frameElement,
            this.canvas.width,
            this.canvas.height
          );

          const cacheKey = `frame-${frameElement.color}-${frameElement.style}-${frameElement.borderRadius}-${this.canvas.width}-${this.canvas.height}`;

          let frameImg: HTMLImageElement;
          if (this.imageCache.has(cacheKey)) {
            frameImg = this.imageCache.get(cacheKey)!;
          } else {
            frameImg = await loadImage(`data:image/svg+xml,${encodeURIComponent(svgString)}`);
            this.imageCache.set(cacheKey, frameImg);
          }

          this.ctx.drawImage(frameImg, 0, 0, this.canvas.width, this.canvas.height);
        }
      } catch (error) {
        console.error(`Error drawing element ${element.id}:`, error);
      }
    }
  }
うーん重たい。
ついついテンションが上がってここまで書き続けていますが私は徹夜です。
ステップずつ理解をしていきます。
まず、画像データの取得。
elementsメンバに保持されている要素をfilterで回し、画像データのみを取得します。
imageElement.srcベースで、キャッシュから取得出来るか試します。
この辺りまでは先と同じなので難解ではないです。
          this.ctx.save();
          this.ctx.globalAlpha = imageElement.opacity;

          // ctxの定義部 ↓
          // private ctx: CanvasRenderingContext2D;
ctxはCanvas2Dにおけるインターフェースで、以下のようなデータが代入されます。
    this.canvas = canvas;
    const ctx = canvas.getContext('2d');
CanvasRenderingContext2D型のctxはcanvas要素に対する描画マンです。
ctx.save()を先に走らせて、後の処理が次回のcanvasへの描画に影響しないようにします。
(今回の描画は上手くいくが、save → restoreを処理の前後に挟まなければ、その後の描画処理で今回描画に使ったオプションが引き継がれたりする)
その後、以下の処理を実行
          const position = imageElement.position || { x: this.canvas.width / 2, y: this.canvas.height / 2 };
          const size = imageElement.size || { width: this.canvas.width, height: this.canvas.height };

          this.ctx.drawImage(
            img,
            position.x - size.width / 2,
            position.y - size.height / 2,
            size.width,
            size.height
          );

          this.ctx.restore();
positionやsizeを調整、うまいこと縦100%、アスペクト比保持、中央で配置するようデータを成形し、ctx.drawImageでcanvasに画像を描画します。
最後にrestore
以上が画像がアップロードされたときに裏で走る処理となります。
文字入れ
サンプルアプリ側
import {
  TextInput,
  TextCustomization,
} from '~/src/index';

function App() {
  // テキスト入力用の状態
  const [inputText, setInputText] = useState<string>('');
  const [textColor, setTextColor] = useState<string>('#000000');
  const [fontSize, setFontSize] = useState<number>(24);
  const [fontFamily, setFontFamily] = useState<string>('Arial');
  const [fontWeight, setFontWeight] = useState<string>('normal');

  // テキスト追加のハンドラー
  const handleAddText = () => {
    if (!inputText.trim() || !editorRef.current) return;

    const id = editorRef.current.addText({
      text: inputText,
      color: textColor,
      fontSize: fontSize,
      fontFamily: fontFamily,
      position: { x: 400, y: 300 },
      weight: fontWeight
    });

    if (id) {
      const newElements = editorRef.current.getElements();
      const newElement = newElements.find(el => el.id === id);
      if (newElement) {
        setSelectedElement(newElement);
      }
      // テキスト入力をリセット
      setInputText('');
    }
  };
              <h3>テキスト追加</h3>
              <TextInput
                label="テキスト"
                value={inputText}
                onChange={setInputText}
                placeholder="テキストを入力してください"
                rows={1}
              />
              <TextCustomization
                label="テキスト"
                color={textColor}
                setColor={setTextColor}
                size={fontSize}
                setSize={setFontSize}
                family={fontFamily}
                setFamily={setFontFamily}
                weight={fontWeight}
                setWeight={setFontWeight}
              />
              <button onClick={handleAddText} className="btn">テキストを追加</button>
こんな感じです。
画像アップロードと同様、統一感を出すためのUI要素のみをimport出来るようになっている他、特殊なロジックは持ちません。

   const id = editorRef.current.addText({
     text: inputText,
     color: textColor,
     fontSize: fontSize,
     fontFamily: fontFamily,
     position: { x: 400, y: 300 },
     weight: fontWeight
   });
のあたりはライブラリ経由のeditorRefのメンバーを呼び出すので、内部実装が係る部分ですが、それ以外は基本的に単純な文字データを記憶・更新するだけで済むように汎用的なもののみをimportして使えるようになっています。
内部実装側
editorRef.current.addTextですが、先のaddImageと同様で、React.useImperativeHandleというhooksを用いて出力されている関数になります。
実態はeditor.addTextで、先のImageEditorクラスのメンバです。
    // Refを通じて公開するメソッド
    React.useImperativeHandle(ref, () => ({
      addText: (textElement: Omit<TextElement, 'id'>): string | null => {
        if (!editor) return null;

        const id = editor.addText(textElement);
        setElements(editor.getElements());
        return id;
      },

      addImage: async (src: string, options?: Omit<ImageElement, 'src'>): Promise<string | null> => {
        if (!editor) return null;

        const id = await editor.addImage(src, options);
        setElements(editor.getElements());
        return id;
      },
React.useImperativeHandleはrefを介して親コンポーネントに子コンポーネントの内部のメソッドや値を公開するためのhooksです。
親に対して全ての情報を渡さないために使われるものになります。
(単にrefで渡すだけだと、内部の関数が不本意に呼び出されるリスクがあるため)
テキストのドラッグによる移動
サンプルアプリ側
対応不要です。
文字を入れるだけで、ライブラリ側完結で文字のDnDが可能です。
内部実装側
テキストのドラッグによる移動実装. ImageEditorComponent
    // マウスイベントハンドラー
    const handleMouseDown = useCallback((e: React.MouseEvent<HTMLCanvasElement>) => {
      if (!editor || !canvasRef.current) return;

      const canvas = canvasRef.current;
      const rect = canvas.getBoundingClientRect();
      const x = e.clientX - rect.left;
      const y = e.clientY - rect.top;

      // キャンバスの実際のサイズとスタイルサイズの比率を計算
      const scaleX = canvas.width / rect.width;
      const scaleY = canvas.height / rect.height;

      // スケールを適用した座標
      const canvasX = x * scaleX;
      const canvasY = y * scaleY;

      // テキスト要素を検索
      for (const element of elements) {
        if (element.type === 'text') {
          const textElement = element.data as TextElement;
          const textPos = textElement.position;

          // テキスト要素の範囲内かどうかを確認
          const textWidth = textElement.text.length * (textElement.fontSize * 0.6);
          const textHeight = textElement.fontSize;

          if (
            canvasX >= textPos.x - textWidth / 2 &&
            canvasX <= textPos.x + textWidth / 2 &&
            canvasY >= textPos.y - textHeight / 2 &&
            canvasY <= textPos.y + textHeight / 2
          ) {
            setSelectedElement(element);
            setIsDragging(true);
            setDragStartPos({ x: canvasX, y: canvasY });
            break;
          }
        }
      }
    }, [editor, elements, canvasRef]);

    const handleMouseMove = useCallback((e: React.MouseEvent<HTMLCanvasElement>) => {
      if (!isDragging || !editor || !selectedElement || !canvasRef.current) return;

      const canvas = canvasRef.current;
      const rect = canvas.getBoundingClientRect();
      const x = e.clientX - rect.left;
      const y = e.clientY - rect.top;

      // キャンバスの実際のサイズとスタイルサイズの比率を計算
      const scaleX = canvas.width / rect.width;
      const scaleY = canvas.height / rect.height;

      // スケールを適用した座標
      const canvasX = x * scaleX;
      const canvasY = y * scaleY;

      // 移動量を計算
      const deltaX = canvasX - dragStartPos.x;
      const deltaY = canvasY - dragStartPos.y;

      if (selectedElement.type === 'text') {
        const textElement = selectedElement.data as TextElement;
        const newPosition = {
          x: textElement.position.x + deltaX,
          y: textElement.position.y + deltaY
        };

        // 要素の位置を更新
        editor.updateElementPosition(selectedElement.id, newPosition);

        // ドラッグ開始位置を更新
        setDragStartPos({ x: canvasX, y: canvasY });
      }
    }, [isDragging, editor, selectedElement, dragStartPos, canvasRef]);

    const handleMouseUp = useCallback(() => {
      setIsDragging(false);
    }, []);

    // マウスイベントリスナーを設定
    useEffect(() => {
      const canvas = canvasRef.current;
      if (canvas) {
        canvas.addEventListener('mouseup', handleMouseUp);
        document.addEventListener('mouseup', handleMouseUp);
        document.addEventListener('mouseleave', handleMouseUp);
      }

      return () => {
        if (canvas) {
          canvas.removeEventListener('mouseup', handleMouseUp);
          document.removeEventListener('mouseup', handleMouseUp);
          document.removeEventListener('mouseleave', handleMouseUp);
        }
      };
    }, [handleMouseUp, canvasRef]);
        <canvas
          ref={canvasRef}
          width={props.width || 800}
          height={props.height || 600}
          className="image-editor-canvas"
          style={{ border: '1px solid #ccc', maxWidth: '100%', height: 'auto' }}
          onMouseDown={handleMouseDown}
          onMouseMove={handleMouseMove}
        />
中こんな感じになってます。嫌になりますね。
ちゃんと読んでいきます。
    // マウスイベントハンドラー
    const handleMouseDown = useCallback((e: React.MouseEvent<HTMLCanvasElement>) => {
      if (!editor || !canvasRef.current) return;

      const canvas = canvasRef.current;
      const rect = canvas.getBoundingClientRect();
      const x = e.clientX - rect.left;
      const y = e.clientY - rect.top;

      // キャンバスの実際のサイズとスタイルサイズの比率を計算
      const scaleX = canvas.width / rect.width;
      const scaleY = canvas.height / rect.height;

      // スケールを適用した座標
      const canvasX = x * scaleX;
      const canvasY = y * scaleY;

      // テキスト要素を検索
      for (const element of elements) {
        if (element.type === 'text') {
          const textElement = element.data as TextElement;
          const textPos = textElement.position;

          // テキスト要素の範囲内かどうかを確認
          const textWidth = textElement.text.length * (textElement.fontSize * 0.6);
          const textHeight = textElement.fontSize;

          if (
            canvasX >= textPos.x - textWidth / 2 &&
            canvasX <= textPos.x + textWidth / 2 &&
            canvasY >= textPos.y - textHeight / 2 &&
            canvasY <= textPos.y + textHeight / 2
          ) {
            setSelectedElement(element);
            setIsDragging(true);
            setDragStartPos({ x: canvasX, y: canvasY });
            break;
          }
        }
      }
    }, [editor, elements, canvasRef]);
一つ目はこの子で、イベントMouseEvent<HTMLCanvasElement>を受け取り
            setSelectedElement(element);
            setIsDragging(true);
            setDragStartPos({ x: canvasX, y: canvasY });
することをゴールとする関数になります。
途中段階としては、「ユーザーがクリックしたのはCanvas内か?」「どのテキスト要素がクリックされているか?」を判定しています。
また最終的な処理のそれぞれの役割としては、
- setSelectedElement
- selectedElementデータの更新
- その後の処理、「handleMouseMove」で使う
- 「クリックされたテキスト要素」
- setIsDragging
- ドラッグ中であることを示す状態の更新
- setDragStartPos
- ドラッグ開始位置の更新
となります。
次の関数は、この子になります。
canvas.onMouseMoveに前述のonMouseDownと一緒にコールバックで設定されていることがわかります。
    const handleMouseMove = useCallback((e: React.MouseEvent<HTMLCanvasElement>) => {
      if (!isDragging || !editor || !selectedElement || !canvasRef.current) return;

      const canvas = canvasRef.current;
      const rect = canvas.getBoundingClientRect();
      const x = e.clientX - rect.left;
      const y = e.clientY - rect.top;

      // キャンバスの実際のサイズとスタイルサイズの比率を計算
      const scaleX = canvas.width / rect.width;
      const scaleY = canvas.height / rect.height;

      // スケールを適用した座標
      const canvasX = x * scaleX;
      const canvasY = y * scaleY;

      // 移動量を計算
      const deltaX = canvasX - dragStartPos.x;
      const deltaY = canvasY - dragStartPos.y;

      if (selectedElement.type === 'text') {
        const textElement = selectedElement.data as TextElement;
        const newPosition = {
          x: textElement.position.x + deltaX,
          y: textElement.position.y + deltaY
        };

        // 要素の位置を更新
        editor.updateElementPosition(selectedElement.id, newPosition);

        // ドラッグ開始位置を更新
        setDragStartPos({ x: canvasX, y: canvasY });
      }
    }, [isDragging, editor, selectedElement, dragStartPos, canvasRef]);
こちらは逆に、要素の位置とドラッグ開始位置を更新することをゴールとしています。
この時、先のonMouseDownで更新した、
- isDragging
- selectedElement
を使っていることがわかります。
if (!isDragging || !editor || !selectedElement || !canvasRef.current) return;
    const textElement = selectedElement.data as TextElement;
      const newPosition = {
        x: textElement.position.x + deltaX,
        y: textElement.position.y + deltaY
      };
この辺ですね。
canvas.onMouseMoveはマウスがキャンバス上を移動するたびに発動するため、「何が選択されているか」「ドラッグ中か」の判定が大事になります。
また、
    const handleMouseUp = useCallback(() => {
      setIsDragging(false);
    }, []);

    // マウスイベントリスナーを設定
    useEffect(() => {
      const canvas = canvasRef.current;
      if (canvas) {
        canvas.addEventListener('mouseup', handleMouseUp);
        document.addEventListener('mouseup', handleMouseUp);
        document.addEventListener('mouseleave', handleMouseUp);
      }

      return () => {
        if (canvas) {
          canvas.removeEventListener('mouseup', handleMouseUp);
          document.removeEventListener('mouseup', handleMouseUp);
          document.removeEventListener('mouseleave', handleMouseUp);
        }
      };
    }, [handleMouseUp, canvasRef]);
この子とかは単純で、MouseUp時(マウスのボタンを離したタイミング)に「ドラッグ状態では無い」状態遷移を行なっています。
おわりに
お疲れ様です。
画像をcanvas2D上で編集することの流れを皆と一緒に勉強出来たかなと思います
おやすみなさい