概要
Spring BootとJPAとFlywayとherokuを使って、DBから返信メッセージを取得するLINE Botを作る。
あくまでちょっと動かしてみた程度のソースなので、細かいところのツッコミはご容赦ください。
また以下については説明しないので、リンク先を参照してください。
- LINE Channelの作成
- herokuでアプリを作成
- JPA (Java Persistence API) => Java標準のORM
- Flyway => Migrationツール
関連
前提
lineが配布しているサンプルコードを使う。
https://github.com/line/line-bot-sdk-java.git
環境
- Java 11.02
- Spring Boot 2.4.9 (line-bot-sdk-javaで使われているversion)
要件
LINEでbot宛にメッセージを送信すると、その送信文字列に応じた返信メッセージをDBのTableから抽出し、返信するシステムを作る。返信の条件は以下の通り。
| 送信Message | 返信Message |
|---|---|
| ハロー | ハローワールド |
| hello | Hello world!! |
| それ以外 | 返信しない |
アーキテクチャ
- heroku
- PostgreSQL 13.3 (on heroku)
ディレクトリ構成
サンプルコードの中で、今回編集、新規追加するファイルだけを以下に記した。
.
├ ─ ─  Procfile
└ ─ ─  sample-spring-boot-kitchensink
     ├ ─ ─  build.gradle
     └ ─ ─  src
         └ ─ ─  main
             ├ ─ ─  java
             │    └ ─ ─  com
             │        └ ─ ─  example
             │            └ ─ ─  bot
             │                └ ─ ─  spring
             │                    ├ ─ ─  KitchenSinkController.java
             │                    ├ ─ ─  models
             │                    │    └ ─ ─  TextMessageModel.java
             │                    ├ ─ ─  repositories
             │                    │    └ ─ ─  TextMessageRepository.java
             │                    └ ─ ─  services
             │                         └ ─ ─  TextMessageService.java
             └ ─ ─  resources
                 ├ ─ ─  application.yml
                 └ ─ ─  db
                     └ ─ ─  migration
                         └ ─ ─  V1_0__create_table_text_messages.sql
サンプルコードの中のsample-spring-boot-kitchensinkを利用するので、以下3つのディレクトリは消してしまってもOK。
- sample-manage-audience
- sample-spring-boot-echo
- sample-spring-boot-echo-kotlin
DB Table
text_messagesという返信用メッセージを入れるテーブルを作成する。Flywayでmigrateするので、手動での作成は不要。
line-bot-sample::DATABASE=> \d text_messages;
                                    Table "public.text_messages"
 Column  |          Type          | Collation | Nullable |                  Default
---------+------------------------+-----------+----------+-------------------------------------------
 id      | integer                |           | not null | nextval('text_messages_id_seq'::regclass)
 message | character varying(255) |           | not null |
Indexes:
    "text_messages_pkey" PRIMARY KEY, btree (id)
GitHUB
完成品はこちら
https://github.com/Esfahan/line-bot-java-sample
作成手順
サンプルコードの取得
lineが配布しているサンプルコードを使う。
$ git clone https://github.com/line/line-bot-sdk-java.git
JPAとflywayを利用できるようにする
sample-spring-boot-kitchensink/build.gradleに以下を追記する。
dependencies {
     implementation project(':line-bot-spring-boot')
     implementation "org.springframework.boot:spring-boot-starter-web"
     implementation 'com.google.guava:guava'
+    implementation 'org.springframework.boot:spring-boot-starter-data-jpa'
+    implementation 'org.flywaydb:flyway-core'
+    runtimeOnly 'org.postgresql:postgresql'
 }
application.ymlを作成
sample-spring-boot-kitchensink/src/main/resources/application.ymlを新規作成する。
環境変数の値については後述する。
line.bot:
  channel-token: ${CHANNEL_TOKEN}
  channel-secret: ${CHANNEL_SECRET}
  handler.path: /callback

spring:
  jpa:
    database: POSTGRESQL
    open-in-view: True
  datasource:
    url: ${DATABASE_JDBC_URL}
    username: ${DATABASE_USER}
    password: ${DATABASE_PASSWORD}
    driver-class-name: org.postgresql.Driver
    connectionProperties: useUnicode=true;characterEncoding=utf-8;
  flyway:
    locations: classpath:/db/migration
    baseline-on-migrate: true
その他のプロパティは以下を参照。
https://spring.pleiades.io/spring-boot/docs/current/reference/html/application-properties.html
Migrationファイルを作成
マイグレーションファイルの命名規則は以下を参照。
https://garafu.blogspot.com/2020/06/how-to-use-flyway.html
今回は以下の名前で作成する。
V1_0__create_table_text_messages.sql
application.ymlのflyway.locationsで定義したように、resources/db/migration/にsqlファイルを設置するとmigrationが実行されるので、ディレクトリを作ってsqlファイルを作成する。
$ mkdir -p sample-spring-boot-kitchensink/src/main/resources/db/migration/
$ vi sample-spring-boot-kitchensink/src/main/resources/db/migration/V1_0__create_table_text_messages.sql
CREATE TABLE text_messages(
  id serial PRIMARY KEY,
  message varchar(255) NOT NULL
);
ディレクトリ作成
各ソースコードを設置するmodels/,repositories/,services/ディレクトリを作成する。
$ mkdir sample-spring-boot-kitchensink/src/main/java/com/example/bot/spring/{models,repositories,services}
Modelの作成
以下のファイルを新規作成する。
sample-spring-boot-kitchensink/src/main/java/com/example/bot/spring/models/TextMessageModel.java
package com.example.bot.spring.models;

import javax.persistence.Entity;
import javax.persistence.Id;
import javax.persistence.Table;

@Entity
@Table(name="text_messages")
public class TextMessageModel {
    @Id
    private Integer id;

    public String message;
}
Repositoryの作成
以下のファイルを新規作成する。
sample-spring-boot-kitchensink/src/main/java/com/example/bot/spring/repositories/TextMessageRepository.java
package com.example.bot.spring.repositories;

import com.example.bot.spring.models.TextMessageModel;
import org.springframework.data.jpa.repository.JpaRepository;

public interface TextMessageRepository extends JpaRepository<TextMessageModel, Integer> {
}
Serviceの作成
以下のファイルを新規作成する。
sample-spring-boot-kitchensink/src/main/java/com/example/bot/spring/services/TextMessageService.java
package com.example.bot.spring.services;

import com.example.bot.spring.repositories.TextMessageRepository;
import lombok.extern.slf4j.Slf4j;
import org.springframework.beans.factory.annotation.Autowired;
import org.springframework.stereotype.Service;

@Slf4j
@Service
public class TextMessageService {
    private String replyTextMessage;
    private boolean replyFlg;

    @Autowired
    TextMessageRepository textMessageRepository;

    public void fetchReplyTextMessage (String message) {
        log.info("fetchReplyTextMessage is called: {}", message);

        Integer id = replyId(message);
        if (id > 0) {
            this.replyTextMessage = textMessageRepository.findById(id).get().message;
            this.replyFlg = true;
        } else {
            this.replyFlg = false;
        }
    }

    public String getReplyMessage() {
        return this.replyTextMessage;
    }

    public boolean getReplyFlg() {
        return this.replyFlg;
    }

    private Integer replyId(String message) {
        switch (message) {
            case "ハロー": {
                return 1;
            }
            case "hello": {
                return 2;
            }
            default: {
                return 0;
            }
        }
    }
}
controller
以下のファイルを編集する。
sample-spring-boot-kitchensink/src/main/java/com/example/bot/spring/KitchenSinkController.java
ここでは、処理内容をシンプルに分かりやすくするため、handleTextMessageEventメソッド1つで全ての処理するように書き換える。
+import com.example.bot.spring.services.TextMessageService;
 import org.springframework.beans.factory.annotation.Autowired;
 import org.springframework.web.servlet.support.ServletUriComponentsBuilder;

public class KitchenSinkController {
     @Autowired
     private LineBlobClient lineBlobClient;

+    @Autowired
+    private TextMessageService textMessageService;
+
     @EventMapping
     public void handleTextMessageEvent(MessageEvent<TextMessageContent> event) throws Exception {
         TextMessageContent message = event.getMessage();
-        handleTextContent(event.getReplyToken(), event, message);
+
+        log.info("TextMessageContent is called");
+
+        textMessageService.fetchReplyTextMessage(message.getText());
+
+        if (textMessageService.getReplyFlg()) {
+            log.info("replyFlg is true");
+
+            String replyText = textMessageService.getReplyMessage();
+            List<Message> replyMessage = singletonList(new TextMessage(replyText));
+            String replyToken = event.getReplyToken();
+
+            log.info("Returns echo message {}: {}", replyToken, replyText);
+
+            boolean notificationDisabled = false;
+            try {
+                BotApiResponse apiResponse = lineMessagingClient
+                        .replyMessage(new ReplyMessage(replyToken, replyMessage, notificationDisabled))
+                        .get();
+                log.info("Sent messages: {}", apiResponse);
+            } catch (InterruptedException | ExecutionException e) {
+                throw new RuntimeException(e);
+            }
+        }
     }
Procfileを書き換え
sample-spring-boot-kitchensinkを利用するため、Procfileを以下の様に書き換える。
-web: java $JAVA_OPTS -jar sample-spring-boot-echo/build/libs/sample-spring-boot-echo-*.jar --server.port=$PORT
+web: java $JAVA_OPTS -jar sample-spring-boot-kitchensink/build/libs/sample-spring-boot-kitchensink-*.jar --server.port=$PORT
.gitignore
*.jarをignoreすると./gradle/wrapper/gradle-wrapper.jarがDeployされず、以下のエラーが出るので編集する。
Error: Could not find or load main class org.gradle.wrapper.GradleWrapperMain
# Package Files #
-*.jar
+#*.jar
 *.war
 *.ear
herokuの環境変数設定
herokuに以下の環境変数を設定する。
| Key | Value |
|---|---|
| CHANNEL_SECRET | LINEのChannel access token |
| CHANNEL_TOKEN | LINEのChannel secret |
| DATABSE_JDBC_URI | jdbc:postgresql://herokuのpostgresのhostname:5432/dbname |
| DATABSE_USER | herokuのpostgresのuser name |
| DATABSE_PASSWORD | herokuのpostgresのpassword |
Deploy
herokuにdeployする。
$ git remote add heroku https://git.heroku.com/${HEROKU_APP_NAME}.git
$ git add --all
$ git commit -m 'Added a sample codeset for Qiita'
$ git push heroku master
Migrationの結果を確認
herokuにdeployすると、postgresに以下のテーブルが作成される。
Intellijなどローカルの場合は、IDEでプログラムを実行すれば接続先のDBにテーブルが作成される。
$ heroku pg:psql postgresql-abcdefg-12345 --app line-bot-sample
line-bot-sample::DATABASE=> \d
                     List of relations
 Schema |         Name          |   Type   |     Owner
--------+-----------------------+----------+----------------
 public | flyway_schema_history | table    | sample-user
 public | text_messages         | table    | sample-user
 public | text_messages_id_seq  | sequence | sample-user
(3 rows)
Insert
DBに以下をinsertする。これが、返信用メッセージとなる。
line-bot-sample::DATABASE=> insert into text_messages (message) values ('ハローワールド');
INSERT 0 1
line-bot-sample::DATABASE=> insert into text_messages (message) values ('Hello world!!');
INSERT 0 1
line-bot-sample::DATABASE=> select * from text_messages;
 id |    message
----+----------------
  1 | ハローワールド
  2 | Hello world!!
(2 rows)
LINEでWebhook URLを設定
LINE DeveloperのMessage APIのWebhook Settingsに、herokuのURLを登録する。
Webhook URL: https://{HEROKU_APP_NAME}.herokuapp.com/callback
Use webhook: onにする
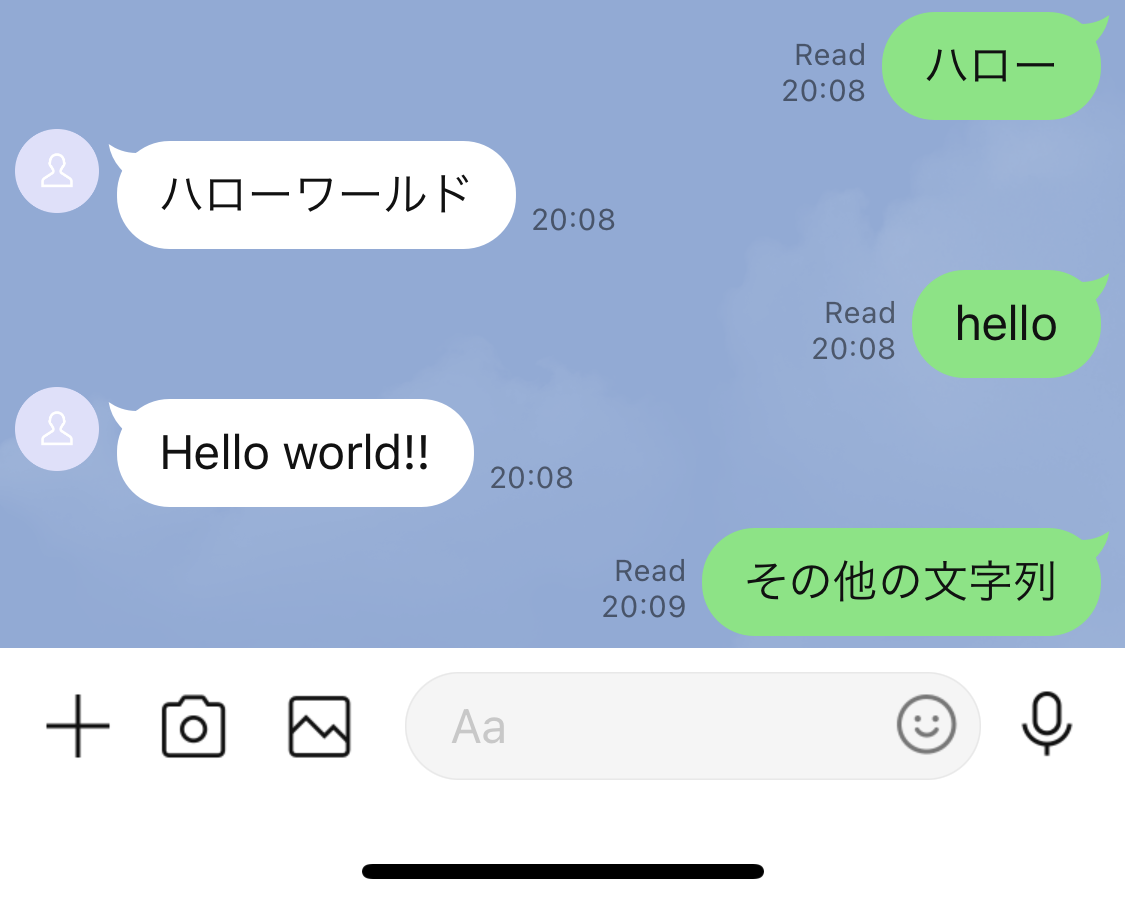
これでbotにメッセージを送信すると、以下のような結果となる。

テストコードを書く場合
以下にtest用ディレクトリを作成し、その下にテストコードを作成する。
$ mkdir -p sample-spring-boot-kitchensink/src/test/java/com/example/bot/spring/
参考
https://tosi-tech.net/2019/04/flyway-with-spring-boot/
https://tomokazu-kozuma.com/how-to-migrate-mysql-using-flyway/