オートスケール(Auto Scaling)
AWSでは、ある状態のEC2インスタンスを記録したAMI(マシンイメージ、スナップショットのようなもの)を作成することができます。
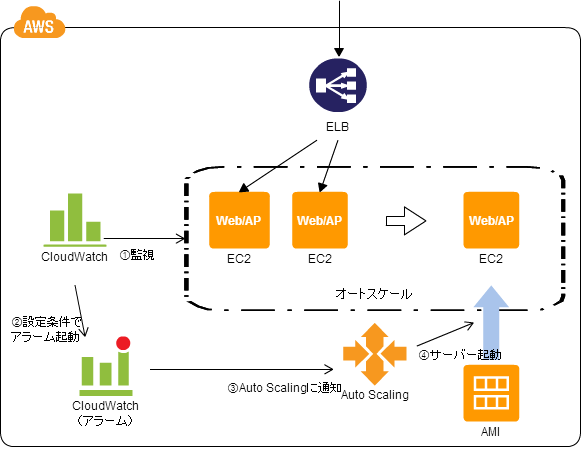
作成したAMIは、サーバの負荷に応じて台数を変化させる「オートスケール(Auto Scaling)」機能によって新しくサーバを立ち上げるときに使用されます。
ここで問題なのが、AMIはある時点でのEC2インスタンスの状態をそのまま記録しただけのものなので、例えばソースコードが更新されていった場合に最新の状態とずれていってしまうことです。
Bootstrapパターン
この問題の解決法として『Stampパターン』と『Bootstrapパターン』の2つが主に知られています。
Stampパターンとは、ソースコードなどが更新された場合は、単純にまた新しいマシンイメージを作り直すというものです。
これは直感的な方法ではありますが、少しでも変更が入った場合は毎回マシンイメージを作り直す必要が出てきてしまいます。
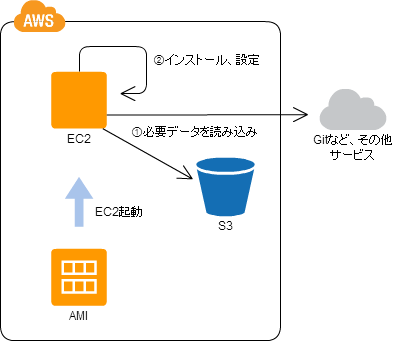
Bootstrapパターンでは、マシンイメージからサーバを起動したタイミングで最新のソースコードなどを自動で取得するように設定しておくことで、毎回マシンイメージを作り直す必要がなくなります。
Capistranoによるデプロイの仕組み
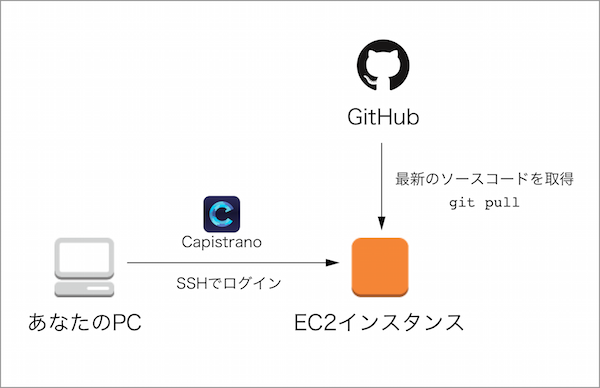
Capistranoは単純に説明すると、サーバにSSHログインしてからGitHubなどのリモートサーバから最新のソースコードを取得する仕組みです。
注目すべきは、Capistranoのコードを実行するのは手元のローカルPCであるということです。サーバのソースコードを最新にするので本来はサーバ内でいろいろと処理をする必要があるのですが、それをCapistranoがSSHログインして自動的にやってくれます。
CapistranoでBootstrapパターンを実装する際の問題点 → セルフデプロイ(self-deploy)
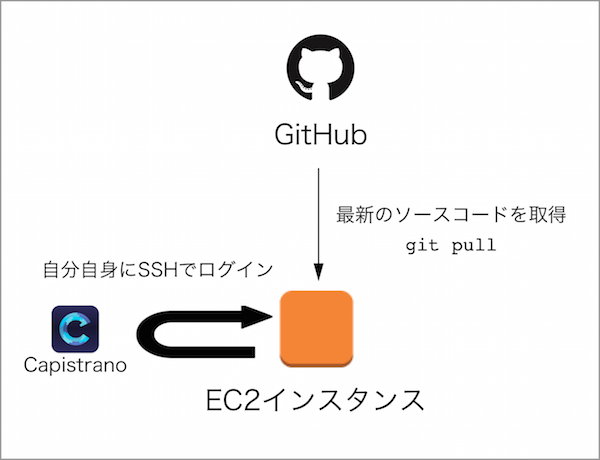
Capistranoは素晴らしいデプロイツールなのでぜひ活用したいのですが、Bootstrapパターンにおいて最新のソースコードを取得するのはそのサーバ自体です。CapistranoはローカルPCからサーバにSSHログインして使うツールなので、単純には使えません。
そこで解決策として、「自分自身(localhost)にSSHログインしてデプロイする」という方法があります。
多少非効率ではありますが、これならCapistranoをそのまま使ってBootstrapパターンを実装できます。

オートスケール時のデプロイを User Data と Capistrano を使って行う(BootStrap パターン)
具体的な実装
1.EC2内で自分自身にSSHログインできるようにする
公開鍵を設置
[ec2-user@ip-x-x-x-x ~]$ ssh-keygen # パスワードなしで生成(何も入力せずEnter)
[ec2-user@ip-x-x-x-x ~]$ cd ~/.ssh
[ec2-user@ip-x-x-x-x .ssh]$ mv id_rsa id_for_localhost # 秘密鍵の名前を変更
[ec2-user@ip-x-x-x-x .ssh]$ mv id_rsa.pub id_for_localhost.pub # 公開鍵の名前を変更
[ec2-user@ip-x-x-x-x .ssh]$ cat id_for_localhost.pub >> authorized_keys # 生成した公開鍵でログインできるように追記(元からあるキーは削除しないでください!)
[ec2-user@ip-x-x-x-x .ssh]$ chmod 600 authorized_keys # 権限を変更
SSHの公開鍵認証について理解したい人は以下から。
SSHの仕組み!ぼんやりとした理解だったものをすっきりさせようの会
SSHログインを確認
[ec2-user@ip-x-x-x-x ~]$ ssh -i ~/.ssh/id_for_localhost ec2-user@localhost
The authenticity of host 'localhost (127.0.0.1)' can't be established.
ECDSA key fingerprint is xx:xx:xx:xx:xx:xx:xx:xx:xx:xx:xx:xx:xx:xx:xx:xx.
Are you sure you want to continue connecting (yes/no)? yes
Warning: Permanently added 'localhost' (ECDSA) to the list of known hosts.
Last login: Tue Jul  8 13:05:16 2014 from localhost

       __|  __|_  )
       _|  (     /   Amazon Linux AMI
      ___|\___|___|

https://aws.amazon.com/amazon-linux-ami/2014.03-release-notes/
[ec2-user@ip-x-x-x-x ~]$
このように表示されたら自分自身にログインできています。
フィンガープリントのチェックを省略する
EC2 は AMI から起動すると毎回ホスト鍵が変わるため、Capistrano からログインを行う際に、再度フィンガープリントの確認が対話的に行われてしまい、デプロイが上手くいかなくなります。それを回避するために、フィンガープリントのチェックを省略するように設定します。~/.ssh/configに以下を記述してください。
Host *
  StrictHostKeyChecking no
  UserKnownHostsFile /dev/null
2.セルフデプロイのためのRailsアプリケーションの設定
サーバ内には、通常のRailsアプリケーションとデプロイ用の2つを用意する必要があります。今回は以下のパスにします。
通常のRails(デプロイ先): /var/www/rails/webapp
デプロイ用(デプロイ実行): /var/www/rails/deploy
ソースコードの内容は同じですが、前者はCapistranoからデプロイして、後者はGitHubからクローンします(お好みの方法で構いません)。
local環境のデプロイファイルを作成
server 'localhost', user: 'ec2-user', roles: %w(web app db)

set :stage, 'local'
set :branch, 'master'
set :rails_env, :production

set :ssh_options, {
  keys: %w(~/.ssh/id_for_localhost),
}
require 'production.rb' # stagingまたはproductionと同じ。
プライベートリポジトリの場合、GitHubからソースコードを取得できるように秘密鍵を設置
プライベートリポジトリの場合は認証を通す必要があるので、秘密鍵をサーバにアップロードして~/.ssh/configに設定を記述しておきます。今回は秘密鍵はid_for_githubという名前で配置します。
Host *
  StrictHostKeyChecking no
  UserKnownHostsFile /dev/null

Host github.com
  HostName github.com
  IdentityFile ~/.ssh/id_for_github
  User git
capistrano3で突然deploy時githubのprivate repositoryにssh接続できなくなった
セルフデプロイが成功するかどうか確認
[ec2-user@ip-x-x-x-x ~]$ cd /var/www/rails/deploy
[ec2-user@ip-x-x-x-x deploy]$ bundle install
[ec2-user@ip-x-x-x-x deploy]$ bundle exec cap local deploy
DEBUG [f55ceada] Running /usr/bin/env [ -d /usr/local/src/rbenv/versions/2.3.0 ] as ec2-user@localhost
DEBUG [f55ceada] Command: [ -d /usr/local/src/rbenv/versions/2.3.0 ]
DEBUG [f55ceada] Finished in 0.103 seconds with exit status 0 (successful).
.
.
.
INFO [f64df576] Finished in 0.036 seconds with exit status 0 (successful).
[ec2-user@ip-x-x-x-x deploy]$
こんな感じで実行されていき、赤いエラー表示がなく終了していれば成功です。
起動時にセルフデプロイを実行
あとは起動時に実行するシェルスクリプトを書いていきます。以下のファイルを設置します。
# !/bin/bash
# chkconfig: 2345 99 10
# description: startup script

######################
# /etc/init.d/startup
######################

# log path
LOG_DIR=/home/ec2-user/log
LOG_FILE=$LOG_DIR/startup.log

# make log directory
mkdir -p $LOG_DIR

# self deploy (ec2-userで実行)
su - ec2-user /home/ec2-user/bin/self-deploy.sh production >> "$LOG_FILE" 2>&1 # staging | production

# change owner of log directory
chown ec2-user:ec2-user -R $LOG_DIR
# !/bin/bash

####################################
# /home/ec2-user/bin/self-deploy.sh
####################################

# path
app_path=/var/www/rails/webapp/current
deploy_path=/var/www/rails/deploy

# environment
rails_env=$1

# change directory
cd $deploy_path

# ️ export $PATH
export PATH

# update rails app for deploy
echo "=== [${rails_env}] update rails app for deploy ==="
if [ ${rails_env} = "production" ] ; then
  git fetch origin master
  git reset --hard origin/master
elif [ ${rails_env} = "staging" ] ; then
  git fetch origin develop
  git reset --hard origin/develop
fi
echo ""

# bundle install for deploy
echo "=== [${rails_env}] bundle install for deploy ==="
bundle install --path vendor/bundle #--quiet
echo ""

# self-deploy
echo "=== [${rails_env}] self-deploy to localhost ==="
bundle exec cap local_$rails_env deploy
echo ""
/etc/init.d/startupを起動時に実行するために、以下のようにchkconfigコマンドを実行します。
[ec2-user@ip-x-x-x-x ~]$ sudo chmod 755 /etc/init.d/startup
[ec2-user@ip-x-x-x-x ~]$ sudo chmod 755 /home/ec2-user/bin/self-deploy.sh
[ec2-user@ip-x-x-x-x ~]$ sudo chkconfig --add startup
[ec2-user@ip-x-x-x-x ~]$ sudo chkconfig startup on
[ec2-user@ip-x-x-x-x ~]$ chkconfig --list | grep startup # 以下のように出力されればOK
startup	0:off	1:off	2:on	3:on	4:on	5:on	6:off
以上です。EC2インスタンスを再起動してみて、/home/ec2-user/log/startup.logにログが書き込まれていれば成功です。
まとめ
CapistranoをAutoScalingを使うような実践環境で使う場合は必須のノウハウだと思ったのでまとめてみました。
誰かのお役に立てれば幸いです。質問等はコメント欄によろしくお願いします。


