概要
TextFSMはテキストをパースするためのPythonモジュールです。もっぱらCLI操作メインの機器が出力する情報を解析するためにgoogleが開発しているものだそうです。
このモジュールは出力データごとにテンプレートを用意し、それを用いてパースを行います。NW機器で言えば、show runやshow ip route等のコマンドごとにテンプレートを用意するイメージですね。
そして、NW機器のコマンドをTextFSMでパースするためのテンプレートとして、ntc-templateというテンプレート群が公開されています。
今回はnetmikoとTextFSM(ntc-template)を連携させ、NW機器のコマンド実行結果を辞書形式にパースしてみました。
パース自体はntc-templateを使うようにするだけなので簡単にできるのですが、gitを使わない場合にntc-templateのテンプレートをどこに置くかわからず苦戦したので、そこをメインに記載します。
実行環境
バージョン
Pythonバージョン:3.6
VSCodeバージョン:1.37.0
フォルダ構成
C:
┣ templates
┃ ┗テンプレートファイル群
┗ Python36Project
┗ ParamikoTest
┣ .vscode\
┃ ┣ launch.json
┃ ┗ settings.json
┣ netmikoTest(仮想環境フォルダ。今回使いません)
┃ ┣色々…
┣ textFSMTest(仮想環境フォルダ)
┃ ┣色々…
┗ SourceFiles\
┣ netmikoTest.py (今回使いません)
┣ netmikoTest2.py (今回使いません)
┗ netmikoTest3.py
以前の記事でnetmikoを使ったターミナルライクなプログラムを作成しました。今回はそれを拡張して使おうと思います。ただ、環境としては新しい仮想環境textFSMTestを用意し、その環境でnetmikoTest3.pyを走らせます。
ntc-templateのテンプレートはCドライブ配下に置きます(後述)
ちなみにプロジェクト名がParamikoTestなのは、もともとParamikoでいろいろやろうとしていたからです。
TextFSMのインストール
netmikoをインストールしたときにTextFSMも同時にインストールされていると思います。pip listで確認してみると良いかと。見当たらない場合はpip install textfsmでインストールします。
ntc-templateの使い方について
ntc-templateを使う場合は、gitを使うことが推奨されています。
The project can be installed using either Git or PyPI; if you would like to use the templates outside of this project, then Git is the recommended approach.(引用元)
今回はそれに逆らって、gitを使わずにテンプレートを利用してみようと思います。
テンプレート利用設定
テンプレートを利用するためには、以下の手順が必要です。
- テンプレートのダウンロード
- テンプレートフォルダの配置
これら手順について順に説明していきます。
テンプレートのダウンロード
まず、github等から以下のファイルをダウンロードしてきます
https://github.com/networktocode/ntc-templates
ブラウザからだと、右のほうにある「Clone for Download」でZIPファイルをダウンロードできると思います。
ダウンロードしたファイルを解凍すると、中に「templates」というフォルダがあるので、これを任意の場所に保管します。
テンプレートフォルダの配置
次にtemplatesフォルダの配置ですが、環境変数を設定する方法と、ホームディレクトリにフォルダを配置する方法があります。
環境変数を利用する場合は、環境変数NET_TEXTFSMを作成し、任意の場所に置いたtemplatesフォルダのパスを指定します。今回は仮にCドライブ直下に置きました。
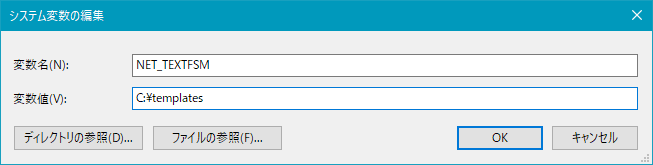
環境変数を読み込まない場合があるので、VSCodeは一度再起動等しておきましょう。
ホームディレクトリ直下に配置する場合は、ホームディレクトリ直下にntc-templatesフォルダを作成し、その配下にtemplatesフォルダを配置します。ホームディレクトリはos.path.expanduser("~")で確認できます。今回の検証環境ではtemplatesフォルダはC:\Users\ユーザ名\ntc-templates\templatesという配置になります。
以上のようにテンプレートフォルダを配置することができたので、実際にそのテンプレートを利用して出力結果をパースしてみます。
コマンド出力結果のパース
コマンド出力結果のパースを試すにあたり、前回の記事で作成したnetmikoTest2.pyをコピーしてnetmikoTest3.pyを作成し、以下のように記述してみました。
device = {
    'device_type':'cisco_ios',
    'ip':'IPアドレス',
    'username':'アカウント',
    'password':'ログインパスワード',
    'secret':'enableパスワード',
}

with netmiko.ConnectHandler(**device) as con:
    con.enable()
    while True:
        prompt = con.find_prompt()
        command = input(prompt)
        if(command == ''):
            continue
        elif (command == 'exit'):
            break
        elif (command == 'format'):
            output = con.send_command('sh ip route', use_textfsm=True)
            print(output)
            continue
        else:
            output = con.send_command(command)
            print(output)
新しく追加したのはelif (command == 'format'):のブロックです。
textFSMを利用するには、send_command()の引数としてuse_textfsmをTrueに設定してあげるだけです。これだけでtextFSMが先のtemplatesフォルダから適切なテンプレートを使ってパースしてくれるようになります。簡単ですね。
ソースコードを実行し、NW機器にログインした後にformatとコマンドをたたけば、自動でtextFSMがshow ip routeの結果を辞書形式にパースしてくれます。(パース結果はマスキングが面倒なので載せません)
終わりに
netmikoとTextFSMを連携させることで、コマンドの実行結果を簡単に辞書形式にフォーマットできました。ほかのプログラムと連携するときに使えそうです。
また、テンプレートは自作できるそうなので、自分で拡張できるところも良いですね。
補足:テンプレートフォルダの保管先について
テンプレートの保管先は、公式を見ると以下のように記載されています
Netmiko has been configured to automatically look in ~/ntc-template/templates/index for the ntc-templates index file. Alternatively, you can explicitly tell Netmiko where to look for the TextFSM template directory by setting the NET_TEXTFSM environment variable (note, there must be an index file in this directory):
つまり、テンプレートの保管先はホームディレクトリ\ntc-templates\templatesか、環境変数NET_TEXTFSMに従うよ。ってことです。
この記述について、正しいかどうかソースコードを読み解いて検証してみます(備忘録的な意味合いが強いので興味のない方は読み飛ばしてください)
まず初めに、利用者側に一番近いbase_connectionクラスのsend_command()の実装を追いました。
send_command()では、引数にあるuse_textfsmの値でテンプレートの利用可否が別れます。use_textfsmがTrueの場合、テンプレートを利用することになるようです。その場合の処理を見てみると、
# If both TextFSM and Genie are set, try TextFSM then Genie
for parser_flag, parser_func in (
    (use_textfsm, get_structured_data),
    (use_genie, get_structured_data_genie),
):
    if parser_flag:
        structured_output = parser_func(
            output, platform=self.device_type, command=command_string.strip()
        )
        # If we have structured data; return it.
        if not isinstance(structured_output, string_types):
            return structured_output
return output
textfsmがTrueの時にはget_structured_data()を呼び出しているみたいです。
フラグと実行関数を辞書にし、for文を使って関数を実行させてます。for文に渡す辞書を更新すればパーサを簡単に増やせそうな実装で面白いですね。普通ならIf文で処理しちゃいそうなものです。Pythonやデザインパターンには疎いのでわかりませんが、メジャーな方法なのでしょうか。
余談は置いて、get_structured_data()のソースを見てみます。
def get_structured_data(raw_output, platform, command):
    """Convert raw CLI output to structured data using TextFSM template."""
    template_dir = get_template_dir()
    index_file = os.path.join(template_dir, "index")
    textfsm_obj = clitable.CliTable(index_file, template_dir)
    attrs = {"Command": command, "Platform": platform}
    try:
        # Parse output through template
        textfsm_obj.ParseCmd(raw_output, attrs)
        structured_data = clitable_to_dict(textfsm_obj)
        output = raw_output if structured_data == [] else structured_data
        return output
    except CliTableError:
        return raw_output
try内は、実際のパース処理なので特に細かくは見ていないですが、それ以前の2行に注目すると、どうやらテンプレートファイルの場所を取得しているようです。
get_template_dir()で取得するパスがテンプレートファイルが配置されているパス。そのディレクトリ直下にindexファイルが存在することがわかります。
get_template_dir()のコードを見てみましょう
def get_template_dir():
    """Find and return the ntc-templates/templates dir."""
    try:
        template_dir = os.path.expanduser(os.environ["NET_TEXTFSM"])
        index = os.path.join(template_dir, "index")
        if not os.path.isfile(index):
            # Assume only base ./ntc-templates specified
            template_dir = os.path.join(template_dir, "templates")
    except KeyError:
        # Construct path ~/ntc-templates/templates
        home_dir = os.path.expanduser("~")
        template_dir = os.path.join(home_dir, "ntc-templates", "templates")

    index = os.path.join(template_dir, "index")
    if not os.path.isdir(template_dir) or not os.path.isfile(index):
        msg = """
Valid ntc-templates not found, please install https://github.com/networktocode/ntc-templates
and then set the NET_TEXTFSM environment variable to point to the ./ntc-templates/templates
directory."""
        raise ValueError(msg)
    return os.path.abspath(template_dir)
ソースコードを読むと、環境変数「NET_TEXTFSM」のパスがテンプレートの保管先だとわかります。indexファイルは、NET_TEXTFSM直下に配置されていればよさそうです。
なので、「NET_TEXTFSM」の値としては、templatesフォルダまでのパスを指定してあげれば問題なさそうです。
また、expectの内部を見る限り、「NET_TEXTFSM」が存在しない場合はホームディレクトリ/ntc-templates/templatesをテンプレートフォルダと決めているみたいです。
ソースコードから、templatesの保管先は環境変数「NET_TEXTFSM」 > ホームディレクトリ配下という優先順位なのがわかりました。
以上の内容から、上で引用したテンプレートの保管先についての説明が正しいことがわかりました。
補足の補足
なぜ今回こんな検証をしたかというと、当初netmikoのREADMEを読まずにntc-templatesを使おうと思ったらテンプレートをどこに置けばわからなかったので、じゃあソースコード追えばいいじゃん。と思い立ったのが始まりです。
READMEを読むことは大切ですね…