まえがき
個人のスケジュール管理を紙媒体からNotionに移行することにした。
紙媒体だとスケジュール帳を探し出したり、筆記用具で書き込むのが面倒で管理するモチベが湧きにくい。
それに対してNotionはWebにアクセスできればすぐ参照、編集できるし、デザインがおしゃれなのでガンガン使いたくなる(個人の感想)。
しかしNotionのカレンダーはデフォルトでは祝日を表示しないため、祝日の把握をする上では使い勝手がよくない。
表示させるためには手動で祝日を1日ずつ登録しなければならない。手動での登録は面倒ということでなにか打てる手はないだろうか?と思い、その謎を解明するため、我々調査隊はアマゾンの奥地へと向かった。
Notionとは
- ホームページ
- 以下例に限らずあらゆる目的に応じた手段として使える(Notionの紹介コンテンツでは近しいものとしてEverNoteと比較されたりする)。
- チーム活動におけるタスク管理、進捗管理、予定管理etc….
- 個人活動における覚書き、読書記録、旅行計画etc…
- 登録したデータは以下ビューの形式から自由に表示できる。
- テーブル
- ボード
- リスト
- タイムライン
- カレンダー
- ギャラリー
- 登録されるデータは「データベース」、「ページ」、「ブロック」の種類に分けられる。
- 今回取り扱うカレンダーは「データベース」におけるビューの種類の一つに相当する。
- カレンダーに記入する予定の一つひとつは「ページ」に相当する。
- 予定の詳細は「ブロック」に相当する。
- データの階層構造は「データベース」>「ページ」>「ブロック」
調査
手動での登録は面倒ということで、打てる手はなにかないかと調べてみた。
-
NotionとAutomate.ioを連携する
祝日を表示できるGoogleカレンダーの予定をNotionのカレンダーにインポートするやり方。
やりたいことにマッチしていると思った矢先、Automate.ioを現在は使えないことが判明した。まだ廃止されていないが、新規でのサインインはできないようになっていた。We’re retiring Automate.io on October 31, 2022. No sign ups are allowed anymore. Learn more in our blog post here.
▼参考URL▼
Automate.ioを使ってNotionのカレンダーに日本の祝日をいれてみた (firecracker.jp) -
NotionとGoogleカレンダーを連携する
祝日を表示できるGoogleカレンダーをNotionのページに埋め込むやり方。
手動で登録せず、システムを利用して祝日を確認できるが、見た目があまり好みではない点であまりやりたくない。▼参考URL▼
NotionとGoogleカレンダーを連携する方法!メリットと手順を解説 | Creatopia Blog -
NotionAPIを使用し、カレンダーに祝日を登録する
NotionAPIとは公式が提供している「インテグレーション」と呼ばれるものを作成することで、Notion上のデータを操作できる。
カレンダーに対して、祝日を「ページ」として登録すれば目的が果たせる。
手動で登録する以外の方法として挙げた上記のうち、今回は「3」のNotionAPIを使って登録することとした。
環境
OS:Windows 10
言語:Bash 4.4.23(疎通確認のために使用)
Python 3.10.2(祝日の登録に使用)
前準備
NotionAPIを使うためにはNotion公式が掲載している手順を踏んで準備する必要がある。
Integrationを作成し、編集対象のデータベースをIntegrationに向けて共有するため以下リンクのStep1、Step2をおこなう。
Getting started (notion.com)
データベースへの疎通を確認するため、リファレンスを参考にシェルスクリプトを作成する(今回はシェルスクリプトを使っているが言語は各自のやりやすさを優先でOK)。
Retrieve a database (notion.com)
環境変数を一時的に設定する。
export NOTION_ACCESS_TOKEN="secret_XXXXXXXXXXXXXXXXXXXXXXXXXXXXXXXXXXXXXXXXXXX”
データベースへの疎通確認をするためのシェルスクリプトを作成。
データベースへの疎通確認。結果が返ってきているのでOK
(結果を確認するため、予め「祝日」や「その他用事」などタグを登録している)。
xxxxxxx@DESKTOP-XXXXXXX MINGW64 /c/Notion-management/notion-test/databases (main)
$ bash retrieve-a-database.sh
{"object":"database","id":"xxxxxxxx-xxxx-xxxx-xxxx-xxxxxxxxxxxx","cover":null,"icon":{"type":"external","external":{"url":"https://www.notion.so/icons/calendar_gray.svg"}},"created_time":"2022-09-11T10:25:00.000Z","created_by":{"object":"user","id":"xxxxxxxx-xxxx-xxxx-xxxx-xxxxxxxxxxxx"},"last_edited_by":{"object":"user","id":"xxxxxxxx-xxxx-xxxx-xxxx-xxxxxxxxxxxx"},"last_edited_time":"2022-09-21T13:15:00.000Z","title":[{"type":"text","text":{"content":"年間カレンダー","link":null},"annotations":{"bold":false,"italic":false,"strikethrough":false,"underline":false,"code":false,"color":"default"},"plain_text":"年間カレンダー","href":null}],"description":[],"is_inline":true,"properties":{"タグ":{"id":"ZlE%5D","name":"タグ","type":"multi_select","multi_select":{"options":[{"id":"AG{:","name":"その他用事","color":"pink"},{"id":"Tnpp","name":"祝日","color":"brown"},{"id":"zl]B","name":"遊び","color":"red"},{"id":"?G[g","name":"あああ","color":"blue"}]}},"日
付":{"id":"%7DDDz","name":"日付","type":"date","date":{}},"名前":{"id":"title","name":"名前","type":"title","title":{}}},"parent":{"type":"block_id","block_id":"xxxxxxxx-xxxx-xxxx-xxxx-xxxxxxxxxxxx"},"url":"https://www.notion.so/xxxxxxxxxxxxxxxxxxxxxxxxxxxxxxxx","archived":false}
祝日を取得してカレンダーに登録する
カレンダーに祝日を登録するためにはまずは取得する必要があるため「取得」→「登録」の流れで実現方法を調べていく。
祝日を取得する
カレンダーにデータを登録するために必要な情報は、データベースをテーブルビューで見てみると分かりやすい。
予定の一つひとつに当たる「ページ」は「プロパティ」という名前で情報を持っているため、これを確認する。
見てみると、
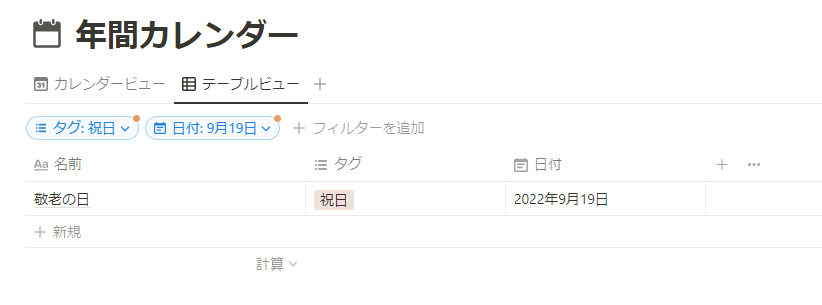
なので、データベースの個々のページには以下プロパティが最低限必要
- 名前(祝日の名前がここに入る)
- タグ(今回は祝日を「祝日」としてタグ付けする)
- 日付(祝日の日付がここに入る)
カレンダーに祝日を登録するためには上記情報を持ったリストが必要。
まずは、上記情報のうち名前と日付のセットをリストで取得することとする。
タグはPythonを使って登録する際に直書きで設定すればよいと考える。
では名前と日付のセットのリストを手軽に取得できる方法はないかとネットを調べてみると、以下ページに行き当たった。JSON形式で手に入るので使いやすそうだ。
具体的にこれをどう使うのかは登録時のデータの整形の過程で考えることとする。
https://holidays-jp.github.io/api/v1/date.json
祝日をカレンダーに登録する
NotionAPIのリファレンスを見てみると、登録データ(parentとproperties)はJSONで指定すると書いてあるので、そのようにデータを整形する。
Create a database (notion.com)
具体的にどのような形に整形しなければならないのかは不明のため、一度試しに手動で祝日をカレンダーに追加し、追加した祝日に紐づくページをcurlで確認してみる。
jqコマンドはJSONを整形したうえで日本語が文字化けしないように追記している(別途準備が必要)。
curl 'https://api.notion.com/v1/databases/xxxxxxxxxxxxxxxxxxxxxxxxxxxxxxxx' \
  -H 'Authorization: Bearer '"$NOTION_ACCESS_TOKEN"'' \
  -H 'Notion-Version: 2022-06-28' | jq
結果は以下の通り。
xxxxxxx@DESKTOP-XXXXXXX MINGW64 /c/Notion-management/notion-test/pages (main)
$ bash retrieve-a-page.sh
  % Total    % Received % Xferd  Average Speed   Time    Time     Time  Current
                                 Dload  Upload   Total   Spent    Left  Speed
100   981  100   981    0     0   4200      0 --:--:-- --:--:-- --:--:--  4192
{
  "object": "page",
  "id": "xxxxxxxx-xxxx-xxxx-xxxx-xxxxxxxxxxxx",
  "created_time": "2022-09-15T14:25:00.000Z",
  "last_edited_time": "2022-09-15T14:26:00.000Z",
  "created_by": {
    "object": "user",
    "id": "xxxxxxxx-xxxx-xxxx-xxxx-xxxxxxxxxxxx"
  },
  "last_edited_by": {
    "object": "user",
    "id": "xxxxxxxx-xxxx-xxxx-xxxx-xxxxxxxxxxxx"
  },
  "cover": null,
  "icon": null,
  "parent": {
    "type": "database_id",
    "database_id": "xxxxxxxx-xxxx-xxxx-xxxx-xxxxxxxxxxxx"
  },
  "archived": false,
  "properties": {
    "タグ": {
      "id": "ZlE%5D",
      "type": "multi_select",
      "multi_select": [
        {
          "id": "Tnpp",
          "name": "祝日",
          "color": "brown"
        }
      ]
    },
    "日付": {
      "id": "%7DDDz",
      "type": "date",
      "date": {
        "start": "2022-09-19",
        "end": null,
        "time_zone": null
      }
    },
    "名前": {
      "id": "title",
      "type": "title",
      "title": [
        {
          "type": "text",
          "text": {
            "content": "敬老の日",
            "link": null
          },
          "annotations": {
            "bold": false,
            "italic": false,
            "strikethrough": false,
            "underline": false,
            "code": false,
            "color": "default"
          },
          "plain_text": "敬老の日",
          "href": null
        }
      ]
    }
  },
  "url": "https://www.notion.so/xxxxxxxxxxxxxxxxxxxxxxxxxxxxxxxx"
}
上記のうち、注目するべきなのは「parent」と「properties」の項目だ。
parentは登録する「ページ」のparentつまり「データベース」を指定する。
database_idにカレンダーのデータベースIDを指定する。指定方法はNotionAPIのGetting Startedで説明されている通り。
"parent": {
    "type": "database_id",
    "database_id": "xxxxxxxx-xxxx-xxxx-xxxx-xxxxxxxxxxxx"
  },
propertiesは登録する「ページ」のプロパティを指定する。
具体的には祝日の名前、「祝日」のタグ、祝日の日付を指定する。
上記で取得したJSONを書き換える形で登録するためのJSONを整形する。整形した結果は以下の通り。
payload = {
  "parent": {
    "type": "database_id",
    "database_id" : "xxxxxxxxxxxxxxxxxxxxxxxxxxxxxxxx"
  },
  "properties": {
    "タグ": {
      "id": "ZlE%5D",
      "type": "multi_select",
      "multi_select": [
        {
          "id": "Tnpp",
          "name": "祝日",
          "color": "brown"
        }
      ]
    },
    "日付": {
      "id": "%7DDDz",
      "type": "date",
      "date": {
        "start": "2022-09-23",
        "end": None,
        "time_zone": None
      }
    },
    "名前": {
      "id": "title",
      "type": "title",
      "title": [
        {
          "type": "text",
          "text": {
            "content": "秋分の日",
            "link": None
          },
          "annotations": {
            "bold": False,
            "italic": False,
            "strikethrough": False,
            "underline": False,
            "code": False,
            "color": "default"
          },
          "plain_text": "秋分の日",
          "href": None
        }
      ]
    }
  }
}
以下の通り、Pythonにおける記法に注意して対応した。
- bool値は「False」に置換
- null値は「None」に置換
そのうえで、Pythonのコードを書く。
# NOTIONのTOKEN・URL・ヘッダー情報を設定
NOTION_ACCESS_TOKEN = "secret_XXXXXXXXXXXXXXXXXXXXXXXXXXXXXXXXXXXXXXXXXXX"
# 追加先であるカレンダーのデータベースID
CALENDER_DB_ID = "xxxxxxxxxxxxxxxxxxxxxxxxxxxxxxxx"

headers = {
  "Authorization": "Bearer " + NOTION_ACCESS_TOKEN,
  "Notion-Version": "2022-06-28",
  "Content-Type": "application/json",
}

# payloadの中身は上記の通り
r = requests.post(url, json=payload, headers=headers)
data = r.json()

pprint(data, sort_dicts=False)
コードを実行すると、コンソールに登録されたデータがJSON形式で出力される(表示形式の説明は上述の通り)。
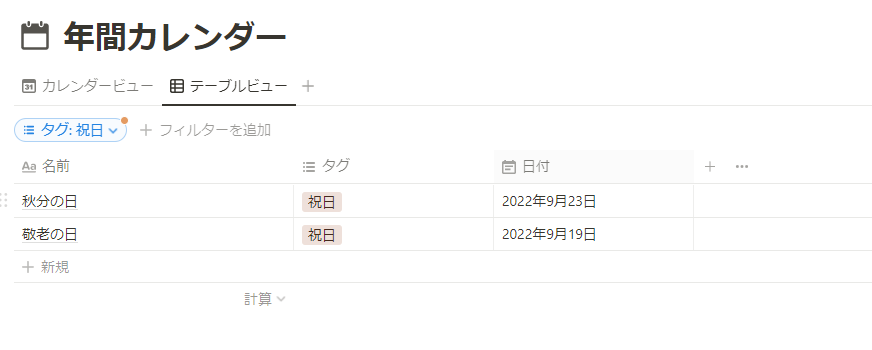
Notion上のカレンダーのデータベースを見に行くと、下記の通り登録されていることが確認できる(カレンダービューでの実際での見え方は次の項に譲る)。
取得した祝日をまとめてカレンダーに登録する
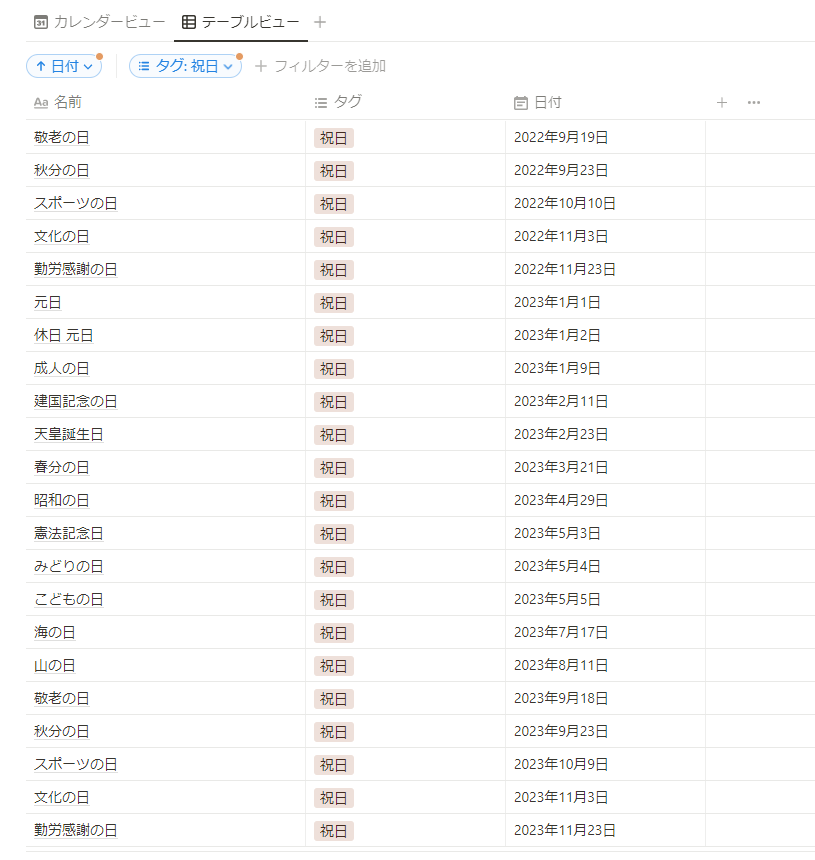
ここまででNotionAPIを使った祝日の登録を確認してきたが、一括で登録できるところまでは至っていない。
これに関してはPythonでロジックを組んで実現することにした。
ざっくりとした処理の流れは以下の通り。
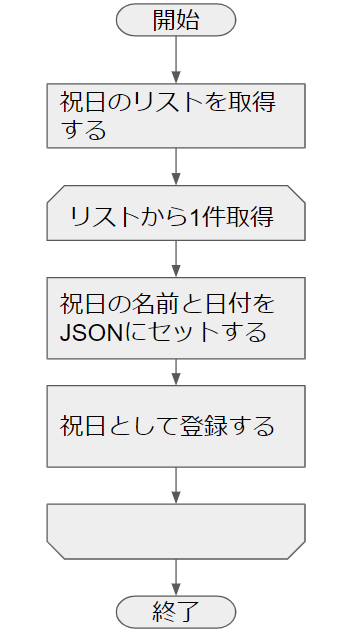
具体的なコードは以下の通り
from datetime import datetime
import datetime
from pprint import pprint
import json, requests

# 祝日のJSONの取得先
url = "https://api.notion.com/v1/pages"

# 祝日のリストをJSON形式で取得
holiday_url = requests.get("https://holidays-jp.github.io/api/v1/date.json")
text = holiday_url.text
holiday_data = json.loads(text)
d_today = datetime.datetime.today()
# 辞書型で取得されるholiday_dataをitems()でリスト化し、取り出す
for date_str, name in holiday_data.items():
    date = datetime.datetime.strptime(date_str, '%Y-%m-%d')
    # 登録日以前の祝日は登録不要なのでスキップ
    if (date < d_today):
      continue
    payload["properties"]["日付"]["date"]["start"] = date_str
    payload["properties"]["名前"]["title"][0]["text"]["content"] = name
    payload["properties"]["名前"]["title"][0]["plain_text"] = name
    # payloadとheadersの中身は上述のコードの通り
    r = requests.post(url, json=payload, headers=headers)
    data = r.json()
    pprint(data, sort_dicts=False)
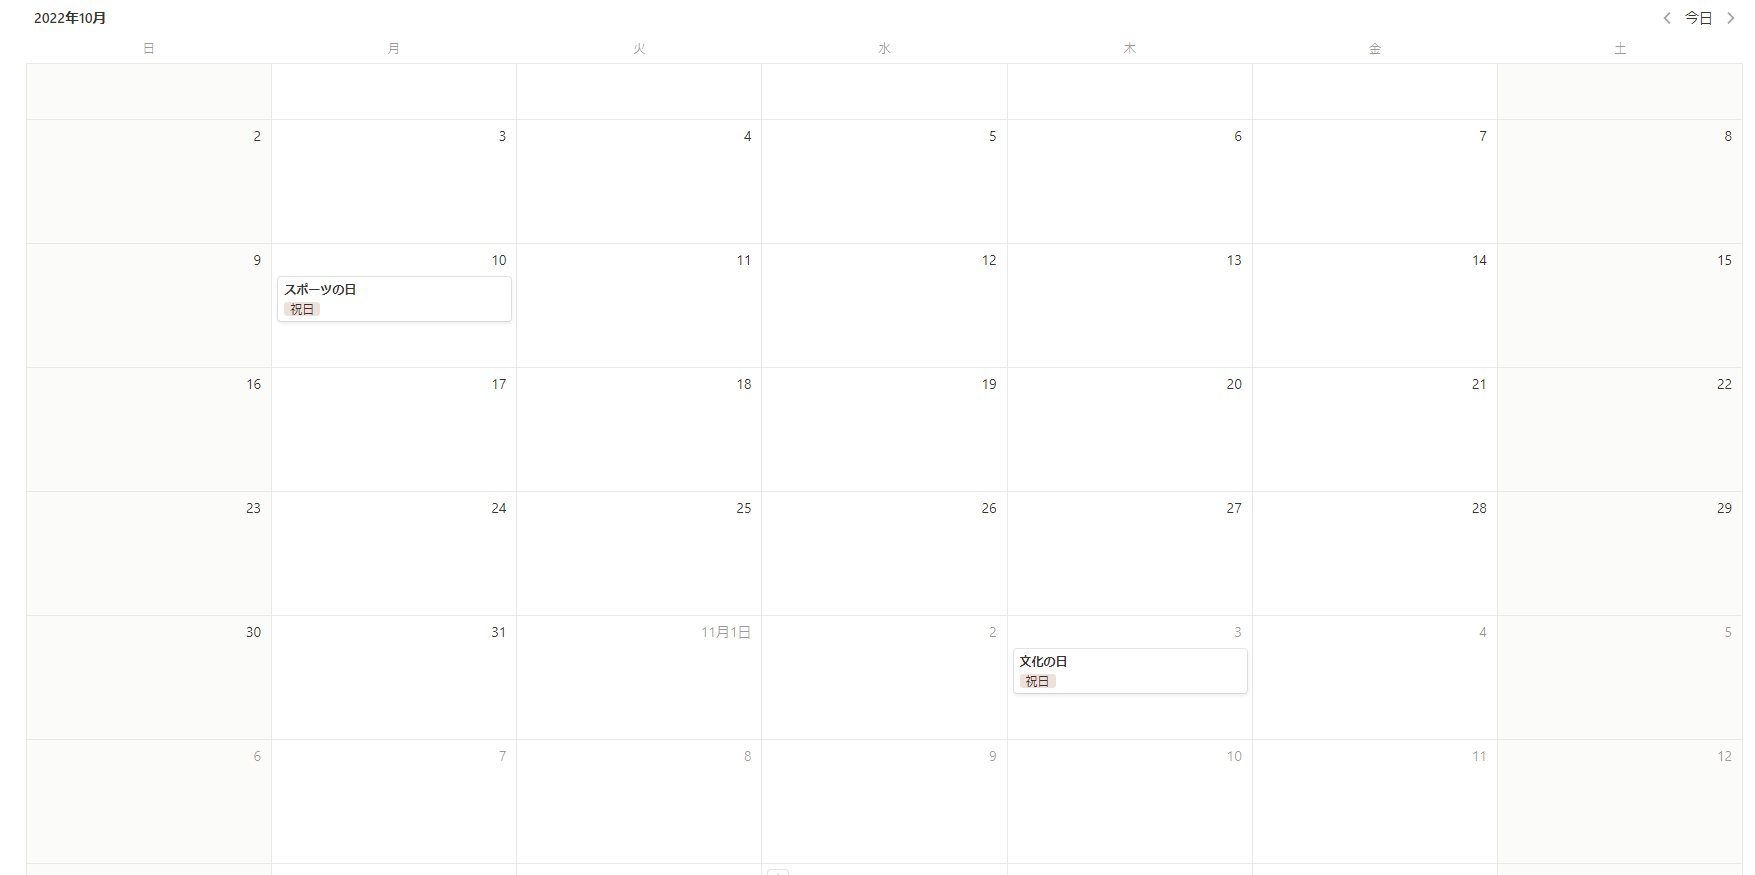
カレンダービューでの見た目は以下の通り。
これで目的が果たされたのでOK。
あとがき
Notionでスケジュール管理をするにあたり、祝日の登録が必要不可欠だったためおこなった。
他にもやり方はあるかもしれないが、目的は果たせたので満足。
また、今回は来年末までの祝日を一括登録できたので、それまでは祝日の登録をする必要がない。
次回登録時に同じ手段を使う上で気を付けることとしては重複の確認処理だろうか。
これについては次回登録する際の課題だ。
